
PROCEDURES
OPEN TRACHEOSTOMY
Indications
- Obstruction at or above the larynx secondary to
- tumor
- edema
- trauma/fracture
- foreign body
- burns
- severe pharyngeal or neck infection
- tumor
- Chronic/long-term respiratory issues
- Coma after head injury, neurosurgery
- Paralysis such as spinal cord injury
- Patients requiring prolonged ventilatory support
- Coma after head injury, neurosurgery
- Anticipated edema/swelling in patients undergoing major operative procedures of the
- oropharynx
- mandible
- larynx
- oropharynx
Preoperative Preparation
Chest x-ray and physical examination of the neck to ensure adequate external landmarks and plan for choice of tracheostomy tube size are paramount, in particular tracheostomy tube length and whether a distal extension or proximal extension tracheostomy tube may be needed. Patients with previous tracheostomy may prove to be challenging. Often, trauma patients may have a concomitant cervical spine injury or a cervical collar in place. This is important to know since the patient’s neck cannot be extended and the procedure must be performed in the neutral position.
Anesthesia
Many of the patients an acute care surgeon operates on will have an existing endotracheal tube and general anesthesia. In the emergent setting, local anesthesia can be used if the clinical situation allows.
Positioning
The patient is placed in the supine position with both arms tucked to the sides. A roll (we use a tightly rolled blanket) is placed under the shoulders to allow extension of the neck if there is no contraindication (Fig. 64.1). Patients with a cervical collar (cervical spine injury or in whom the cervical spine has not been cleared) require maintenance of the neutral position, and this can be accomplished with immobilization of the patient’s head and neck with sandbags on either side of the head with the anterior portion of the collar removed to gain access to the neck.
Operative Preparation
Sterile field is prepared in the usual manner and includes the anterior neck, chin, and upper chest.
Procedure
A vertical incision from just above the cricoid cartilage or transverse incision a fingerbreadth cephalad to the sternal notch is made in the skin and extended 3 cm. The skin and subcutaneous tissues are incised down to expose the strap muscles, and the median raphe of the strap muscles is identified and incised vertically (Fig. 64.2). The strap muscles are then retracted laterally to expose the isthmus of the thyroid gland. We generally divide the isthmus with electrocautery followed by suture ligation. This exposes the underlying airway. The cricoid cartilage is identified and a tracheotomy is performed through the second or third tracheal ring. This is accomplished utilizing a no. 11 or 15 scalpel to excise the anterior portion of the tracheal cartilage. Care must be taken to not extend the incision too deeply to avoid injury to the posterior wall of the trachea and esophagus. Communication between the surgeon and the anesthesiologist or person managing the airway is critical during the actual tracheotomy, withdrawal of the endotracheal tube, and insertion of the tracheostomy tube. Once the anterior portion of the tracheal cartilage is incised, the endotracheal tube is withdrawn under direct vision so the distal tip is just visible through the tracheotomy. The tracheotomy may then be dilated utilizing a tracheal dilator. The tracheostomy tube is then inserted into the trachea, the obturator removed, the balloon inflated, and the inner cannula placed and connected to the anesthesia machine to ensure end-tidal CO2 and ventilation (Fig. 64.3). The tracheostomy tube is then secured to the skin with 2–0 nylon sutures, and a dressing may be placed under the flange of the tube. The incision usually does not need to be reapproximated.
Postoperative Care
A chest x-ray is obtained postoperatively to ensure adequate placement and to ensure that the pleura had not been violated with development of a subsequent pneumothorax. A duplicate tube should be at the patient’s bedside at all times. The inner cannula should be removed and cleaned frequently to prevent buildup of secretions.
BEDSIDE TRACHEOSTOMY
A tracheostomy can be performed at the patient’s bedside in the intensive care unit (ICU) via an open technique as stated above or via a semiopen or percutaneous method. The surgeon must ensure that the same equipment, lighting, monitoring, and personnel are present as in the OR. Lighting must be adequate, and electrocautery is necessary. Within the past 10–20 years, bedside percutaneous tracheostomy has gained popularity. We utilize the Seldinger-based blunt dilation approach (Blue Rhino Percutaneous Tracheostomy Introducer Kit, Cook Critical Care). A number of these kits are available on the market. When initiating a percutaneous tracheostomy program in your institution, patient selection is critical. Exclude patients with coagulopathy, high oxygen requirements, previous tracheostomy, morbid obesity, and unstable cervical spine injuries or an inability to hyperextend the neck.
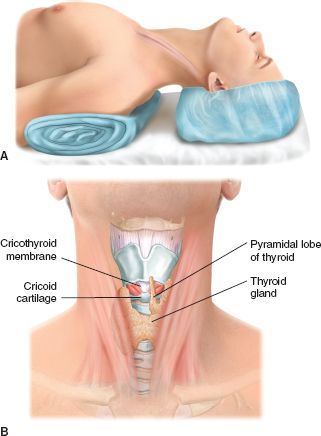
FIGURE 64.1. Patient positioning.
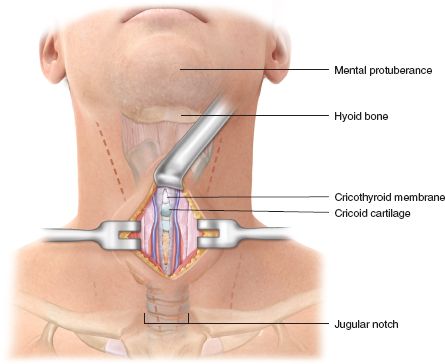
FIGURE 64.2. Dissection to the trachea.
The proper equipment must be available to ensure a successful procedure and prevent devastating complications. When beginning to utilize the percutaneous method, both percutaneous tracheostomy kit and surgical instruments should be present at the bedside. Again, adequate light is critical, and electrocautery may be beneficial. The appropriate personnel should also be present. The surgeon and his/her assistant perform the procedure; the anesthesiologist or second surgical assistant monitors the airway and performs the bronchoscopy. We recommend routine use of the bronchoscope for percutaneous tracheostomy. A nurse is necessary to assist in any parts of the procedure from monitoring vital signs to the administration of sedation (propofol and narcotic).
The patient is positioned, prepped, and draped as discussed above. The bronchoscope is passed into the endotracheal tube and positioned to adequately visualize the trachea. Local anesthetic may be infiltrated in the subcutaneous tissues prior to making a 1-cm incision over the second and third tracheal ring. Using a hemostat, the tissues are bluntly dissected to adequately palpate the second tracheal ring. Under bronchoscopic guidance, the trachea is entered percutaneously between the second and third rings. Upon entry into the airway, air bubbles are seen in the fluid-filled syringe, and the bronchoscope easily visualizes the needle. Then, in a Seldinger fashion, a wire is passed into the needle, and the needle is withdrawn (Fig. 64.4A). The track is then dilated over the wire, all under bronchoscopic visualization (Fig. 64.4B,C). The endotracheal tube is then slowly withdrawn to just above the tracheotomy, and the tracheostomy tube is placed in appropriate position (Fig. 64.4D). An end-tidal CO2 monitor should be used to reconfirm placement.
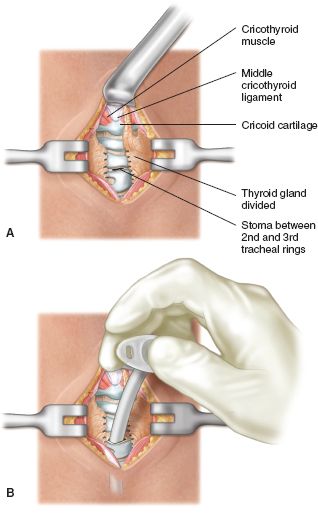
FIGURE 64.3. Exposure of the trachea and insertion of tracheostomy tube.
CRICOTHYROIDOTOMY
Indications
A cricothyroidotomy is performed when an emergent airway is needed with no time to prepare for routine tracheostomy.
Preoperative Preparation
A sterile field should be attempted; however, the emergent nature of the procedure may not allow this.
Anesthesia
Local anesthesia is preferred if possible.
Positioning
Same as for tracheostomy; however, the usual emergent nature of the procedure precludes any elaborate methods for positioning. Remember that a cricothyroidotomy is performed by palpation, not visualization. If you are right-handed, you should be standing on the patient’s right. The thyroid cartilage should be held between the thumb and third finger of your right hand and your index finger essentially in the cricothyroid membrane until you have incised the membrane. This technique ensures that landmarks are not lost resulting in an ill-placed incision.
Procedure
A vertical incision similar for tracheostomy is made; however, the incision is extended cranially to the mid-thyroid cartilage. It is important to avoid the anterior jugular veins that are just off the midline. Since the procedure is often performed emergently with minimal instruments and lighting, palpation of landmarks is key. The skin and subcutaneous tissue over the cricothyroid membrane is incised in a vertical fashion. A transverse incision in the cricothyroid membrane is created with a scalpel and the cricothyroidotomy may be dilated with the end of the scalpel blade or a curved hemostat (Fig. 64.5). Dilate transversely, not longitudinally. Longitudinal incision or dilatation may fracture the cricoid cartilage. Either a no. 7 endotracheal tube or no. 7 tracheostomy tube can be used in an adult male; at times a no. 6 may be necessary. A no. 6 or even a no. 5 tube may be required in a small female. Do not attempt to force too large a tube through the cricothyroid membrane as this may also fracture the cricoid cartilage. We prefer placement of an endotracheal tube, which makes subsequent conversion to formal tracheostomy easier. When utilizing an endotracheal tube, care must be taken not to insert the tube too deeply. Usually, insertion to just after disappearance of the balloon is adequate. The endotracheal tube should be properly secured the skin. If a tracheostomy tube is used, it is secured as noted above.
Postoperative Care
If an endotracheal tube is utilized, care must be taken to prevent dislodgement of the airway as well as malpositioning (usually down the right mainstem bronchus). A cricothyroidotomy is usually converted to formal tracheostomy.
DIAGNOSTIC PERITONEAL LAVAGE
Indications
In 1965, Root described the use of diagnostic peritoneal lavage (DPL) for the evaluation of the blunt trauma patient. Much has changed in the past 45 years in the care of trauma patients. Computed tomography (CT) and focused abdominal sonography for trauma (FAST) have dominated the workup of both the blunt and penetrating trauma patient. DPL remains a useful diagnostic tool. Its major disadvantages are that it is invasive and nonspecific. A positive DPL means the patient has hemoperitoneum (generally) with no information about organ injury. Thus, many laparotomies based on positive DPL in the past were nontherapeutic. In the trauma population, DPL is currently reserved for the unstable blunt trauma patient with an equivocal FAST exam. DPL is 98% sensitive for intraperitoneal bleeding. This becomes useful when deciding where to proceed from the trauma bay, CT scan/angiography, or the operating room. DPL is also helpful in diagnosis of hollow viscus injury. Many also use DPL in the penetrating trauma patient with a positive local wound exploration.
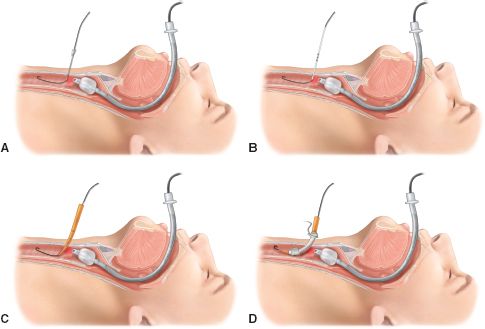
FIGURE 64.4. Percutaneous dilatational tracheostomy.
DPL can also be useful in the ICU. Should the trauma patient become hemodynamically unstable several hours after admission, DPL can be performed to assess bleeding in the peritoneal cavity. Although not commonly considered, DPL can be utilized to evaluate the acute care surgery patient who may be too unstable to be transported to CT scan. A patient with dead bowel will often have a serosanguineous fluid or a positive WBC count.
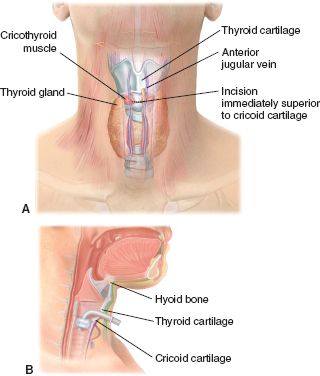
FIGURE 64.5. Cricothyroidotomy.
Stay updated, free articles. Join our Telegram channel

Full access? Get Clinical Tree


