WOUND CARE
The World Health Organization (WHO) lists what it considers to be the essentials for wound care worldwide (Table 25-1), varying with four levels of hospital capabilities (described in Table 5-1).
| Facility Level | ||||
|---|---|---|---|---|
| Resources/Capabilities | Basic | GP | Specialist | Tertiary |
| Assess wounds for potential death and disability | E | E | E | E |
| Nonoperative management: clean and dress | E | E | E | E |
| Tetanus prophylaxis (toxoid, antiserum) | D | E | E | E |
| Minor surgical—cleaning and suturing | PR | E | E | E |
| Major surgical—debridement and repair | I | PR | E | E |
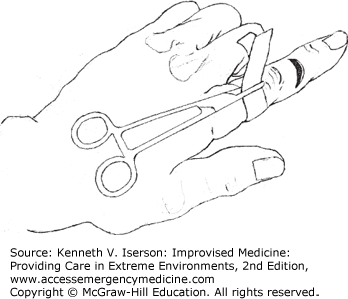
Optimal wound care requires an inspection for deep structure injury and foreign bodies. A dry field, without bleeding, is usually necessary. For wounds on a finger or toe, the best method is to apply a large venous tourniquet tightened around the base of the finger or toe and secured with a large clamp (Fig. 25-1). No one will forget that they have a hemostat attached to their hand. The old “rubber band” tourniquets are generally not a good idea, because they are easy to inadvertently leave on after the procedure is complete.
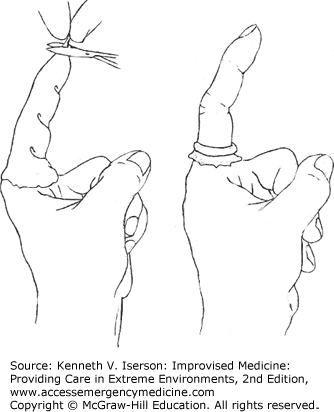
Make another type of digital tourniquet by cutting the finger off a surgical glove and putting it on the finger to be sutured—or putting the entire glove on the patient’s hand. Then cut a small hole at the top and roll the rubber down to the finger or toe’s base and, voilà, a dry field in which to explore and suture the laceration or remove part of the toenail (Fig. 25-2). It is safer if you leave the entire glove on the hand so that no one forgets the tourniquet is there. The cut-off glove finger alone works well on a toe, especially the hallux of an ingrown nail needs to be removed.
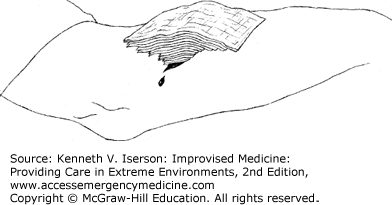
While large pressure dressings, tourniquets, and vessel ligation can all stop bleeding from a wound, an elegant and easily improvised pyramid dressing can often stop significant bleeding using fewer resources. Once you identify a briskly bleeding area—often from a relatively small wound—occlude it with finger pressure. Then replace the finger with a tightly folded “nugget” of gauze held firmly on the spot. If the positioning is correct, the bleeding should cease. Then place several layers of progressively larger, or less-folded, pieces of gauze on top (Fig. 25-3). This “focuses” the pressure on the bleeding point. Then place a very light-pressure dressing over this gauze pyramid; it works because it conforms to the equation: Pressure = Force/Area.2
Both epinephrine spray and epinephrine combined with KY jelly (water-based, water-soluble lubricant, primarily methyl cellulose and carboxymethyl cellulose) help to quickly achieve hemostasis. This is particularly useful for patients requiring larger split skin graft harvests or burn wound debridement, or in other cases with significant topical blood loss. Using a typical alternative, thrombin, is more costly, slower, and often not available.3,4
To make the epinephrine/K-Y jelly mixture, mix 1 mL of 1:1000 epinephrine with a newly opened tube of 50 mg K-Y jelly from Johnson and Johnson, Arlington, TX. Make a saline-epinephrine spray by combining 400 mL normal saline (NS) with 1 mL of 1:1000 epinephrine. With this formula, the final concentration of saline-epinephrine spray is 1:400,000; the final concentration for the KY jelly-epinephrine mixture is 1:50,000.5
Obtain local hemostasis by applying pressure to the edge of small wounds using a surgical instrument (e.g., needle driver, hemostat, skin hook, scissor’s finger ring). Use the inside (finger) ring of a scissors or hemostat to apply pressure around the rim of annular wounds.
Honey has been used to treat wounds, scalds, ulcers, and burns at least as far back as ancient Egypt. It is readily available, inexpensive, and easy to apply. Honey has antibacterial and anti-inflammatory activity, has a deodorant effect, aids debridement, and provides a moist healing environment. It also creates a non-adherent interface between the wound and the dressing.6,7,8,9,10 While multiple randomized controlled trials suggest that it is often inferior to standard therapy, when it is the only option, use it.11
Dressing wounds, burns, and skin ulcers with unprocessed natural honey (under bandages) may work in place of antibiotics or even in some organisms that are resistant to antibiotics (such as with some cases of methicillin-resistant and vancomycin-resistant Staphylococcus aureus).12 Theoretically, honey works by depriving microbes of water and by frequently releasing low levels of hydrogen peroxide into wounds. While natural honey may have batch-to-batch variability in its bactericidal activity, the main difference between natural and medical-grade honey is the cost. In austere situations, use whatever honey is available. It works.
If using honey on wounds or burns, first clean the site. Apply 15 to 30 mL pure, unprocessed, undiluted honey and bandage the area. One drawback is that honey attracts insects. Bandaging helps reduce this problem. Change the dressing daily.13,14
Pharmaceutical sugar paste, a similar treatment to honey for wounds and abscesses, was developed at Northwick Park Hospital (UK). Available in both thin and thick consistencies, sugar paste supposedly is very effective on large abscesses. How well it works is unclear, but the basic ingredients are inexpensive and readily available. The originators specify that the sugars used are “pharmaceutical grade” and that the paste should be made under sterile conditions, although that is unnecessary if the paste is used immediately.15
| Material | Thin Paste | Thick Paste |
|---|---|---|
| Fine granulated sugar | 1200 g | 1200 g |
| Powdered sugar | 1800 g | 1800 g |
| Polyethylene glycol 400 | 1416 mL | 686 mL |
| Hydrogen peroxide 30% | 23.1 mL | 19 mL |
Use thin sugar paste for small abscesses. Prepare it by mixing 23.1 mL 30% hydrogen peroxide (final concentration 15% volume to weight [v/w]) with 1416 mL polyethylene glycol 400. Mix 1200 g fine granulated sugar with 1800 g additive-free powdered sugar. Combine the two mixtures in a heavy blender until smooth. Store it in sterile screw-capped bottles. The mixture is stable for 6 months at 4°C (39°F). Apply to the wound with a syringe and catheter.15
Use thick paste for large open wounds. Prepare it by mixing 19 mL 30% hydrogen peroxide (final concentration 15% v/w) with 686 mL polyethylene glycol 400. Mix 1200 g fine granulated sugar with 1800 g additive-free powdered sugar. Combine the two mixtures in a heavy blender until smooth. Store the paste in sterile screw-capped bottles. If prepared under sterile conditions, the mixture is stable for 6 months at 4°C. Apply by molding like clay into wounds.15
Poorly healing wounds pose a problem for clinicians and patients. A highly successful and inexpensive treatment employs a topical vacuum that can be fashioned from materials readily available in resource-limited settings.
After cleaning the wound and packing it with sugar, place a piece of gauze in the wound. Insert a sterile 14-Fr nasogastric (NG) tube into a sterile (autoclaved, if possible) sanitary napkin, and place this over the wound. Use cellophane paper tacked down with adhesive tape to seal the edges and make the wound airtight. (Clear plastic wrap can also be used.) Apply intermittent (15 min/hr) suction to the NG tube. In place of a suction machine, a glass intravenous (IV) bottle with a vacuum can be a low-cost suction device.
Normally, change these dressings daily or every 2 days if cellophane adhesive is used; it does not stay firmly attached to the skin longer than this and the vacuum is lost.16
Dead tissue in wounds is a nidus for infections. Remove it with a scalpel. For those not used to debriding wounds, follow this principle: If it bleeds or blanches, it is living tissue; if it does not, debride it.
If there is a question about which tissue is nonviable, use a delayed primary closure (described in the “Wound Closure” section below in this chapter). This is especially important in vital areas where excess debridement may cause cosmetic problems or compromise function. No worries: In 3 to 5 days, the viable tissues will clearly demarcate from the nonviable tissues.
Those uncomfortable doing sharp debridement can rely (at least partly) on wet-to-dry dressings. Put thin dressings moistened with 0.9% NS on the wounds. When they dry, remove them along with the necrotic tissue. Change the dressing three to four times a day.17
Maggot therapy is a relatively rapid and effective debridement method, particularly for large necrotic wounds. Also known as biodebridement, biosurgery, maggot debridement therapy (MDT), and larval therapy, the technique is useful for debriding necrotic tissue, and also for eliminating and preventing biofilm formation,18 disinfecting the wound (gram-positive antibiotic activity), and promoting wound healing.19
MDT generally has been used on lower extremities in patients with chronic ulcers, chronic osteomyelitis, and other pus-producing infections; most of these patients have diabetes, peripheral arterial disease, or both. The majority of patients achieve debridement of >90% of the necrotic tissue in 2 to 10 days. Most wounds then heal with follow-up moist wound care.20 In some cases, this therapy avoids amputations.
Ideally, purchase sterile, medical-grade maggots, because they are unlikely to cause an infection or to introduce a species that eats live, as well as dead, tissue. These are usually larvae of the Lucilia sericata (sometimes called Phaenicia sericata), a green bottle blowfly. However, when medical-grade is unavailable, clinicians have had success using “wild” maggots, that is, those that arrive with the patient (see “Wild Maggots” section, below).
For successful MDT, provide the maggots with oxygen, moisture/dampness, and substrate/dead tissue. Avoid using topical antiseptics and surfactant agents on the wound, but use systemic antibiotics as needed. Each maggot consumes about 0.3 grams of necrotic tissue per day.
Administer required tetanus immunization.
Inform the patient and family of the process. (Most tolerate the procedure well, especially because it may be the last option to avoid amputation.)
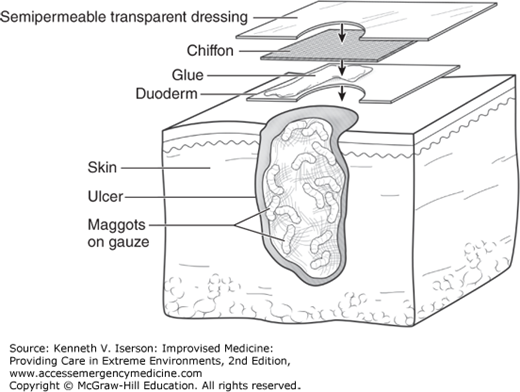
Surround (“picture frame”) the wound with an adhesive protective covering (e.g., hydrocolloid, ostomy dressing, or the local equivalent).
Apply skin cement to adhesive protective covering to keep ostomy appliances in place.
Place maggots in the wound. Depending on the size and depth of the wound, use from 50 to 1000 maggots (5 to 10 larvae/cm2 necrotic tissue) that are 24 to 48 hours old.
Apply a piece of nylon mesh/“chiffon” directly on the wound, overlapping onto the adhesive dressing. (Chiffon is usually included with medical-grade maggots.)
Use tape or transparent film (e.g., Opsite, Tegaderm) to further secure the nylon mesh/chiffon edges to the adhesive protective covering/hydrocolloid dressing. For improved adherence, extend the tape out onto the skin (Fig. 25-4).
Cover the leg (usually it is the leg or foot) with knee-high pantyhose.
Secure the pantyhose around the top with tape to contain any “escaped” maggots.
Apply surgical pads, two thin layers of gauze, or a highly absorbent incontinence pad to the dressing to absorb wound exudate.
Be extremely careful that excessive dressings neither suffocate nor squash the maggots.
Replace the gauze as often as every hour at the start; this is when the most fluid will be expelled from wound. If the fluid is not absorbed, maggots drown, because they are aerobic. Later, the amount expelled will decrease. Some blood may be seen, but there should never be any frank bleeding.
Patients and family can replace gauze and bandage at home when it becomes saturated.
Leave for 1 to 2 days.
Do this 2 to 5 times weekly until at least 90% of the necrotic tissue is debrided.
At the end of each period, remove the maggots with a jet of sterile NS. If necessary, remove them with forceps, or use other methods (discussed below).
Patients completing MDT can often be grafted or treated with normal wound dressings. (Personal communication, Mario Llurie, RN, CWCS, Wound Specialist, University Medical Center, Tucson, Ariz., July 25, 2014; and Katherine Mehaffey, BSN, RN, CWS, CWOCN; Wound, Ostomy, and Continence Nursing Service, University Medical Center, Tucson, Ariz., January 14, 2015.)
Wound pain (very common); use of analgesics is recommended18
Wound bleeding (common)
Tingling sensation, itching, skin reactions
Allergy to soy, eggs, or disinfectants—all used to produce commercial/medical-grade larvae20
Psychological aversion to MDT20
Need for urgent surgical intervention20
Patients receiving anticoagulants or with wounds at risk of hemorrhage18
Wounds near exposed large blood vessels18
Wounds near body cavities or internal organs18
Tissue with inadequate perfusion18
Wounds with Pseudomonas infection18
Rapidly progressing infections or the risk of sepsis18
While it is optimal to use sterile maggots approved for medical use, the Israeli Defense Force used wild maggots by necessity during their humanitarian deployment after the Haiti earthquake. Unable to sedate and safely debride all infected necrotic wounds, especially those in complex anatomical areas like the feet, they left maggots in place when patients arrived with them already in their wounds. They wrapped the wounds so that larvae could not crawl out and then opened the dressings after 2 days: Two of five patients had much cleaner wounds, and these were redressed with maggots for 2 more days, after which the patients had clean wounds. Two other patients showed no improvement and underwent below-knee amputations. One patient’s maggot treatment was aborted when he could not stand the tickling sensation.21 Note that wild maggots in a patient’s wound will contain larvae at every development stage, including eggs, which firmly attach to the tissue and cannot be washed out immediately. Using them for debridement may still be a reasonable option, because removing them will require several washings over days as the maggot eggs age and release their hold on tissues. (Mario Llurie, RN, CWCS, Wound Specialist, University Medical Center, Tucson, Ariz. Personal communication, July 25, 2014.)
Two methods exist for eliminating maggots from open wounds, either after MDT or in those presenting with wild maggots: wound cleaners and suction. The best cleaning agent is Dakin solution (sodium hypochlorite), followed by isopropyl alcohol, Betadine, and hydrogen peroxide. Make full-strength Dakin solution by adding half a teaspoon of baking soda and 95 mL (3 oz) bleach to 32 oz (4 cups) of sterile water or boiled tap water.22 However, no treatment resulted in 100% maggot mortality, and some of these agents will be painful.23
The second method is to use suction. To do this, apply suction with a Yankauer (large) tip directly to the wound containing maggots. Remove the superficial maggots and wait for additional larvae to emerge from deeper within the wound, then remove them the same way. Place all components in a biohazard disposal container, making disposal of the larvae simple, rapid, and clean.24 Repeat this procedure over several days to allow time for deep or immature larvae to emerge.
Irrigate wounds with soap and water, especially if disinfectants are scarce or nonexistent. Then use a disinfectant, if available. Even for open fractures, irrigating wounds with hand soap is at least as effective as irrigation with an antibiotic solution.25
Wound irrigation under pressure can be beneficial. Irrigate uncontaminated wounds with potable tap water or NS using a pressure of 8 to 13 psi (lb/in2). Filtered (if necessary), boiled, then cooled water is an alternative if suitable tap water or NS is not available.26 While higher irrigation pressures have a theoretical disadvantage, the bottom line is to use whatever means are available to thoroughly irrigate wounds, especially when subsequent treatment may be difficult or not available. The exact amount of irrigation fluid to use is unclear and depends on the size, depth, and cleanliness of the wound. A general rule is “the more, the better.” It must be at least enough to remove any visible foreign material. Complex wounds may need to be irrigated with ≥9 L.27
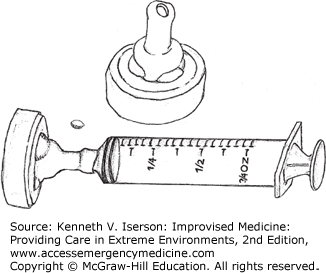
An IV bag connected to a 19-gauge needle pressurized to 400 mm Hg with a blood pressure (BP) cuff (and kept at that pressure, even when the volume in the bag diminishes) generates from 6 to 10 psi. A 35- or a 65-mL syringe with a 19-gauge needle generates about 35 psi and 27.5 psi, respectively.28 Easily make an improvised splash guard/irrigator with the nipple end of a baby bottle and a syringe. Attach a catheter or needle to the syringe and you have a perfect manually operated system (Figs. 25-5 and 25-6). Other types of sealed bags under mechanical pressure should provide equivalent pressure, while commonly used and recommended irrigation methods produce inadequate pressure. These include a bulb syringe (0.05 psi), gravity flow from a fluid-filled bag, manual pressure on an IV bag (5 psi), or any plastic bag or bottle (2 psi) punctured with a needle.28

Although using water directly from a faucet has been suggested as “pressure irrigation,” its success depends on whether the water is potable (generally not in austere circumstances) and on the water pressure/flow rate (usually insufficient). If the water is suitable, increase the pressure generated onto the wound by decreasing the size of the outlet. Do this by tying the finger from a rubber glove with a small hole to the end of the spigot.
If no irrigation methods exist or they are impractical, copiously cleanse the wound with dressing material or a swab using potable tap water, sterile NS, or boiled and cooled water. This is an especially effective technique in wounds >3 hours old. Irrigation does not replace the debridement of devitalized tissue from a wound.
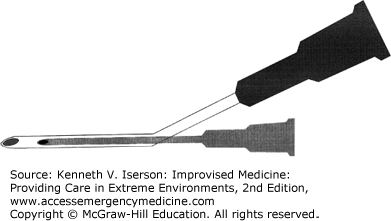
Cleaning extensive areas of road rash is a common and uniquely difficult problem. Analgesia is usually required to help patients tolerate a thorough cleaning, which is necessary to reduce scarring and lessen the chance of infection from foreign bodies. Dr. Larry Raney, former Director of Emergency Services at the Medical University of South Carolina, devised an improvised pressure washer for large areas of road rash. The only problem is that it requires a jet insufflation device such as is occasionally used with a needle cricothyrotomy. So, if you have one, put it to good use. Take a 21-gauge needle and a 16-gauge IV catheter with the inner needle removed. Insert the 21-gauge needle into a 16-gauge IV cannula so that the needle is in the center of the catheter, with the tip fully inside and below the tip of the catheter. Attach the needle-jet insufflation device to the inner 21-gauge needle and IV tubing to the 16-gauge catheter (Fig. 25-7). Tape the needle, catheter, and tubing together (firm enough to hold the unit like a pencil). Placing one piece of tape at the juncture and another a few inches up is enough. Turn on the IV and jet-insufflator and begin irrigating. A large area takes about 1 hour to clean. (Written communication, August 3, 2007.)
The most commonly used antiseptic products in clinical practice today include povidone iodine, chlorhexidine, alcohol, acetate, hydrogen peroxide, boric acid, silver nitrate, silver sulfadiazine, and sodium hypochlorite. Antiseptics usually target all pathogenic bacteria in a wound, and there is little microbial resistance to them. Where available, using 1% povidone-iodine solution prior to suturing reduces the incidence of wound infection.30 In resource-poor situations, alcohol and hypertonic saline may be the best choices. Note that neither hydrogen peroxide nor modified Dakin solution is acceptable as a wound cleanser.
Alcohols denature the protein of bacterial cells, producing excellent antibacterial activity against most gram-positive and gram-negative organisms, the tubercle bacillus, and many fungi and viruses, including cytomegalovirus and human immunodeficiency virus. They are not, however, sporicidal. Alcohols are extremely safe skin antiseptics. They are most effective at concentrations between 70% and 92% by weight, and most effective on clean skin. Immersing or scrubbing the skin with alcohol for 1 minute is as effective as 4 to 7 minutes with other antiseptics; washing with alcohol for 3 minutes is as effective as 20 minutes scrubbing with other antiseptics. After an alcohol scrub, bacterial counts continue to decrease for several hours after gloving. The three types of alcohol suitable for skin use are ethyl (ethanol), normal propyl (n-propyl), and isopropyl.31
Sir Almroth Wright and his colleagues (including Sir Alexander Flemming) had good success using hypertonic salt solution as a wound antiseptic.32 Ulcerating wounds, after being cleaned and dressed with gauze soaked in hypertonic saline (changed two to three times per day if very dirty), showed significant improvement. Wounds lost their odor, edema, and most of their necrotic material. At 2 weeks, there was no bacterial growth. The optimal solution strength is 1.5 osmol/L.33
Foreign bodies in open wounds may be difficult to visualize. Even if you can visualize the bottom of a wound, 7% of glass particles seen on x-ray will be missed. For deeper wounds, the missed-glass rate is 21%.34 If available, use high-resolution ultrasound, which can detect nonradiopaque foreign bodies ≥1 mm by 2 mm in size more than 95% of the time.35
Although the dramatic extraction of bullets or other metal fragments seems to be a part of every war movie, the reality is that you should leave most of them in the body. The worldwide experience with these injuries is that it is usually far worse to operate to remove these fragments than to leave them in situ. Migrating bullets or fragments are rare occurrences, and lead poisoning from retained bullet and shotgun fragments usually does not occur.
The International Red Cross recommends that clinicians should remove a metallic foreign body only if it36
Causes a localized infection, such as an abscess or non-healing fistula.
Disturbs function, such as when it is located within a joint or in a body area that is subjected to repeated pressure (e.g., sole of foot, palm back, sacrum, or subcutaneously over the elbow).
Can easily be retrieved and is an obvious source of pain.
Causes documented (blood levels >40 mcg/dL in an adult or >10 mcg/dL in a child, positive ethylenediaminetetraacetic acid (EDTA) challenge test, or bone marrow evaluation) lead poisoning. Even then, treat the lead level before removing the offending fragments.
Has lodged in the spinal cord and there is clear evidence that it is causing cord compression. Only do this if an experienced surgeon is available.
Is in the anterior chamber of the eye and both an experienced surgeon and the proper equipment are available.
Ring cutters will not work on tungsten carbide, ceramic, or natural stone (onyx/jade) rings. Since these hard substances have very little flexibility, use a pair of locking pliers (e.g., Vise-Grip) to break them. Adjust the plier’s jaws to clamp lightly over the ring’s circumference. Then release it and adjust the tightening screw slightly (~1/4 turn) and clamp down on the ring. Repeat this process until a crack is heard and the ring pieces fall away. It sometimes helps to move the pliers around the ring for each clamping. Once it breaks, handle the pieces carefully, because the ends may be very sharp.
Wind thread, floss, the elastic from an oxygen mask, or a similar material around the finger and then slide the ring over the thread to avoid cutting or bruising the finger. Even easier: Spray a little glass cleaner (e.g., Windex) on the stuck ring and it will slip right off. Soap or another lubricant may work, although it may still be very painful to remove the ring, and can damage the tissues of the finger. If the swelling is too bad, it does not work at all!
If nothing else works, very slowly force the ring off using the jaws of a large Kelly clamp to apply pressure on both sides of the ring simultaneously. While applying continuous pressure, rock the clamp from side to side very slowly as the edema is compressed. Do not relax the pressure or the procedure will need to be restarted. Have someone else hold the patient’s hand steady during what is often a long (~20 minutes) procedure. Unlike the other methods, digital anesthesia is vital to success.37
It may be necessary to mark a patient’s skin to determine the spread of cellulitis or the swelling after an envenomation, to denote the proper side of the body or limb for invasive procedures, to designate incision points for complex plastic surgical procedures, or to help localize a foreign body. Apply skin marks with normal ballpoint or felt-tip pens, or by using methylene blue, gentian violet, or self-made dyes applied with a toothpick or the wooden end of a swab. One formula for skin-marking dye is to add 1.3 g basic fuchsin dye, 5.6 mL acetone, and 11 mL alcohol to 100 mL distilled water. (Add alcohol to further dilute it.) The benefit of this self-made dye is that it will remain visible on the skin after five scrubs with Betadine, as might occur preoperatively. It does not stand up that well to repeated scrubs with povidone iodine.38
If a dye is used, the cap from an 18-gauge or similar-sized needle works well as an inkwell for a toothpick “pen.” Use a pipette to transfer dye into the needle cap. One benefit is that, even when the cap is lying on its side, the dye does not run out due to surface tension.39
For a discussion of these, see Chapter 22.
The cost of materials may vary greatly in resource-poor situations. Table 25-2 lists cost differences among the three most common types of wound closure, as well as their complication rates. Consider cost when choosing wound closure methods, especially when large numbers of patients need attention.
Related posts:


Stay updated, free articles. Join our Telegram channel

Full access? Get Clinical Tree


