MEDICAL TRANSPORT IN AUSTERE CIRCUMSTANCES
In austere circumstances, a functioning emergency medical system (EMS) may not exist or an existing system may not function as it should. In these circumstances, you may not be able to reach patients or they may not be able to get to you using normal methods, such as if the roads are impassible. This chapter discusses improvised methods to transport patients or medical personnel.
TRANSPORT THE PATIENT?
The first question is always whether to transport the patient. In resource-poor settings, this decision is a delicate balance between patient benefit and the appropriate use of available resources. It comes down to two vital questions: Can we transfer and should we transfer? The detailed parts of each question are listed in Table 21-1. All the parts must be answered “Yes” for a transfer to take place.
| Can We Transfer? | |
| Yes | No |
| Higher level of care (facility/equipment/skills) reasonably available (time/distance) | No higher level of care reasonably available |
| Referral facility accepts transfer | Referral facility refuses transfer |
| Transfer method available | Transfer method unavailable |
| Transfer safe for personnel | Unacceptable danger to personnel |
| Should We Transfer? | |
| Yes | No |
| Patient benefit probable | Patient benefit uncertain |
| Patient will probably survive transfer | Patient will probably die during transfer |
| Resources used for transfer not needed immediately by other patients and can be replaced before other patients need them | Other current patients need the resources to be used for transfer, or resources can’t be replaced before needed by other patients |
| Patient/surrogate wants/accepts need for transfer | Patient/surrogate does not want/accept need for transfer |
PREHOSPITAL FLUID THERAPY
Optimally, prehospital resuscitation should be goal directed, based on the presence or absence of prehospital hypotension. In severely injured blunt trauma patients without hypotension, a prehospital crystalloid volume >500 mL is associated with an increased risk of mortality and coagulopathy.1 Obtaining prehospital intravenous (IV) lines are associated with longer EMS on-scene and prehospital times; the patients with prehospital IVs do not receive blood products any faster than those without them.2
If the patient has an IV line in place, keep it flowing during transport: Either put a pressure cuff (or a blood pressure (BP) cuff or an elastic bandage) around the bag or place the bag under the patient to maintain pressure and flow. The danger of this practice is not paying attention to the now-hidden IV bag, which can result in letting the bag run dry, thus ruining the IV access port.
If the patient has an IV line but does not currently need fluids—or needs them only intermittently—use a saline lock and put the IV fluids through it in boluses, as necessary. That also works for works for stopping the fluids and later restarting them without having to restart an IV line. Improvised saline (or heparin) locks are described in Chapter 5.
TRANSPORTING PATIENTS WITHOUT LITTERS
If a litter is not readily available or cannot be improvised, rescuers can choose from a variety of methods to transport patients, including carrying or dragging the patient. Evacuation from a multistory hospital or other building is discussed below in this chapter.
Patients can be dragged head or feet first for short distances to remove them from a dangerous, time-critical situation or when they are in a confined space and no other method is practicable. If the time and circumstances allow, wrapping the patient in a sheet, blanket, or similar cloth makes it easier to drag them. This also provides more protection from any debris over which the patient may be dragged.
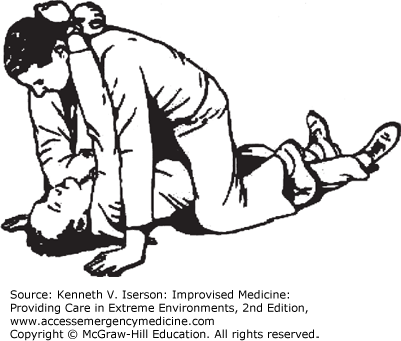
One-person drags are particularly useful when it is necessary to go under low obstructions. The downside is that there is no way to support the victim’s head. Place the patient in a supine position. Cross the patient’s wrists and tie them together with any available material (e.g., belt, rope, hose, or scarf), then kneel over the patient and lift the tied wrists over your head so they rest on the back of your neck (Fig. 21-1). When crawling forward, raise your neck just high enough so that the patient’s head does not bump against the ground.
Most people can carry a person in their arms for a short distance, as long as they are relatively small and lightweight compared to the rescuer.
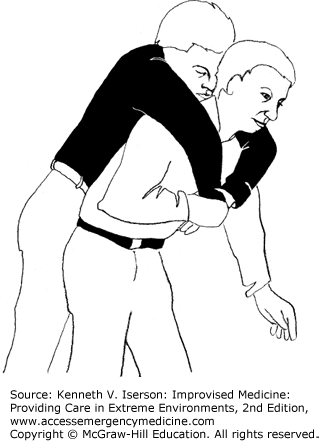
Larger patients can be transported more easily across the rescuer’s back (Fig. 21-2). If the person is standing or can be lifted into a standing position, the rescuer drapes the patient’s arms over his shoulders and holds the wrists with one hand (pack-strap carry). Once upright, the rescuer should lean slightly forward so the patient’s feet are just off the ground and then begin to move.
To get an adult on your back takes extra effort if a patient is supine and no one is available to help the patient stand. With the patient supine, lie on your side alongside the uninjured or less-injured side. Position your shoulder next to the patient’s armpit, and pull his far leg over your own, holding it there if necessary. Grasp the patient’s far arm at the wrist and bring it over your upper shoulder as you roll and pull the patient onto your back. Get up to your knees, using your free arm for balance and support. Hold both the patient’s wrists close against your chest with your other hand. Lean forward as you rise to your feet, and keep both of your shoulders under the patient’s armpits.3 If this carry is to be used for more than a short distance, tie the patient’s wrists together with any available material to secure a better handhold on the arms.
It is much easier for two people to carry a patient, especially for long distances.
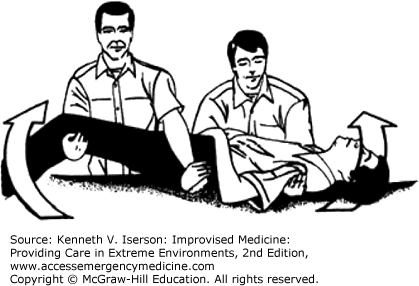
The most basic two-person carry has both rescuers squatting on the same side of the patient, with one at chest level and the other at the thighs. The person at the chest passes both arms under the patient while the other rescuer puts one arm under the knees and his other arm over the pelvis, gripping his partner’s wrist. They then pull the patient toward their own chests and move forward (Fig. 21-3).
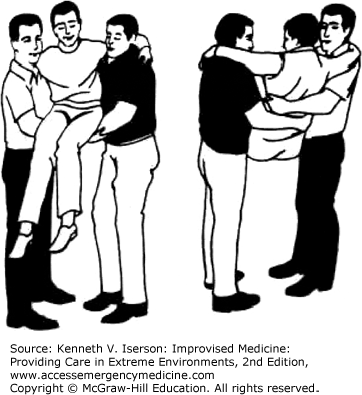
Another method that can be used for longer distances starts with rescuer A squatting at the victim’s head. Then rescuer B lifts the patient to a sitting position by pulling on the patient’s arms, if necessary. Rescuer A grasps the patient from behind around the midsection, holding his own wrist with the other hand for security. Rescuer B then squats between the patient’s legs and grasps the knees. This rescuer can face toward or away from the patient (Fig. 21-4); for longer distances, the rescuers should face in the same direction and walk forward. Both rescuers then stand while holding the patient. This carry, as well as some of the others, can be used for bed-bound patients by first moving them to a sitting position in the bed and then having the two rescuers sit on either side of the patient to begin their lift.5
FIG. 21-4.
Two-person carry, anterior-posterior view. (Adapted from Community Emergency Response Team.4)

The two-person chair carry is more useful over longer distances. The two rescuers squat on either side of the patient and slide their arms under the patient’s back and thighs. Although Fig. 21-5 shows the two rescuers holding onto the patient’s side, it is more secure if they hold onto each other’s arms in the back and grab each other’s wrists under the thighs. They then stand and begin walking forward.
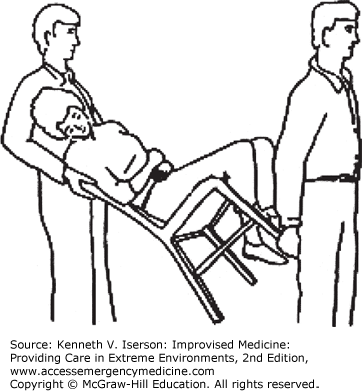
Two rescuers can also sit a patient in a chair, with one grasping the back of the chair and the other the bottom of the chair’s front legs. Starting from a squatting position, they tilt the chair backward and stand, both facing in the same direction (Fig. 21-6). The rear person (the more strenuous position) must also support the patient’s head and shoulders. A key to success is finding a sturdy chair that is not too heavy.
LITTERS
Litters can be used either as the only means of transporting patients or to get them to another form of transportation. They often are used as the patient’s “bed” while in transit. When no litter is available, improvise one from available materials. This is an emergency measure; always use standard litters when available.
When using any type of litter, designate a team leader to keep those carrying the litter synchronized. Once the team is squatting in position and holding the litter, it is customary for the leader to announce, “Ready to lift on the count of three: One, two, three, lift.” Once they are standing, the leader should say, “Ready to move on the count of three: One, two, three, move.” The team begins moving. The leader gives the same directions for “Ready to stop” and “Ready to lower.”
Be kind to the patient if using a rigid litter—pad it. Use any available soft material, such as clothing or sleeping bags. For a head or neck rest (assuming the person does not need to be in a cervical collar), use a roll of toilet paper. Stand on it to squash it. It is the right size and softness for a head/neck support. If it is too thick, unroll some of it.6
If material for poles is not available, roll a blanket, sheet, poncho, cloth sack, or similar item from both sides toward the center so that the rolls can be gripped for carrying a patient. Bunch up a blanket lengthwise next to the patient. Push one side under the patient; the patient may need to be “log rolled” to get the blanket underneath. Roll the edges as close as possible to the patient. All rescuers should squat facing the patient, three on each side. They each grasp a rolled-up portion of the blanket, and the team leader instructs the team to lift in unison (Fig. 21-7). They stand and begin walking.
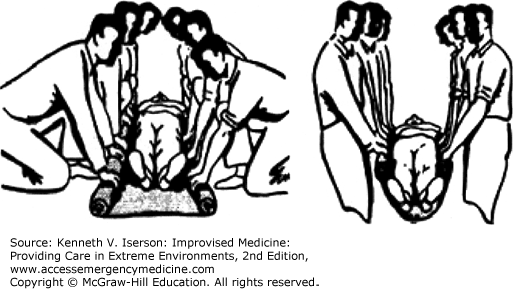
Rescuers should pull out sideways on the blanket as they lift; this avoids straining their backs and prevents the blanket from sagging too much in the middle. This type of litter is useful for carrying a patient only for limited periods, because it is much more tiring than using one with poles. At least six people are needed to safely move an adult patient.
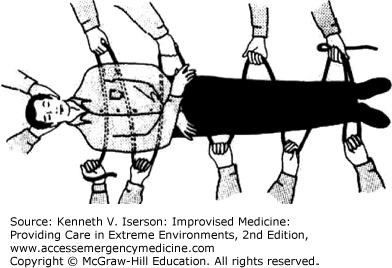
Make a rope litter by passing a strong rope back and forth beneath the patient, with the loops extending past the patient’s body. Rescuers on each side use these loops and each end of the rope as handholds to carry the patient (Fig. 21-8). Another rescuer supports the patient’s head. These litters are useful only over relatively short distances.
Most flat objects that are not too heavy can be used as a litter. These include doors, slabs of wood or light metal, benches, ladders, and cots. This type of rigid stretcher is excellent for patients with suspected spinal injuries. An ingenious litter can be fashioned from two chairs by tying or wiring them together with one back overlapping the other.7 The two back legs serve as handles (Fig. 21-9). Some backpack frames can be linked together in a similar manner to form a stretcher.

To improvise a stretcher using a blanket and two poles, lay one pole lengthwise across the middle of the blanket. Then, fold the blanket over the pole. Place the second pole across the middle of the folded blanket. Fold the free edges of the blanket over the second pole so the edge is almost at the first pole. The patient’s weight on the litter will keep the blanket from unfolding when carried (Fig. 21-10). Poles can be fashioned from strong tree branches, tent poles, skis, pipes, and so forth.

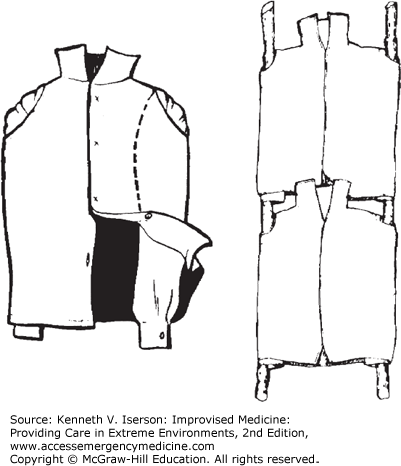
Use two long-sleeved shirts or jackets. Button the shirts or jackets and turn them inside out, leaving the sleeves inside. Pass the poles through the sleeves. Two to four shirts or jackets will often be needed to make an adequate litter (Fig. 21-11).
A sleeping bag may also be used as a litter. Zip it up completely and make a small hole at each of the two corners away from the opening. Put carrying poles through the bag’s wide opening and then through the new holes. The patient lies on top of the sleeping bag. Gunny sacks, grain bags, or similar containers made of cloth may also be used in this manner, although two or more will be needed, depending on the height of the patient.
The US military’s standard collapsible litter (Fig. 21-12) will probably be available in large-scale emergencies when organizations, including hospitals, begin using their disaster resources. The collapsible litter is commonly used in conjunction with military transport vehicles, including fixed-wing aircraft. It folds lengthwise and has a cotton cover to hold the patient. There are four wooden handles for carrying it and four metal stirrups (one bolted near the end of each pole) to support the litter when it is placed on the ground. Two spreader bars (one near each end of the litter) are extended crosswise at the stirrups to hold the cover taut when the litter is open. Two straps secure the litter when it is closed. Most also have straps to secure the patient. The litter weighs 15 pounds and is 90 inches long by 22.88 inches wide. The patient area is 72 inches long and 22.88 inches wide.

The Stokes litter provides maximum security for the patient when the litter is tilted, such as during ground-to-helicopter, ship-to-ship, or vertical-ground transfers. Its steel or aluminum tubular frame supports wire mesh netting on which the patient lies—first pad the basket with blankets or other material. If it doesn’t come with patient straps, they can be improvised using webbing or rope secured to the end of one side rail and passed back and forth over the patient—first toward the head and then back toward the feet, forming a crisscross pattern. It may also have carabineers and cables for attaching to helicopter long lines or ship-to-ship transfer cables. Some baskets are fitted with handles so they can also be used as a litter. A search and rescue improvisation is to attach a large wheel to the underside to assist in moving the patient long distances. The standard basket is 84 inches long, 23 inches wide, and, without attachments, weighs 3.5 pounds.
Many types of litters can be fitted with skis. The formal type is known as an Ahkio. This Alaskan sled is particularly useful when evacuating patients through deep snow.
An improvised method of making prolonged litter extrications more tolerable for paralyzed or immobile patients is to use two stretchers. The first stretcher has a hole for the patient’s face and a hole for urine output when the patient is in the face-down position (Fig. 21-13). The second stretcher has a hole for stool output, for use when the patient is in the face-up position. Turn the patient every 2 to 4 hours, by first sandwiching the patient between the two stretchers and then flipping them over. This also prevents the patient from developing pressure sores or autonomic dysreflexia from a distended bladder.11

VERTICAL TRANSPORT
Hospitals are rarely forced to evacuate their non-ambulatory patients. When they must, vertical evacuations from multilevel facilities represent a major logistical hurdle. The options often employed include lowering patients out of windows or moving them down stairways.
In some circumstances, such as when normal hospital exits are blocked, patients may need to be lowered out of the windows to safety. For this risky maneuver, get the most experienced people to help, such as fire department and rescue personnel.
The basic technique, without normal litters and ropes, involves securing the patient as well as possible into sheet slings and using additional sheets as “ropes.” Anchor bed-sheet ropes to hospital beds, or the rigid “standpipes” in stairwells can be used to belay the patients.
It may be necessary to move non-ambulatory patients down the stairs when the elevators do not work. This has traditionally been an extremely slow process involving fire department stretchers and many teams of strong people.5,12
However, the following method, which can be used in nearly any situation, including in non–health care facilities for less-than-fully ambulatory individuals, is much faster, takes only a few people of normal strength to operate, and requires no specialized equipment.13
Check the entire length of the stairwell to be certain that it is clear and that an exit is available at the bottom. For safety, station someone at the bottom of the stairway to ensure that the exit stays open and to warn the team if it doesn’t.
Place patient mattresses end-to-end on the stairs. Cover each flight of stairs (the stairs between a flat landing) with mattresses by putting a mattress even with the top stair and having mattresses extend to the landing. Push all the mattresses against the wall side of the stairway so there is a narrow area for personnel to walk.
Repeat the process for the entire length of stairs to be traversed.
Prepare the patients to be transported by wrapping them with two sheets (Figs. 21-14 and 21-15), leaving their faces uncovered. Tie both sheets individually at the head and foot ends with square knots. Wrapping the patient in two sheets provides extra support and allows the two rescuers at the head end to each hold a different sheet (for safety). The rescuer at the foot end holds both sheets.
Related posts:

Stay updated, free articles. Join our Telegram channel

Full access? Get Clinical Tree


