INTRODUCTION
When health care resources are limited, rehabilitation services are rare. You may need to improvise rehabilitation equipment for use in therapy or to help patients with mobility and activities of daily living (ADLs). Therapy devices help patients gain or regain activity levels as close to normal as possible. Equipment used for mobility and ADL helps patients function better in their daily lives, despite decreased physical ability. For convenience, I will discuss each of these separately.
THERAPY
Use transfer belts (aka walking belts or gait belts) for people who have difficulty walking. These belts enable helpers to lift patients safely and without straining their backs into and out of beds and chairs.
To make a transfer belt, place a 3-inch-wide webbing (or several loops of it), a wide clothing belt or a sturdy, wide piece of cloth, such as canvas, with a buckle around a patient’s waist, and use it as a handhold while transferring them or helping them to walk.
Patients use parallel bars to practice walking. Fashion these from two long, sturdy poles set into Y-shaped supports at each end. Place the poles parallel to one another and low enough so that patients can use their arms to steady themselves as they walk. Fix the apparatus solidly in place, because patients depend on it if their legs give out.
When children need to use walkers or to practice walking, such as when they are healing from a leg fracture, it helps to make it fun. Use your imagination to craft these devices. Girls especially enjoy using a baby buggy, with a doll in it if possible. For boys, decorate a walker with cardboard or paint to make it look like a car or boat. When using a baby buggy, be sure to put enough weights in the bottom so that it provides the child with support and will not tip over.
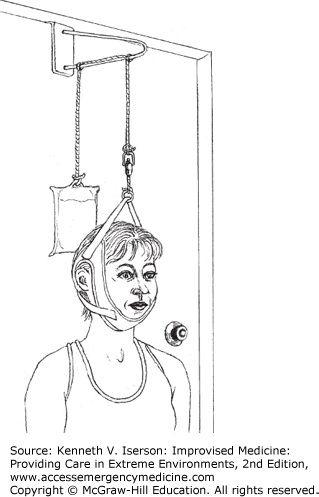
Cervical traction helps lessen the pain for patients with cervical disc disease. It can be applied in a clinic for 30 minutes twice a day, or at home more frequently for shorter periods of time.
To make a cervical suspension device
Build an overhead suspension frame using a flat 2-inch × 12-inch metal bar bent so that it can hook over a door.
Bend a 0.5-inch diameter × 6-inch-long rod into a horseshoe shape and then weld both ends to the flat bar.
Fashion a head harness from leather, jeans, or khaki clothing material and fasten with sandal buckles. Pad it well with soft cloth. Use a cotton cord or rope purchased from a local market. Tie one end of the cord to the support.
Make two hooks from 0.25-inch metal rods shaped into an “S.” Tie these to both ends of the cord.
Loop the cord from the head harness through the metal loop on the door hanger and attach it to a bag, bucket, or jar, which acts as a weight. As shown in Fig. 39-1, wrap the cord around the door hanger to reduce the tension. One alternative to the weight is to use a clothesline tightener between the head harness and the door hanger. Another alternative is to hang the weight over the end of a bed, as is done when using cervical traction for spinal injuries (see Fig. 29-9).
When water is used as weight, start with 2 L for an adult and add water until the patient is comfortable and no longer has pain.1
MOBILITY AND ACTIVITIES OF DAILY LIVING
A wide variety of devices can be improvised to assist patients’ mobility or to help them perform their daily activities.
The cane is the easiest mobility device to improvise. Patients often do not use their cane because it is the wrong size for them or because they are not told how to use it correctly.
To use a cane, patients should hold it in the hand opposite to their injury or weakness. In addition, they need sufficient upper-extremity strength to bear 20% to 25% of their body weight on the cane. (If they use it in the wrong hand, they need to support >50% of their weight.)
To determine the correct size of cane, measure the cane against the patient while he or she is standing. Turn the cane upside down and rest it on the ground next to the standing patient. Cut the bottom of the cane at the level of the patient’s flexor wrist crease and apply a rubber tip to the end.
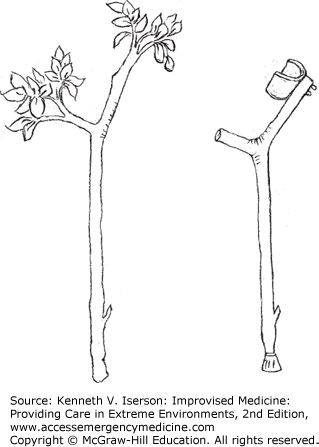
You can make canes from a tree limb or small tree that has a small sturdy branch that extends at a right angle. It should be light enough so that the patient can easily use the cane. Remove any bark, extra branches, or leaves, and smooth the surface. Patients use canes and walking sticks for balance rather than to support an injured limb.2 Fashion a cane with an arm brace by attaching a piece of polyvinyl chloride (PVC) pipe to the tree limb (Fig. 39-2).
Related posts:


Stay updated, free articles. Join our Telegram channel

Full access? Get Clinical Tree


