INTRODUCTION
In some cases, patients cannot tolerate oral therapy or they need immediate medications, rehydration, or fluid/blood-product resuscitation. Clinicians must then be prepared to use intravenous and other parenteral infusion methods. Some of the following methods are not well known, but all can be used safely when needed.
INTRAVENOUS HYDRATION
Intravenous hydration is a rapid method that ensures that the fluid enters the vascular space. In addition, it is appropriate for administering at least one form of nearly all parenteral medications and fluids. In severely dehydrated patients, rapid volume replacement, also called rapid rehydration therapy, saves lives.1,2,3,4 Patients who present with severe dehydration (indicated by a weight loss of ≥10%), with impaired circulation (as measured by rapid pulse and a reduced capillary fill time), and evidence of interstitial fluid loss (including loss of skin turgor and sunken eyes) should be rehydrated intravenously over 1 to 2 hours with isotonic saline. To rapidly restore extracellular fluid (ECF), administer intravenous (IV) lactated Ringer’s solution and/or normal saline (NS) at 40 mL/kg over 1 to 2 hours. If skin turgor, alertness, or the pulse does not return to normal by the end of the infusion, infuse another 20 to 40 mL/kg over 1 to 2 hours. Repeat that infusion as needed. Initiate oral rehydration therapy (ORT) as soon as tolerated.5
In situations of scarcity, multiple problems exist with using IV hydration, including lack of equipment, skilled personnel, and ability to monitor patients adequately. The most obvious problem is scarcity of equipment and personnel trained to place IV catheters and administer IV solutions. The lack of adequate patient monitoring can lead to critically over-hydrating patients, especially infants and the elderly.
Rapidly establishing peripheral IV access in the sickest children is vital, because delaying “fluid resuscitation is associated with increased mortality. In septic shock, every hour that passes without restoration of normal blood pressure has been associated with at least a 2-fold increase in mortality.”6
Reusing either IV tubing or needles poses a serious risk of passing on blood-borne diseases, a result that may not be immediately obvious. Reusing IV tubing may be the safer of the two, because, if tubing has not been contaminated with patient secretions or blood, it may be relatively safe to use if disinfected. To disinfect IV tubing, first try to boil it for 5 minutes. If that destroys the tubing, disinfect subsequent tubing by soaking it in sodium hypochlorite (bleach) or another antiseptic for several hours. Be sure to also soak the inside of the tubing, which can be done by sucking the solution into the tube with a syringe. Before using the tubing on a patient, wash it thoroughly with boiled water, inside and out, to remove the disinfectant.
Reusing needles is more problematic. Classed as high-risk devices, needles must be sterilized, not just disinfected, before reuse.7 That can be a challenge, because the interior is difficult to clean of residual materials, a prerequisite to adequate sterilization. See Chapter 6 for further details on cleaning, disinfecting, and sterilizing equipment.
Necessity is the mother of invention, and making IV equipment is a good example. Physician–prisoners working in prisoner of war (POW) camps along the Thai/Burma Railway during World War II, for example, made IV sets “from stethoscope tubing and sharpened bamboo sticks.”8 Injection needles can be used as IV needles after slightly bending the needle so that the hub will not exert as much tension on the skin.9
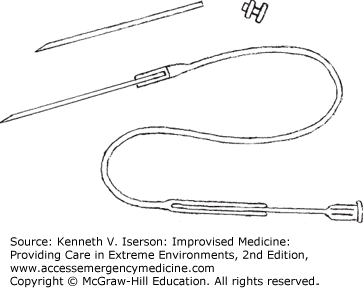
To make a scalp vein IV unit, break off the adapter of a short needle of the appropriate gauge (Fig. 12-1). Insert the needle’s broken end into the end of a short piece of thin plastic tubing. (This type of tubing is often used in laboratory equipment.) If the tube fits loosely over the needle, soften the plastic by heating it over a small flame (e.g., match). When soft, squeeze it tightly around the needle. Put an ordinary injection needle into the other end of the tubing; that end may also need to be crimped. Nearly all IV tubing adapters fit the ends of these needles. When constructing this equipment, use forceps to hold the pieces. Disinfect this unit before use. Generally, it is best to have the scalp vein filled with fluid when entering a vein so that the blood does not clot.10
METHODS OF LOCATING AND DILATING PERIPHERAL VEINS
Multiple methods have been suggested to increase the chance of finding a child’s vein to access; most do not work well. The most useful in austere settings is to warm a hand or extremity to produce vasodilation. Also, alcohol swabs reflect the light off the skin, making vessels easier to see, especially in darker skinned patients. While transilluminators, including penlights, may help in visualizing vessels, their clinical benefit is marginal. Applying nitroglycerin ointments to locate and dilate IVs actually may decrease the chance of success and is associated with adverse effects, including increased infiltration, bleeding, and hypotension.11
Seeing or feeling the vein obviously helps when inserting the IV catheter. If applying a standard venous tourniquet does not produce a vein, inflate a blood pressure cuff above diastolic pressure with the arm supported at the level of the heart. This produces the largest increase in basilic vein size. Esmarch (hard rubber) bandages also work well, as do standard IV tourniquets, although their effect lessens if the arm is below heart level.12 If that does not work, drop the extremity below the level of the heart and apply a blood pressure cuff. Inflate it first to about 35 mm Hg. If that doesn’t produce a vein, inflate the cuff to halfway between the systolic and diastolic pressures. If the cuff’s tubes leak, clamp them to keep the cuff at that pressure.
Applying heat to the limb also helps. Use a hot, wet towel, but squeeze out the water before applying it to the limb so you do not burn the patient. The distal extremity can also be immersed in warm water for 10 minutes, as they once did for donors in person-to-person transfusions.13
In patients with peripherally constricted veins, apply a tourniquet above the elbow and establish IV access in the dorsum of the hand with a small (e.g., 22 gauge) catheter. Leave the tourniquet in place and immediately infuse NS (100 mL in adults) under pressure. The bigger proximal veins of the cubital fossa engorge so that a larger catheter can be placed.14
SECURING INTRAVENOUS CATHETERS
Put a paper cup over a scalp vein to protect it, cutting a notch so that the cup’s lip does not crimp the tubing.
“Ruggedized” IV systems prevent catheters from being accidentally pulled out, a common occurrence.15 Developed by military medics, they are excellent for seriously ill and injured patients in all settings in which the loss of an IV may pose serious harm. To place a ruggedized IV, insert either the largest possible needle or IV catheter (recommended) into a vein. Convert it into a saline lock and cover it completely with a clear dressing (e.g., Tegaderm). Insert a slightly smaller IV catheter into the first catheter (saline lock) and begin infusing. If the tubing gets snagged and the infusing catheter is pulled out, the saline lock remains so that a new catheter can immediately be inserted. The downside to this system is that the flow will be limited by the size of the smaller catheter. If trying to infuse fluids rapidly, pressurize the IV bag.16
Many austere settings may not have clear surgical dressings or standard catheters for saline locks. In that case, use a large amount of tape and gauze to secure the initial catheter, keeping only the hub exposed. To make a saline lock from an IV catheter and the rubber from the end of a 2- or 3-mL syringe plunger (see Fig. 5-26), shave off the flanges around the hub of some IV catheters. The system then works so well that nearly all critical patients and those with altered mental status can have their IVs started in this fashion.
INTRAOSSEOUS INFUSION
Intraosseous (IO) infusion is one of the quickest ways, both in children and in adults, to establish access for the rapid infusion of fluids, drugs, and blood products in emergency situations.17,18,19 However, in some cultures, almost any other method, including intraperitoneal infusion, is preferable to IO infusion.20
Placing an IO needle and beginning the infusion generally takes <1 minute; this is much faster than placing an IV in critical situations, especially in infants/small children or in any patient in shock or in cardiac arrest.18,21 Standard practice is to use an IO needle in resuscitation situations when venous access cannot be obtained after either three attempts or within 90 seconds of starting the procedure, or when the clinicians do not believe they can quickly get venous access.
Because the marrow cavity is contiguous with the venous circulation, the IO route can be used to infuse fluids and medications, and to take blood samples for crossmatch. Any fluid, blood product, or medication (except for cytotoxic agents, such as chemotherapeutic drugs) can be given through the IO route. The onset of action and drug levels during cardiopulmonary resuscitation (CPR) using the IO route are similar to those given intravenously.19
Intraosseous infusion is contraindicated when (a) there is a proximal fracture on the ipsilateral side of the extremity that will be the site of needle placement, (b) the bone where the needle will be placed is fractured, or (c) osteomyelitis exists in the bone to be used.19
Intraosseous infusion is also contraindicated in patients with osteogenesis imperfecta or osteopetrosis, with an infection or burn overlying the infusion site, with a bleeding diathesis, and who have already had multiple IO needles or attempts at the same site.
Ideally, IO infusions are done through a special IO needle or a bone marrow aspiration needle with an obturator. Alternatively, use any needle with a stylet. A large-gauge spinal needle and stylet can be cut down to a 3-cm length, beveled, sharpened, resterilized, and packaged in advance for IO use.22,23
In emergencies or situations of scarcity, use a standard 14- to 20-gauge butterfly/injection/IV needle (without a stylet); all connect to syringes and standard IV tubing. Using smaller-gauge or longer needles, however, risks their being too fragile or flexible to penetrate the bony cortex. Occasionally, when using such a needle, the lumen becomes plugged with bone. If aspiration or running fluid under pressure does not clear the obstruction, another needle can immediately be placed in the same hole—although this may be more difficult than it sounds.
However, experience shows that needles from some large-bore catheter-over-needle cannulas may not work because the needle retracts if pressure is applied distally. Rather than entering the bone, the needle simply moves back into the hub. Test them in advance. Also, pediatric bone marrow needles may not be long or strong enough to penetrate adult bone, even at the supramaleolar site.
Common sites for IO placement are the proximal anteromedial tibia (1-3 cm below the tibial tuberosity on the anteromedial surface) or distal anterior femur in children, the proximal humerous (the greater tubercle of the anterior humeral head 1 cm proximal to the surgical neck of the humerus), the anterior-superior iliac spine or above the medial malleolus (adult or child), and the sternum (in adults with special equipment).
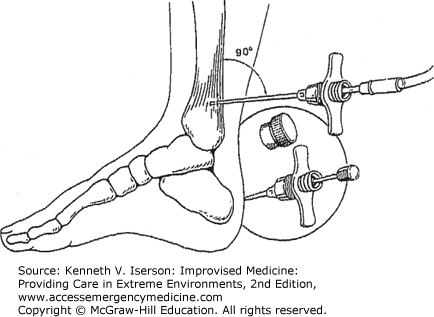
Without special equipment, the thickness of the bone precludes the use of the tibia or distal femur in children, and almost always in adults. Using the sternum has the potential for lethal injuries, so avoid this site unless using a sternum-specific needle or an IO drill. However, using most injection needles, the area just above the medial malleolus has proven to be easy to use in both pediatric and adult patients (Fig. 12-2). Enter the bone at a 90-degree angle (perpendicular) to the skin.18
FIG. 12-2.
Intraosseous needle insertion at ankle: pediatrics or adult. (Reproduced with permission from Iserson.18)
Use aseptic technique and a sterile needle. Placing a bone marrow needle without using aseptic technique increases the chance of osteomyelitis and cellulitis. Clean the skin. In awake patients, inject a small amount of local anesthetic in the skin and continue to infiltrate down to the periosteum. Hold the insertion site firmly to stabilize it. Do not put your hand behind the insertion site; it could get stabbed with the needle.
Insert the needle with a pressing and twisting (or “drilling”) motion until you feel a “give” as the needle passes through the cortex.
Remove the obturator (if there is one) and attach a 5-mL syringe to aspirate a blood sample—both to confirm placement and to draw a sample for analysis. (A larger syringe may not be able to generate sufficient negative pressure.)
Another method to confirm needle placement is that the needle remains upright without support, although this may not be as obvious in infants because they have softer bones than older children or adults. Also, with correct placement, fluid flows freely through the needle without swelling of the subcutaneous tissue.19
Related posts:


Stay updated, free articles. Join our Telegram channel

Full access? Get Clinical Tree


