INTRODUCTION
DIAGNOSTIC EXAMINATION AND EQUIPMENT
Testing visual acuity is, by far, the most important diagnostic test on the eyes; yet, it is frequently overlooked. Even with penetrating or apparently corneal-occluding injuries (e.g., alkali burns), test visual acuity in this order: light perception, movement, counting fingers, and reading/identifying at distance. Testing takes only a short time—just seconds if stopped at counting fingers—but provides invaluable information to a consulting ophthalmologist.
To test whether a nonverbal or uncooperative patient can see, elicit optokinetic nystagmus. (See Chapter 29 for improvising optokinetic test equipment.) This test works in children as young as 4 to 6 months old. The presence of nystagmus with an optokinetic stimulus confirms cortical vision and the integrity of the frontal and parietal lobes and visual fields. An even simpler visual acuity test for a nonverbal or an uncooperative child is to offer him or her various toys and see how he or she reaches for and plays with them.1
If an eye chart is not available, use a newspaper or magazine. Begin with the fine print. Stop if the patient can read it. If not, work up to the largest print the patient can read. That gives a rough gauge of the patient’s visual acuity.
Standard eye charts are easy to manufacture. Download copies from multiple internet sites, including the US National Eye Institute (www.nei.nih.gov/photo/visual-acuity-testing), or smart phone apps. If copies are available, even in miniature, local printers can enlarge them to produce standard Snellen visual acuity charts, as well as “illiterate” eye charts (Landolt ring chart and “E” chart), on heavy paper and cardboard. Mount these on a heavier board and, if possible, laminate or cover charts with a plastic sheet for protection.
For patients who present without their corrective lenses or for those who have never gotten lenses but should have, there are two ways to test visual acuity: an ophthalmoscope or a pinhole device.
To test visual acuity using an ophthalmoscope, have patients cover one eye while looking at the eye chart through the ophthalmoscope. Have the patient hold the instrument as would a practitioner; the examiner should adjust the lenses to find the optimal one for the patient. If the visual acuity examination is done after an ophthalmoscope examination, start with the lens setting with which the patient’s disc is best seen. If only a wall-mounted ophthalmoscope is available, use a pocket eye chart to position the patient at the proper distance from the chart (generally 14 to 16 inches for a pocket chart and 20 feet for a standard chart). For supine patients, such as those suffering trauma, get a helper to stand on a stool and hold the eye card. Dr. Joseph Miller, a professor of ophthalmology at the University of Arizona, says that another option is to borrow someone’s reading glasses and test the patient’s vision with and without the glasses. (Personal written communication, September 8, 2008.)
You can also use a pinhole device to determine a patient’s optimal visual acuity. Make one by cutting a 5-cm-diameter circle from opaque x-ray film and attaching it to a handle. Puncture the center of the film to produce a hole about the size of the head of a pin. Putting in more holes may improve the chance of some patients finding a hole to look through. Alternatively, use a paper cup with holes punched in the bottom (Fig. 30-1).
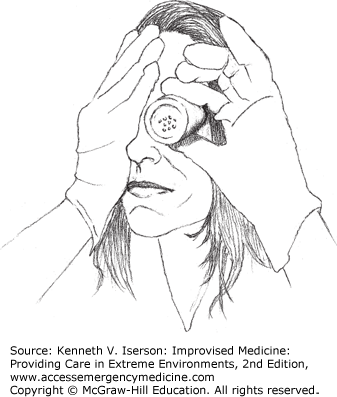
An even easier method is to remove the top from a salt shaker and use that as the pinhole device. While it may be little messy, a soda (e.g., Saltine) cracker with holes may also be used. Many elderly people use cracker holes to read the menu in restaurants, so we know it works.
Color vision testing probably will not be important in austere circumstances. But, if it becomes necessary, the only method is to ask the patient if he (nearly always a “he”) can tell you the color of various objects in the room. Choose red, green, violet, and pink objects, because red-green color blindness is most common. The only caveats are (a) be certain that you have good color vision yourself to get a baseline, and (b) be aware that there is a spectrum of “normal” color vision.
Clinicians may need to manually open eyelids to examine or treat patients with periorbital swelling due to trauma or infection, or to look under the lids for foreign bodies.
When lifting the eyelid to examine the superior conjunctival fornix in a non-trauma patient, place a cotton-tipped applicator (e.g., Q-tip) against the lid. Then, rather than manually lifting the lid over it, roll the applicator and the eyelid will curl around it and lift.
In patients with facial trauma, retract the lids as early as possible after the patient presents; the swelling may progress enough that it may be nearly impossible to examine the eye later without surgery. Opening massively swollen eyes may reveal the most surprising result—a normal eye with normal vision. Without the examination, however, you will not know that.
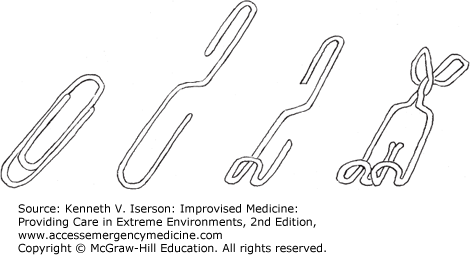
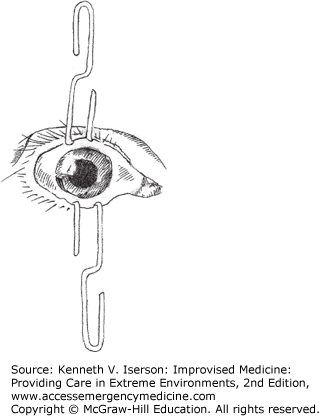
The best way to open swollen eyelids is to use lid retractors. If the patient is conscious, drop in some topical anesthetic. Open a paperclip so that the small (inside the clip) and large (outer part of the clip) pieces are in the same plane (i.e., flat) (Fig. 30-2). Use a clamp to hold one end and bend it 180 degrees. (With some paperclips, this can also be done by hand, although I don’t recommend it.) Bend the larger side for use in adults; the smaller side is best for children. Clean the paperclip and use it as a lid retractor. Use two if both the upper and lower lids must be retracted simultaneously, which is often the case (Fig. 30-3). Paperclip retractors can be sterilized and reused.
In the operating room (OR), tie a suture to the paperclip and secure that to the drape. If you have a sterile rubber band, secure that to the paper clip: It provides additional laxity, if you need it. Occasionally, a 7-0 (or smaller) silk or nylon suture is used for lid retraction. Pass it through the lid just above the lash line and pass it back through so it is just on the other side of the lashes. Do not penetrate the palpebral conjunctiva.
For a better view of the sclera and cornea during the examination, use an ophthalmoscope or put a (an additional) pair of reading glasses or a handheld magnifying lens between your eye and the patient’s.
In practice, many clinicians no longer routinely use an ophthalmoscope, so using it may be challenging. This method helps you get a clear view of the fundus if you are unable to focus when using the diopter lenses. Wear your glasses and have the patient put on his or her eyeglasses. Flip the ophthalmoscope lenses until the fundus comes into focus. Then both of you remove your glasses so that you can take a closer look.2,3
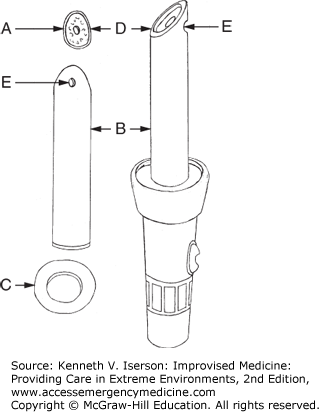
A method of constructing an improvised ophthalmoscope uses a flashlight, a 2-cm diameter piece of black polyvinyl chloride (PVC) pipe, aluminum foil, glue, a drill, a small saw, and an oven (Fig. 30-4).
Cut a 15-cm piece of pipe; then cut one end so that it has a 45-degree angle “beveled edge” (B).
Cut another 10-cm piece of pipe and split it lengthwise; heat it to obtain a flat piece of PVC. (See the following “Heating PVC Pipe” section.)
Cut this flat piece into two discs: one disc (C) is the same diameter as the glass at the front of the flashlight, which it will replace. (If you have a small [mini-] Maglite, that may provide a better view.) Drill a 2-cm hole in its center. Cut the other disc (A) so that it fits over the beveled end of the long pipe (B).
Cover the inside of the pipe (B) with aluminum foil, except for the tip at the beveled end. The bright side of the aluminum foil should face the center of the pipe to increase illumination.
Cover one side of the flat PVC disc (A) with aluminum foil, and drill a small hole through its center (D).
Drill another, slightly larger, hole (E) directly opposite to where the disc’s hole will be, at the end of the long piece of PVC pipe (B). This (hole E on pipe B) is the viewing port.
Attach the oval disc (A) to the beveled end of the PVC pipe (B) with glue.
Glue the “non-viewing” end of the long pipe (B) to the round piece with the 2-cm hole (C). Both PVC glue and cyanoacrylate work. Remove the flashlight’s glass and replace it with the flat end of the device. The ophthalmoscope is ready for use. This device provides enough light to observe an upright image of the optic disc without needing to dilate the eye. For refraction, use either a lens-correcting set (such as optometrists use) or various eyeglass lenses.4
To flatten pieces of PVC pipe, they must be heated. Because PVC pipe emits dioxins and other toxic, potentially cancer-causing gasses, heat it in a well-ventilated area, preferably outside, while wearing a good protective mask. If possible, work on a large flat piece of wood because it acts as a good insulator, allowing the pipe to stay warmer longer. Wear gloves to protect your fingers and slowly heat the PVC with one of the following: (a) a propane torch (keep enough distance to not burn the pipe); (b) a heat gun, which will not burn the pipe; (c) very hot or boiling water (dip the piece into the water until it heats completely through and repeat as necessary); (d) an ordinary heat lamp; or (e) another heat source, such as a kerosene heater. Keep testing the pipe with a gloved finger until it becomes flexible, like rubber. Put a flat, fireproof object (like metal) on it. Once the PVC pipe is flat, cool it by spraying it with or dunking it in cool water.
Ophthalmologists who want to do indirect ophthalmoscopy, but who do not have the standard equipment, may succeed in the unconscious patient with fixed, dilated pupils. Hold a ≥2-inch- diameter handheld magnifier positioned at arm’s length, about 4 cm from the patient’s eye. Use a direct ophthalmoscope as a light source (preferred), a transilluminator (second choice), or a Mini-Maglight (focused to the smallest possible spot, a distant third choice as it can be quite tricky). You can get a nice, wide field view of the retina and optic nerve. It is the best way to see hemorrhages. Good quality 4X and 5X magnifiers (corresponding to about 20-diopter lenses) work well, but the cheapest handheld magnifiers (3X magnification, ~ 30¢ US) produce too poor an image to use. If using the direct ophthalmoscope, set it so you can see the magnifying glass clearly and in focus. An aerial image of the retina forms about 3 inches in front of the lens. This wonderful trick does not require the fancy headlamp that ophthalmologists routinely use. (Joseph Miller, MD, PhD. Personal written communication, September 8, 2008.)
Non-traumatic eye complaints are common. Table 30-1 provides a method of differentiating among them. Some, such as an external hordeolum (sty), are usually minor problems; a corneal ulcer can be a serious, and potentially sight-threatening, condition.5
| Symptoms and Signs | External Hordeolum (Sty) | Internal Hordeolum | Chalazion | Conjunctivitis | Anterior Uveitis | Corneal Ulcer |
|---|---|---|---|---|---|---|
| Eye pain | Sensation of foreign body | Sensation of foreign body possible | Sensation of foreign body possible. After a few days, signs and symptoms resolve | Itching or burning | Moderate to severe dull ache | Moderate to severe |
| Vision | Normal | Normal | Normal | Normal | Blurred | Blurred |
| Photophobia | Possible | Absent | Absent | Absent to moderate | Present | Present |
| Discharge | Lacrimation | Absent | Absent | Present (purulent or watery) | Absent | Purulent |
| Redness/inflammation | Usually localized, but may be diffuse | Localized | Grayish-red, freely moveable mass in lid. Conjunctiva red and elevated | Entire eye red, more pronounced away from cornea | Pink to red flush around cornea | Entire eye red, darker away from cornea |
| Pupil size | Normal | Normal | Normal | Normal | Constricted | Normal or constricted |
| Pupil shape | Normal | Normal | Normal | Normal | May be irregular | Normal |
| Pupil reaction to light | Normal | Normal | Normal | Normal | Diminished or absent | Normal or diminished |
| Special notes | Small, round, tender area of induration on lid margin | Small elevation or yellow area at site of affected gland, on conjunctival side of lid | If mass is nonmobile, it may be malignant | Rarely a serious condition | Moderately serious condition | Very serious condition |


