PRIORITIZING PATIENTS FOR THE OPERATING ROOM
As with all medical care under austere circumstances, priority for the operating room (OR) should be given to patients with the best chance of benefiting. For example, when prioritizing multiple patients with penetrating abdominal injuries, keep these statistics in mind1:
If operating <3 hours after the injury, there is a 10% mortality rate.
If operating >10 hours after the injury, there is a 50% mortality rate.
Stable patients with abdominal wounds should be prepared for surgery, but can wait up to 4 hours post-injury for surgery.
For patients in shock, assume that these unstable patients have ongoing abdominal bleeding. A laparotomy is the only effective basic life support. Control external bleeding, administer volume and transfuse (type O or type-specific), and perform a laparotomy without further examination.
Patients who arrive >10 hours after injury have a high risk of complications from surgery, which does not increase much with a further delay. Provide basic fluid and airway support; give broad-spectrum antibiotics, if available; and, at surgery, concentrate on establishing a diversion stoma and effective drainage.
RAKING AND SWEEPING FOR UNDETECTED WOUNDS
Combat medics and many prehospital providers use the “rake and sweep” method to detect injuries when they cannot remove clothing due to combat, extreme cold, constricted or dangerous environments, etc. Form the hand into a rake/claw and firmly pass it over the patient, beneath as many layers of clothing as possible. The fingers may catch in and identify penetrating injuries. Using clean gloves (or hands), again pass the open hand over the body and as close to the skin as possible to identify blood. Use a combination for best effect.
NECK
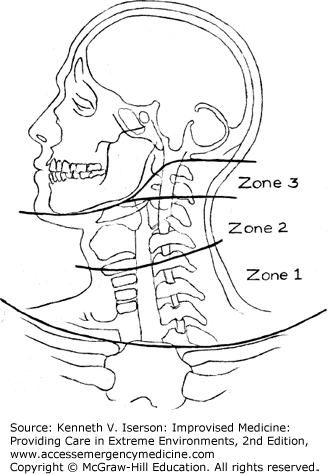
Penetrating neck injuries are commonly treated using an ever-changing set of rules that often depend on the resources available. In austere circumstances, with limited evaluation and monitoring resources, exploration may often be the safest treatment, especially for Zone 2 injuries (Fig. 24-1), if any doubt exists regarding injury to deep structures.
When faced with severe hemorrhage from neck or facial injuries that cannot be stopped any other way, Dr Husum and colleagues advise that “the internal jugular vein or the carotid artery on one side may be ligated for lifesaving reasons: The brain is well drained through the other side. Some neurological problems may follow ligature of a bleeding carotid artery, but in most cases the blood supply from one carotid artery is sufficient.”2
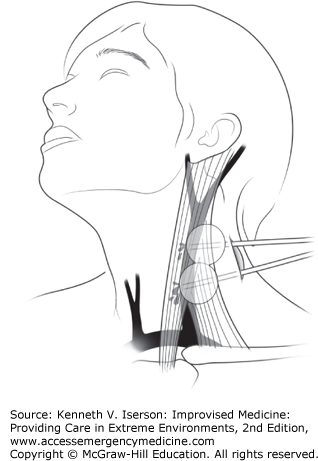
The US military medical community has found that inserting Foley catheters to tamponade arterial or venous bleeding for wounds in any zone of the neck or in the maxillofacial area buys sufficient time to get patients to a higher level of care. It is far superior to direct pressure on these wounds.
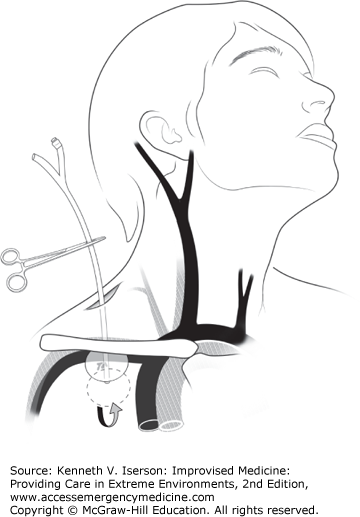
First, place a hemostat on the distal end of an 18-French Foley catheter. Then, use a finger directed along the wound track to place the catheter at the estimated or palpated source of bleeding; inflate the Foley balloon with sterile water until the bleeding stops or there is moderate resistance. If this technique fails to stop the hemorrhage, place a second catheter into the wound and inflate it to provide more proximal control (Fig. 24-2). With Zone I injuries of the supraclavicular fossa, insert the catheter as far as possible past the defect in the vessel, inflate the balloon, and firmly pull back on it to compress the injured vessel onto the first rib and clavicle (Fig. 24-3). Secure it with a hemostat. If bleeding continues at any site after Foley placement, supplement it with direct pressure to the wound. Foley catheter treatment for these wounds significantly reduced mortality when compared with direct pressure techniques.3
ABDOMEN
In critical, austere situations, a decision to open an abdomen may be lifesaving—or lethal. In their book, War Surgery, Dr. Husum and colleagues list the reasons (Table 24-1) to perform laparotomies under these circumstances, suggest widening the scope of who can do them, and detail ways of shortening the procedure.
| Reasons and Methods |
| Done on dying patients, or on unstable patients before prolonged evacuation. |
| Can be lifesaving. |
| Should be done immediately, to be effective. |
| Uses a few simple surgical instruments. |
| Is performed in the field. |
| Use intermittent intravenous (IV) ketamine anesthesia. |
| The operator should be anyone (“paramedic”) trained in the procedure. |
| Procedures to Shorten Emergency Laparotomy |
| Pack tears of abdominal organs with dry gauze. |
| Then pack the bleeding quadrants with large, dry gauze packs, 40 cm × 40 cm. |
| Consider leaving vascular clamps until the second-look laparotomy without tying ligatures. |
| Tie the intestines proximal and distal to intestinal wounds with ribbon gauze. |
| Consider closing the midline incision with towel clamps. |
| Distended abdomen: Suture plastic infusion bags to the abdominal wall fascia to close the midline incision temporarily. |
An excellent technique that has all but disappeared in developed countries with the advent of ultrasound and computed tomography (CT) scans, diagnostic peritoneal lavage (DPL) requires few resources and is a good tool to diagnose intraperitoneal bleeding, perforations, and infections. This relatively simple and fast procedure helps a clinician decide whether to do exploratory laparotomy after blunt abdominal injuries. It can be done using local infiltration or low-dose ketamine anesthesia.
The abdomen is entered 2 cm inferior or superior to the umbilicus. (Go above the umbilicus if a pelvic fracture is suspected.) The technique can be done through an incision or by using the Seldinger (catheter-through-needle) technique. Using the Seldinger technique, insert the needle into abdomen and pass a catheter through the needle into the peritoneal space. This method may be hazardous in patients with prior abdominal surgery due to adhesions and the possibility of bowel perforation. This method is much faster and has, in reality, proved to be as safe as the open method.5
The more common technique is to make a small midline incision through the abdominal wall. The reason this method fails is that the midline cannot be identified. Experience shows that by using a self-retaining retractor, the midline is much easier to find and the procedure is easily and quickly done by one clinician. When the peritoneum is identified, make a small hole and insert a soft catheter, such as sterile intravenous (IV) tubing in which additional side holes have been cut distally.
Once the catheter is in the peritoneum, immediately aspirate to check for ≥10 mL of gross blood, which indicates a “positive” lavage and the need for a laparotomy. Otherwise, tie a purse-string suture around the tube and close the incision tightly. Instill 1 L of normal saline; once it is instilled, let it drain from the abdomen using gravity by putting the IV bag or bottle on the floor.
A diagnostic lavage requires 250 mL to return out of the abdomen. A positive result is not being able to read newspaper-sized print through the tubing. (Don’t assess the IV container’s clarity, because it may vary with the amount of fluid in the bag or bottle.) If laboratory testing is available, a positive lavage will have >100,000/mL red blood cells (RBCs) in blunt trauma patients or >10,000/mL RBCs for penetrating trauma patients, a white blood cell count >500/mL, elevated amylase (>175 IU), elevated bilirubin, food particles, or a high bacterial count in the effluent.
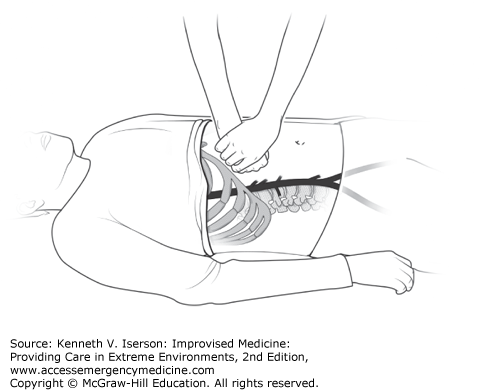
Applying external compression to the abdominal aorta may provide time to use other modalities to treat victims of traumatic hemorrhage, postpartum bleeding, and some cardiac conditions. (It has been used to increase cardiac afterload after severe cyanosis in a 3-month-old with Tetralogy of Fallot). To do this, the clinician applies maximal bimanual force to the patient’s epigastrium to compress the abdominal aorta by pressing the right fist (bolstered by his left hand) between the xiphoid and umbilicus (Fig. 24-4). Experience shows that, to be effective, the clinician must be considerably larger than the patient.
CHEST
Chest wounds can be open or closed. Open, or “sucking,” chest wounds should be covered with what amounts to a one-way valve. To do this, tape three sides of an airtight dressing over the hole in the chest. Many things fit that description, but some commonly used materials include plastic food wrap, aluminum foil or aluminum foil packaging, and meal-ready-to-eat (MRE, a military food container) packaging. If the patient has increased difficulty breathing or diminished pulses or blood pressure (BP), remove the dressing.
The common teaching is that a tension pneumothorax is easily treated with simple 14-gauge- needle thoracentesis.7 Maybe that is true in children and thin adults, but it is not true in other cases. Failure rates with 5-cm needles range from 25% to 50%, and are up to 77% with a 3.2-cm needle. Failure is attributed to excessive chest wall thickness, user error, catheter malfunction, and obstruction.8
Needle thoracostomy is most successful in children and younger men because of their smaller chest-wall size. Whether the standard 14-gauge over-the-needle catheter (5-cm long needle; 4.5-cm long catheter) relieves a pneumothorax in adult patients depends on their position, gender, and age. If the chest puncture is in the second intercostal space at the mid-clavicular line, the catheter won’t reach the pleural cavity in one-half to three-fourths of women and in one-fifth to one-third of men in the arms-down position, which is the typical position of patients needing chest decompression. Even if the catheter does reach the pleural space, it can easily pop out when the patient is moved. If the catheter is placed with the patient’s arms raised, it pops out as soon as they lower their arms.9
For optimal pleural space decompression with a needle, consider that the chest wall thickness at the fourth intercostal space/anterior axillary line is significantly thinner than at the traditional entry site—the second interspace in the mid-clavicular line. In addition, there is a much better chance of actually decompressing the chest when using an 8-cm rather than a 5-cm catheter (7.6 cm = 3 inches). For maximum success, insert the 8-cm needle at a 90-degree angle to the chest wall at the fourth intercostal space/anterior axillary line. This technique has a similar injury rate to that of a 5-cm needle.8
Pneumothoraces in critical trauma patients can be treated initially without a chest tube when there is no tube, if there are questions about the sterility of the surroundings, or when cramped quarters (helicopter, ambulance, etc.) do not permit easy manipulation of the tube. The following “simple thoracostomy” technique is both preferable to using a needle thoracostomy and safe and effective for intubated and ventilated trauma patients who have evidence of decreased breath sounds, subcutaneous emphysema, serial rib fractures with chest wall instability, or a penetrating chest wound.
The technique is to thoroughly clean the chest wall at the fifth intercostal space between the anterior and mid-axillary lines and make a 5-cm incision, bluntly dissecting down to, and entering, the pleural cavity. (This can also be done at the mid-clavicular line if access to the side presents a problem.) Cover the incision with a sterile gauze dressing that should be taped down on only three sides. Any air in the pleural space naturally exits as the intrapleural pressure rises with ventilation, while no air enters the chest.10 A chest tube is inserted when the patient arrives at the hospital or at another facility that can easily and safely insert one.11
Rather than inserting a chest tube (with many resources used), observation alone is adequate treatment for healthy young patients who present with a small (<20% of the hemithorax) primary spontaneous pneumothorax. The intrinsic reabsorption rate of intrapleural air is about 1% to 2% of the total lung volume per day. Administering 100% oxygen increases the reabsorption rate three- to fourfold (~5%/day). For those with <20% collapse, simply observe for 6 hours and repeat imaging.
If the collapse is >20% but <40%, aspirate the air. (Determining the percent of collapse for a pneumothorax is always an approximation; see Chapter 19 for reasonably accurate methods to assess it.) Do this under local anesthesia through the second intercostal space in the mid-clavicular line using a 16-gauge cannula, a three-way stopcock, and a 50-mL syringe. Repeat imaging in 6 hours. If, after 6 hours, the collapse is still >20%, either repeat the protocol once or insert a chest tube. If, at any point, the patient becomes dyspneic or the lung collapse significantly increases in size, insert a chest tube. Have the patient return for a reassessment in 1 week.12
Related posts:


Stay updated, free articles. Join our Telegram channel

Full access? Get Clinical Tree


