INTRODUCTION
Treating orthopedic and related soft-tissue injuries can be problematic when medical equipment is scarce, especially in settings with high levels of injury (e.g., wilderness, war) or where having a disability is a threat to survival (e.g., treks, battles, subsistence economies). Extremity injuries are the primary cause of injury-related disability in many countries, especially in the developing world.1 In developed countries, they account for about 6% of all adult emergency department visits.2
The World Health Organization (WHO) has developed a list of essentials for treating extremity trauma at facilities with different levels of treatment capability throughout the world (see the “Facilities” section in Chapter 5). Table 32-1 suggests what equipment and skills may need to be improvised in situations of scarcity.
| Facility Level | ||||
|---|---|---|---|---|
| Resources | Basic | GP | Specialist | Tertiary |
| Ability to recognize neurovascular and disability-prone injuries | E | E | E | E |
| Basic immobilization (sling, splint) | E | E | E | E |
| Wrap pelvic fractures for hemorrhage control | E | E | E | E |
| Hand injury assessment and basic splinting | E | E | E | E |
| Spine board availability/use | D | E | E | E |
| Proper management of immobilized patient | D | E | E | E |
| Radiology available | D | D | E | E |
| Closed reduction of fractures/dislocations | PR | PR | E | E |
| Compartment pressure measurement | I | D | D | E |
| Operative wound management | I | PR | E | E |
| External fixation (or pins and plaster) | I | PR | E | E |
| Skeletal traction | I | PR | E | E |
| Skin traction | I | PR | E | E |
| Tendon repair | I | PR | E | E |
| Hand injury debridement and repair | I | PR | E | E |
| Amputation | I | PR | E | E |
| Fasciotomy for compartment syndrome | I | PR | D | E |
| Internal fixation | I | I | E | E |
This chapter discusses the diagnosis and treatment of fractures and dislocations, including emergency amputations.
DIAGNOSIS OF FRACTURES, DISLOCATIONS, AND SOFT-TISSUE INJURIES
Lacking radiographs or other imaging capability, clinicians need to rely on physical signs and symptoms to make presumptive diagnoses of fractures and dislocations. Table 32-2 lists the common signs and symptoms of fractures, with a comment about their diagnostic utility. Radiographs and ultrasound are included in the list to identify their relationship with the physical examination. Many factors affect the usefulness of imaging as a diagnostic tool, including its technical quality and the skill of those interpreting the images.
| Open fracture with observable bone fragments (10) | When bone fragments or fat-containing blood extrude from a wound, the question is no longer whether a fracture exists, but rather its extent and how to treat it. |
| False point of motion (10) | Definitive proof of a disruption in the bone and, after acute trauma, indicates a fracture. Its absence does not indicate anything. |
| Palpable discontinuity in bone (9) | This is an excellent indicator of bony discontinuity, especially in the patella, long bones, and diastasis of the symphysis pubis. Soft-tissue defects, edema, and hematomas may limit palpation of or simulate this defect. |
| Results of radiograph (9) | Excellent, if positive. The usefulness of radiographs depends on obtaining the correct images, the radiographic technique, the practitioner’s skill at interpreting radiographs, and the type of fracture. Some fractures will not be seen initially on radiographs (e.g., stress fractures, some hip fractures), so clinical evidence must always weigh more heavily with negative studies. |
| Examination under anesthesia (8) | Giving local, regional, or general anesthesia to examine the possible fracture site may aid in making the diagnosis, especially in children or uncooperative adults. Once anesthetized, test the patient for abnormal movement, deformity, and crepitus. Fractures may exist without any of these being found. |
| Deformity (8) | Presume diagnosis of fracture or dislocation if it can be discerned. Deformities are more likely to be seen if the patient presents before there is significant edema or several days later after edema has resolved, and if the fracture is away from the joints, is angular, is not a partial (e.g., stress, torus) fracture, and is not a compression fracture. Old fractures and some chronic bone deformities, such as rickets, may give the appearance of a fracture, although generally without the acute pain and skin tenting often seen after trauma. |
| Crepitus (8) | Crepitus, a grating sound caused by contact of the broken surfaces with each other, is highly suggestive of a fracture. Patients generally feel a rough, grinding sensation. In fractures with many spicules, the sensation is often that of a click. Badly comminuted or impacted fractures and those that are days or weeks old may have no crepitus [Hamilton]. Occasionally, chronic joint disease or blood clots near a suspected fracture may produce crepitus, so the sign is not perfect. |
| Shortening of a limb (7) | This is a convincing sign of a long-bone fracture. Both extremities should be measured using easily identified landmarks (e.g., anterior iliac spine and medical malleolus). The difference may be an inch or more. Dislocations or prior injuries on either side may also cause shortening, but other signs can often differentiate between the two problems. Measurements can also be used to determine if adequate traction has been applied. The measurements must be taken accurately. For details, see the sections “Measuring Legs for Diagnosis” and “Angle Measurement Using a Goniometer” in this chapter. |
| Loss of function (4) | Many injuries can limit a patient’s ability or willingness to use the extremity. There is often inability to lift the limb, owing to pain or to the separation of the bony lever upon which the muscles act, but this inability does not extend to all fractures, and especially does not exist in all partial or impacted fractures [Hamilton]. Mild, non-sedating analgesics may help make the diagnosis by allowing a patient to better test their use of an extremity. |
| Pain and tenderness (1) | Unreliable sign. Often present, even severe, with only soft-tissue injury; may be minimal or absent with a fracture. |
| Swelling (1) | Unreliable acutely. Swelling is such a common sign that it loses its diagnostic significance. If the swelling is out of proportion to the soft-tissue injury or persists longer than such apparent damage would warrant, it may indicate a fracture. If deep swelling persists after the skin edema resolves, it often indicates a displaced bone or callus. |
| Ecchymosis (1) | Although ecchymosis is more common in fractures than in dislocations [Hamilton], even if it occurs acutely, it has minimal diagnostic value. If it persists over several days, it probably indicates ongoing bleeding from a deep (probably bony) vessel. |
| Altered percussion (1) | Although highly touted, clinicians who have tried the technique of listening for changes of tone across fractures produced by either percussion or tuning fork have found it to be grossly unreliable. False-positive and false-negative results are the rule, rather than the exception. |
Compartment syndrome (CS) denotes high pressure within a myofascial space, which reduces perfusion and decreases tissue viability. The role of most clinicians is to recognize the potential for CS as early as possible so that an experienced surgeon can do a fasciotomy. The most common CS occurs in the anterior leg and is associated with open tibial fractures; the most commonly missed CS occurs in the leg’s anterior and deep posterior compartments.
Recognizing CS means considering the mechanism of injury, the injuries sustained, and the classic 5 Ps, although all five are rarely present. The 5 Ps are: (a) Pain out of proportion to that of the injury when muscles are passively stretched. This is often a sensitive, but nonspecific finding. (b) A palpably tense muscle is specific but not sensitive for CS. (c) Paralysis, paresthesias, and sensory deficits are generally late findings. (d) Pulselessness is rare in civilian injuries. Therefore, clinical diagnosis relies primarily on pain during passive ankle dorsiflexion, muscle palpation for tenseness, and a high index of suspicion. Use hourly serial examinations to monitor patients at high risk of CS. Pressure monitoring is unreliable in austere settings. (Pallor is often included as one of the 5 Ps, although it parallels Pulselessness.)
Note that in the absence of crush injury, fracture, multiple trauma, over-resuscitation, electrical injury, or similar indications, prophylactic fasciotomies on burned extremities may increase morbidity and mortality and are not indicated.6
One of the most persistent myths in orthopedics is that fractures can be diagnosed using a stethoscope with a tuning fork or percussion. This fallacy continues to be sustained by experts in academia and wilderness medicine.7,8,9,10 Yet our forebears knew that this was nonsense. Stimson, for example, wrote in 1910 that even under the best circumstances, this adds nothing to the diagnosis. “Auscultatory percussion,” he wrote, “the stethoscope being moved from one fragment to the other while percussion is made upon the first, will sometimes give a marked change in the sound as the line of fracture is crossed; but it is rarely significant, except in cases in which the diagnosis can be made by other means.”11 What Stimson did not mention is that the percussion usually hurts over the fracture site: not a great finding, but enough to suggest that there might be a fracture.
No study has demonstrated the validity or reliability of the tuning fork test in detecting simple acute fractures.12 My own tests, done with naïve optimism, used not only percussion, but also tuning forks of various recommended frequencies. These tests demonstrated that while percussive diagnosis works occasionally—usually in cases where the fracture is clinically obvious anyway—there are many false positives and false negatives, making the method virtually worthless. False negatives were especially frequent when hematomas overlaid the fracture site.
Physicians use ultrasound successfully both to diagnose and to reduce fractures.13 See Chapter 19 for information about how to use ultrasound for orthopedic injuries.
The balance of this section deals with the physical diagnosis of fractures and dislocations, which is an art seemingly lost to a reliance on imaging. Physical diagnosis consists of (a) observation, (b) measurement, and (c) palpation. Using these three modalities, the clinician can diagnose many acute orthopedic disorders without imaging.
Unlike many other fractures, carpal bone fractures may not produce much deformity, or even edema. After trauma, the patient’s wrist pain, limitation of motion, and tenderness on palpation should provide enough information, without imaging, to treat an injury as a probable fracture and immobilize it. Even with imaging, some fractures, especially those of the scaphoid, may not be seen.
If all of the following signs are present, there is a 100% sensitivity and 74% specificity for a scaphoid fracture.14 Assume that there is a scaphoid fracture, even if it appears normal on imaging, when there is:
Tenderness when pressing the anatomical snuffbox. The anatomical snuffbox is the groove between the tendons of extensor pollicis longus (on the ulnar side) and of extensor pollicis brevis and abductor pollicis longus (on the radial side).
Tenderness when pressing on the scaphoid tubercle. The scaphoid tubercle is the palpable prominence visible at the distal flexor crease when the wrist is extended and radially deviated.
Tenderness when longitudinally pushing the thumb toward the scaphoid while holding the wrist.
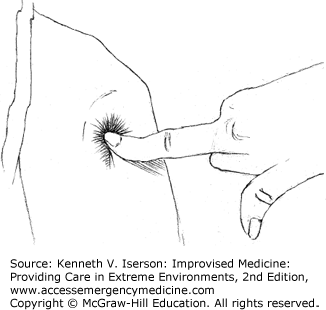
Diagnosing a shoulder dislocation without a radiograph is quite simple: Just feel for the “hole” when your finger falls into the now-empty joint at the glenoid (Fig. 32-1). If there is any doubt, feel the other side. Other signs include a flattening of the shoulder, projection of the elbow with the impossibility of bringing it to the side of the body and, most important, the presence of the head of the bone in an abnormal position, usually below the coracoid process. If measured from the tip of the acromion to the external condyle of the humerus, the affected arm will be shorter than the other; this difference is increased by abducting the arm.15
Patients with a fracture of the proximal humerus usually have localized pain, especially when the elbow is pressed upward. If the elbow is rotated slightly, the tuberosities fail to move. With marked displacement, the arm appears to be at an abnormal angle, with the axis of the humeral shaft pointing medially. Any movement usually produces pain at the groove between the pectoralis and the deltoid near the coracoid. Dislocation of the shoulder is excluded by recognizing that the humeral head is still in place.16
With injuries at the elbow, the clinician must differentiate between fracture, dislocation, and sprain. If signs of the first two are not present, the diagnosis of exclusion—which must be given with caution—is sprain. History is usually of no help, so you must rely on the clinical examination.
Examination of the elbow is much easier if done early, before significant swelling impedes the exam. If there is swelling, try to reduce it by having the patient hold his or her arm down or by using an elastic bandage. When doing the exam, concentrate on the area where the swelling first appeared or where it remains after reducing it.
If the anatomical relationship of the olecranon and epicondyles and the radial head is normal, the elbow is not dislocated. So, begin by simultaneously holding the two epicondyles and the tip of the olecranon to determine if their relative positions are normal. At 90-degree flexion and viewed from the back (posteriorly), the three should look like an isosceles triangle—with the two equal sides being from the olecranon to the condyles. Next, palpate the radial head to determine its position.
If the exam shows no dislocation, and if the patient can cooperate, test to see what areas are painful. Grasping the elbow with one hand and the humeral shaft with the other, first press the two together and then sideways. Then, with your thumb and fingers on the epicondyles, check the distal humerus for abnormal mobility and trace the humeral shaft downward to determine its relation to the condyles. If a supracondylar fracture is suspected, confirm its presence by palpating the condyloid ridge for points of pain and irregularity.
Supracondylar fractures also have abnormal lateral mobility. If examined on an extended arm, abnormal adduction and abduction of the forearm can be demonstrated. Grasp the condyles firmly with one hand and the shaft with the other to demonstrate free mobility of one upon the other, usually with crepitus. Pressing upward with the hand under the flexed elbow causes pain. If the line of the fracture runs between the condyles (T-fracture), pressing the condyles together neither causes pain nor permits independent movement.17
If there is no evidence of a supracondylar fracture, press the condyles together and then hold each separately to check for pain or abnormal movement. If either moves independently, often with crepitus, a fracture is present. Local, regional, or general anesthesia may greatly facilitate this exam—for both the patient and the clinician.18
If there is any suspicion of pelvic fracture, clinicians should quickly apply a pelvic binder. Many trauma protocols require pelvic radiographs, because physical examinations for pelvic fractures are unreliable and can cause additional bleeding without providing additional vital clinical information.19,20 Yet, in situations of scarcity, access to imaging may be limited or nonexistent. The following information is helpful to determine which trauma patients need radiographs, transfer, or the maximal possible treatment. A clinically significant pelvic fracture will exist only if a trauma patient has at least one of the following findings: (a) Glasgow Coma Score <14, (b) complaint of pelvic pain, (c) pelvic tenderness on palpation, (d) distracting injury, or (e) clinical intoxication. One study found that if one or more of the previously listed criteria were present in adult patients after blunt trauma meeting Level 1 (serious) criteria, those patients had a 12% chance of having a significant fracture.21 After trauma, the presence of diastasis (separation) at the pubic symphysis on palpation suggests a fracture, whether or not the patient has pain.
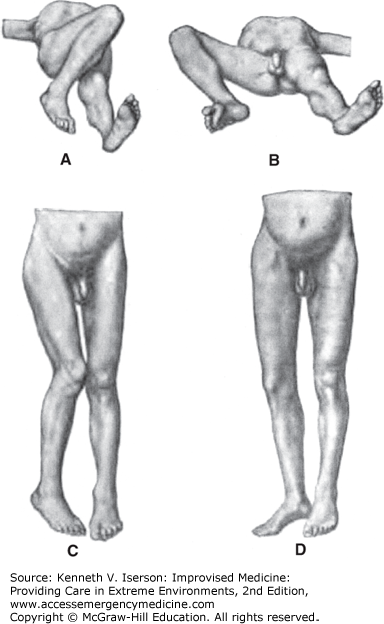
Because quick recognition and treatment of hip dislocations decreases long-term disability and the treatment may depend on the type of dislocation, rely on the patient’s clinical appearance to determine the type of dislocation (Figs. 32-2 and 32-3). Palpating the femoral head in the groin is also a common clue to the correct diagnosis. If there is severe pain in the hip without rotation, consider femoral neck fracture.
FIG. 32-2.
Anatomical appearance of different hip dislocations. (A) Anterior dislocation onto the ischium. (B) Anterior-central dislocation into the obturator foramen. (C) Posterior dislocation onto the ilium. (D) Anterosuperior dislocation onto the pubic rami. (Reproduced from Helferich.22)
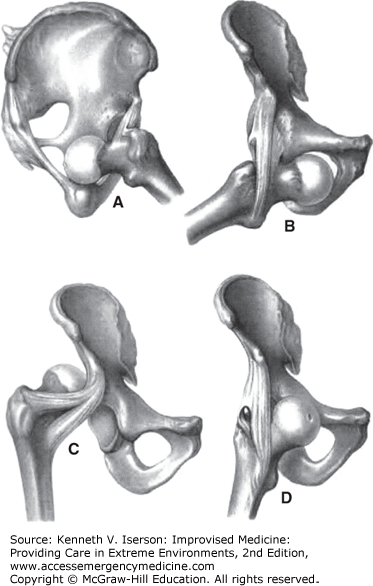
FIG. 32-3.
Clinical appearance of different hip dislocations. (A) Anterior dislocation onto the ischium. (B) Anterior-central dislocation into the obturator foramen. (C) Posterior dislocation onto the ilium. (D) Anterosuperior dislocation onto the pubic rami. (Reproduced from Helferich.23)
Unlike many other areas of orthopedics, patient history often plays a large role in the diagnosis of a hip fracture—especially in an elderly patient. As Helferich noted, “One should always think of the possibility of a fracture of the femoral neck when an old person, after a fall on the knee or side of the body, cannot stand up, and when the injured limb is shortened and rotated outward. In the diagnosis, contusions and dislocations of the hip and fractures of the pelvis have to be considered. It is hardly possible to mistake the injury for a dislocation (with outward rotation only a forward dislocation could be possible).”24 A confounder is that elderly hip fracture patients may complain about knee, rather than hip, pain.
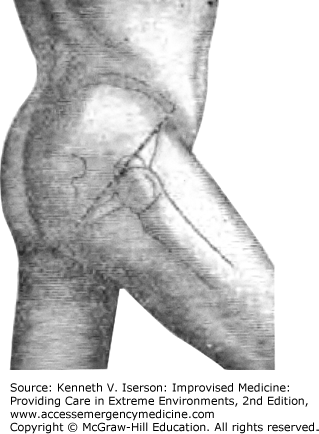
With hip fractures, normally, (a) the patient cannot lift his leg off the bed, (b) the leg is shortened to various extents (you may need to measure the limbs; see “Measuring Legs for Diagnosis,” below), (c) passive motion of the foot laterally and medially causes hip pain, (d) crepitus is felt unless the fracture is impacted or the fragments are widely separated, (e) the leg may be externally rotated, and (f) the greater trochanter can be felt above Nélaton’s line, an imaginary line from the anterior superior iliac spine to the ischial tuberosity (Fig. 32-4).24
Measuring limbs to detect a discrepancy between the two sides after an acute injury is a technique that has been lost over time. However, it is still useful, especially when imaging is not available and the clinician must rely solely on the physical examination to diagnose fractures and dislocations—of any extremity.
Regarding hip fractures, Stimson wrote that leg length discrepancy “may vary in extent from a small fraction of an inch to two or three inches.” It may occur immediately or “appear gradually or suddenly after the lapse of a few hours or days.” He added that it is vital “to have them form the same angle with the pelvis, that each is in the same position of extension and abduction.… The measurements are usually made between the anterior superior spine of the ileum and a malleolus.”26
This injury nearly always shows the typical signs of a fracture. It may, however, occasionally be confused with a large hematoma.
The Ottawa Ankle-Foot Rule, the Ottawa Knee Rule, and the Pittsburgh Knee [Decision] Rule (discussed next) are validated diagnostic criteria for two commonly injured joints. They are useful when radiographic imaging is present, but limited. If there is no imaging, the clinician must assume that patients who are “positive” using these rules have a fracture that they must treat with immobilization or by providing non-weight-bearing assistance with crutches or other devices.
These rules are for patients with blunt trauma, including twisting injuries, falls, and direct blows. They have not been validated in children <18 years old, pregnant women, or those with diminished ability to cooperate with the test (e.g., head injury, intoxication).27
The knee and ankle-foot rules all have nearly 100% sensitivity and are modestly specific.28,29 The Pittsburgh Knee [Decision] Rule is 99% sensitive and 60% specific for the diagnosis of knee fractures. Of patients in whom the rule indicated a fracture, 24% had a knee fracture. For patients in whom the rule suggested no fracture, 99.8% had no fracture. The Ottawa Knee Rule was 97% sensitive and 27% specific for knee fractures.30
There is a high suspicion of fracture (obtain an ankle radiograph, if available) if there is pain near a malleolus plus one of the following:
Bone tenderness at the posterior edge of the distal 6 cm or at the tip of either malleolus.
The patient could not bear weight for at least four steps immediately after the injury and still cannot at the time of evaluation.
There is a high suspicion of fracture (obtain a foot radiograph, if available) if there is pain in the mid-foot plus one of the following:
Bone tenderness at the navicular or at the base of the fifth metatarsal.
The patient could not bear weight for at least four steps immediately after the injury and still cannot at the time of evaluation.
A knee radiograph is required only if a knee injury patient has one of the following31:
Age >55 years
Isolated tenderness of the patella
Tenderness at the head of the fibula
Inability to flex to 90 degrees
Inability to walk four weight-bearing steps immediately after the injury and at the time of the evaluation
A patient with a knee injury following blunt trauma or a fall needs a radiograph only if they have either32:
Age <12 years or >50 years, or
Inability to walk four weight-bearing steps at the time of the evaluation
Because the tibia is subcutaneous for much of its length, the clinician can diagnose fractures of the tibial spine by palpating the entire shin.
REDUCTION AND TREATMENT OF FRACTURES AND DISLOCATIONS
As with all procedures in this book, the techniques described for fracture and dislocation reduction and treatment are for use only by medically trained personnel who are in wilderness, isolated, developing world, or disaster settings in which more expert help, the normal equipment, or another needed resource is not available. In these settings, treating fractures and dislocations is often complicated because radiographs are not available.
The three goals of fracture treatment are:
Reposition bone fragments: Correct any bone angulation and pull the limb out to length, especially when there are no pulses below the site of the injury or when the patient must be moved and the limb’s position will interfere with that effort. The best time to undertake a dislocation reduction is immediately after the injury, when there is minimal muscle spasm and resistance. Try to minimize pain during this process by using local, regional, or general sedation/anesthesia. (See Chapters 15, 16 and 17.)
Immobilize the fragments: Keep the limb at length if required (traction) and immobilize it while the bone heals.
Restore function: This requires evaluating the limb’s (and the patient’s) neurovascular status before and after any manipulation.
In resource-poor settings, the closest x-ray machine may be located hours away; often radiographs are not available at all. In such cases, you will have to rely on physical signs (such as remeasuring limbs, see below) to achieve the treatment goals listed above.
As Husum and colleagues wrote, battlefield fracture management means
Immediate reduction! Every fracture, open as well as closed, should be reduced as soon as possible after injury.… Early fracture reduction improves the local circulation, reduces pain and improves the general condition. During the first 1–2 minutes after the injury, manipulation of the fracture is less painful, and any fracture may be aligned without anesthesia. Reduction more than two minutes after the time of injury, should be done with local anesthesia (10–20 mL lidocaine injected into the fracture hematomas; or low-dose IV ketamine anesthesia).33
After any attempted fracture reduction where shortening of the extremity has occurred, remeasure the two extremities after reduction. Generally, if the shortening continues to be >0.5 inches, reduction is unsatisfactory: Either the fragments have not been restored to their normal position or the muscles have distracted them again. At that point, make another attempt to reduce the fracture under better anesthesia or, if that fails, splint to await additional intervention—which may include surgery.34
For open fractures, the first step is to control bleeding. Direct pressure on soft-tissue bleeding sites usually works best. If absolutely necessary, a tourniquet can be used (see Chapter 24).
Irrigate the wound extensively: Use at least 5 to 10 L of fluid for the typical open fracture. Use the cleanest fluid possible. Tap water works well if the water supply is relatively clean (i.e., can be used for drinking). If not, boil and cool the water first. Prepackaged sterile fluids are not necessary. Because dilute iodine solution is useful for wound irrigation in open fractures, adding a single povidone-iodine pad to each liter of water is thought to provide the equivalent antibacterial efficacy; however, this has not been proven.35,36
A continuous fracture irrigation system (that may also be used, if desired, for continuous antibiotic instillation into a wound) can be improvised using any closed drainage system. The most commonly available, other than intravenous (IV) systems, is a urethral catheter drainage system: Just insert a small-gauge urethral catheter into the wound and hang the drainage bag to drip in fluids for irrigation.
After cleaning the wound, reduce the fracture as well as possible, and put the bone beneath the skin. Do this either by extending the limb or by pulling the skin aside with the fingers, with the handle of a metal spoon, the blunt end of a tweezers (“pickup”), or a similar firm instrument.37 Experience shows that these methods work well to lift skin over extruding segments of bone in an open fracture. “If these measures do not succeed, the skin may be slit open freely … Enlarging the opening does not generally complicate the case—sometimes it is even advantageous.”37
Do not close the wound in an open fracture. Pack it open with gauze; soak the gauze in a dilute iodine solution, if available. Change the packing at least twice a day and do not let the wound close until there is no sign of infection and there is good granulation tissue. Then, allow the wound to close by secondary intent—bottom-up and inside-to-outside without the skin closing over the wound, until it fills in with granulation tissue.
If available, give antibiotics, immobilize the limb using plaster or traction, and begin rehabilitation as soon as practicable.
Anterior shoulder dislocations are common. Clinicians need a “bag of tricks” to reduce these deformities, because any single method does not seem to work in every case. Especially in austere circumstances, methods that do not require sedation are helpful. When analgesia is needed, consider using hypnosis or intra-articular injections, both of which have worked well for joint reductions (see also Chapter 15).38,39 Reduction methods include:
Biceps massage: Simply massaging the biceps may reduce the shoulder dislocation. If not, this technique usefully augments any of the other methods.
Stimson’s method: The shoulder reduction technique first described by Stimson in 1900 may be the easiest one to use in the midst of multiple casualties or limited resources. With the patient prone, extend the affected arm vertically from the examination table. Attach a 10- to 15-lb weight to the wrist and allow it to hang there for approximately 6 to 20 minutes to achieve reduction. Stimson used a cot with a hole in it for the patient’s arm to go through or “two tables placed end to end, so that the body would rest on one and the head on the other, the arm hanging down between.”40
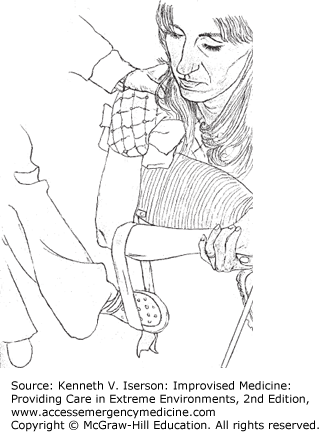
Snowbird traction: The easier and faster Snowbird traction technique is done while the patient sits facing the back of an armless chair, with the affected arm draped over the back. A special chair is unnecessary.41 Place a pad under the axilla and flex the elbow to 90 degrees. Drape a stockinet or cloth loop over the proximal forearm and let it hang to the floor. Using the chair back as counter-traction, the clinician should place his foot in the loop and apply a firm, steady downward traction. This way, his hands are free to apply pressure or to rotate the arm, as needed (Fig. 32-5). This method has been reported to be successful in 97% of cases without complications; >90% can be done without sedation or narcotic analgesia.42 Alternatively, have the cooperative patient keep his arm straight while the clinician (with strong arms and a good back) applies traction in line with the arm. As the muscles relax, have the patient stand; this increases the traction.41,43
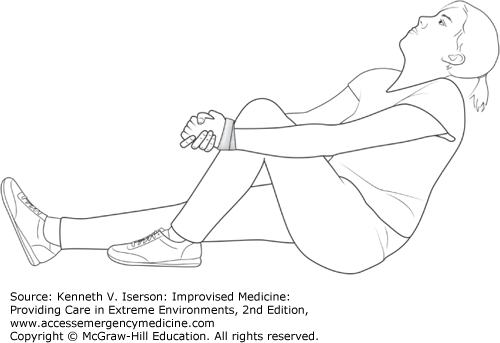
Boss-Holzach-Matter autoreduction: This method allows the patient to reduce his or her own anterior shoulder dislocation.44 The patient sits on a hard surface, clasping the hands (which are often tied together) around the flexed knee ipsilateral to the shoulder injury. The patient leans back and hyperextends the neck. This exerts anterior axial traction on the humeral head. Instruct the patient to perform an anterior shoulder shrug, increasing anteversion of the glenoid cavity and facilitating relocation (Fig. 32-6).45
Milch technique: Cooper first described the Milch technique in 1825. With the patient supine, the clinician abducts the affected arm while simultaneously applying pressure to the humeral head. External rotation and traction are applied when the arm is fully abducted, that is, straight “up” so that the arm is in line with the body. Few patients require sedation or analgesia for this procedure.46,47
Hippocratic method: This method of shoulder reduction is very old and some have suggested that the method is dangerous, because it can cause nerve damage to the axilla. However, recent studies show that the Hippocratic method may actually be safe, although it often requires sedation or significant analgesia to be successful. Place the patient supine, and put traction on the patient’s hand and forearm while an assistant provides counter-traction at the axilla with a sling. Pull the arm along its axis in approximately 30 degrees of abduction to move the humeral head from its dislocated position into apposition with the rest of the joint.48
Scapular manipulation: The scapular manipulation/rotation method, often used along with other methods, supposedly has a success rate of >90% when used alone, although that presumes significant relaxation. With the patient sitting, have an assistant hold the affected arm straight out from the patient with the palm up (the patient’s shoulder should be flexed to an angle of 90 degrees), while resting his other hand on the patient’s ipsilateral clavicle. This applies gentle traction. The clinician then pushes the tip of the scapula medially and upward while pushing the superior part of the scapula laterally. A palpable “clunk” confirms reduction. The patient can also be positioned prone, with the arm dangling, while an assistant maintains gentle traction with the hand in supination.49
External rotation/Kocher maneuver: This external rotation maneuver is a modification of the Kocher maneuver. It can be performed in any position with the assistance of only one person or by the patient. If the patient is very cooperative, he or she can sit and allow the muscles to relax. Then, flex the elbow at a 90-degree angle, stabilize it against the trunk, and, slowly, externally rotate the arm at intervals. This allows time for any muscle spasms to subside. Most dislocations are reduced after about 5 minutes of external rotation.50
Both open and closed supracondylar fractures can be successfully treated with traction and splinting. As Stimson wrote.
In the higher fractures in adults and the late lateral angular deviation in the low ones in children, the overriding can be corrected by traction, preferably with the elbow at a right angle, and its recurrence effectively opposed by anterior and posterior molded splints, or a plaster encasement, aided sometimes by a weight attached to the forearm close by the elbow, with the wrist supported by a sling. In the low form in children.… even very marked deformity disappears rapidly in the young by absorption of projecting bone and the filling up of hollows, and functional limitations are rarely caused by it. In compound [open] fractures, I always use vertical suspension of the limb for about a fortnight [two weeks] unless the wound heals sooner. It is of great value in controlling reaction as well as preventing gross displacements; minor adjustments can still be made after the wound has healed or has become unimportant.51
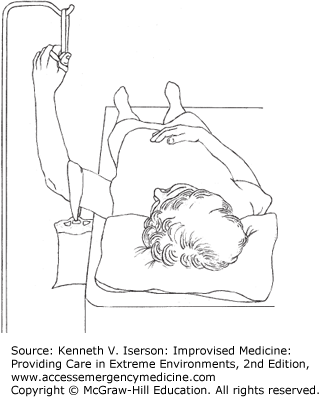
A Colles’ (or similar) fracture can be reduced by suspending the arm. A hematoma block (see Chapter 15) helps relieve discomfort. Make a finger trap by forming a girth hitch with bandage material, cloth, or thick rope (Figs. 32-7 and 32-8). Loop these around the thumb and index finger, or the index and long fingers, and suspend the material from a hook or an IV pole. Traditional Chinese finger traps used as toys also work well to hold fingers aloft. Usually made of folded paper, they may not be good for more than a few patients before they need to be replaced.52 Do not use string, wire, or anything else that might compromise circulation to the fingers, even when you are not using any added weight to assist fracture reduction. Suspend 2.3 to 4.5 kg (1 to 2 lbs) from a padded cloth at the proximal forearm to speed the reduction. After 20 to 30 minutes, return and make any necessary minor adjustments. To make life simple, keep the arm suspended while the splint or cast is applied.
Related posts:


Stay updated, free articles. Join our Telegram channel

Full access? Get Clinical Tree


