AVAILABILITY AND IMPROVISATION
Be prepared to improvise even the most basic medical equipment. In developing countries and other resource-poor settings, even some of the largest medical facilities lack equipment and materials considered standard elsewhere.1 Louis Pasteur reportedly said, “Chance favors the prepared mind.” This book supplies ideas about how to make-do when faced with shortages. Problem-solving skills will take you the rest of the way.
“When improvising medical equipment, consider whether it (a) Will accomplish the purpose for which it is intended? (b) Is practical? and (c) May cause an accident or increase danger to the patient or clinician?”2
FACILITIES
Health care resources, whether purchased, donated, or improvised, should be matched to the skills of the practitioners and the type of facility in which they are to be used. Table 5-1 describes the spectrum of health care facilities worldwide and is the basis for the “Essentials” tables in this chapter (Table 5-2) and elsewhere in the book.
| Basic | Village health posts Clinics with nurses or medical assistants Clinics with doctors |
| General Practitioner Hospital | General practitioner-staffed hospitals General practitioner-staffed with surgical capabilities |
| Specialty Hospital | Hospitals with general surgeons Hospitals with general and orthopedic surgeons Hospitals with general and orthopedic surgeons and other specialties |
| Tertiary Hospital | Tertiary care facilities with limited range of specialties Tertiary care facilities with full range of specialties |
| Facility Level | ||||
|---|---|---|---|---|
| Resources/Capabilities | Basic | GP | Specialist | Tertiary |
| Stethoscope | E | E | E | E |
| Blood pressure cuff | E | E | E | E |
| Flashlight (torch) | E | E | E | E |
| Thermometer | E | E | E | E |
| Fetal stethoscope | D | E | E | E |
| Urinary catheter and collection bag | D | E | E | E |
| Otoscope | D | E | E | E |
| Ophthalmoscope | D | D | E | E |
| Pediatric length–based tape (Broselow) | D | D | D | D |
| Electronic cardiac monitoring | I | D | D | D |
| Central venous pressure monitoring | I | D | D | D |
| Right heart catheterization | I | I | D | D |
| Intracranial pressure monitoring | I | I | D | D |
Given the rustic clinical facilities in resource-poor environments, basic ethical standards of privacy and even confidentiality may be compromised. Little or nothing provides privacy between adjacent patients in the clinic and other inpatient settings when they relate their medical histories or undergo physical examinations and procedures. However, with a little effort, sheets, blankets, and makeshift dividers can be used to provide some privacy.
Any available site may be used to provide immediate health care when local facilities are overwhelmed. Generally, these will be buildings of convenience. Optimally, especially in regions prone to repeated disasters, planners will select such buildings in advance and assign them a specific use (ambulatory care, hospital or nursing home overflow, minor acute hospitalization). Control (who runs and is responsible for it) and funding (who pays) for the facility, as well as the required supplies and equipment, should be predetermined. In most cases, a contingency contract with the building’s owners will be necessary.
The following elements are necessary for any health care facility to function. They may need to be improvised at alternative sites and even at regular health care facilities in disaster or austere situations.
Making the public aware of the availability of a makeshift medical facility is an often overlooked task. Workers assume that once they have set up shop, people will know where they are located. Not true! If possible, make easily visible signs with identifiable symbols (e.g., Red Cross, Red Crescent, Mogen David Adom, or Disaster Medical Assistance Team [DMAT]). Also, ask patients and others who visit the site to spread the word.
If the facility you use has stairs at the entryway or inside the building between patient care areas, build ramps so that non-ambulatory patients and those with difficulty walking have easy access.
When elevators are not functional, use pulley systems to help get stretchers up ramps with steep inclines. Such pulley systems, similar to search and rescue haul systems, can be set up and operated by fire departments or rescue teams.
Health care facilities must have ambient lighting and specialized task lighting for workers to perform examinations and procedures. Because electrical power may be limited or nonexistent, you may need to improvise.
Sunlight (or even a bright moon) can provide excellent general lighting. During the US Civil War, for example, surgeons often performed operations outside. This provided them with much better light than they could get inside the hospital tent. It also was safer, because there was no need to have an open flame that could ignite the flammable anesthetic they were using.4
When using sunlight for illumination, it helps to know how much time you have until sunset. Hold your palm out flat toward the Western horizon. One fingerbreadth from the horizon to the bottom of the sun = 15 minutes until the sun sets.
Powerful illumination is, of course, necessary in the operating room (OR). It is also needed for many diagnostic and therapeutic procedures, including intra-oral and gynecological procedures. Even at major medical centers during normal conditions, extra light may be needed. Carrying a powerful, small, battery-powered, and hands-free headlamp literally “saves the day” by providing sufficient light to examine patients and do procedures when the power fails or the existing light is insufficient.5
When choosing a headlamp, check the brightness and the focus at the distance you will need to perform procedures. Also, be sure it is comfortable to wear for several hours (or an entire shift) and that you can get extra batteries for it. (Rechargeable batteries are useless if the power is out.)
Very small flashlights, such as the penlights that health care professionals commonly carry, can be tucked into an elastic athletic headband or an elastic bandage wrapped around the head to make a headlamp. Laryngoscopes have been used for light when ORs unexpectedly lost power.
Solar-powered garden lights work well as room lighting (if charged). They last for several hours and work best if put into an empty 2-L soda bottle (with a hole cut in the side). They can be carried around, and the plastic helps diffuse the light, like luminarias (paper bags half-filled with sand in which a candle sits). Just remember to put them in the sun to recharge. Another option is to put a glow stick (like divers use) into a clear plastic container with a gallon of water. The water diffuses the light, which can illuminate a small space for a short time period.
One group successfully used an automobile headlamp as a light for the OR. They wrote that
The halogen headlamp is preferable to an incandescent lamp because of greater light intensity. A 12-volt automobile battery serves as the power source.… A disadvantage is the periodic need to recharge the battery. The battery may remain in a vehicle (a mobile eye unit’s Land Rover, operating on a 12-volt electrical system, for example) and a constant charge maintained with the engine running. The battery leads for the operating lamp are passed into the operating theatre through a window. The halogen lamp is affixed with a small metal hinge to a 10 × 20 × 2 cm section of wood with 4 drilled holes, one in each corner. Sturdy cord passed through these holes and to an IV pole will attach and elevate the lamp above the surgical field for an excellent surgical light source. The portable operating theatre light may be used as a back-up light source for eye surgery in communities where power shortages are frequent. It is also reliable for mobile eye work and surgery in rural areas where electricity is unavailable.6
You may need to make a fire for light. More commonly, you can use one or more candles. For a short burst of light (or as a fire starter), petrolatum (Xeroform) gauze works well, as does an alcohol swab. The swab’s flame lasts only seconds, but is especially useful for warming ENT mirrors. Always be careful when using open flames because there is always danger of igniting nearby objects (such as clothing) or combustible gases.
To make medical records and radiographs more accessible and less likely to “walk away,” tie them to the end of the patient’s bed or chair. Alternatively, place radiographs and the patient’s bedside chart (containing vital signs and intake/output) in a holder made from cloth or old x-ray film and taped to the head of the bed or wall.
If no other method is available, especially when there are large numbers of patients during a disaster or when transferring patients to another medical unit or facility, clip or pin patients’ records and imaging studies to their clothing.
The ability to keep laboratory reagents and medications cool is usually taken for granted. When there is no power, some type of system must be devised to keep them cool. It is important to remember that refrigeration is vital for vaccines, as well as for some other medications (e.g., epoetin alfa, total parenteral nutrition, some antibiotic intravenous [IV] solutions, and suppositories). Four types of refrigeration units can be improvised. Note that storing blood requires a relatively constant temperature of 4°C: This cannot be achieved using the methods mentioned below.
If you have electricity, but not a standard refrigerator, try to find an alternative. The best way to store refrigerated medical supplies is in a unit with a transparent door so that the contents are visible. Other than laboratory refrigerators, only commercial-product refrigerators, such as those used to dispense soda pop and cold water, have these. Some hospitals have appropriated them for use when necessary. Of course, they put a lock on them to avoid pilferage.
To make an “icebox,” use a 5- or 10-gallon can or jar with a cover.7 Place it in the center of a wooden box or barrel. Surround the can with chopped ice mixed with sawdust, bran, flaxseed, hay, straw, or similar material. Cover the entire box with newspapers or an old raincoat, robe, or quilt. Place the material to be cooled in the can. Do not let it remain uncovered for long when you retrieve the contents.
Alternatively, you can make an “in-ground” icebox. Dig a hole in the ground big enough for a large sealed can or jar plus a 1-foot space between the can and the sides of the hole. Put the can in the center and pack cakes of ice (as big as will fit) around it. Pack crevices with sawdust, leaving a generous covering on top of the ice. Put on another covering of hay or straw, followed by a thick layer of heavy mud. Leave about 8 inches of the container above ground for easy access; cover this part to protect it from the sun. Place the articles inside the can to cool. Take special care to close the cover tightly after opening the icebox.
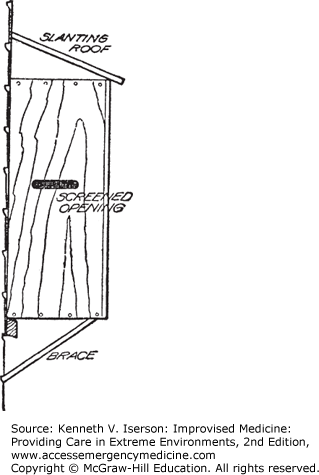
During cold weather, a “cold box” built into a window will keep items cold. Fit a wooden or metal box to the outside of a window with a vertical sash (the pane slides up). Raise the window to access the cold box. This still allows light to enter the upper half of the window. Extend the windowsill with a shelf supported by brackets. The cold box rests on the windowsill and the extended shelf, and is fastened to the window casing by screws or nails near the top and bottom of each side of the box. The box should have a sloping top to shed rain. Cut holes for ventilation in the ends of the box and cover with screen. Shelves in the box may be made of heavy screening, poultry netting, or wood. They rest on cleats fastened to the sides of the box (Fig. 5-1). Cover anything placed in the box to protect it from dust.7
This iceless refrigerator is excellent for high-temperature, low-humidity conditions. It costs little to build and nothing to operate. Make a wooden frame 42 × 16 × 14 inches and cover it with screen wire, preferably rust-resistant. It should have a solid floor, but cover the top with wire screening. Attach the door with brass hinges and fit tightly; fasten it with a wooden latch. Wooden shelves or sheets of galvanized metal rest on side braces that can be spaced as needed. Place a 14 × 16-inch baking pan on the top and rest the frame in a 17 × 18-inch pan. Paint the wood, the shelves, and the pans with two coats of white paint and one or two coats of white enamel. Also paint the wire screen to prevent rusting.7
Make a cover of flannel, burlap, or canvas to fit the frame; this requires about 3 yards of material. If flannel is used, put its smooth side out. Secure this cover around the top of the frame and down the two sides and back using buttons, hooks and eyes, safety pins, or similar easy-to-remove methods. On the front, arrange the hooks on the top of the door, instead of on the frame, and fasten the cover along the latch side of the door, allowing a wide hem of the material to overlap where the door closes. This allows the door to be opened without unbuttoning the cover. The bottom of the cover should extend down into the lower pan. Sew four double strips, which taper to 8 or 10 inches wide, to the upper part of the cover. These strips form wicks for the water to drip down the sides from the upper pan (Fig. 5-2).
FIG. 5-2.
Completed iceless refrigerator showing fitted canvas covering. (Reproduced with permission from United States Bureau of Agriculture.7)

Lowering the temperature inside the refrigerator depends on the evaporation of water. Keep the upper pan filled with water. The water is drawn by capillary attraction through the wicks and drips onto the cover, saturating it. Capillary action starts more readily if the cover is dampened with water. The greater the rate of evaporation, the lower the temperature; therefore, the refrigerator works best with rapid evaporation. Place the refrigerator in a shady spot with a strong, preferably warm and dry, breeze. Evaporation takes place continuously, and the temperature inside the refrigerator may get as low as 50°F under ideal conditions. It works less well in damp or cool conditions. Clean and dry the refrigerator regularly. If possible, make a second cover, so the first can be removed for cleaning and thoroughly dried.
Sagging mattresses and poor bedsprings are a universal problem in health care facilities, as well as in other sleeping accommodations. To fix this, place two smooth boards across the bed, between the mattress and the springs. Place the first about one-third of the way down from the head and the other one-third of the way up from the foot.8 You can also put one big piece of plywood under the entire mattress, if you have lots of wood.
If available, plastic trash bags of any decent thickness work well as mattress protectors—as well as shelters, rain catchers, ponchos, and boot liners. They also can double as personal protective equipment (PPE), especially gowns (see the “Gowns, Gloves, Masks, Booties, and Goggles” section below), protective covers over tables and chairs being used for medical treatment, and various first aid wraps and slings. Even if rubber, plastic, or similar impermeable materials are not available, patient mattresses can be protected from soiling. Use heavy paper such as butcher’s paper or newspapers stapled together (about 10 layers thick) to protect the mattress. Smooth them out, if necessary, by sewing or stapling them to heavy cloth, which may be tucked under the mattress.8 Pieces of old raincoats, tents, or tarps can also be used.9
Heating a patient’s bed or sleeping bag when the external temperature is low makes them feel better and may stave off hypothermia. Just remember to wrap hot objects to avoid burning the patient. Heat bricks or smooth stones, wrap in newspapers or old cloth, and place them in the bed. Sand, salt, sawdust, bran, oats, or wheat can be heated and then placed in bags, or just placed in bags or old cotton socks and then heated. (Turn filled bags frequently so they don’t burn.) You can also make “hot-water bottles” using plastic bottles or bags, canteens, or similar items filled with hot water.10,11
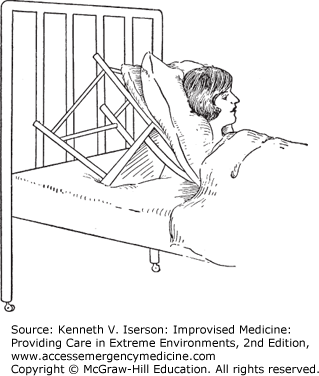
On basic beds and stretchers, the head end cannot be raised. To elevate a patient’s head, use a chair placed with its legs against the headboard and the seat facing the mattress. Pad it by putting pillows under the patient’s head (Fig. 5-3).
Making a comfortable improvised pillow is difficult. Generally, after a few hours, what initially seemed like a fluffy pillow substitute is rock hard. Reportedly successful options include stuffing a clothes or laundry bag or stuff sac with clothing, especially anything made of fleece. Or, wrap clothes or a water bottle (already hard) in a fleece jacket. Carry rubber bands to try to keep it shaped. Better yet, use an inflatable airplane pillow or neck rest.
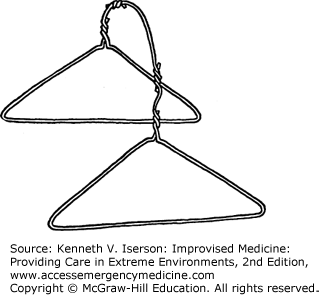
Make cradles to support bedsheets over sensitive areas, such as for burn patients, by tying two or more wire hangers together. Put the ends of the hangers under the mattress or other support (Fig. 5-4). (See also Fig. 25-13.) Use several supports, depending on the length needed. Another method is to string wire or twine the length of the bed above the patient and hang the sheet over the wire(s) (Fig. 5-5).12
Construct temporary tables for meals by placing a board, supported on both ends by chairs, across the patient. Alternatively, use piles of books to support the corners of a square piece of wood or metal.9
To screen one patient from another in multi-bed rooms, including in the emergency department, tape together bed sheets or newspapers and suspend them from string or wire, or from hooks in the ceiling. For more substantial and portable screens, make two or three lightweight wood frames that are tall enough to provide privacy (at least 6 feet). Each should be about 3 feet wide. Put three hinges between the frames, one set going each way. Stretch a sheet or piece of cloth across the frames, and nail or staple it in place. When using this screen, angle the pieces slightly at the points where they are hinged, to give it stability. If desired, put small wheels on the bottom so that it can be moved.
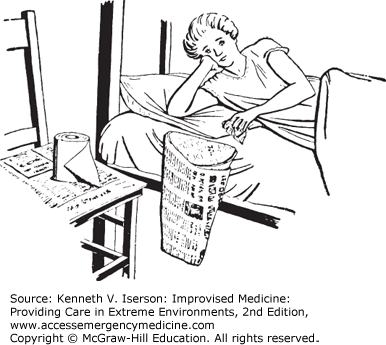
A “newspaper bag” pinned to the bedside will hold refuse and tissues. Fold a newspaper into a basket, with or without staples or adhesive, and attach it to the side of the patient’s bed using safety pins or clothespins (Fig. 5-6).13
To improvise a bedpan, place a board (for the patient to sit on) across one end of a wide baking pan.14 At the Nakom Paton Japanese prison camp during World War II, allied medical personnel made bedpans from giant bamboo.15 One disaster team lined bedpans with plastic bags that, after use, were tied closed and put into a large red biohazard bag. The waste was incinerated on a daily basis.5
The camp toilet for the same disaster team was a bucket lined with plastic. It had a padded toilet seat attached. Each team member was responsible for removing their bag and depositing it in the larger biohazard bag.5
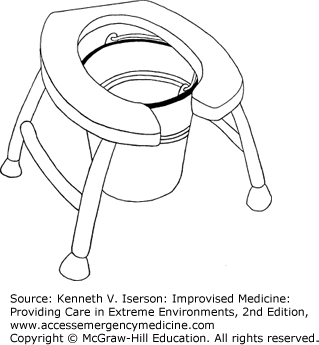
A bedside commode or toilet also can be fashioned by cutting a hole in the seat of an old kitchen chair and then putting padding and a plastic cover on it. Place the chair over a bucket at the patient’s bedside. To hide the bucket, tack a piece of heavy cloth around the chair legs (Fig. 5-7). Similarly, you can put wheels on the legs of a chair that has a hole cut into the seat, and use it over a standard toilet or a bucket. This can also double as a wheelchair to take a non-ambulatory patient to the bathroom (Fig. 5-8).16 Attaching legs to a standard toilet seat or to a padded piece of wood with a hole cut into it works, either over a bucket or as a movable seat over a pit latrine (Fig. 5-9).


As every trucker knows, any waterproof container can be used as a urinal. For patients, a plastic bottle or carton, cut such that the diameter of the container’s mouth is at least 2 inches (5 cm), serves as an adequate urinal. One nurse described a very usable urinal made from a bleach bottle with a large oval hole cut out opposite the bottle’s large handle.17
Construct an infant urine bag from a small plastic sandwich bag, several pieces of tape, and a small straw or piece of IV tubing. Use waxed paper to store it until needed. To make this urine bag (Fig. 5-10), follow these directions18:
Make a hole in the plastic sandwich bag using radial cuts (A). The hole should be about the size of a small child’s penis for a boy or, for a girl, large enough for the urethral opening.
With the holes lined up, attach a piece of adhesive tape with the same-size hole (B) (adhesive side out) to the outside of the bag with two smaller pieces of tape.
Insert the straw or a small piece of IV tubing into the bag, and fold the top piece of tape over the top of the bag to seal it closed (C). Fold the radial cuts out and stick them to the adhesive tape.
Then, take a smaller piece of adhesive with a slightly smaller hole (D), line the holes up, place it adhesive-to-adhesive, and fold its sides inward to form a smooth opening (E).
Cover the bag’s exposed adhesive piece with wax paper if it is not being used immediately. Multiple bags can be made at one time and stored. They can also be sterilized using ultraviolet irradiation, such as is available in most laboratories and ORs.
FIG. 5-10.
Related posts:


Stay updated, free articles. Join our Telegram channel

Full access? Get Clinical Tree


