BASIC AIRWAY MANAGEMENT
Establishing or maintaining a patent airway is one of the most fundamental lifesaving skills. Clinicians must be able to secure an airway regardless of the circumstances, that is, with limited or unusual equipment. Depending on a single technique or device is potentially dangerous for the patient.1
It is much better to prevent aspiration than to treat it. When there is concern about a patient maintaining his airway, especially if there are copious secretions or vomitus, place the patient in the “rescue” or “recovery” position—on his side with his face aimed toward the bed to prevent aspiration. If possible, also raise the foot of the bed so that the patient is in the head-down position.
Even patients with extensive and penetrating facial injuries may not need endotracheal intubation if they are put into the recovery position.2
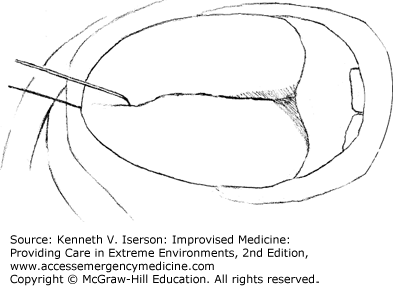
If the individual has a suspected cervical spine injury, use the High Arm IN Endangered Spine (HAINES) position (Fig. 8-1). This differs from the recovery position in that the dependant upper limb is fully abducted and lies under the head, where it reduces lateral neck flexion, and both lower limbs are flexed at the hip and the knee, resulting in one lying on top of the other, possibly reducing torque on the thoracolumbar spine. A single rescuer can easily put a patient in the HAINES position.3

Perhaps the easiest method to maintain an open airway is to simply push the chin up. For somnolent and sedated patients, this is often all that is needed to keep the airway patent. If a cervical spine injury is suspected, push the jaw forward from the mandibular angles.
Head turn is a simple, but rarely used, procedure to open an airway. In patients with significant amounts of redundant tissue in the pharynx and hypopharynx (and no history of possible acute cervical spine injury), simply turn the head to one side to improve airflow.1
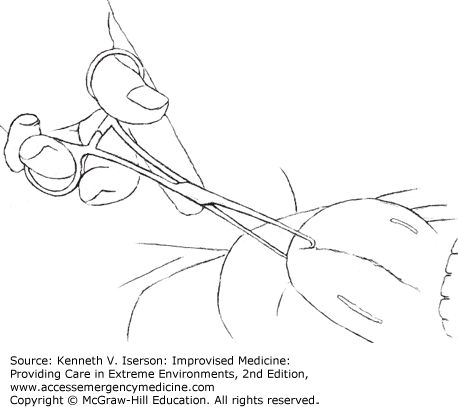
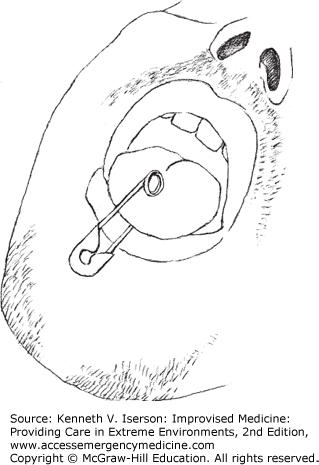
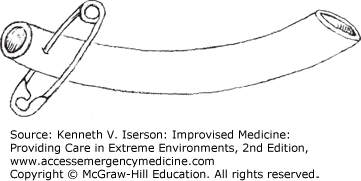
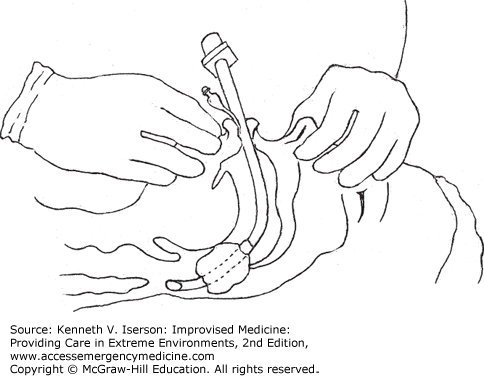
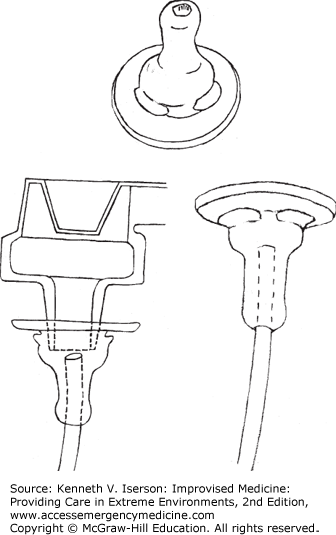
If the patient’s tongue still blocks the airway after positioning the head, or if the head cannot be repositioned because of a suspected cervical spine injury, grasp the tongue with gauze and pull it forward. This is a temporizing measure only. For better control over longer periods, put a heavy (~2-0) suture or a wire or suture substitute (such as fishing line) vertically through the tip of the tongue in the midline (Fig. 8-2). Placing it anterior and midline avoids significant bleeding. An assistant can hold the suture or it can be passed through the skin of the lower lip and then tied.4 A towel clip (Fig. 8-3) or a safety pin (Fig. 8-4) can also be placed vertically in the midline to hold the tongue. Do not use a clamp or forceps that “may in the excitement of the moment be so firmly applied as to nip a piece out of the tongue.”5 Physicians, surgeons, and anesthetists have used these methods since at least the 19th century without complication.6
If the mouth is clenched and the patient needs to be ventilated, first ventilate through the nose. Try to open the mouth by putting pressure on the temporomandibular joints. If neuromuscular blockers are available and you are comfortable with your advanced airway skills, use them to relax the jaw.
If the patient is apneic with a clenched jaw, press your fingers between his teeth and gums, behind the last molars. This will usually open the jaw wide enough to pass a laryngoscope or to place an airway.
A nasal airway, or “trumpet,” is one of the most useful pieces of airway equipment. However, for some reason, clinicians rarely use it, even though it is easy to improvise.
To make a nasal airway, use any soft piece of rubber tubing that is the appropriate size for the patient’s nose and put a safety pin through the end so that it cannot disappear down their nose (Fig. 8-5). Most adults do well if the length of the tube beyond the safety pin equals the length from their nares to the meatus of their ear (4.5 to 5 inches; 11.5 to 13 cm). This device has been termed a “Goldman’s nasopharyngeal airway.”7 The Goldman’s airway can be made to fit any nose. Some clinicians cut an uncuffed endotracheal tube (ETT) to size. It can be sutured to the nasal septum (midline between the cartilage and skin) to keep it in place.1
If one nasal airway works, two may sometimes work better. Consider using a “binasal airway”—you need only an extra piece of tubing and a second safety pin or suture. When placing a nasal airway, lubricate it well and pass it along the floor of the nose (straight back, not cephalad).
EVALUATE FOR DIFFICULT INTUBATIONS
Total laryngectomy patients cannot be ventilated through their mouths; they are obligate neck breathers and usually have no tube in their stoma. Airway assessment and control and supplementary oxygenation must be done through the stoma. If it is unclear whether the patient is an obligate neck breather, place supplemental oxygen over both the face and the neck. Use a tracheostomy mask or a pediatric face mask placed over the stoma. Assess stomal and tracheal patency by passing a suction catheter into the trachea and, if patent, use it to suction the patient. If the suction catheter cannot be passed, deflate any tube cuffs and remove a laryngectomy tube, if present. Oxygenate through the stoma and ventilate using a pediatric face mask or with mouth-to-stoma ventilation. To intubate, use a 6-mm ETT through the stoma. If necessary, pass it over a bougie or fiberoptic scope. (Algorithms for treatment can be found at http://www.tracheostomy.org.uk/.) Use a tracheostomy mask or a pediatric face mask placed over the stoma to deliver nebulized drugs to patients with a total laryngectomy. After giving the medications, wash and dry the skin surrounding the stoma to prevent skin reactions.8
When intubating children, the two key elements are (a) using the laryngoscope correctly and (b) correctly estimating the ETT size.
No matter what type of laryngoscope is used, the most common reason practitioners cannot intubate a child is that they advance the laryngoscope too far. If the laryngoscope does not immediately produce a view of the cords, keep looking into the larynx and slowly back the laryngoscope out. The epiglottis usually pops into view.
For pediatric intubations, you need to have the correct ETT size. Because cuffed tubes are now being used for most children and for infants other than neonates (and even for some neonates), many of the older formulas for uncuffed tubes do not work. See Table 8-1 for the standard and formula-calculated sizes for cuffed and uncuffed pediatric ETTs. The size of a cuffed tube will be smaller than an uncuffed tube, because only the balloon, not the tube itself, needs to occlude the airway. Keep cuff inflation pressure <20 cm H2O to avoid tracheal necrosis.
| Age (years) | Weight Using “Simple” Method (kg) | Tube Internal Diameter (mm) | ||||
|---|---|---|---|---|---|---|
| Uncuffed Tubes | Cuffed Tubes | |||||
| Standard | Formula #1 | Formula #2 | Standard | Formula #3 | ||
| Newborn | 3.0 | 4.5 | — | 3.0 | 3.0 | |
| 1 | 10 | 3.5-4.0 | 4.5 | — | 3.5 | 3.0 |
| 2 | 4.5 | 5.0 | 4.5 | 4.0 | 3.5 | |
| 5 | 20 | 5.5 | 5.0 | 5.0 | 4.0 | |
| 10 | 30 | 6.0 | 7.0 | 6.5 | 6.0 | 5.5 |
| 10-15 | 6.0-7.5 | 5.5-8.0 | 6.5-7.5 | 6.5-7.0 | 5.5-7.0 | |
The ETT should be inserted to a distance (in centimeters) equal to (10 + age in years) or (3 × ETT size) at the lips. Table 8-2 gives the placement for newborns.
Adults have anatomical, physiological, and situational issues that may complicate intubation (Table 8-3). However, improvised solutions are available, as described later.
|
Most intubations won’t be dramatic. However, patients may be in a variety of unusual positions, especially in out-of-hospital situations. Knowing some alternative positions to use for intubation can lessen the stress.9
Obesity alone predicts that ventilating with a laryngeal mask airway (LMA) may fail. In addition, its use in obese patients is relatively contraindicated, because it doesn’t protect the airway from aspiration, causing increased morbidity and mortality.
Obesity does not necessarily predict impossible mask ventilation or difficult laryngoscopy/intubation. However, the combination of obesity and abnormal upper teeth or a large neck circumference measured at the level of the superior border of the cricothyroid cartilage may predict difficult laryngoscopy.
Direct laryngoscopy can be optimized in obese patients by aligning their external auditory meatus with their sternal notch. Achieve this by placing obese patients in the “ramped” position, either with multiple pillows or folded blankets or towels under their upper body, shoulders, and head (Fig. 8-6), or by elevating the head of the stretcher to 30 degrees.11 An added benefit in obese patients is that the head-up (or even simple reverse-Trendelenburg) position slows desaturation during apnea when compared to the supine position, thus increasing the time available to obtain a definitive airway.

When patients are trapped in a sitting position, face the victim when managing the airway. Even in this position, if bag-valve-mask (BVM) or mouth-to-mask ventilation is necessary, an adequate mask seal may be difficult to achieve. If a controlled airway is necessary and the patient is still breathing, use blind nasotracheal or digital intubation (see the “Non-Laryngoscopic Intubation” section later), a Combitube, an LMA, retrograde intubation (often unsuccessful), or a cricothyrotomy. If the patient has lost muscular tone and can no longer bite down, use digital intubation. If a patient is not breathing, perform an “inverted” intubation by holding the laryngoscope handle toward the patient’s lap with the blade facing upward like an ice-pick and visualizing the glottis from the front. Gently pull on the laryngoscope handle to visualize the vocal cords. It may be easier to perform this maneuver by using the laryngoscope in the nondominant hand and guiding the tube with the dominant hand.
For a patient strapped into stretcher with rigid sides (e.g., a Stokes basket), straddle the patient and face him or her, then do the intubation as with a seated vehicular entrapment.
If the patient is difficult to intubate, stop trying and return to using bag-and-mask ventilation. The maximum time allotted to intubate should be no longer than the time you can hold your breath; the patient who needs intubation can’t hold his or her breath that long. This time can be slightly longer if the patient is preoxygenated with 100% oxygen for 3 minutes of tidal volume breathing or with eight vital capacity breaths over 60 seconds, or until FEO2 (Fraction of Expired Oxygen) exceeds 90%. Preoxygenation is most effective if done with the patient in the semi-seated (Fowler’s) or reverse Trendelenburg position. Also, consider using a nasopharyngeal catheter or nasal cannula to provide apneic oxygenation.10
If you can use a BVM to ventilate the patient, use that to buy yourself time to consider any adjuncts or procedures that may help you to intubate.
If you are unable to ventilate the patient despite using the adjuncts mentioned, consider trying one of the airway methods described in the following paragraphs and call for help. If none of these is an option, wake the patient if appropriate (such as in the operating room [OR; theatre]) or prepare for an emergency cricothyroidotomy.
IMPROVISED NON-INTUBATION AIRWAYS
The Poor-man’s LMA consists of blindly passing an appropriately sized cuffed ETT into the oropharynx so that the cuffed portion of the tube lies between the tongue and the posterior pharyngeal wall (Fig. 8-7). Insert the ETT with the balloon fully inflated. Then pinch the patient’s nose closed and seal the lips around the tube, while an assistant bags the patient through the tube in the normal fashion.12 This does not work as well as a normal LMA, so replace this with another airway method as soon as possible.
Transtracheal (percutaneous jet) ventilation (TV) generally does not work well in adults.13 Use this method only in children, as a temporizing measure to provide oxygenation until a definitive airway can be obtained; do a surgical cricothyrotomy on everyone else who needs this type of intervention.
The problems with doing a TV are (a) placing the needle/catheter correctly, (b) preventing the catheter from kinking, and (c) obtaining adequate flow through the catheter. So, the guiding principle is that if the cricothyroid membrane will be violated in austere circumstances, use a knife, not a needle, whenever possible.
If opting for TV, insert the needle/catheter into either the cricothyroid space or the trachea, directing it inferiorly while aspirating for air. Determining where to place the needle can be daunting for those not familiar with the process. The key is to find the midline. (See the “Cricothyrotomy” section for more details.)
The catheters used for jet ventilation range from 14 to 18 gauge, but most clinicians use 14-gauge intravenous (IV) catheters for the procedure. These standard over-the-needle IV catheters may kink at their hub due to the acute angle as they pass into the trachea.14 This may be ameliorated somewhat by holding the catheter at its hub.15
An alternative is to use a larger (13-Fr/ > 4-mm outside diameter [OD]; 9-Fr/3-mm internal diameter [ID], ~6-inch) catheter, which is about the same size as an ETT for a newborn (12-Fr/4-mm OD; 2.5-mm ID). These catheters generally are used as central lines or as “introducers” for large lines. While they may not provide much better oxygenation or ventilation than a 14-gauge catheter, the polyvinyl chloride structure and the length provide enough strength to prevent collapse and decannulation. It also avoids the catheter slipping into the subcutaneous space where, if the oxygen is being delivered under pressure, it can result in a massive buildup of subcutaneous air, leading to collapse of the tracheal lumen and death.16 A real benefit is that these catheters also can be easily turned cephalad and used to do a retrograde intubation.17
Once the catheter is placed and functions, the real problem begins: how to oxygenate/ventilate the patient without a standard transtracheal jet ventilator. High pressures are required, so clinicians must hold the catheter tightly to prevent it from kinking or dislodging. This method doesn’t work well in adults because a 70-kg patient requires a flow rate of >1100 mL/second to be adequately ventilated. The only makeshift method that supplies this flow through a 14-gauge catheter is unregulated wall oxygen that delivers about 1400 mL/second at about 65 psi. (This is not oxygen from a “wide-open” regulator that delivers only about 350 mL/second.17) Flow through a simple catheter can be controlled using a simple “Y” device in the tubing, which connects the oxygen source and the patient (Fig. 8-8). When using this device, occlude the opening for 1 second to allow inspiration and release it for 3 seconds during expiration.18
In addition, in the OR, the catheter can be connected to the “oxygen flush valve” on the anesthesia machine; this is essentially a jet ventilator.19 To do this, connect stiff tubing to the common gas outlet with a standard 15-mm ETT connector. Most modern machines, however, are fitted with a safety valve to prevent overpressure and therefore may not be suitable for this purpose.20
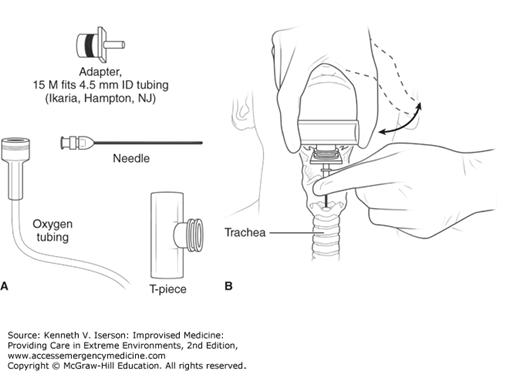
Another option is to use a needle connected to a standard T-piece that allows flow control by occluding one end with the thumb (Fig. 8-9).
The danger when using an unregulated oxygen source is that it can cause barotrauma to the lungs. However, adequate jet ventilation is just that—ventilation. The high flow rate not only supplies oxygen, but also forces CO2 out of the lungs.21 It also appears to protect against aspiration at least as well as a cuffed ETT does.22
How about connecting a 15-mm ETT adapter and using a BVM? This has been suggested repeatedly in the literature and in medical protocols. Any IV catheter can be attached to a 3.5-mm ETT adapter, although removing the adapter from the tube may require cutting it off, because it is very firmly attached. An easier method is to insert a 6.5- to 8.5-mm cuffed ETT into a 5-, 10-, or 20-mL syringe barrel, inflate the balloon, and connect the syringe to the IV catheter. The ETT provides the 15-mm BVM adapter.23
The problem, then, is that ventilating with a BVM is not only physically challenging, but also quickly results in hypercarbia, even when a 4-mm ID catheter is used (about three times the ID of a 14-gauge catheter). However, if doing TV with a jet ventilator, patients may have the same respiratory and hemodynamic variables after 20 minutes as those with surgical cricothyroidotomies, if they are allowed adequate time for exhalation.24 Therefore, unless a jet ventilator, unregulated wall oxygen, or an anesthesia machine’s oxygen flush valve is used, consider TV a temporizing method, to be used for no more than a few minutes. In most adult patients, this makes it not worth the trouble. Use another method!
LMA insertion may be made easier if you make a 90-degree angle close to the laryngeal portion of the LMA by using the malleable metal ETT stylet (sometimes doubled over to be stiffer). For safety, do not extend the stylet into the mask. The bend is about 3 cm proximal to the mask, and the result looks similar to a commercial intubating LMA (Fig. 8-10). To insert the modified LMA, partially inflate the mask, lubricate it normally, and slide the tip along the hard palate. Then use the same motion as when inserting a laryngoscope and rotate the LMA so that the mask follows the airway’s curvature into its final position in the pharynx. Once the mask is inserted, remove the stylet so the tube can bend to match the patient’s anatomy. Lubricating the stylet makes it easier to remove once the LMA is inserted.25,26

INDICATIONS TO INTUBATE
Intubation is probably used far too often in Western tertiary care centers and not often enough elsewhere. However, ask yourself why you are not intubating a patient who
Tolerates an oral airway
Is too agitated to fully evaluate and cannot be easily or safely sedated
Is not oriented to time, place, person, or events after head trauma
Is not maintaining, or may not be able to maintain, a patent airway
Cannot or may not be able to handle his or her secretions without aspirating
Has had an acute mental status change
While many of these patients may not need intubation immediately, make a conscious decision to either intubate them or carefully observe them.
IMPROVISED INTUBATION EQUIPMENT
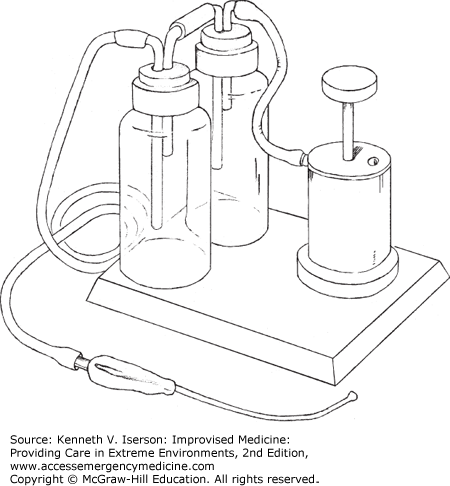
It is possible, and often necessary, to remove airway debris manually with your fingers or by sucking it out with a bulb syringe or large-mouth (Toomey) syringe. However, the best option for long-term use is to build a simple foot-operated suction device (Fig. 8-11). One way to do this is to modify an automobile or truck tire pump so that its valves suck instead of pump. Attach this to two wide-mouth, unbreakable 1-L bottles and then to the sucker.27
Many tubes can be used as uncuffed endotracheal, cricothyrotomy, and tracheostomy tubes in emergency situations. The wide variety of medical tubing available in hospitals and clinics offers the benefits of cleanliness and various degrees of flexibility. For example, connector tubing for suction devices and chest tubes are useful for this purpose. Even though very large urethral catheters could be used for infant ETTs if their tips are cut off, their soft rubber walls may collapse. Some polyvinyl tubes and heavier rubber tubes offer less flexibility than others (e.g., chest tube). Typical chest tube sizes (OD = ETT size) that work appropriately as ETTs are 10 Fr (3.3 mm), 12 Fr (4.0 mm), 16 Fr (5.3 mm), 20 Fr (6.7 mm), and 24 Fr (8.0 mm). Cut any tube to the appropriate length before use.
Any hollow tubing that can go through the airway also can be used as an ETT, at least temporarily. If the tube is straight and rigid (like a rigid bronchoscope), such as a small pipe or a piece of bamboo, the patient must be kept fully sedated and, if possible, paralyzed, to avoid breaking the teeth or causing other trauma. The patient must also be in a condition to have his head extended (i.e., no neck injury).
The biggest problem with makeshift ETTs is how to connect them to a BVM or a ventilator. Whatever tubing is used, and no matter what size is needed—from neonatal to large adult—the tube can quickly and easily be adapted to fit a standard ventilator or bag-valve connector using the technique described in the following section.
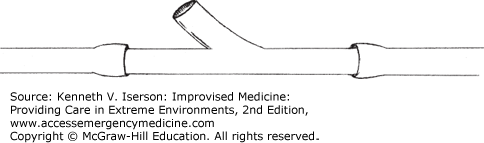
If an alternative tube is used as an ETT, if the standard ETT you have does not fit the ventilation device being used, or if the standard adapter that fits the ventilation device is lost or broken, a simple fix is at hand. Made from the nipple of a standard infant feeding bottle, this adapter is similar to a Foregger-Racine adapter and other, more complex equipment described for the same purpose.28 Enlarge the nipple hole so that the ventilator end of the ETT can just fit through with a tight seal. Push the tube through the hole so that the BVM/ventilator end is inside the nipple. The other (bottle) end of the nipple connects to the ventilation device (Fig. 8-12). Experience shows that any size pediatric or adult ETT, or any equivalent that is being used as a makeshift endotracheal, cricothyrotomy, or tracheostomy tube, will fit.29
ETTs work best if they are cuffed. If an ETT (regular or improvised) is not cuffed or if its balloon breaks, there may be a significant air leak, which may increase the chance of aspiration. In those cases, pack the pharynx under direct vision with moist 2-inch roller gauze or cloth soaked in saline, using Magill or similar forceps. Moisten the pack in water and squeeze the water out. Don’t use petroleum jelly (e.g., Vaseline) or other petroleum-containing products to soak the gauze, because that might cause pneumonitis.30 As when packing the nose or an abscess, use only one length of packing material so that, when it is removed, there is no chance of leaving an unobserved second piece behind. Tie one end of the packing to the ETT to ensure its removal when the tube is removed.7 It is safest to write “PACK” on a piece of tape and place it on the patient’s forehead to let other clinicians know that a pack is in place. This method can also be used if an ETT cuff develops a leak after a successful intubation and changing the tube is too dangerous.31
If a polyvinyl ETT is torn, the best solution is not to use it. If it is already in place, replace it. However, if this is not possible or is too dangerous for the patient, two temporizing methods exist: (a) To quickly seal a small hole, put a moist sponge over it; (b) For a more permanent seal, use a small amount of cyanoacrylate (i.e., superglue, Dermabond) to immediately and completely seal the hole. Before using the glue, thoroughly dry the torn portion of the tube so that it will seal properly.32
Stylets are invaluable for keeping an ETT in the shape desired by the intubating clinician. But, when stylets are used repeatedly, especially those used for neonatal intubations, they can break at their tip from constant bending.33 To make an improvised stylet, take a piece of any malleable wire and put it into a nasogastric (NG) tube or a small urethral catheter. Voilà! A stylet.
A coat hanger slips into a 12-Fr NG tube, thus producing stylets for ETTs size 5 and greater. Fashion stylets for smaller tubes using smaller NG tubes. These can be easily resterilized for repeated use.34 Alternatively, batches of stylets can be made from copper wire that is the appropriate diameter for the ETT in which they will be used.
To keep a tube rigid without using a stylet, and if there is time to wait, put the ETT in ice water or freeze it. This tends to work better for smaller caliber ETTs. (Daniel Tzse, MD, Brown University. Personal written communication, June 5, 2007.)
Bougies, also known as introducer guides, intubation guides and Eschmann-type guides, have been available to facilitate orotracheal and nasotracheal intubations since Macintosh described them in 1949. They are semirigid thin rods that can be inserted with blind technique into the airway of patients with poor glottic visualization. Table 8-4 describes the technique.
|
To use a bougie for endotracheal intubation without assistance, use the “pistol grip” technique. Preload the ETT onto the bougie, leaving about one-quarter of the introducer exposed at the ETT’s proximal (ventilation) end. Have the bent (Coudé) tip facing anteriorly. Bend the proximal bougie so that the clinician can hold both that end of the introducer and the ETT simultaneously in one hand. Once the tip of the introducer passes the cords, release the proximal part and pass it, and then the ETT, into the trachea, making the counterclockwise (left-hand) turn so that it does not hang up on an aretynoid cartilage.
Sterilized bougies can also be used to assist with chest tube insertions, cricothyrotomies, and peritoneal lavages. Although they are listed as single-use items, commercial guides that have sealed ends are often cleaned with a disinfectant, such as glutaraldehyde, and reused. Autoclaving melts them. If there are no bougies available, they may need to be improvised, as the following section details.
According to Dr. James Riopelle of Louisiana State University Dept. of Anesthesiology, one can make an intubation guide using any type of plastic rod, although it should be about 15-Fr diameter (4.7 mm; 3/16 inches) for a child, and slightly larger for an adult. The tighter the fit the introducer has in the ETT, the less chance it has of catching on the ariepiglottic fold. The length can be 60 cm (less chance for over-insertion) or the more common 70 cm. The plastic must be malleable when heated so that the tip can be bent into a Coudé tip. Some people have used esophageal temperature probes, guide wires for passing electrical wire through conduits (i.e., thread guides) or NG tubes. Two commonly available materials are Teflon fluorinated ethylene propylene (FEP) and polyethylene rods. The latter are stiffer than Teflon, and so may be more dangerous in the hands of novices. In either case, sandpaper the ends to make a bullet-shaped tip. Then add the kink about 2.5 cm from the end by dipping one end of the guide into boiling water for about a minute, withdrawing it, and holding the tip under cold running water to “fix” the kink in place. Use a permanent marker (or tape in the case of Teflon) to make a prominent mark 23 to 25 cm from the tip to warn against passing the introducer further than this distance past the lips (and less in a very small patient). (Personal communication, July 28, 2014.)
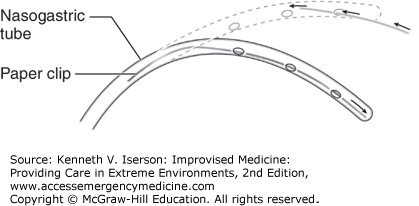
A 14- or 18-Fr or a Salem Sump NG tube can also be used to improvise a bougie, or used as a “jet stylet,” to insufflate oxygen or simply to provide nasopharyngeal oxygen to a breathing patient. To fashion this device, insert an unbent paper clip through the NG tube’s most distal hole (eyelet). Then use a forceps to push the paperclip into the most distal end of the NG tube (Fig. 8-13). Bend this end into a 40-degree “hockey stick” angle. Cut the proximal end of the NG tube so that it is 60- to 70-cm long. Place the NG tube with the desired curvature into a basin of ice. Within 30 seconds, the tube will be sufficiently rigid so that it can be used as a bougie. An 18-Fr NG tube is suitable for 8.0 mm and larger ETTs, whereas the 14-Fr tube can be used for a 6.0- to 7.0-mm ETT.36 Dr. Riopelle has used this device a few times in infants, using a very thin paperclip.
To convert the NG bougie into a jet stylet, insert a 14-gauge IV catheter into the proximal end and attach it to a transtracheal jet ventilator. When using an 18-Fr NG tube, fully insert the catheter to ensure an adequate seal. To provide oxygen to a spontaneously breathing patient, insert a standard 3-mm ETT adapter into the end of the 18-Fr tube or a 2.5-mm adapter into a 14-Fr tube. Provide oxygen by attaching the adapter to a conventional anesthetic circuit, BVM (compressing the bag), or similar device.36


