Direct Laryngoscopy
Robert F. Reardon
Steven C. Carleton
Calvin A. Brown III
DIRECT LARYNGOSCOPY
Direct laryngoscopy (DL) is the most common technique for tracheal intubation in the emergency setting. In experienced hands, DL has a very high success rate, and the equipment is inexpensive, reliable, and widely available. However, DL requires significant experience to gain proficiency and has inherent limitations that manifest when factors such as decreased cervical mobility, a large tongue, a receding chin or prominent incisors are present.
BASICS OF DIRECT LARYNGOSCOPY
The concept of DL is simple—to create a straight line of site from the mouth to the larynx in order to visualize the vocal cords. The tongue is the greatest obstacle to laryngoscopy. The laryngoscope is used to control the tongue and displace it out of the line of sight. A laryngoscope consists of a handle, a blade, and a light source. It is a left-handed instrument despite the operator’s handedness. In general, DL blades are either curved (Macintosh) or straight (Miller) (Fig. 12-1). Both blades come in a variety of sizes from newborn to large adult, and sizes 3 and 4 are commonly used in adults. Macintosh blades have a gentle curve, a vertical flange for displacing the tongue and a relatively wide square tip with an obvious knob. Variations of the original Macintosh blade design, which include a smaller vertical flange and a shorter light-to-tip distance have also been manufactured. The vertical flange height of the size 3 and 4 blades is similar making it reasonable to start with the longer size 4 blade in all adults. Curved blades are intended to be advanced into the vallecula and when the knob on the tip makes contact and depresses the hyoepiglottic ligament, the epiglottis elevates exposing the vocal cords (Fig. 12-2).
Miller blades have a narrower and shorter flange and a slightly curved tip without a knob. The smaller flange may be advantageous when there is less mouth opening, but makes tongue control more difficult and decreases the area of displacement for visualization and tube placement. Size 3 and 4 Miller blades are nearly identical except for length, so it may be reasonable to start with the longer size 4 blade in most adults. Miller blades are intended to be passed posterior to the epiglottis, to lift it directly
in order to expose the vocal cords (Fig. 12-3). Most operators prefer the curved Macintosh blade because it is wider and allows better control of the tongue; however, the straight Miller blade may provide better visualization of the glottis when there is limited cervical movement, prominent upper incisors, a large tongue, limited mouth opening, or a floppy epiglottis, so it is important to master both techniques.
in order to expose the vocal cords (Fig. 12-3). Most operators prefer the curved Macintosh blade because it is wider and allows better control of the tongue; however, the straight Miller blade may provide better visualization of the glottis when there is limited cervical movement, prominent upper incisors, a large tongue, limited mouth opening, or a floppy epiglottis, so it is important to master both techniques.
 Figure 12-1 • Macintosh (top) and Miller (bottom) Laryngoscope Blades. The curved blade is a size 4 German Macintosh, which is a good blade for routine use in adults, unlike the American design, which has a taller flange height. The straight blade is a size 3 Miller, for normal size adults. Most Miller blades have the light on the left side (as shown here), which can embed in the tongue, but better designs place the light on the right side of the blade. |
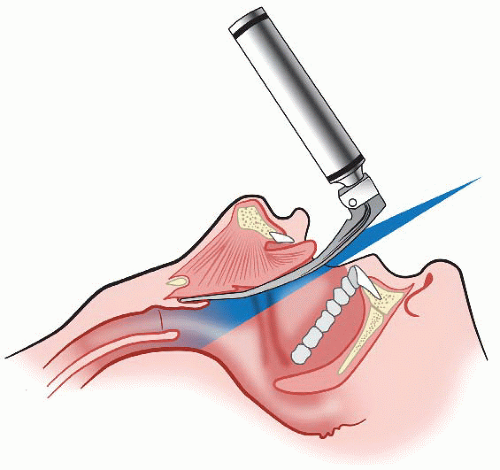 Figure 12-2 • Direct Laryngoscopy with a Macintosh Blade. Note that the tip of the blade is properly placed into the base of the vallecula and elevates the epiglottis by pushing against the hyoepiglottic ligament. |
ANATOMY FOR DIRECT LARYNGOSCOPY
Recognition of anatomic landmarks is critical to DL success (See Figs 12-4 and 4-5 pages 124 and 41, respectively.) For laryngoscopy the most important laryngeal structures are the epiglottis, the posterior arytenoid cartilages and interarytenoid notch, and the vocal cords. Tracheal intubation is accomplished by passing the endotracheal tube (ETT) through the vocal cords. Success is more likely if the vocal cords are well visualized; however, tracheal intubation does not always require visualization of the vocal cords. If only the posterior cartilages are visible, the tube can be passed anterior to these structures in the midline and will usually enter the trachea (Fig. 12-4B). Furthermore, intubation can often be accomplished when the only visible structure is the epiglottis (Fig. 12-4C), especially if an endotracheal tube introducer (ETI or “bougie”) is used. If the epiglottis cannot be identified, the likelihood of successful tracheal intubation is very low (Fig. 12-4D).
PREPARATION AND ASSISTANCE
Before embarking on the intubation attempt, the airway manager must ensure that the following are available:
Established IV and monitoring systems.
Oxygen saturation and cardiac monitoring.

Figure 12-3 • Direct Laryngoscopy with a Miller Blade. The tip of the blade is used to lift the epiglottis directly.
All required equipment and medications.
Laryngoscope blade and handle, ETT and backup ETT of a smaller size, 10-cc syringe, lubrication, working suction, and rapid sequence intubation drugs.
ETI (disposable or reusable bougie, see page 131.)
Adequate suction.
Trained assistant standing on the patient’s right.
The assistant should be prepared to do the following:
Pass equipment as needed to the airway manager.
Hold the head in a position as stipulated.
Perform laryngeal manipulation as instructed.
Retract the corner of the mouth during intubation.
PREINTUBATION ASSESSMENT AND EQUIPMENT CHOICE
Preintubation assessment of the patient’s airway is essential and must be performed on every patient before administration of neuromuscular blockers. In the mnemonic LEMON, discussed in Chapter 2, the M stands for Mallampati, serving as a reminder to examine the oral cavity to assess the relative size of the tongue in relationship to the oropharynx and the mandibular space (see Chapter 4). The laryngoscope blade is the tool that controls and maneuvers the tongue. Fundamental to successful laryngoscopy is the selection of a blade, curved or straight, that will be wide and long enough to capture the tongue during laryngoscopy, sweep it leftward and inferiorly into the mandibular space out of the visual field, and permit direct visualization of the airway. The larger flange of the curved Macintosh blade usually provides better tongue control than the thinner blade of the straight Miller
blade. Many laryngoscopists prefer a size 4 Macintosh blade for most emergency airways to assure adequate blade length. However, choice of a laryngoscope blade and the technique used to facilitate intubation is best guided by personal choice and experience. The literature suggests that straight blades improve laryngoscopic view (increased exposure of the vocal cords), whereas curved blades provide better intubating conditions (continuous visualization of the vocal cords during ETT passage). Using an ETI (bougie) improves intubation success rates with the straight-blade technique.
blade. Many laryngoscopists prefer a size 4 Macintosh blade for most emergency airways to assure adequate blade length. However, choice of a laryngoscope blade and the technique used to facilitate intubation is best guided by personal choice and experience. The literature suggests that straight blades improve laryngoscopic view (increased exposure of the vocal cords), whereas curved blades provide better intubating conditions (continuous visualization of the vocal cords during ETT passage). Using an ETI (bougie) improves intubation success rates with the straight-blade technique.
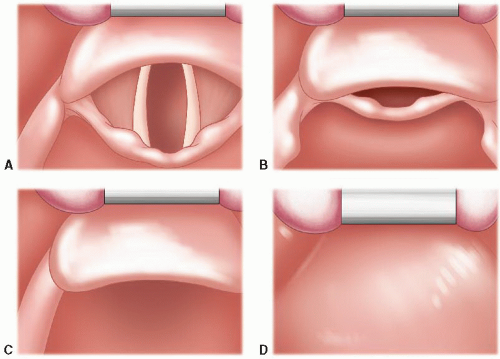 Figure 12-4 • A-D: Laryngoscopic views (correlating with the Cormack-Lehane system). A: Full view of the vocal cords (grade I). B: Only the posterior glottic structures/cartilages are visible (grade II). C: Only the epiglottis is visible (grade III). D: Neither the epiglottis nor glottic structures are visible, only the soft palate (grade IV). |
HANDLING THE LARYNGOSCOPE AND POSTURE OF THE OPERATOR
The laryngoscope should be held low on the handle, so the proximal end of the blade pushes into the thenar or hypothenar eminence of the left hand. This grip will encourage lifting from the shoulder, keeping the elbow low, and keeping the wrist stiff during laryngoscopy. The operator should be in an upright position with his or her arms and hands at a comfortable working height, rather than stooping or straining to reach the patient. The patient’s bed should be elevated and the operator should step back from the patient so that his or her back is relatively straight during laryngoscopy.
PATIENT POSITIONING
Optimal head and neck positioning for DL is often described as the “sniffing position”; lower cervical flexion and atlanto-occipital extension. The sniffing position attempts to align the oral,
pharyngeal, and laryngeal axes of the upper airway (Fig. 12-5). Absent contraindications, alignment of these axes is important for optimizing the laryngoscopic view. The appropriate degree of lower cervical flexion brings the external auditory meatus to the level of the sternal angle of Louis or anterior surface of the shoulder. In adult patients of normal body habitus, a 4- to 6-cm pad beneath the occiput usually suffices for this purpose. Alternatively, the operator can extend
and lift the head with his or her right hand during laryngoscopy to determine the optimal position empirically. The head can then be supported by an assistant standing on the right side of the patient while the operator intubates or performs external laryngeal manipulation. In morbidly obese patients, optimal positioning will often require a ramp to be constructed from linens or pads placed beneath the upper torso, shoulders, neck, and occiput in order to align the ear canal with the sternal angle of Louis (see Chapter 39, Fig. 39-1). Airway ramps are also commercially available for this purpose. In small children with a protuberant occiput, the torso may need to be raised to allow the external meatus to fall back to the desired plane (see Chapter 25, Fig. 25-2). Because of individual variations in anatomy, the optimal head and neck position is often unpredictable, and may require empiric adjustment during the intubation attempt. It is critically important that some means of adjusting the patient’s position be available before initiating the procedure. Understanding optimal head and neck positioning will help operators appreciate the difficulty of performing DL on trauma patients and others who must be intubated in a fixed position.
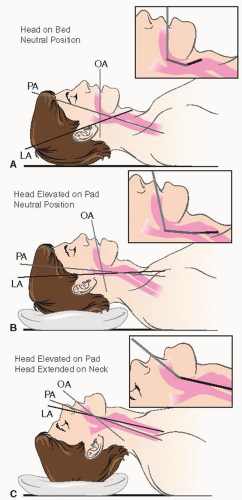 Figure 12-5 • A: Anatomical neutral position. The oral axis (OA), pharyngeal axis (PA), and laryngeal axis (LA) are not aligned. B: Head, still in neutral position, has been lifted by a pillow flexing the lower cervical spine and aligning the PA and LA. C: The head has been extended on the cervical spine, aligning the OA with the PA and LA, creating the optimum sniffing position for intubation. |
STANDARD DIRECT LARYNGOSCOPY TECHNIQUE
This is the standard technique used with both curved and straight blades.
Open the mouth as widely as possible.
Insert the blade along the right mandibular molars and sweep the tongue to the left.
Use a “look as you go” approach—that is, advance the tip of the blade down the tongue in a careful step-by-step manner, lifting intermittently to ascertain the location of the tip in relation to anatomic structures, until the epiglottis is located. The epiglottis is the main anatomic landmark because the glottis can be consistently found just posterior and inferior to it.
Lift the epiglottis. When using the curved blade, displace the epiglottis indirectly by pressing against the hyoepiglottic ligament at the base of the vallecula (Figs. 12-2 and 12-6). When using the straight blade, lift the epiglottis directly with the tip of the blade (Figs. 12-3 and 12-7).
Identify the posterior cartilages and interarytenoid notch. These structures make up the posterior border of the glottis and separate the tracheal inlet from the esophagus. Tracheal intubation can be accomplished by passing the tube anterior to these structures, even when the vocal cords cannot be seen.
Visualize the vocal cords, if possible.
Pass the tube through the vocal cords and into the trachea.
PARAGLOSSAL (RETROMOLAR) STRAIGHT-BLADE TECHNIQUE
This is an alternative technique that may be useful when standard DL is unexpectedly difficult because of prominent upper incisors, a large tongue, or limited mouth opening.
Insert the Miller blade into the right corner of the mouth.
Pass the blade along the groove between the tongue and the tonsil.
Sweep the tongue to the left and maintain it to the left of the blade.
Advance the tip of the blade toward the midline, keeping the back of the blade to the right side of the mouth adjacent to the molars (Fig. 12-8).
Identify the epiglottis and lift its tip to expose the vocal cords.
Have an assistant retract the right corner of the mouth.
Pass the tube through the vocal cords and into the trachea. Often one needs to use an ETI down the channel of the scope with this approach because of limited space preventing ETT advancement. The ETI was specifically designed for this purpose.
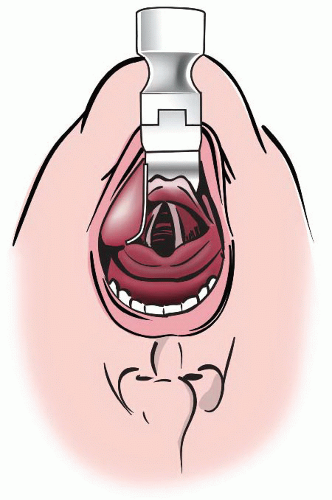 Figure 12-6 • Direct Laryngoscopy with a Macintosh Blade. The mouth is opened widely and the tongue is well controlled and kept entirely to the left by the large flange of the Macintosh blade. The epiglottis is visualized and the tip of the blade is pushed into the vallecula to elevate the epiglottis and expose the vocal cords. Force is applied by lifting the entire blade upward, not by tilting the butt of the blade toward the upper incisors. |
BLIND INSERTION TECHNIQUE FOR THE STRAIGHT BLADE
This is an alternative technique often used in neonates, infants, and small children using a straight blade, or in adults when other techniques are predicted to be difficult or have failed. There are two phases to this method: (1) Blind insertion of the tip of the laryngoscope blade into the esophagus, and (2) visualization of the glottis during withdrawal. The potential for esophageal and tracheal injury or regurgitation resulting from opening the upper esophageal sphincter during blind insertion of the blade has not been studied.
Place the blade into the right side of the mouth and maintain the tongue to the left.
Hold the laryngoscope with the fingertips and gently advance the entire length of the blade blindly toward the midline, past the base of the tongue, posterior to the glottis, and into the proximal esophagus. If there is any resistance stop and withdraw slightly, then realign and advance completely.
While looking into the airway, lift the blade and then slowly and deliberately withdraw until the glottis drops down into view. If the epiglottis also drops into view, lift it with the tip of the blade to expose the vocal cords.
Pass the tube through the vocal cords and into the trachea.
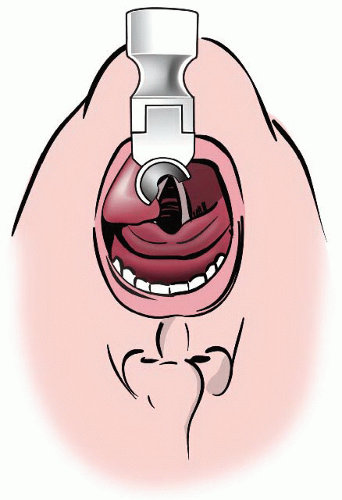 Figure 12-7 • Direct Laryngoscopy with a Miller Blade. The mouth is opened widely and the tongue is difficult to control with the small flange of the Miller blade, but it is kept entirely to the left. The epiglottis is identified and then lifted with the tip of the blade (so it is no longer visible here) to expose the vocal cords. Force is applied by lifting the entire blade upward, not by tilting the butt of the blade toward the upper incisors. |
INTUBATING THE TRACHEA
If the glottis is directly visualized, it is usually easy to pass a tube into the trachea. However, even with excellent glottic exposure, it is possible to block the line of sight with the ETT during the intubation attempt. This possibility can be minimized by inserting the tube from the extreme right-hand corner of the mouth while an assistant retracts the lip, and by keeping the tube below the line of site while advancing it toward the glottis, raising it over the posterior landmarks only during the terminal phase of insertion. Tube shape can also influence the ease of visualization during intubation. Using a malleable stylet to produce a straight tube with a single “hockey-stick” bend of <35° just proximal to the balloon facilitates cord visualization during passage, by keeping the tube out of the line of sight until it passes the cords (Fig. 12-9). As the tube approaches the depth of the glottis, it is raised up over the posterior landmarks and passed through the vocal cords. A banana-shaped tube tends to cross the visual axis twice in the course of insertion and may interfere with visual guidance during placement.
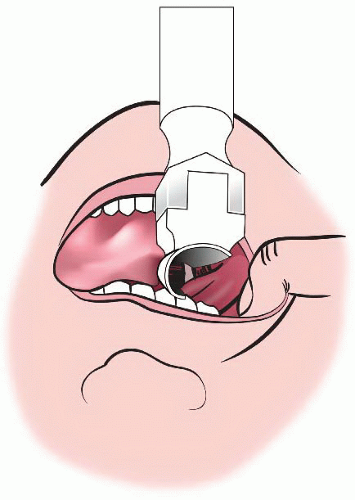 Figure 12-8 • Paraglossal (Retromolar) Straight-blade Technique. The Miller blade enters the right corner of the mouth and the tip advances toward the midline while the proximal blade remains in the right side of the mouth. Note that the tongue is entirely to the left of the blade. This technique may improve glottic visualization in difficult situations but does not leave much room for passage of the ETT. Have an assistant retract the lip to create more room as shown. |
TROUBLESHOOTING DIFFICULT DIRECT LARYNGOSCOPY
Paralysis
Related posts:


Stay updated, free articles. Join our Telegram channel

Full access? Get Clinical Tree


