INTRODUCTION
WOUND CLEANING AND IRRIGATION
The goals of minor wound care are to achieve optimal wound aesthetics and infection prevention. For most uncomplicated wounds, irrigation is the most effective means of reducing bacterial count. However, debridement may be necessary in contaminated wounds since devitalized tissue may impair the wound’s ability to resist infection.
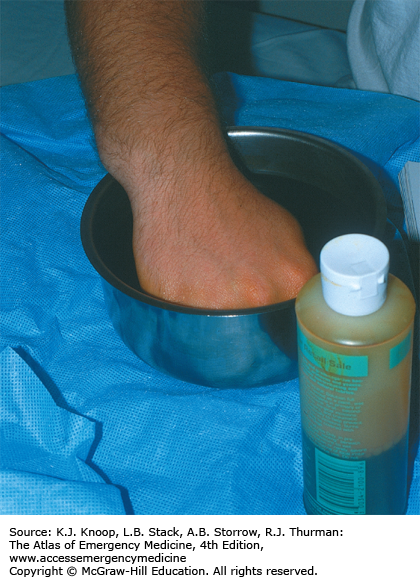
Preliminary wound management begins with assessment, adequate hemostasis, foreign-body removal, and irrigation. Provide adequate analgesia prior to wound cleansing. In simple well-vascularized wounds, tap water is as effective as normal saline or sterile water. In contaminated wounds, povidone-iodine diluted 1:10 with normal saline may help with disinfection. Bacterial-static solutions, such as nonionic surfactant cleaner, may also reduce bacterial inoculum. Solutions containing ionic detergents (eg, Betadine surgical scrub) should not be used as it is toxic to wound tissue. If necessary, wound scrubbing should be done gently to avoid damaging viable tissue.
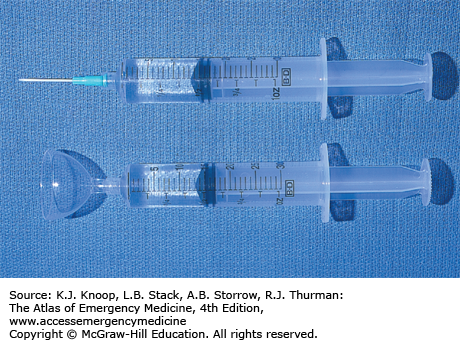
Irrigation is the most effective means of reducing bacterial inoculum; 500 to 1000 mL of fluid or 60 mL/cm of wound length is adequate for most uncomplicated wounds. The recommended irrigation pressure of 5 to 8 lb per square inch (PSI) can be accomplished by attaching an 18- or 19-gauge intravenous (IV) catheter sheath, or a commercially available splash shield, to a 20- or 30-mL syringe. A bulb system is suboptimal; it generates only 0.5 to 1 PSI. Debris that cannot be irrigated can be scrubbed or sharply debrided. The tissue should appear pink and viable; a scant amount of fresh bleeding indicates good vascular supply. High-pressure irrigation (≥25 PSI) may be necessary in highly contaminated or complicated wounds requiring operating room washout. However, it offers no advantage for routine wounds.
Universal precautions, including gloves and face shield, should always be observed.
Antibiotics are no substitute for thorough wound cleansing and irrigation.
Shaving the eyebrow for wound repair is contraindicated due to the unpredictable pattern of hair regeneration.
WOUND ASSESSMENT
Proper wound assessment and preparation are essential to good wound management. Always consider the age and mechanism of injury, risk for contamination or foreign body, risk to the nerve, blood vessel and tendon, tetanus status, and identifying comorbid conditions that may affect wound healing.
Patient compliance is integral to achieving adequate wound exploration. The use of local or regional anesthesia is usually sufficient. However, procedural sedation may be required in some. Document neurovascular status prior to any anesthetic administration. Application of direct pressure is often the easiest way to achieve hemostasis. Other methods include the use of blood pressure cuff or tourniquet to achieve temporary hemostasis. Anesthetic solution containing epinephrine (1:100,000 dilution) may help constrict small vessels; however, particular caution should be exercised when using any vasoconstrictors in areas of end arterial circulation (eg, fingers, nose, toes, ears, and penis).
While hemostats or other self-restraining devices such as retractors may help achieve adequate exposure, care must be exercised to avoid damaging the dermis and the tissue’s vascular integrity. If exposure is still not adequate despite hemostasis and separation, the wound margins may be slightly extended with fine iris scissors or scalpel to allow better visualization. The wound is extended from one end, through the epidermis and dermis only, to avoid further injury to underlying structures. Once the superficial fascia has been exposed, it may be carefully and bluntly dissected using forceps or scissors.
Never probe a wound blindly or blindly attempt to control bleeding with hemostats.
At 1:100,000 dilution, epinephrine-containing anesthetics may be used with caution in areas of end arterial circulation such as the ear, fingers, nose, toes, and penis.
If epinephrine-induced tissue ischemia occurs, injection of phentolamine around the area of ischemia may help restore flow.
FIGURE 18.4
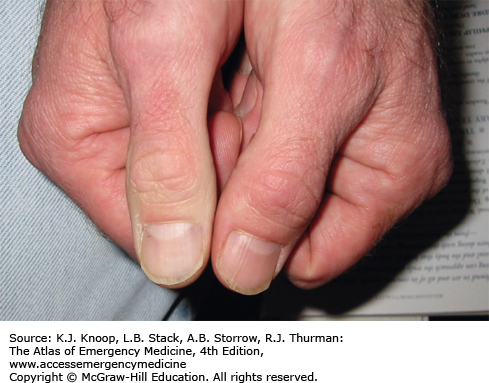
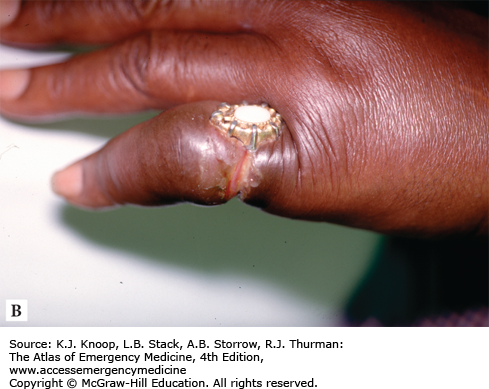
Finger Ring Tourniquet. The ring tourniquet is an effective means of hemostasis. Removal after the procedure is important to prevent finger ischemia. Another effective method of hemostasis involves using a Penrose drain tightened with hemostats. (Photo contributor: Matthew D. Sztajnkrycer, MD, PhD.)

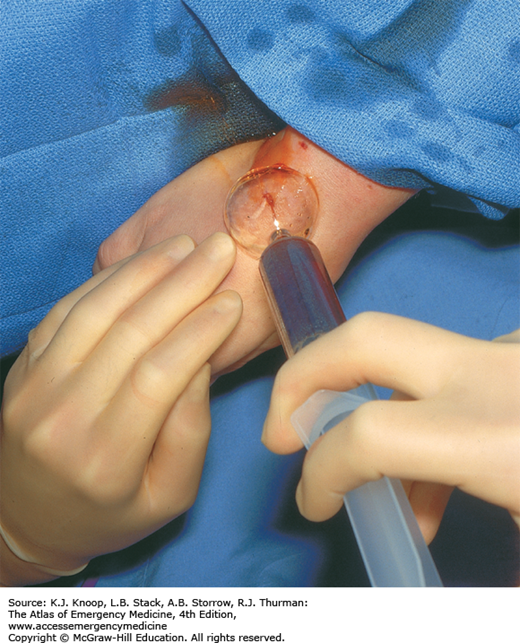
FIGURE 18.5
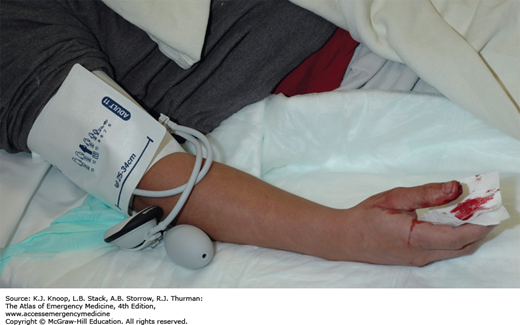
Epinephrine Injection. Although epinephrine can be used to help achieve hemostasis, it should be used with caution on areas with poor collateral blood supply. Epinephrine has been injected into the right thumb which shows the pallor of finger ischemia. (Photo contributor: Selim Suner, MD, MS.)
WOUND FOREIGN BODIES
All foreign bodies can become a nidus for delayed infection. All reasonable attempts should be made to remove them. Radiographic evaluation or ultrasound (see related chapter) may assist in locating foreign bodies not directly visualized. Foreign bodies are characterized as being either reactive (eg, organic materials such as wood, bone, and soil) or nonreactive (eg, glass and metal).
Patients are often unaware that a foreign body is present in their wound; a high level of clinical suspicion should accompany any injury pattern at risk for foreign-body penetration. Wounds at increased risk for foreign-body penetration include lacerations caused by broken glass, perioral injuries with loss of dentition, and injuries to the hands and feet involving needles, nails, or splinters.
Suspicion of a retained foreign body mandates local wound exploration and the consideration of radiographic or ultrasound evaluation. Nearly 80% of objects can be identified on plain radiographs. More specifically, approximately 90% of glass fragments greater than 2 mm in size can be identified through the use of plain radiographs; fragments as small as 0.5 mm can be identified in 50% to 60% of cases. In situation where plain radiographs are poor, ultrasound may be considered.
Due to their increased risk for delayed infection and poor wound healing, reactive material must be removed. Nonreactive objects, however, may be left in place if reasonable effort to remove it has been unsuccessful, and no potential for harm to a vital structure exists. Glass, however, has the potential for significant irritation and a removal attempt should be pursued.
The base of the wound must be visualized as many foreign bodies hide there.
Common foreign bodies retained in hand wounds are wood splinters, glass fragments, metallic objects, and needles.
Missed retained foreign bodies are a very common source of litigation in emergency medicine.
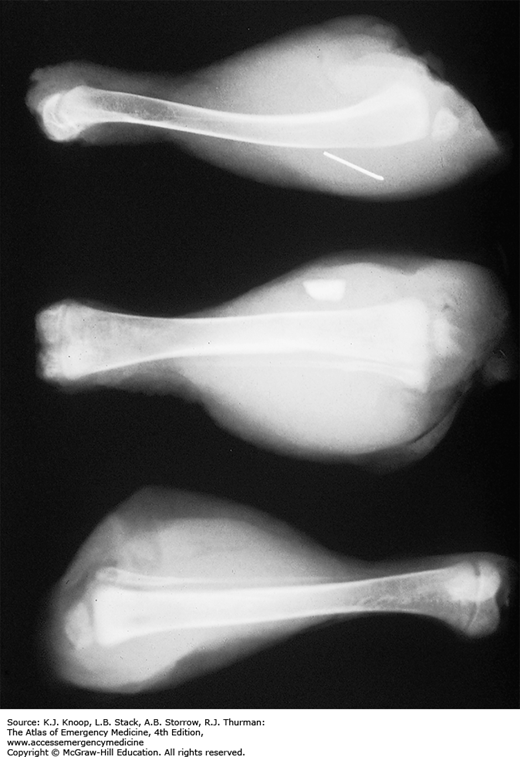
FIGURE 18.7
Radiodensity of Common Foreign Bodies. The plain radiograph (A) demonstrates the radiodensity of common foreign bodies. Counterclockwise from top left: pebbles, paper clip fragment, wood splinter, hollow needle, light bulb glass, dark (“beer bottle”) glass, transparent glass, and automobile windshield glass. Note that, although faint, the wood splinter is visible on plain radiography. Ruler markings (B) for the photograph of the corresponding objects are in centimeters. (Photo contributor: Matthew D. Sztajnkrycer, MD, PhD.)
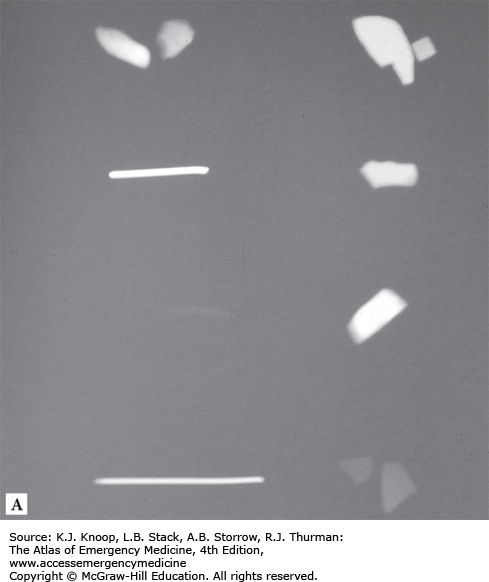
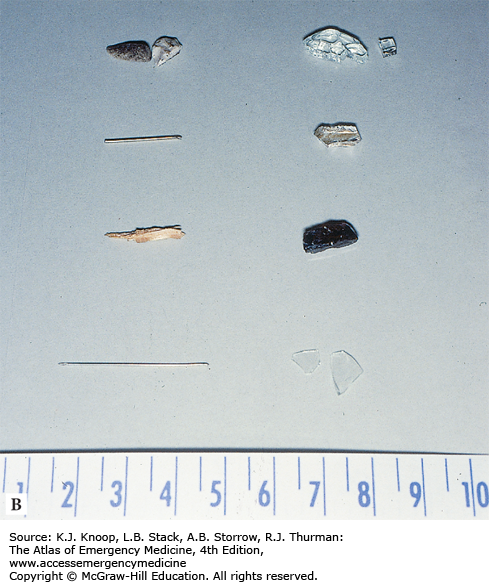
FIGURE 18.8
Radiodensity of Common Foreign Bodies in Tissues. The paper clip, dark glass, and wood splinter (top to bottom) imaged in Fig.18.7 were inserted into chicken legs and radiographs taken. The wood splinter is no longer clearly visible within the soft tissue. For purposes of foreign-body localization, a minimum of two radiographic views at 90 degrees to one another are obtained, and the site of the foreign-body entry clearly marked. (Photo contributor: Matthew D. Sztajnkrycer, MD, PhD.)
TRAUMATIC WOUNDS
Traumatic surface wounds are caused by one of three mechanisms: shearing, tension, or compression. Such a division helps to guide management decisions involving infection risk and scar formation.
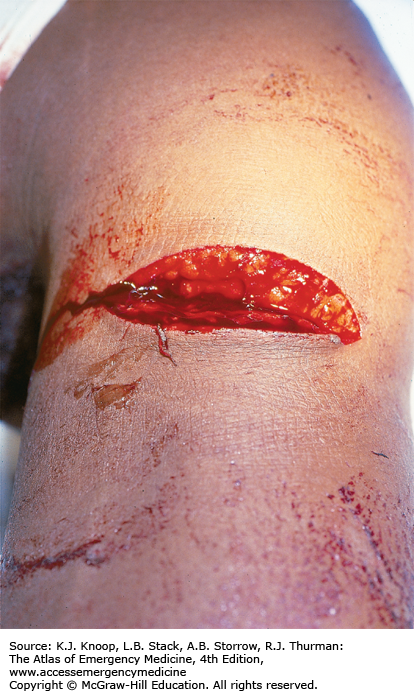
Shearing injuries are caused by sharp objects, such as glass shards or knives, which impart low-energy injury and minimal tissue destruction. A majority of uncomplicated shearing injuries (ie, those not involving neurovascular or anatomically important structures) are repaired primarily in the emergency department (ED). The risk of infection is low and scar formation is typically cosmetically acceptable. Puncture wounds occur from sharp objects that pierce the skin and penetrate into deeper tissues. Such wounds are at a higher risk for infection, foreign-body retention, and underlying structural injury.
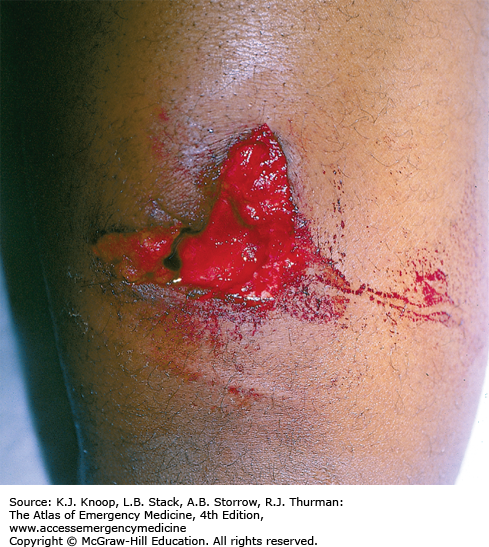
Tension or partial avulsion injuries occur when an object strikes the skin at a sharp angle creating a triangular flap. This results in potential vascular disruption, greater tissue destruction, and a higher risk for infection and tissue ischemia. During the repair, vascular supply to the flap must be meticulously preserved; otherwise, the flap may become ischemic.
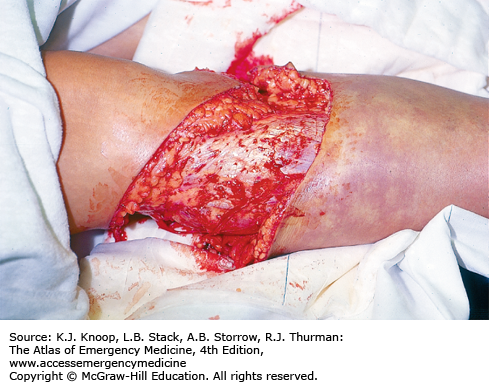
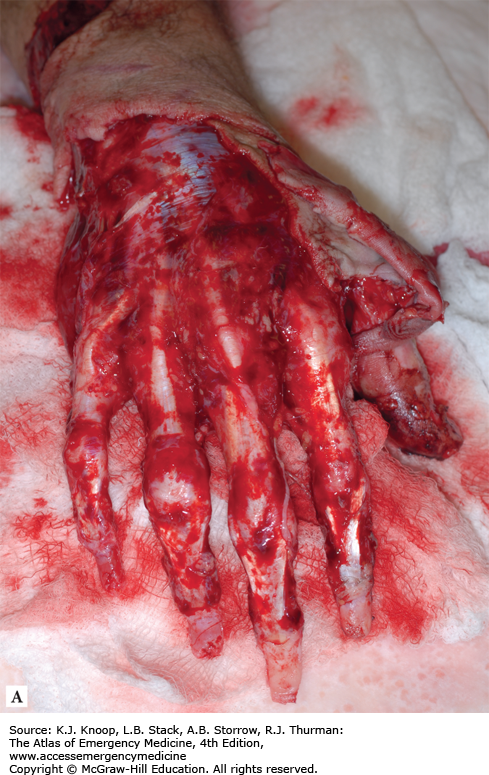
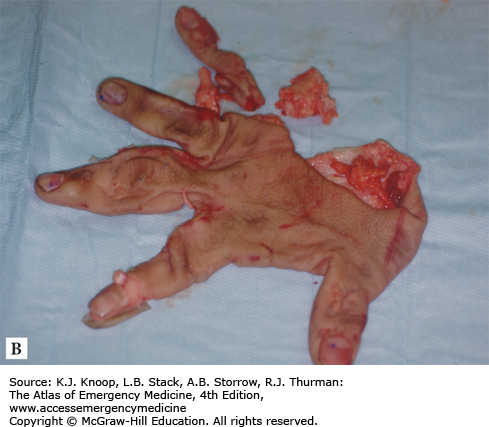
Crush or compression injuries occur when a blunt object strikes tissue at a right angle, imparting a high degree of kinetic energy. This results in significant tissue destruction of the skin and its underlying supportive fascial layers. Crush injuries are typically ragged, with irregular wound edges and a complex laceration pattern. Despite meticulous wound care and careful primary closure, the resulting scars may be cosmetically poor.
First update the tetanus status of all patients requiring wound management. Carefully document the time and functional/neurovascular status at initial evaluation, as this may change over time. Upon optimizing wound preparation, appropriate closure tension must be achieved. If open fracture is suspected or confirmed, IV antibiotics are administered and orthopedic consultation obtained. Repair of traumatic wounds depends on the depth, complexity, and location. Deep wounds are closed in layers or by using a vertical mattress technique to remove dead space and relieve tension. Superficial wounds may be repaired with staples, simple interrupted sutures, or running sutures. In certain circumstances, the use of adhesive skin closures or adhesive glues may be adequate.
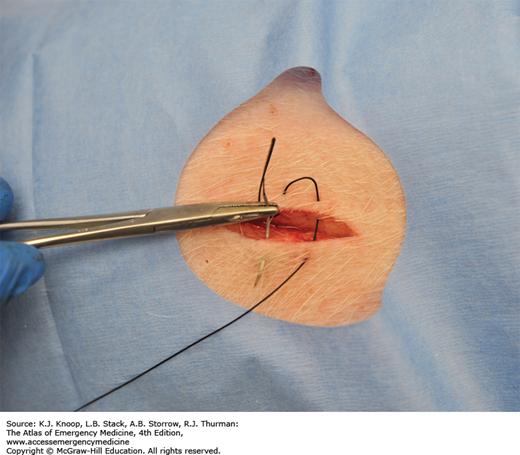
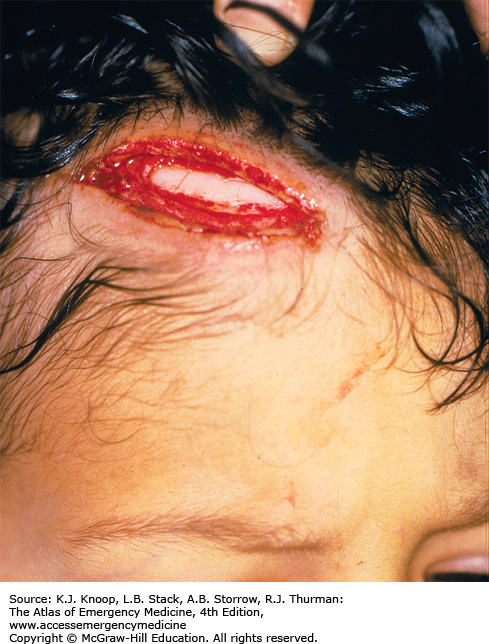
FIGURE 18.10
Linear Laceration. A long, linear shearing laceration involving the forehead and scalp, with exposed galea. The wound is explored and palpated for evidence of a depressed or open skull fracture. Closure of large galeal lacerations is recommended to prevent infection. Large frontal galeal lacerations are also repaired to prevent a cosmetic deformity of the frontalis muscle. (Photo contributor: Kevin J. Knoop, MD, MS.)
Simple, uncontaminated, and uncomplicated wounds caused by clean, sharp objects in otherwise healthy patients may undergo primary closure up to 18 hours from the time of injury with good cosmetic result (see Simple Wound Closures).
The vascular supply to a flap is often tenuous; improper closure may further compromise the tissue, especially at the tip. A repair using a corner stitch will help minimize further ischemia (see Complex Wound Closures).
Crush injuries have an increased susceptibility to infection. Thorough cleansing, copious irrigation, and judicious debridement are required.
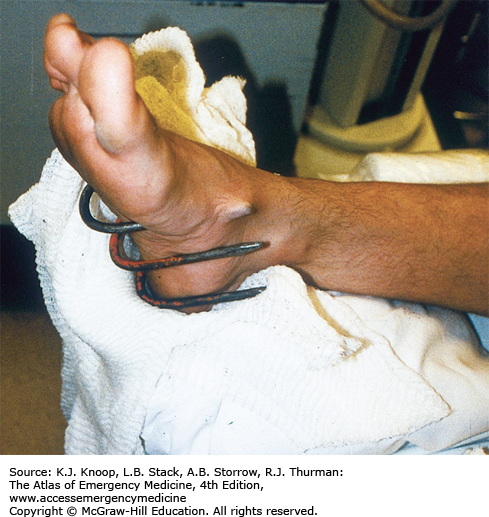
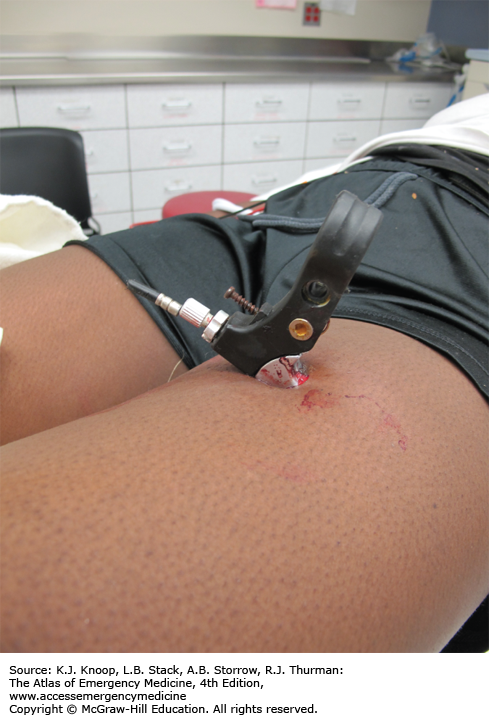
FIGURE 18.13
Partial Avulsion Injury. A typical partial avulsion laceration from a fall onto the edge of a staircase. Note the triangular “flap” in the upper left wound quadrant. Closure of partial avulsion injuries must be particularly meticulous to reduce any further compromise of the flap tip’s vascular supply. (Photo contributor: Alan B. Storrow, MD.)
EAR LACERATIONS
The ear is composed of a poorly vascularized cartilaginous skeleton covered by tightly adherent skin. Given the paucity of subcutaneous tissue, ear injury that results in hematoma formation can cause pressure necrosis of the cartilage. The goal of repairing an ear laceration involves completely covering the exposed cartilage and preventing hematoma formation.
Prior to repair, the area is examined for signs of acute hematoma formation or other associated traumatic injuries. Hemotympanum or Battle sign suggests the presence of a more serious closed head injury, especially basilar skull fracture. Blunt trauma may result in barotrauma resulting in tympanic membrane perforation. Examination can be facilitated by local anesthesia infiltration or, in the case of larger or more complex lacerations, a regional nerve block.
Simple lacerations through the earlobe or the helix can be repaired with interrupted 6-0 nonabsorbable monofilament sutures if the cartilage is not exposed. Simple lacerations that involve the cartilage are primarily repaired by ensuring complete coverage of the exposed cartilage by careful apposition of the overlying skin. The skin generally provides sufficient support, so sutures are not required for the cartilage itself. If the wound is sufficiently irregular and cartilage debridement becomes necessary to avoid undue wound tension, the debridement should be kept to a minimum.
A perichondral hematoma must be drained within 72 hours to prevent potential pressure necrosis which can result in a “cauliflower” ear. Ear wounds are best dressed with a mastoid pressure dressing either primarily or after later hematoma drainage. Such a dressing reduces the chances for future hematoma formation and its complications. Ear sutures are removed in 4 to 5 days.
Epinephrine-containing anesthetic at a 1:100,000 dilution may be used in ear laceration repair.
Hematoma evacuation needs to be rechecked in 24 hours to evaluate for reaccumulation.
If cartilage has been exposed or a hematoma drained, antistaphylococcal antibiotic coverage is recommended.
Complex lacerations and hematomas of the ear are best cared for in conjunction with a consultant.
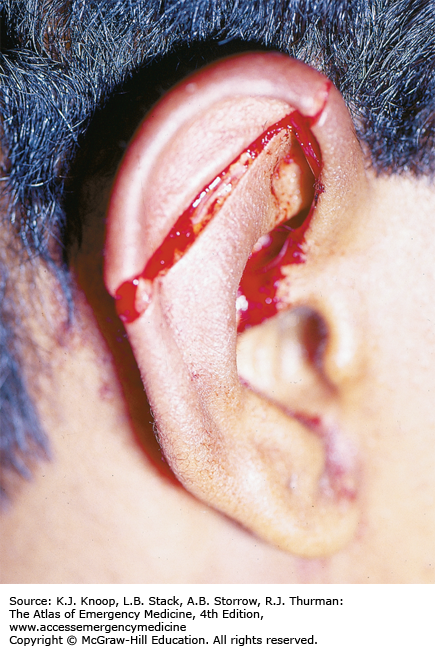
FIGURE 18.19
Ear Laceration.
Related posts:


Stay updated, free articles. Join our Telegram channel

Full access? Get Clinical Tree


