INTRODUCTION
AIRWAY MAXIM ONE
MAXIM: Endotracheal intubation is not always the best initial intervention for respiratory failure.
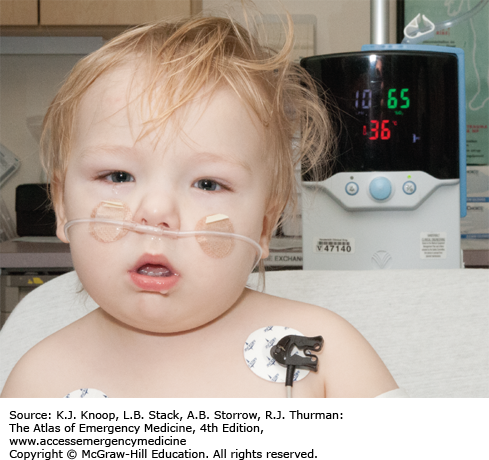
Some patients in respiratory distress may benefit from other interventions, short of intubation. Patients with flash pulmonary edema may have dramatic improvement with intravenous nitroglycerin, intravenous furosemide, and BiPAP (Bi-Level Positive Airway Pressure) ventilation (see Fig. 22.1). Patients with airway narrowing (edema, neoplasm, stricture, foreign body) can have significant decreased work of breathing by decreasing airway resistance to inspired gas using administration of helium-oxygen (HELIOX) mixture. HELIOX, usually as a 78%: 22% helium: oxygen mixture, is much less dense than either air or 100% oxygen by virtue of helium replacing nitrogen or oxygen, respectively. This lowers resistance to laminar flow by as much as 20% to 25% and the effects are immediate.
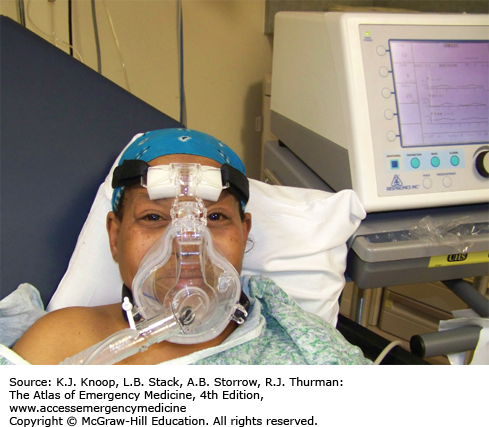
Alternative ventilatory adjuncts include HELIOX, CPAP, BiPAP, and Vapotherm (see Fig. 22.2). These adjuncts may prevent the need for intubation in selected patients.
AIRWAY MAXIM TWO
MAXIM: The most important initial airway intervention may be to ask for help.
Clinical scenarios where asking for help include:
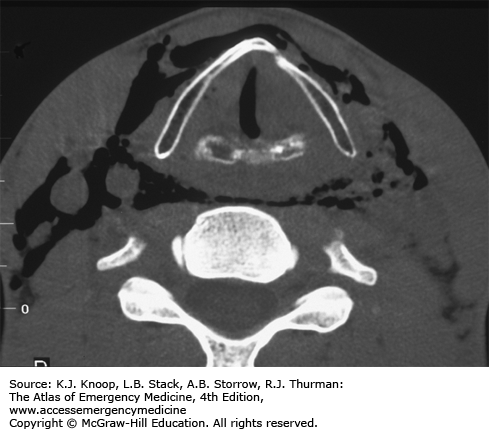
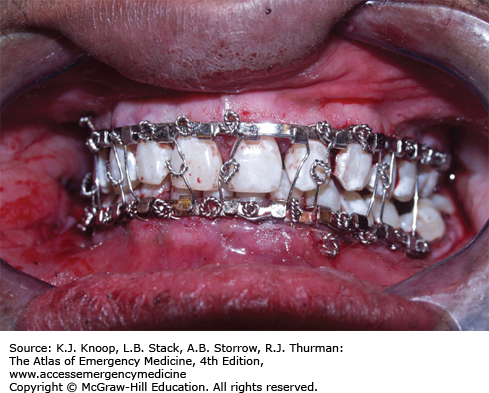
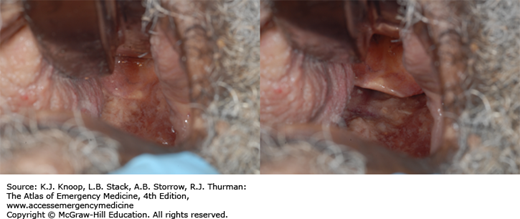
Laryngeal injury/tracheal disruption, for whom a nonendoscopic intubation attempt can result in tracheal disruption and fatally lost airway (see Fig. 22.3).
Recent neck surgery, with pending loss of airway from an expanding hematoma; definitive and life-saving intervention in this case is to open up the recent incision and evacuate the hematoma.
Suspected epiglottitis, where an immediate operative tracheostomy or cricothyroidotomy may be required if intubation fails due to epiglottic edema.
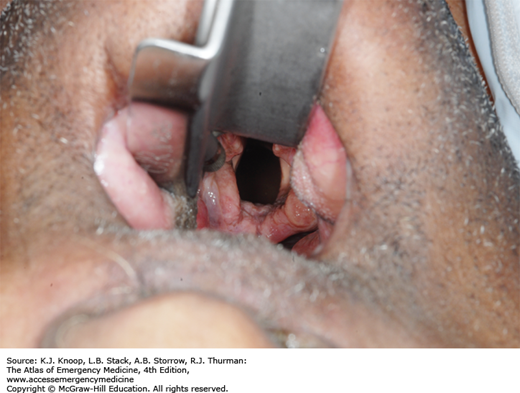
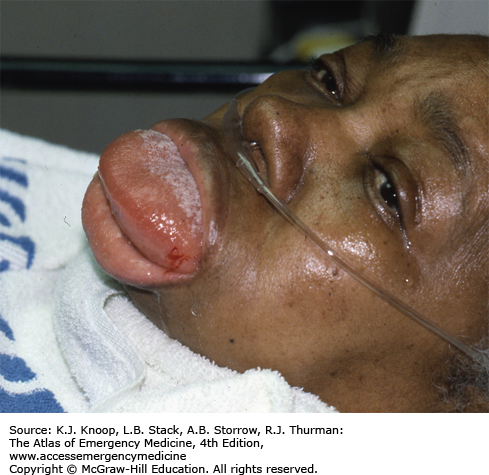
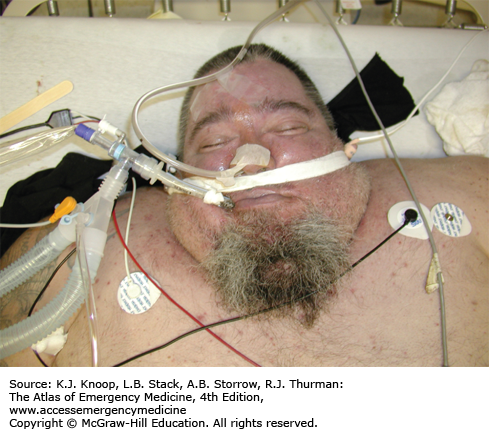
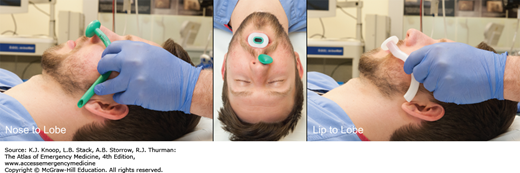
Severe angioedema with tongue, oropharynx swelling where endotracheal or nasotracheal intubation may be obstructed (see Fig. 22.4).
Emergency physicians are emergency airway experts, but know your limitations.
Do not let your ego get in the way of proper patient airway management and care.
AIRWAY MAXIM THREE
MAXIM: Most patients with airway/respiratory problems should be positioned for their comfort, not ours.
If mentating normally and physically able, a patient with airway difficulty will assume a position which optimizes their airway patency and gas exchange, usually sitting up and leaning forward. Such patients include those with incomplete airway obstruction, flash pulmonary edema, and massive airway bleeding from oropharyngeal trauma. Unfortunately, during preparation for intubation, such patients often are placed supine prematurely, increasing the patient’s respiratory distress and anxiety, increasing the likelihood of spontaneous emesis and aspiration, and decreasing his ability to handle oropharyngeal bleeding or secretions. In these clinical situations, we should rethink the desire to immediately place a patient supine for endotracheal intubation. Intubation can be accomplished with the patient sitting up, by either of the following.
Altering the intubation technique (see Fig. 22.5).
Altering the intubator position relative to the patient (see Fig. 22.6).
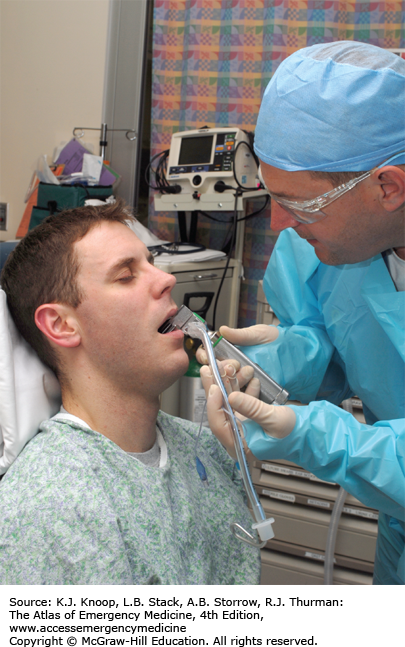
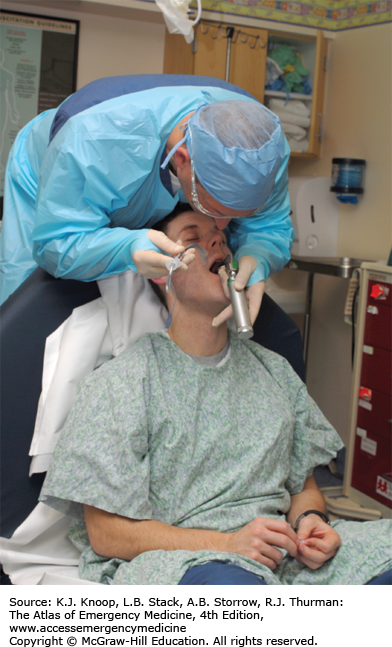
FIGURE 22.6
Intubation above the Sitting Patient. Standing above a patient and intubating in the conventional manner is an alternative airway management position in a patient who may be difficult to ventilate in the supine position. An assistant may be necessary to hold the patient upright if sedated and/or paralyzed. (Photo contributor: Lawrence B. Stack, MD.)
Keep patients in optimal position for spontaneous ventilation until they are sedated just prior to intubation; then, place them supine.
Consider intubating a patient sitting upright if you feel the supine position will compromise their ability to be ventilated.
Titrating ketamine in small doses (10 mg every 1-2 minutes) may facilitate awake intubation in a patient sitting upright.
AIRWAY MAXIM FOUR
MAXIM: Think before you paralyze.
Before committing to rapid-sequence induction (RSI) for direct laryngoscopy, consider the following:
Are any planned medications contraindicated?
Can rescue ventilation be achieved?
Is direct laryngoscopy possible? (See Fig. 22.7.)
What are my secondary and tertiary backup plans in the event of primary plan failure?
Are my equipment and personnel ready for RSI?
A good backup plan to direct laryngoscopy should have at least one alternative intubation technique, one alternative ventilation technique, and one surgical airway technique.
Prepared equipment, correct patient position, proper drug dosing, having a backup plan, effective communication, and good technique will promote first-pass intubation (see Figs. 22.8 and 22.9).

AIRWAY MAXIM FIVE
MAXIM: Patients will not die if they are not intubated; they will die if their lungs are not ventilated and their blood is not oxygenated.
The goal for airway management in any patient must be to maintain adequate ventilation and oxygenation. This does not necessarily mean intubation. Correct bag-valve-mask (BVM) ventilation/oxygenation technique is an underrated skill that will buy you time in the patient with a difficult airway. Proper steps for optimal two-person BVM ventilation include:
Positioning—ear-to-sternal notch alignment (when clinical scenario permits). Neck slightly flexed, head slightly extended (see Fig. 22.10).
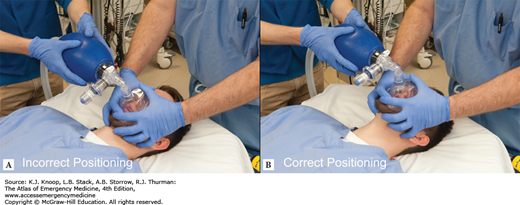
Jaw thrust—displace mandible anteriorly with pressure from long, ring, and small fingers on mandible, not on soft tissues.
Mask compression—thumb and index fingers should apply firm pressure to face and nasal bridge (see Figs. 22.11 and 22.12).
Oral/nasal airways—may help maintain airway patency during BVM ventilation (see Fig. 22.13).
Use 7 mg/kg tidal volume, over 1 to 2 seconds at 12 breaths/min.
FIGURE 22.10
Optimal Ear-to-Sternal Notch Alignment. Optimal position for ventilation and laryngoscopy occurs when the external auditory canal and the sternal notch are aligned in the horizontal plane (B) and the face is parallel to the ceiling (C). This position optimizes airway patency and ventilation mechanics. (Photo contributor: Lawrence B. Stack, MD.)
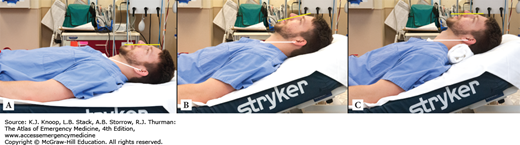
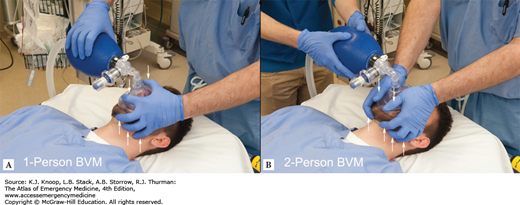
FIGURE 22.11
Bag-Valve-Mask Ventilation. Correct positioning and forces during bag-valve-mask ventilation are demonstrated for the one- and two-person (thumbs) techniques. Upward force on the mandible, not soft tissue, is key to effective jaw-thrust technique. (Photo contributor: Lawrence B. Stack, MD.)
Be an expert at BMV ventilation.
Ear-to-sternal notch positioning is most beneficial in obese patients and those with obstructive sleep apnea.
Keeping dentures in place facilitates BVM, while removing them facilitates orotracheal intubation.
Midface and mandibular disfiguration from whatever cause will interfere with optimal BVM ventilation.
Consider LMA, King LT, or Air-Q if unable to intubate or obtain adequate seal for BVM ventilation.
LARYNGOSCOPIC OROTRACHEAL INTUBATION
The optimal position to maximize laryngoscopic visualization of the larynx is:
The head extended.
The neck flexed.
The base of the ear is aligned with the sternal notch (see Fig. 22.10).
The facial plane is horizontal, parallel to the ceiling (see Fig. 22.10).
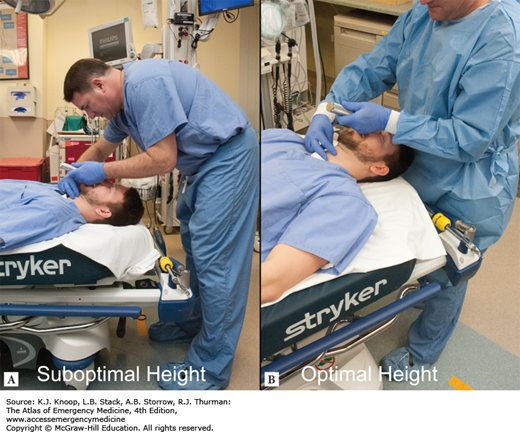
The facial plane should be positioned between the laryngoscopist’s xiphoid process and umbilicus (see Fig. 22.14).
This position most closely replicates in a supine posture which the patient would assume sitting up. For very large individuals or those with significant morbid obesity, this may require creation of a textile ramp of blankets, sheets, or towels to raise the head and shoulders to proper elevation and alignment.
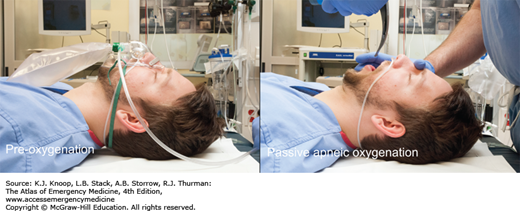
Preoxygenation, when possible, should be used to create an oxygen surplus in the blood and tissue which permits a period of apnea to occur without arterial oxygen desaturation. This process hopefully begins in the prehospital setting with the placement of a nonrebreather mask with high-flow oxygen on the patient. This should continue in the ED in the event intubation is required. In addition, a nasal cannula on high flow (15 L/min) should also be placed when the patient arrives in the ED if there is a high likelihood of intubation. High-flow oxygen delivered by nasal cannula provides passive apneic oxygenation during the apneic phase of endotracheal intubation.
A stylet should be used with all oral intubations in which a laryngoscope is employed. The laryngoscopist will typically fashion an inexpensive stylet, essentially a malleable wire, into a shape of their preference, to permit control of the distal endotracheal tube (ETT) tip. One should take care not to place too much bend or curvature to the stylet, because such a configuration can actually impair the glottic view and control of the ETT tip. Optimal stylet configuration has been described as “straight to the cuff” and then a gentle anterior bend of 30 degrees.
FIGURE 22.15
Preoxygenation and Passive Oxygenation. In preparation for intubation, simultaneously placing an NRBM (preoxygenation before induction) and nasal cannula (passive oxygenation after paralysis) at 15 L/min will help prolong tissue oxygenation during the apneic phase of intubation. (Photo contributor: Lawrence B. Stack, MD.)
Even with a correct bend on the stylet, it may be difficult to advance the styletted ETT into the trachea. The tip of the left-sided beveled tube can impact and catch on the anterior tracheal cartilages, preventing advancement. This can often be remedied with a generous clockwise or rightward rotation of tube and stylet, which acts to rotate the bevel anteriorly and depress the ETT tip.
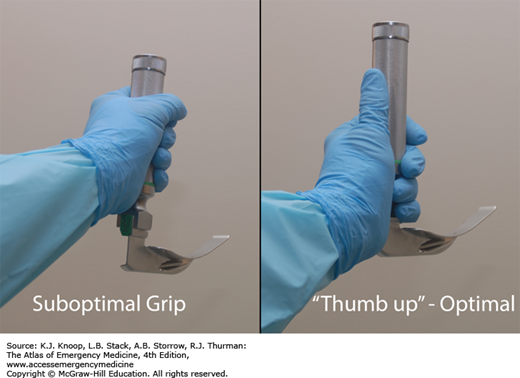
Holding the laryngoscope handle and blade where the proximal end of the blade is in the palm of the hand creates a natural extension of the forearm and provides fine control of the blade tip. The left thumb should run parallel to the axis of the handle. Effort mechanics are more efficient with this grip. Placing the elbow close to the body requires less effort and more mechanical control than if the elbow abducted from the body. A memory aid for these concepts are “Thumb up-Wing in.”

The scissor technique places the laryngoscopist’s right thumb on the occlusive surface of the patient’s lateral mandibular teeth or gum and long or index finger on the maxillary teeth or gum. A scissoring motion opens the mouth allowing blade insertion. The fingers should be removed once the blade is adequately inserted. An alternative technique is to place the laryngoscopist’s right thumb on the nasal bridge and long finger between the mental protuberance and alveolar margin. The thumb and long finger are moved away from each other, causing the mouth to open.

The blade is initially inserted just to the right of midline with the handle pointed toward the patient’s feet. As the tip of the blade advances downward along the tongue base and into vallecula, the tongue is swept slightly to the left to increase the amount of workspace. When fully inserted into the vallecula, the angle of the handle is now approximately 40 degrees from horizontal with lifting forces directed upward and forward.

The key to using the laryngoscope to optimally visualize the glottic opening is to first visualize and control the epiglottis, a relatively fixed anterior structure. Pulmonary secretions, blood, and/or vomitus that pools in the posterior pharynx may obscure the posterior laryngeal structures, dependent with gravity. The epiglottis itself may be camouflaged in this pool of muck (see Fig. 22.20). One should carefully insert the laryngoscope blade with a goal of adequately visualizing and controlling the epiglottis. Failure to do so risks inserting the laryngoscope blade too deeply, and often results in displacing the larynx anteriorly to expose the esophagus, which, as a consequence of anterior-ward tension on the laryngoscope blade, may then look like a glottic opening begging for a tube. By carefully controlling the epiglottis, the intubating clinician will be able to locate important airway landmarks. Be careful to displace the tongue to the left side as you insert the blade. If the bulk of the tongue wraps around the blade, it can both impair your view and impede insertion of the ETT.
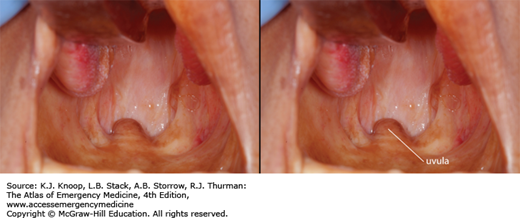
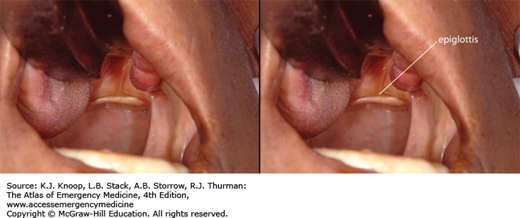
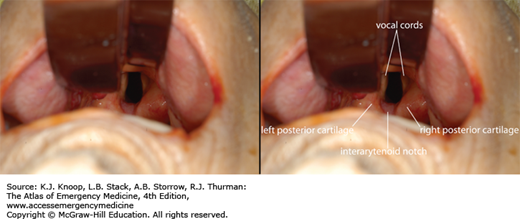
Progressive visualization of laryngeal structures is predictable:
Uvula and posterior pharynx (see Fig. 22.21A)
Epiglottis (see Fig. 22.21B)
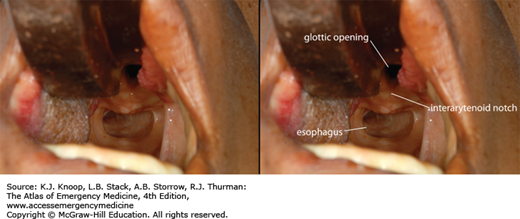
Posterior arytenoids cartilages and interarytenoid notch (see Fig. 22.21C)
Glottic opening (see Fig. 22.21D)
Vocal cords (see Fig. 22.21E)
Esophagus (see Fig. 22.21F)


Even with well-performed laryngoscopy, adequate visualization of the laryngeal structures may be difficult. Bimanual laryngoscopy (external laryngeal manipulation by the operator), where the laryngoscopist performs laryngoscopy while simultaneously manipulating the external larynx, facilitates optimal visualization. This eliminates any delay or miscommunication between an assistant and laryngoscopist. Once optimal position is found, an assistant can maintain that position. Alternatively, an assistant’s hand, placed on the laryngeal structures, guided by the laryngoscopist’s hand can maintain optimal position after the laryngoscopist removes his hand from the assistant’s hand.
Related posts:


Stay updated, free articles. Join our Telegram channel

Full access? Get Clinical Tree


