CHAPTER 44 Vascular Access in the Intensive Care Unit
Peripheral Intravenous Line
Almost every patient in the intensive care unit needs intravenous access.1–3 If fluids or drugs need to be delivered, if the patient cannot be managed entirely on a PO regimen, if the need to resuscitate may arise, access to the vascular system is required. Most often patients need more invasive access, but peripheral intravenous access still has its utility.
Technique
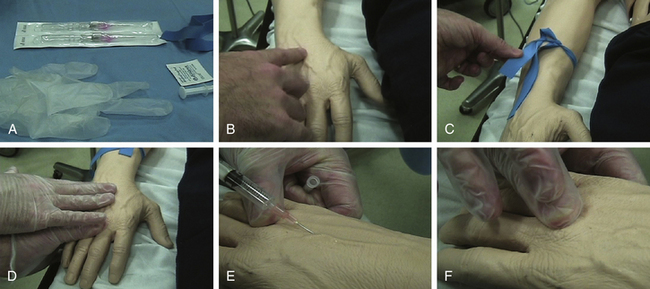
Steps for inserting a peripheral intravenous line are shown in Figure 44-1. Always wear gloves. Place the tourniquet, but do not tie it in a knot. Get the vein to pop up by asking the patient to pump the fist, lightly tapping the vein, or hanging the arm down. Other ways to get the vein to stick up include putting warm blankets on the arm or using the blood pressure cuff: inflate the cuff above systolic pressure; wait a minute, then let the cuff down between systolic and diastolic so the blood can go in but can’t get out.
Complications
Some of the known complications of intravenous line placement are phlebitis, infection, and extravasation. Contributing factors for phlebitis are size of the catheter itself, site of insertion and skill of the practitioner, and duration. Infection may be aggravated by contaminated infusions, poor technique, and inadequate preparation of the skin. Age, duration, site of insertion, and type of cannula may make patients susceptible to extravasation.
Radial Arterial Line
Indications and Contraindications
The radial artery is the most common location for placing an arterial line.4–8 It is indicated for close blood pressure measurement, where small changes in blood pressure will make a big difference, as well as frequent blood gas sampling. Radial arterial line is contraindicated in patients who underwent radial artery harvesting for a bypass, arterial insufficiency of the hand, and infection at the site. Interestingly, Raynaud’s phenomenon is not a contraindication for placement of a radial arterial line.
Technique
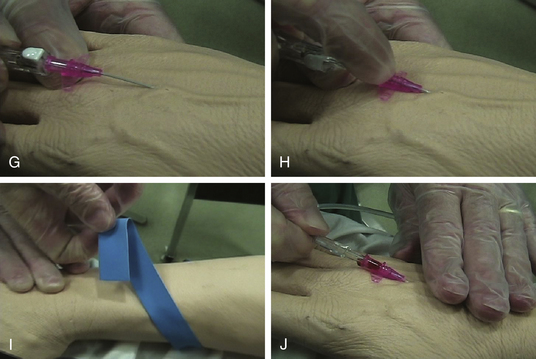
Steps for inserting a radial arterial line are shown in Figure 44-2. First, explain the procedure and obtain consent. Set up the equipment so there is pressure tubing ready to connect as soon as the line is in, as the blood will be pumping out at arterial pressure. Zero the transducer and make sure the pressure tubing is pressurized. Using the patient’s non-dominant hand, extend the wrist and flatten out the hypothenar eminence so there is a straight shot into the radial artery. Going up and over the thenar eminence is much more difficult. Prep and apply a little local anesthetic. In the through-and-through technique, poke all the way into and through the artery, then pull back until the blood flows (signifying the catheter’s re-entry into the artery) and then advance the catheter up into the artery. A variant of this technique involves a wire: go through the artery, pull the needle out, then pull back until there is pulsatile flow, slide a wire in, then advance the catheter over the wire. In the go-in-the-first-time technique, do not go all the way through. When blood flow is seen, advance a little (making sure the catheter is in the artery, not just the needle tip), then advance the catheter. There are proponents and detractors of both techniques, so use the one that works best for you. Keep in mind that the blood should keep flowing and the catheter should slide easily with either technique. Hold the artery to keep the blood from spilling when you pull out the needle. Connect the pressure tubing to the catheter via Luer Lok (a non-Luer may fall out). Check the tracing to ensure that there is an arterial waveform. Once the line is in, do not keep the wrist in extreme extension to avoid stretching the median nerve.
Brachial Arterial Line
Indications and Contraindications
The indications for placing a brachial arterial line9,10 are the same as for other arterial lines, i.e., when close blood pressure monitoring and frequent blood gases are needed. In reality, most often a brachial line is chosen after the radial arterial line placement has been unsuccessful and the femoral artery is not an option due to aorto-occlusive disease or history of femoral vascular surgery. Contraindications for placing a brachial arterial line include vascular disease in the arm and infection at the intended site.
Technique
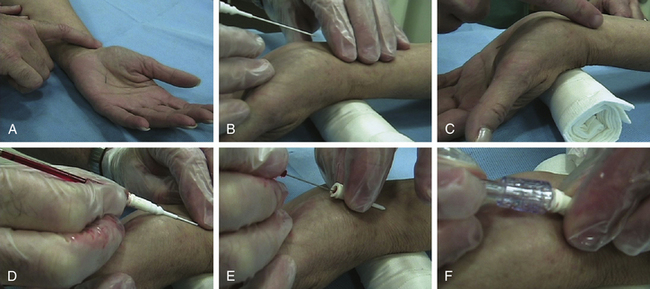
Steps for inserting a brachial arterial line are shown in Figure 44-3. Explain the procedure and get consent. Position the patient’s arm flat on the arm board. Palpate the brachial artery, just medial to the midline in the antecubital fossa. Make a mark on the skin with a marker. Prep, drape, and administer local anesthetic. We recommend the Seldinger technique for line placement. Use the hollow needle to nick the vessel. Disconnect, observe for good blood flow, and then advance wire up the hollow needle. Remove the needle, advance the catheter up the wire, remove the wire, hook up and sew in the line. Ensure all the connections are tight, the trace is good, and that one can draw back easily.
Femoral Arterial Line
Indications and Contraindications
Similar to radial arterial line, femoral arterial line11–13 is indicated for close blood pressure measurement, where small changes in blood pressure can make a big difference, as well as frequent blood gas sampling. Also, in some cases one can anticipate the need for an intra-aortic balloon pump later on, so having a line already in the femoral artery will allow quick access. Femoral arterial line is contraindicated in patients with recent femoral surgery (aorto-iliac procedure, femoral-femoral or femoral-popliteal bypass), infection at the site, those who already have a venous line in the femoral region (can get an arteriovenous malformation), and patients with an occluded aorta (the blood pressure measurement will not be accurate).
Technique
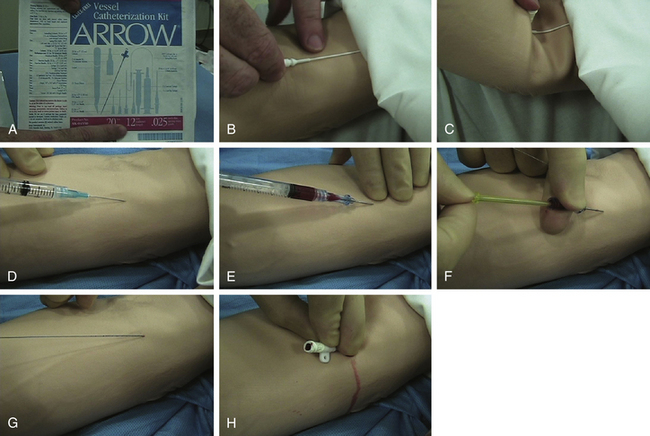
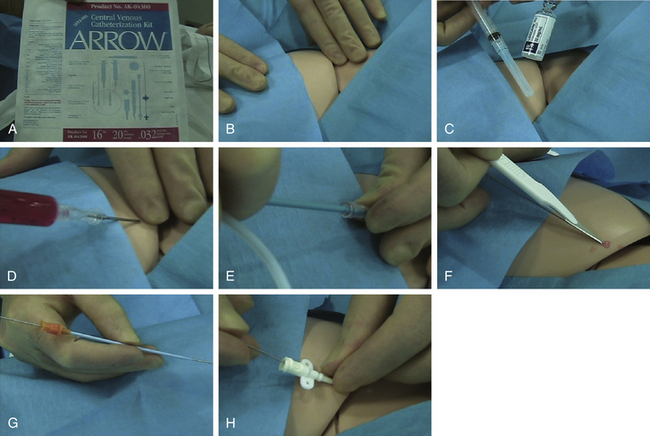
Steps for inserting a femoral arterial line are shown in Figure 44-4. Explain the procedure and obtain consent. If the operator is right-handed, the right femoral artery is easier to approach. The left femoral artery is easier to approach for a left-handed person. Prep and drape in sterile fashion and have an assistant nearby. Apply local anesthetic liberally as the femoral artery is very deep and it can be uncomfortable. The mnemonic NAVEL is useful to remember for anatomic structures from lateral to medial (Nerve, Artery, Vein, Empty space, Lymphatics). It is recommended to use a long needle without a finder. Stick below the inguinal crease and go for the pulse. Use ultrasound guidance to find the vessel if it is available. When blood flow is seen, ensure it is arterial and not venous. Pass the wire through the needle without forcing it; it should pass easily. When the wire is in, remove it. Make a small nick in the skin, pass the catheter, again check that there is good flow, sew in place, and put a good dressing on.
