NON-IMAGE DIAGNOSES
ESSENTIALS
The World Health Organization (WHO) lists what they consider the essential diagnostic imaging equipment worldwide (Table 19-1).1 This varies with the four levels of hospital capabilities (see Table 5-1).
| Facility Level | ||||
|---|---|---|---|---|
| Resources/Capabilities | Basic | GP | Specialist | Tertiary |
| Plain radiography | D | D | E | E |
| Portable plain radiography | I | D | D | E |
| Ultrasound for trauma (pleural cavity/abdomen for hemoperitoneum; fluid/heart for pericardial effusion) | I | D | D | D |
| Computerized axial tomography (CT scan) | I | D | D | D |
| Contrast radiography (barium, Gastrografin) | I | I | D | D |
| Angiography | I | I | D | D |
| Image intensification/fluoroscopy | I | I | D | D |
| Magnetic resonance imaging (MRI) | I | I | D | D |
| Nuclear medicine imaging | I | I | D | D |
VIEWING X-RAYS
Even if radiology is available, it may be intermittent or deliver poor quality images. Film, rather than digital images, may be the norm.
To help illuminate dark areas of the film, make a “hot light.” Using a lamp with a 25-watt regular lightbulb, take off the shade and slip a tin can with both ends cut out over the shade’s support wires. The can should fit tightly so the wires support the can. If this is not the case, cut the can lengthwise and wind tape around it so that it sits securely on the shade supports. Then take a piece of heavy cardboard, aluminum foil, or thin metal and cut a hole with a 2- to 3-inch diameter in the center. Lay this on top of the can and tape it in place. If using cardboard, be careful that it doesn’t get too hot and burn. When you need to see a dark area on the film, turn on the light and hold the film over it—but not too close or it will begin to burn. Do not bother trying to use flashlights (too diffuse a beam) or penlights (too narrow a beam).
Light boxes to view radiological images may be scarce. Make light boxes or read the film without one. Methods to view films without a light box include the following:
Hold the radiograph up to a light source, such as a lamp or ceiling light. If you just want to get a general look at an x-ray, perhaps to make sure it is the right one, then basic background lighting should be sufficient. A more detailed examination, however, will require a stronger light source.
Place the radiograph against a brightly lit window. Tape the film in place if it will be needed for some time, such as in the operating room or when teaching. Similar to a light box, this method backlights the radiograph so that you can see the contrast.
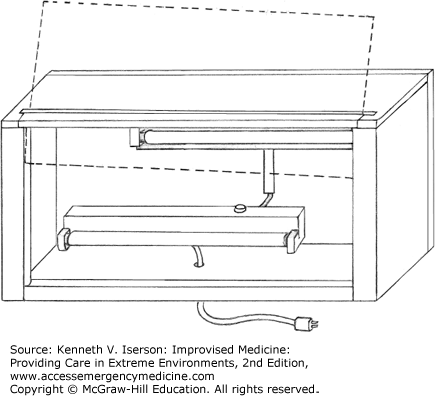
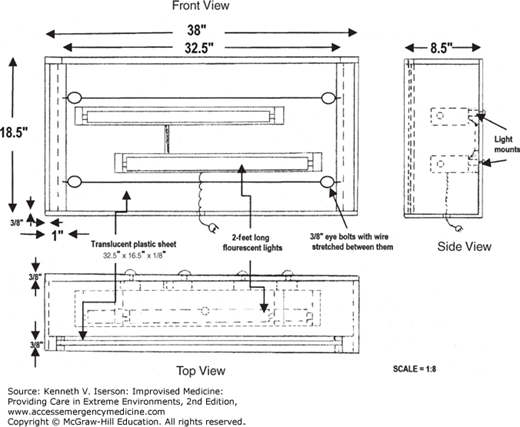
A view box can quickly (3 hours) and inexpensively (~$63 US) be made from locally available materials, as we did in Kintampo Municipal (District) Hospital in rural Ghana (Figs. 19-1 and 19-2). Our view box is a wooden case containing fluorescent bulbs with a translucent plastic viewing screen. The bulbs are the same as those used in the hospital’s ceiling lights. The plastic, available locally, slides into grooves cut in the sides of the box, and can easily be lifted out to change the bulbs. Radiographs rest on a lip at the bottom of the box, and are held in place with both the top wooden slat that anchors the plastic sheet and two wires strung across the front of the box to eye bolts in the sides. The activation switch on the electrical socket is used to turn the light box on and off. Our light box design accommodates two full-size radiographs simultaneously. The light box can be set on a desk or shelf or, as at our hospital, mounted on the wall using standard brackets.2
FIG. 19-1.
A locally made radiographic viewing box. (Reproduced with permission from Iserson and Timeb.2)
Which is the right side? Normally, films are labeled with either “right” or “left” markers. (On chest and abdominal films, except with situs inversus, it should be obvious.) These metallic markers are small and easily lost. Bend a paper clip into an “L” (easier) or an “R” (if you are talented) and tape it on the film as you would with a standard marker.
Localizing foreign bodies in soft tissues can be challenging.
Radiopaque markers used to localize embedded foreign bodies on radiographs include ball bearings, metallic pellets for air rifles (BBs), lead markers for radiographs (especially the “O”), hypodermic needles placed at right angles to a puncture, electrocardiogram (ECG) or electroencephalogram (EEG) leads, or paperclips. Use Vitamin E capsules as markers for magnetic resonance imaging (MRI) and computed tomography (CT) scans because they are visible but do not cause scatter.
Make a simple but highly effective marker from two paperclips, with one wire of each opened to about 45 degrees and pointed toward the wound. Tape them over and around the wound using clear adhesive tape. Use more for large wounds. With plain radiographs, obtain at least two views to better localize any foreign body. When using paperclip markers for a CT scan, unbend them to minimize scatter at the end of the marker nearest the wound. Once the site is determined, mark it with methylene blue or another skin marker before removing the paperclips.3
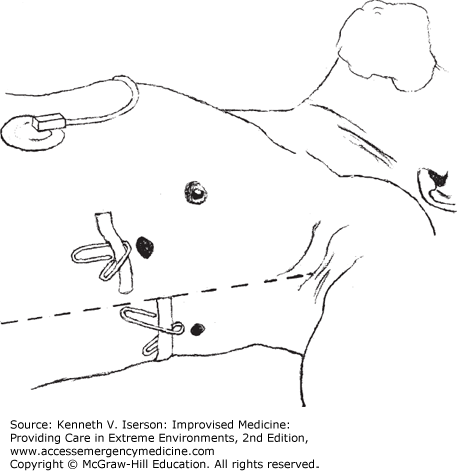
One variation on the paperclip foreign-body marker is to use a “forward arrow” (Fig. 19-3) pointing to penetrating wounds that enter anterior to the anterior axillary line (the front of the body) and a “backward arrow” pointing to those that enter posterior to that line (back of the body). This helps with localizing the penetrating foreign body’s, usually a bullet’s, trajectory.4 Of course, everyone has to know what the different markers mean.
DETECTING PNEUMOTHORACES ON SUPINE CHEST RADIOGRAPHS
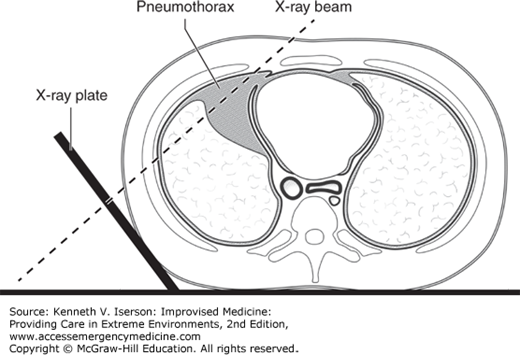
ESTIMATING THE SIZE OF A PNEUMOTHORAX
The treatment of pneumothoraces depends on their size. Rather than inserting a chest tube (and using many resources), it is possible to manage patients without dyspnea who are <50 years old and have a “small,” first-time unilateral spontaneous pneumothorax solely with observation.6 But, how can you tell that it is “small”?
To avoid using the complex, and often inaccurate, formulas and nomograms to calculate pneumothorax size, the British Thoracic Society suggests the use of a simple method that works well in clinical practice: A “small” spontaneous pneumothorax is determined when the average interparietal distance (AID) is <2 cm. The AID is an average of the distance between the parietal and visceral pleura at three points: the lung apex, and one-third and three-fourths of the way down the lung. Other recommendations state that the distance between the apex of the chest to the cupula of the lung should be <3 cm to be considered “small.”7
CONTRAST STUDIES
Related posts:


Stay updated, free articles. Join our Telegram channel

Full access? Get Clinical Tree


