, Spencer Skelton2, Krista Turner3 and Hassan Aijazi4
(1)
Department of General Surgery, University of Texas Health Science Center, Houston, TX, USA
(2)
Department of General Surgery, The Methodist Hospital, Houston, TX, USA
(3)
Department of Surgery, Weill Cornell Medical College, The Methodist Hospital, 6550 Fannin St, SM 1661A, Houston, TX 77030, USA
(4)
Department of Anesthesiology, University of Texas at Houston Medical School, Houston, TX, USA
Abstract
An understanding of airway management skills and concepts is essential for any clinician. Maintaining a patent airway is a prerequisite for successful ventilation and oxygenation, and even a temporary lapse in airway patency can lead to permanent, potentially fatal consequences. The first successful attempt at creating an artificial airway dates to 1667, when Robert Hooke inserted a narrow-lumen tube into a dog’s trachea and then manually insufflated the dog’s lungs using a bellows. The need for airway proficiency combined with technological advancement in fields such as laryngoscopy allowed physicians to improve the standard of care in airway management after World War I, and by the mid-1920s, most patients were intubated under direct laryngoscopic vision. The basic fundamentals of airway management have remained largely unchanged since that time. This chapter discusses basic airway skills such as proper patient positioning and mask ventilation. It will also describe how to conduct a focused airway examination and give a short overview of how to proceed if a difficult airway is encountered. Surgical airway techniques and their complications will also be covered in detail.
Introduction
An understanding of airway management skills and concepts is essential for any clinician. Maintaining a patent airway is a prerequisite for successful ventilation and oxygenation, and even a temporary lapse in airway patency can lead to permanent, potentially fatal consequences. The first successful attempt at creating an artificial airway dates to 1667, when Robert Hooke inserted a narrow-lumen tube into a dog’s trachea and then manually insufflated the dog’s lungs using a bellows. The need for airway proficiency combined with technological advancement in fields such as laryngoscopy allowed physicians to improve the standard of care in airway management after World War I, and by the mid-1920s, most patients were intubated under direct laryngoscopic vision. The basic fundamentals of airway management have remained largely unchanged since that time. This chapter discusses basic airway skills such as proper patient positioning and mask ventilation. It will also describe how to conduct a focused airway examination and give a short overview of how to proceed if a difficult airway is encountered. Surgical airway techniques and their complications will also be covered in detail.
Airway Anatomy
It is important to have a clear understanding of the functional anatomy of the airway, as illustrated in Fig. 13.1. The airway begins with the mouth and nasal cavity. The tongue fills the floor of the oral cavity and extends posteriorly into the oropharynx. In unconscious and/or paralyzed patients, the tone of these attaching tongue muscles can become impaired, allowing the tongue to fall back into the pharynx and obstruct the airway. Anteriorly, the palate divides the oral and nasal cavities into two distinct entities; these cavities merge posteriorly to form the pharynx. The pharynx acts as a conduit connecting the oral and nasal cavities to the esophagus and larynx inferiorly. The pharynx serves as part of both the digestive and respiratory systems, and has two inferior openings: the esophageal opening and the laryngeal opening. For the purposes of securing an airway, there are three specific anatomic considerations:
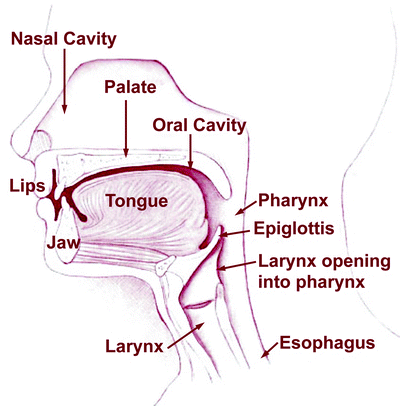
Fig. 13.1
Upper airway anatomy. Reproduced with permission from http://training.seer.cancer.gov/head-neck/anatomy/overview.html
1.
The size and orientation of the pharyngeal openings. The laryngeal opening is the smaller of the two hypopharyngeal openings, and lies on the anterior aspect of the pharynx. Conversely, the esophageal opening is larger and closer to the terminal, inferior aspect of the hypopharynx. This arrangement of the two openings allows pharyngeal contents to more naturally progress down into the esophagus as opposed to the larynx. Thus, a tube blindly inserted into a patient’s mouth is more likely to enter the esophagus than the airway.
2.
The epiglottis. The epiglottis is a cartilaginous flap that is attached to the entrance of the larynx. Its function is to cover the laryngeal opening during swallowing and protect against aspiration. During normal respiration, the epiglottis points upwards and out of the way of the laryngeal opening, allowing air to pass easily into the larynx. During swallowing, elevation of the hyoid bone draws the larynx upwards, rolling the epiglottis into a more horizontal position. In this position, the epiglottis covers the laryngeal opening and protects against aspiration. During laryngoscopy, the practitioner uses the laryngoscope to “lift” the epiglottis out of the way, allowing direct visualization of the glottic opening.
3.
The axes of the oral cavity in relation to the pharynx and larynx. The orientation of the axes of the oral cavity, pharynx, and larynx, as seen in Fig. 13.2, is misaligned with respect to each other. In order to successfully visualize the vocal cords, the three axes must be maximally aligned, allowing the airway practitioner to see directly from the mouth to the glottis. This is done by positioning the patient in the “sniffing” position, which is discussed later in the chapter.
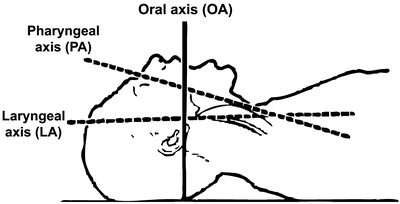
Fig. 13.2
This picture shows the misaligned axes of the oral cavity (OA), pharynx (PA), and larynx (LA). Stone DJ, Gal TJL. Airway management. In: Miller RD, editor: Anesthesia. 4th ed. New York: Churchill Livingstone; 1994, p. 1408
Airway Assessment
Just as it is important to conceptualize what a “normal” airway looks like, it is important to recognize that the airway is subject to anatomical variation. Patients with such “difficult airways” are a significant cause of anesthesia-related morbidity and mortality [1]. It is important to attempt to predict which patients might present difficult airways, and to take extra precautionary measures in these patients.
History
Airway assessment begins with a solid history of potential airway-related concerns. The patient and or family should be questioned regarding history of previous difficult intubation or history of sleep apnea or snoring. If previous anesthetic records are available, they should be referenced for any indication of a difficult intubation or airway.
The Airway Examination
After taking a detailed history, the next step is to complete a detailed airway examination. Some of the more important points to assess are described as follows.
1.
Visibility of uvula. The most commonly used method of assessing airway difficulty is the modified Mallampati test (MMT) as denoted in Fig. 13.3. Dr. Seshagiri R. Mallampati created the original Mallampati test in 1983, which was later modified by Samsoon and Young in 1987. Mallampati hypothesized that the size of the base of the tongue is an important factor in predicting difficult laryngoscopy and that a large tongue would cramp the oropharyngeal space. The MMT is conducted while the patient is sitting upright with his or her mouth fully open and tongue extended as far as possible. Intubation becomes progressively more difficult as the score increases. MMT scores of I–II generally indicate a good chance of being able to easily visualize the glottic opening, while MMT scores of III–IV predict a more difficult laryngoscopy.
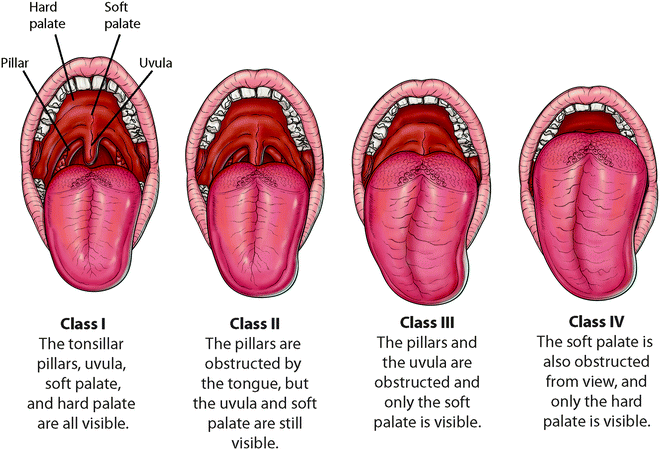
Fig. 13.3
Mallampati classifications. Modified with permission from Finucane BT, Tsui BCH, Santora AH (eds). Principles of airway management. 4th ed. (ISBN: 978-0-387-09557-8). New York, NY: Springer; 2011
2.
Thyromental distance. This is the distance measured from the superior aspect of the thyroid cartilage to the mentum while the neck is fully extended. A thyromental distance of greater than 7 cm generally predicts a straightforward intubation, whereas a distance of less than 6 cm may predict difficulty. A short thyromental distance is associated with an anterior larynx, meaning that it is at a more acute angle to the hypopharynx. This can make aligning the axes of the larynx and the pharynx more difficult. A shorter thyromental distance also allows for less mandibular space for the tongue to be compressed into by the laryngoscope blade.
3.
Range of motion of head and neck. The ideal position for intubation is with the neck flexed and the head extended at the atlanto-occipital joint. Any restriction in neck movement or contraindication to moving the neck can prevent optimal neck positioning and greatly affect the ease of laryngoscopy. Normal neck mobility is assessed by asking the patient to sit with his or her head upright and mouth open as wide as possible. At this point the maxillary teeth should be parallel to the floor. The patient is then asked to tilt his or her head back as far as it goes. The angle that the maxillary teeth make to their original position is measured, and should be 35° or greater. The patient is then asked to fully flex his or her neck, at which point his or her chin should touch his or her chest wall.
4.
Neck length and thickness. In general, patients with longer and slimmer necks have greater neck mobility and present easier subjects for laryngoscopy. Conversely, patients with shorter, thicker, and more muscular necks present greater difficulty. While the neck is being examined, other indications of difficult airway can be assessed, such as discoloration (which could indicate previous neck radiation and tissue scarring) and stigma of a previous tracheostomy (which could indicate tracheal stenosis).
5.
Length of upper incisors, interincisor distance. The length of the upper incisors should be compared to the surrounding teeth. The examiner should then ask the patient to open his mouth as wide as possible, and the distance between the upper and lower incisors measured. An interincisor distance of less than 4.5 cm (or about three fingerbreadths) signifies a potentially difficult intubation. Long upper incisors and a narrow interincisor gap restrict the laryngoscope’s range of movement within the mouth. A small interincisor gap can also present a greater risk of complications such as tooth injury and bleeding.
6.
Relation of maxillary and mandibular incisors during normal jaw closure. In this test, the patient is asked to close his or her mouth while the practitioner observes the relationship of the upper and lower incisors. Normally the upper and lower incisors should be mostly opposed, or at least very close to each other. The more anteriorly the upper incisors lie in relation to the lower incisors, the more likely it is that difficulty will be encountered during intubation.
7.
Foreign bodies. Foreign objects include dentures, tongue rings, and loose teeth that can be damaged or dislodged during airway manipulation. If dislodged, these objects can aspirate into the airway and cause obstruction or infection. Try to remove any such foreign objects prior to attempts at intubation. If they cannot be removed (for example a loose tooth), document the object and confirm its presence after the airway maneuver is performed. If the object is missing after intubation, perform a chest X-ray to confirm its location.
Basic Airway Skills
These basic airway skills can be useful whether preparing to intubate a patient for surgery or attempting to ventilate a patient with an emergently compromised airway. This part of the chapter is dedicated to explaining these skills and the concepts behind them.
Head Tilt–Jaw Lift Maneuver
The basic goal of this technique is to manipulate the patient’s airway to provide the clearest path for airflow. With the patient supine, place one hand on the patient’s forehead and the other hand under the patient’s chin. The hand on the patient’s forehead should be used to tilt the patient’s head back so that it is extended at the neck as well as the atlanto-occipital joint. Use your second hand to protrude the patient’s mandible upward and away from the head. This position widens the pharyngeal openings and helps to move the tongue out of the pharynx and back into the oral cavity. It is important to note that this technique should be avoided in any patient with a possible C–Spine injury. It is important to have a high suspicion of C-Spine injury, because moving an injured C-Spine may further damage the spinal cord and cause permanent debilitation. When a C-Spine injury is possible, it is better to open the airway using a jaw thrust maneuver instead.
Jaw Thrust Maneuver
This has a similar effect as the head tilt–chin lift maneuver in terms of widening the airway and ensuring that the tongue does not occlude the oropharynx. Instead of tilting the head, both hands are focused on protruding the mandible. Use your hands to grip the angles of patient’s mandible, with one hand on either side of the mandible. Your thumbs should be on the patient’s chin, positioned slightly below his or her lower lip. Your other four fingers should be at the angle of the mandible. Use these four fingers to push the patient’s mandible upward and away from his or her head. Use your thumbs to pull the patient’s chin out slightly so that his or her mouth is partially open.
Foreign Body Obstruction
If the head tilt–chin lift and jaw thrust techniques fail at establishing a patent airway, then a foreign body may be obstructing the airway. In a partial obstruction the patient will still be passing some air, but a whistling or wheezing sound might be heard with each breath, and the patient might be coughing. If the airway is only partially obstructed and the patient is still moving some air, do not interfere. Let the patient try to cough and allow the body’s natural reflexes to expel the foreign body.
Patients presenting with complete obstruction will not be able to cough or make any sound. They will often present with the “universal choking sign,” clutching at their throat to indicate they are choking. Perform the Heimlich maneuver until the foreign body is expelled or the patient loses consciousness. If the patient is unconscious, it is important not to blindly stick a finger into his or her mouth to search for a foreign body, as this could lodge a foreign body deeper into the pharynx. Instead, carry out chest compressions and give breaths as you would during normal cardiopulmonary resuscitation (CPR). After each round of compressions and breaths, open the patient’s mouth to look for a foreign object. If a foreign object is visible, then attempt to use a finger to carefully remove it from the patient’s mouth. If nothing is visible, then proceed with another round of CPR.
Airway Equipment and Techniques
The following equipment is available in most operating rooms and in an increasing number of intensive care settings.
Oropharyngeal and Nasopharyngeal Airways
These are small, often soft plastic or rubber devices that can be used to maintain an airway once it has been established by the preferred techniques of repositioning, head tilt–chin lift and jaw thrust. Occasionally oropharyngeal (OP) and nasopharyngeal (NP) airway devices are used to supplement these airway-opening maneuvers if the initial maneuvers prove unsuccessful at maintaining a patent airway.
The OP airway is inserted upside down into the mouth, with the peak of the device’s arch facing downwards towards the tongue. Once it has been inserted about halfway into the mouth, it is flipped 180° and simultaneously inserted deeper into the pharynx. This maneuver helps to lodge the tip of the airway behind the tongue, securing it in place. It is important to note that OP airways are only indicated in unconscious patients. This is because they commonly elicit the gag reflex, which can lead to vomiting or aspiration. If an artificial airway is indicated in a conscious patient, a nasal airway should be used instead, as it does not elicit the gag reflex.
The nasopharyngeal airway (or nasal trumpet) is a thinner device that has a horn or a ring shape at its proximal end. Nasal trumpets also come in a variety of sizes. Nasal trumpets are usually 2–4 cm longer than the OP airway indicated in the same patient. Before a nasal trumpet is used it should be well lubricated. Continuous, gentle pressures should be applied to slowly guide the trumpet along the floor of the nasal cavity. Although nasal trumpets are better tolerated in conscious patients, they also present a higher risk of bleeding and epistaxis. NP airways are contraindicated in patients presenting with basal skull fractures, as there is a risk of penetrating through the fracture directly into the cranial vault. It is also important to note that most patients have at least mild deviations in their nasal septums, which means that the nasal cavity on one side is wider than the other. If resistance is encountered while placing a nasal trumpet, attempt to insert it into the other nostril, or change to a smaller diameter tube.
Mask Ventilation
If a patient can be adequately ventilated using a face mask, they are at very little risk of becoming hypoxic and the practitioner is afforded time to determine how to establish a more secure airway. It is important to note that mask ventilation is contraindicated in patients with airway obstruction. These patients require more invasive measures to secure a patent airway. Face masks are designed to create an airtight seal over the nose and mouth. Different sized masks are available, the best mask being the one that creates the best seal over the patient’s face. An appropriately sized mask covers the patient’s nose and mouth in a way that the nasal bridge is covered superiorly but the mask does not go over the chin inferiorly. It is important to keep a “best-fitting” mask next to a patient’s bed so that it is immediately available in emergent situations.
There are two different mask ventilation techniques: ventilating with one person, and ventilating with two people when the assistant knows how to perform a jaw thrust. With one-person ventilation, the patient is positioned so the head is semi-flexed at the neck and the ear is in the same plane as the sternal notch. This is possible by placing the patient’s head on a towel or a pillow. The mask is gently placed over the patient’s nose and mouth and held in position using the nondominant hand, whereas the dominant hand is used to ventilate. The best seal is created using the “E-C technique,” named as the thumb and index are held in a C shape over the mask, while the three remaining fingers form an E on the angle of the patient’s mandible. This technique allows you to use all five fingers to accomplish three seal-creating goals simultaneously: push the mask onto the patient’s face, tilt his or her head back slightly, and lift his or her jaw. When two people are available for ventilation and the airway assistant is adept at using the jaw thrust maneuver, the role of the primary airway manager is similar to what they would do on their own. The nondominant hand is placed on the mask, and the dominant hand used to squeeze the bag. The role of the airway assistant is to use both of his or her hands to assist in lifting the jaw to open the airway. This allows the primary ventilator to focus more on creating a seal than lifting the jaw.
Difficult Mask Ventilation
Difficult mask ventilation (DMV) is defined as inability to maintain SpO2 > 92%, or reverse signs of inadequate ventilation. It can be due to an inadequate mask seal, excessive gas leak, excessive resistance to the flow of gas, or mechanical obstruction. The MOANS mnemonic can be remembered to predict difficulties in mask ventilation:
Mask seal: The main problems leading to a difficult seal are facial deformities such as nasal or mandibular fractures, or micrognathia. Patients with facial hair present difficulties in creating an adequate seal.Related posts:

Stay updated, free articles. Join our Telegram channel

Full access? Get Clinical Tree


