LABORATORY SERVICES
Clinical laboratory tests have relatively less utility in resource-poor settings, but lives can be saved if a few simple tests are available, such as those for urine pregnancy and, in endemic/high-prevalence areas, for human immunodeficiency virus (HIV), malaria, and tuberculosis (TB) screening. This chapter discusses how to improvise various materials, equipment, and tests when clinicians need laboratory tests and the normal procedure for doing them is unavailable.
ESSENTIALS
Table 20-1 lists essential laboratory tests worldwide, which differ depending on the facility’s capabilities (described in Table 5-1).
| Facility Level | ||||
|---|---|---|---|---|
| Resources/Capabilities | Basic | GP | Specialist | Tertiary |
| HIVa | E | E | E | E |
| Urine pregnancy | E | E | E | E |
| Hemoglobin/hematocrit | D | E | E | E |
| Malariaa | D | E | E | E |
| Urinalysis | D | E | E | E |
| Glucose | I | E | E | E |
| Gram stain | I | D | E | E |
| Tuberculosisa | I | D | E | E |
| Sickle cell prep | I | D | E | E |
| Bacterial cultures | I | D | D | D |
| Electrolytes (Na, K, Cl, CO2, BUN, creatinine) | I | D | D | D |
| Arterial blood gas measurements | I | D | D | D |
| Serum lactate | I | I | D | D |
EQUIPMENT AND MATERIALS
Use filtered rainwater rather than distilled water to make laboratory reagents, such as stains. Collect uncontaminated rainwater in rooftop tanks.1 Distilled water is best for use in autoclaves and in pressure cookers used as sterilizers. If available, also use distilled water to produce intravenous (IV) fluids.
Distillation involves boiling clean water and collecting the steam, which then condenses back to water. The water from condensed vapor does not contain salt and other impurities. In austere situations, improvising distillation systems saves many lives, as is seen in the following story from a World War II prison camp2:
Some six weeks before the outbreak [dysentary] I had constructed, as a precaution, a small plant for distilling water for intravenous saline. It was a very primitive affair, the condenser being a coiled rubber tube inside a hollow bamboo in which cold water was circulated. The boiler was a 4-gallon kerosene can. Within 24 hours of the outbreak we were able to give intravenous saline. The plant was producing 40 pints daily, and eventually double that figure. The giving IV bottle was a jam-jar connected to a needle by a rubber tube.
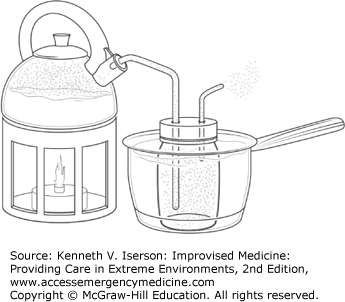
Obtain small amounts of distilled water by heating water in a kettle and running rubber tubing from the spout through a hole in the lid of a collecting jar (Fig. 20-1). Use another small tube as a vent in the jar’s lid. Seal all joints with adhesive tape, clay, or glue. Immerse the collecting jar in a pan of cool water so the steam will condense quickly.3 Voilà, distilled water!
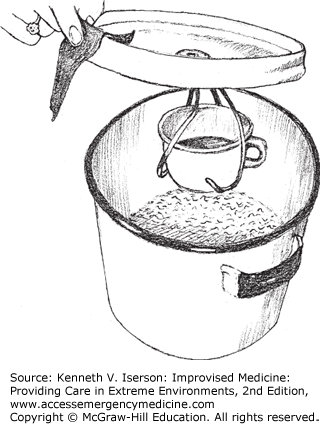
An alternative method of distilling small amounts of water is to fill a large pot one-half to three-quarters full of water. Invert the lid and suspend a heat-resistant cup from a cradle made from wires (coat hangers may be used) attached to the lid’s handle. The cup should hang right-side up without dangling in the water when the lid is upside-down. This takes about 5 minutes to set up. As the water boils and steam collects on the lid, it drips down the handle into the cup.4 If only a little water is used, watch the pot more closely (Fig. 20-2).
In austere situations, the electrical supply is often intermittent, if available at all. Obtain suitable AC current for instruments from rechargeable batteries using a solar or DC/AC inverter.
For about $10 and with common tools in less than a half hour you can make a stand that will transform your smart phone into a powerful digital microscope with magnification levels as high as 175 to 375 power (Fig. 20-3). The materials required are 3 carriage bolts (4½ inches × 5/16 inches); 9 nuts (5/16 inches); 3 wing nuts (5/16 inches); 5 washers (5/16 inches); ¾ inches × 7 inches × 7 inches plywood for the base; ⅛ inches × 7 inches × 7 inches plexiglass for the camera stage; ⅛ inches × 3 inches × 7 inches plexiglass for the specimen stage; scrap plexiglass (~ 2 inches × 4 inches) for a specimen slide (optional but useful); a laser pointer focus lens (use two for increased magnification); and an LED click light (necessary only for viewing backlit specimens). The tools needed are: a drill, assorted bits, a ruler, and pliers. Video instructions, detailed photos of each step, and answers to some common questions can be found at: http://www.instructables.com/id/10-Smartphone-to-digital-microscope-conversion/?ALLSTEPS.
FIG. 20-3.
Improvised microscope, using a smart phone stand with specimen stage below and a light source. (Adapted from Yoshinok.5)
To use the microscope, place the phone (with camera or video activated) on the top piece of plexiglass. Put the specimen on a separate piece of plexiglass and slide it onto the viewing platform, just beneath where the camera sits. Bring the object into focus by turning the wing nuts on either side of the stage. Then observe the specimen and take a picture or video, if necessary. Zoom in using the camera’s tools. Generally, this only requires laying your fingers on the image and spreading them apart. Use the focus lenses from one or two laser pointers for magnification, and use an inexpensive LED light to backlight specimens.
If using a standard microscope, when the electricity fails, use a mirror and sunlight or a battery-operated light as your light source.
If you need to filter solutions, including stains, use a flowerpot with a hole in the bottom. Loosely plug the hole with cotton, fill the pot with several inches of clean sand, and pour in the liquid. Collect the filtered solution in a jar placed under the pot (put it up on a stand). Replace the sand frequently.
To put out small laboratory fires, keep buckets of sand available. Water may not be readily available (or appropriate for all laboratory fires), and fire extinguishers are expensive and need regular maintenance.
Speaking of fires, fashion a simple laboratory burner from an empty shoe polish container. Make a hole in the lid and fill the container with denatured or wood alcohol. If desired, solder a small piece of tin can to the lid to hold a cloth or cotton wick.
If needed for samples and reagents, improvise refrigeration using the methods and equipment discussed in Chapter 5.
Make laboratory flasks from “dead” light bulbs. Spotlight-type bulbs are the best, because they have flat “bottoms.” If regular lightbulbs are used, an egg carton can serve as a holder. When modifying the bulbs, wear gloves and eye protection, and cover the bulb’s glass with a cloth.
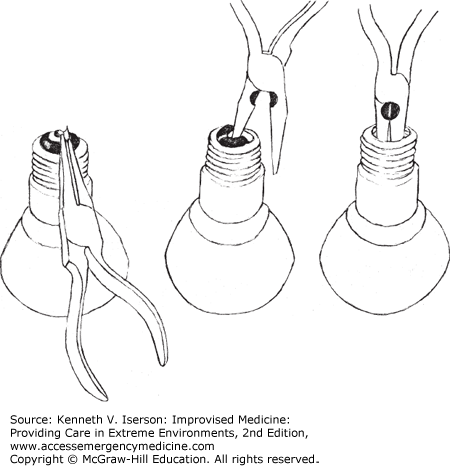
With either type of bulb, first use a pair of needle-nose pliers to pull off the little black button that holds the bulb’s electrical contact (Fig. 20-4, left). Doing so leaves a hole in the bulb’s porcelain base. Put one of the pliers’ jaws into that hole, and gently work it around until the porcelain cracks (Fig. 20-4, center). Remove the pieces. The hole (with the filament) becomes visible.
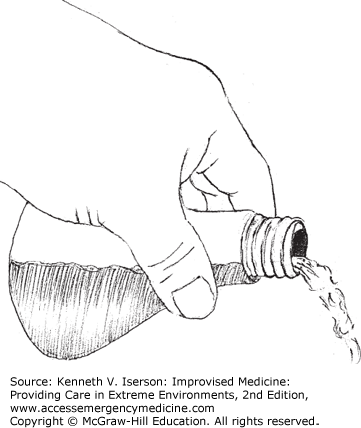
After gently breaking off any protruding glass pieces in the hole, sharply tap the glass piece holding the filament (Fig. 20-4, right) to break it, and it will fall into the bulb. Turn the bulb over and dump the pieces out. A thin metal disc may remain in the bulb. Grab it with the pliers, bend it in two, and remove it. Then bend down any sharp edges on the metal (screw part) that remains on the bulb, rinse it out, and begin using it (Fig. 20-5).
This whole process takes about 5 minutes. Use a known amount of liquid to measure the flask’s volume and mark it on the outside at convenient increments (e.g., 50 mL, 100 mL).
To hold test tubes over a burner, fashion a test tube holder by bending a wire hanger or similar material (Fig. 20-6). Use pliers (rather than just your fingers) to do the bending.6
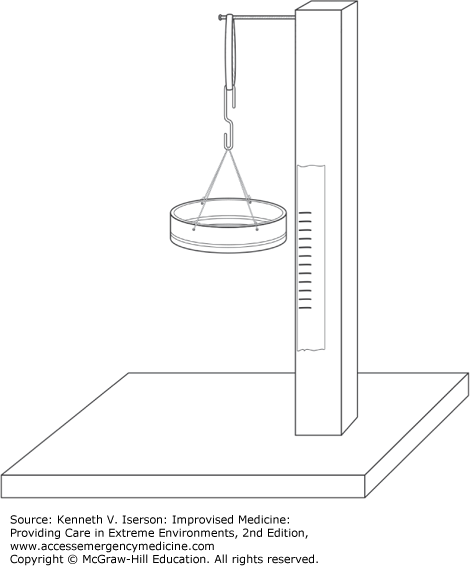
To measure small quantities or objects, build a scale using a jar lid and a heavy rubber band (Fig. 20-7). Insert a nail in an upright piece of wood. Make four holes that are equidistant around the lid, attach a wire to each, and tie or twist all the ends together. (Sutures or fishing line may also be used in place of wire.) Use a paper clip (unwound to an “S” shape) to join the wires and the rubber band.7 Now that the scale has been assembled, it must be calibrated. Attach a piece of tape that you can write on to the upright wood, and mark the gradations as you add small known weights. (Small quantities of water can also be used.) Once the scale is calibrated, either keep the original set of weights or find small stones (mark each stone with its weight) that can be used to recalibrate this scale. Change the rubber band and recalibrate the scale daily.
Used for heavier weights, this scale holds larger items and measures in kilograms. Attach a heavy spring from a chair or automobile cushion to a solid wooden base. Affix two upright posts on opposite sides (Fig. 20-8). These steady the structure and can be marked with incremental measurements when the scale is calibrated. Affix a metal pan to the top of the spring, either by soldering it to the spring or by passing wires through the pan onto the spring. Calibrate the scale by putting objects of known weights on it and marking the slat as the spring is depressed.7 Known quantities of water (1 kg = 1 L = 2.2 lb) work well. Use the top of the pan as the point to mark.
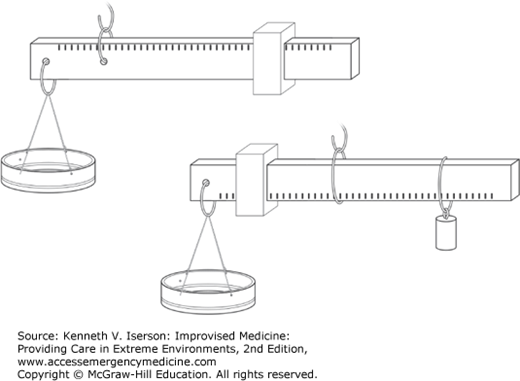
Several types of “steelyard” scales can easily be made. Make the long beam from either wood or metal; use pieces of metal pipe for the sliding counterweights. Fasten the beam and the pan together with wire. For support, place the entire balance on a stiff piece of wire that goes either through or around the beam (Fig. 20-9). As with the other scales, use known weights to calibrate this scale.8
In resource-limited regions, the sterile gas-filled compartments in “bubble wrap” packing material can be used as an inexpensive alternative to glass test tubes and culture dishes; 1 square foot contains from 100 to 500 bubbles and costs about 6 cents. The bubbles can be used to store reagents, perform bioanalysis, and culture and store microorganisms. Using a syringe with a needle or a pipette tip, inject the samples into the bubbles and seal the hole with fingernail hardener. Because they are transparent in the visible spectrum, also use the bubbles as “cuvettes” for absorbance and fluorescence measurements. Of note, the bubbles are also gas permeable and chemically inert to most aqueous samples.9
Making media for bacteriology is a complex process; so, if you really need to grow cultures, buy the prepackaged powder.
To build an incubator, get a 20-gallon glass aquarium or any container having the same volume (Fig. 20-10). A cardboard box will do in a pinch, but it may not last long. Turn the container on its side with the open end facing front. Tape a piece of heavy plastic sheeting to the top, draping it down so that it covers the open end. The sheeting is the incubator’s “door.” A bacteriology incubator is normally kept at body temperature, 98.6°F (37°C). Tape a standard thermometer inside the container so that you can easily read it. Set a standard incandescent lamp enclosed in a can or small pail inside the incubator with the electrical cord going out the “door” to a plug. Begin with a 40-W bulb and assess the temperature after 12 to 24 hours. If it needs to be warmer, use a higher-wattage bulb. It will probably not be exactly 98.6°F, but if it is a little cooler, that will still work. To be more accurate, use a higher-watt bulb with a dimmer switch to modulate the emitted heat.10
Stay updated, free articles. Join our Telegram channel

Full access? Get Clinical Tree


