INTRODUCTION
The goals of emergency airway management are maintaining airway patency, assuring oxygenation and ventilation, and preventing aspiration. Tracheal intubation can achieve these goals. Sedation or paralysis after intubation can facilitate diagnostic testing. Extraglottic devices are discussed in detail in the chapter 28, “Noninvasive Airway Management.”
Rapid-sequence intubation (RSI) is the sequential administration of an induction agent and neuromuscular blocking agent to facilitate endotracheal intubation. It is the method of choice for emergency airway management.1 RSI allows the highest intubation success rate in properly selected emergency airway cases and is superior to sedation alone. Not all patients targeted for intubation are best managed with RSI; patients deeply comatose and those in cardiac or respiratory arrest will not likely have a response to laryngoscopy and may be intubated without pharmacologic assistance.
Whenever performing endotracheal intubation, anticipate airway difficulties and be facile with alternative airway techniques: bag-mask ventilation, rescue airway devices, and surgical access to the airway.2 In addition, if bag-mask ventilation or rescue device deployment is not likely to succeed or if anatomic alterations exist that will not improve with RSI (edema, mass, bony disruption), do not extinguish intrinsic airway protection and respirations with paralysis.
Develop and discuss an intubation plan, and communicate responsibilities of the care team. Make sure medications are prepared. Have equipment for the difficult or failed airway available. Review proper patient positioning. Discuss the plan for postintubation hypoxia, hypotension, sedation, and ventilation. The use of a checklist may facilitate decision making and error prevention.3
OROTRACHEAL INTUBATION
Clinical assessment, pulse oximetry, capnography, and the expected course of the patient all collectively guide decisions regarding the need for tracheal intubation. See the “Difficult Airway” section below for detailed discussion of airway assessment.
Table 29-1 lists all equipment needed at the bedside before beginning intubation.
Oxygen source and tubing Ambu bag Mask with valve, various sizes and shapes Oropharyngeal airways—small, medium, large Nasopharyngeal airways—small, medium, large Suction catheter Suction source Pulse oximetry Carbon dioxide detector Endotracheal tubes—various sizes Laryngoscope blades and handles Syringes Magill forceps Stylets, assorted Tongue blade Intubating stylet (gum elastic bougie) Water-soluble lubricant or anesthetic jelly Alternative or rescue devices: video laryngoscopes, laryngeal mask airway, intubating laryngeal mask airway, Combitube® (Sheridan Catheter Corp., Argyle, NY), King LT® (King Systems, Noblesville, IN) Surgical cricothyroidotomy kit Medications for topical airway anesthesia, sedation, and rapid-sequence intubation |
Rescue devices and a surgical airway option ideally are placed in a designated difficult airway cart in the ED and include pediatric sizes (see chapter 111, “Intubation and Ventilation in Infants and Children”.)
When preparing for intubation, select the appropriate-size endotracheal tube (ETT) and an additional tube (0.5 to 1.0 mm smaller in diameter), and check the cuffs for air leaks with a 10-mL syringe. ETTs with high-volume, low-pressure cuffs are preferred. The approximate sizes for ETTs are 8.0- to 8.5-mm inner diameter for an average adult male and 7.5- to 8.0-mm inner diameter for an adult female. The second hole at the end of the tube above the bevel is called the Murphy eye. This hole permits some uninterrupted airflow if the tip is occluded. A stylet can aid emergent intubations, especially when using video laryngoscopy. Test the light on the laryngoscope after attaching the appropriate-size blade.
Laryngoscopes have straight or curved blades. The straight Miller blade physically lifts the epiglottis to visualize the larynx. The curved Macintosh blade tip is placed in the vallecula to indirectly lift the epiglottis off the larynx (Figure 29-1). The curved blade may cause less trauma and is less likely to stimulate an airway reflex when used properly, because it does not directly touch the larynx. It also allows more room for adequate visualization during tube placement and is helpful in the obese patient. The straight blade is mechanically easier to insert in many patients who do not have large central incisors. In adults, the curved Macintosh #3 is popular, and #4 is more useful in large patients. The straight Miller #2 and #3 are popular for the same purposes.
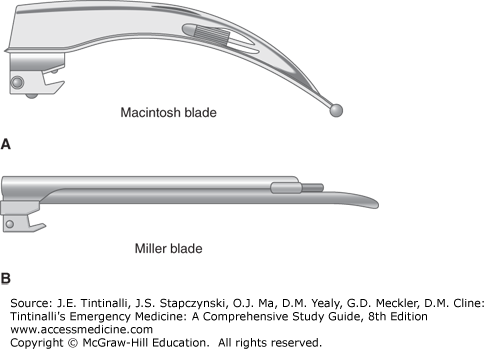
There are a variety of other straight and curved blades available; however, the Miller or Macintosh blades are most commonly used in direct laryngoscopy. Video laryngoscopes often use blades that have a much more acute angle to the blade because of the indirect visualization. Video laryngoscopy is an alternative to traditional direct laryngoscopy and preferred in some clinical scenarios including morbid obesity, difficult airway, or limited neck mobility.4
Begin preoxygenation as soon as possible, even for patients with no apparent hypoxia/hypoxemia. Preoxygenation optimizes blood oxygen content and also displaces nitrogen in the alveoli, creating a potential reservoir of oxygen that may prevent hypoxia and hypoxemia during the first minutes of apnea. Even with adequate preoxygenation, hypoxia develops more quickly in children, pregnant women, and obese patients and in hyperdynamic states. To preoxygenate, administer 100% oxygen for 3 minutes, using a non-rebreather mask supplied with 15 L/min of oxygen. Nasal cannulas alone do not provide optimal preoxygenation. Non-rebreather masks typically deliver 60% to 70% oxygen. A bag-mask ventilator, appropriately applied, can deliver 90% to 97% oxygen. This requires a tight seal, with either active bagging or enough inspiratory pressure from the patient to open the one-way valve. There are a number of bag-mask devices that vary in their oxygen delivery; use a bag-valve mask device with one-way inspiratory and expiratory valves.
In patients who have arterial oxygen saturations that remain below 95% despite supplemental oxygen, a short period of noninvasive positive-pressure ventilation may improve the oxygen reservoir. This strategy is particularly effective in obese patients.5 Elevating the head of the patient 20 to 30 degrees improves preoxygenation. Finally, providing high-flow nasal cannula oxygen (≥15 L/min) or the OptiflowTM oxygen delivery system (which allows even higher flow) throughout the apneic phase of RSI prolongs the period of safe apnea during paralysis and is wise in all patients undergoing emergent RSI.5
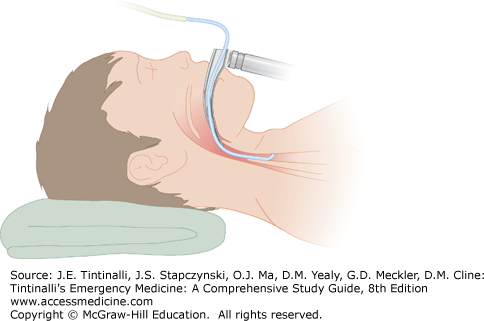
Flex the lower neck and extend the atlanto-occipital joint (sniffing position) to align the oropharyngeal–laryngeal axis for a direct view of the larynx. Padding under the shoulders, not the neck, also improves visualization. For most airway maneuvers, the best position occurs when the ear is horizontally aligned with the sternal notch. Inadequate equipment preparation and poor patient positioning are common failure triggers; take the time to do these right before using the laryngoscope. Reposition the patient if initial attempts at viewing the larynx fail.
The Sellick or cricoid maneuver (application of direct pressure on the cricoid ring in the unconscious or paralyzed patient) can impair bag-mask ventilation, worsen the laryngoscopic view, and hamper insertion of the tube.6 Some practitioners still use it to prevent aspiration of gastric contents, although it may trigger vomiting. If the Sellick maneuver is used, apply cricoid (not thyroid) pressure and release if visualization does not improve. Aspiration occurs due to low esophageal sphincter tone, depressed protective laryngeal airway reflexes, or stimulation in the patient with upper airway fluids or stomach contents (Table 29-2).
Instructions for ETT insertion are summarized in Table 29-3.
| Step | Comments |
|---|---|
| 1. Hold laryngoscope in left hand. | Holding the laryngoscope at the base, where the blade inserts to the handle, aids proper use and lift; do not hold further up the handle. |
| 2. Use right hand to: | Remove dentures and any obscuring blood, secretions, or vomitus suctioned before insertion of the ETT. |
| Insert the ETT | Use a properly sized, semi-rigid, malleable, blunt-tipped, metal or plastic stylet to assist with tube placement. The tip of the stylet must not extend beyond the end of the ETT or exit the Murphy eye. |
| Operate suction catheter. | |
| Manipulate larynx externally to enhance the visualization. | |
| 3. Insert blade into the right corner of the patient’s mouth. | The flange of the curved Macintosh blade will push the tongue toward the left side of the oropharynx. |
| If the blade is inserted directly down the middle, the tongue can force the line of sight posteriorly, impairing the view. | |
| 4. Visualize arytenoids. | — |
| 5. Lift epiglottis. | Lift the epiglottis directly with the straight blade or indirectly with the curved blade. |
| 6. Expose larynx. | Pull laryngoscope handle in the direction that it points (i.e., 90 degrees to the blade). |
| Cocking the handle back, especially with the straight blade, risks fracturing central incisors and is ineffective at revealing the cords. | |
| 7. Advance blade incrementally. | Look for the arytenoid cartilages to avoid overly deep insertion of the blade, which is a common error. BURP maneuver may improve visualization. |
| 8. Advance ETT. | Visualize tube and cuff passing through vocal cords. |
| Correct tube placement is a minimum of 2 cm above the carina (approximately 23 cm in men and 21 cm in women). | |
| The base of the pilot tube (a tube with the adapter to inflate the cuff) is usually at the level of the teeth. | |
| 9. Check ETT placement. | Listen for bilateral breath sounds and the absence of epigastric sounds. |
| Confirm placement with colorimetric carbon dioxide detector or capnography. | |
| 10. Inflate balloon. | Use 5–7 cc of air. Ask the technician to check cuff pressure to avoid tracheal injury from pressure (target 25–40 cm H2O). |
| 11. Secure ETT. | Do not impede cervical venous return with umbilical tape or a fixator; circumferential securing devices can cause skin breakdown if too tight or in place too long. |
| Use a modified clove-hitch knot or a commercial fixator to avoid kinking the pilot tube. |
Suction at the bedside is critical. The Yankauer catheter is the most common device used, but any large-diameter suction system and tubing that allows for the removal of particulate matter or large clots is acceptable.
ETT insertion without clear cord visualization commonly leads to espohageal placement. Some techniques can help avoid esophageal placement: (1) retracting the right side of the mouth laterally by an assistant aids visualization; (2) using backward-upward-rightward pressure on the thyroid cartilage enhances visualization of the anterior glottis (BURP maneuver); and (3) bimanual laryngoscopy, where the intubator manipulates the larynx with the right hand until ideal visualization and then an assistant maintains this position, improves visualization of the vocal cords.6 To avoid error, make sure you see the cuff of the ETT pass completely through the cords. Finally, abort the attempt if you cannot visualize the larynx.
The endotracheal introducer, also known as the “gum elastic bougie“7 (Figure 29-2), may aid and is typically 70 cm in length and made of plastic. The angled tip facilitates insertion when the glottis cannot be fully visualized, although it is not helpful when no visualization exists. Once correctly inserted, you may feel the bougie tip moving over the tracheal rings. Thread the ETT over the introducer into the trachea and then remove the introducer. Never force the tube through the vocal cords, which can avulse the arytenoid cartilages or lacerate the vocal cords.
Most difficulties in passing the tube are a result of the failure to maintain the best possible laryngoscopic view, selecting too large a tube, applying cricoid pressure, or the formation of an undesirable curve on a semi-rigid stylet that is inserted into the ETT. A stylet angle of <35 degrees is more likely to pass through the glottis. Switching to a smaller tube, altering the curve of the stylet, or rotating the tube 90 degrees to align the bevel with the glottic opening are other techniques for eventual success. Do not apply cricoid pressure when inserting the ETT.
Advance the tube until the cuff disappears below the cords. Inflate the cuff with 5 to 7 cc of air. To avoid ischemia of the tracheal mucosa while limiting aspiration and maintaining a seal, target a cuff pressure of 25 to 40 cm H2O. There is poor correlation between volume of air and tracheal cuff pressure, and if there is concern about cuff pressure, a manometer can be used to measure cuff pressure.
After ETT insertion, use a well-lubricated, soft, curved-tip catheter to suction the tracheobronchial tree. Straight catheters usually will pass into the right mainstem bronchus. If a curved-tip catheter is available, turn the head to the right and rotate the catheter to facilitate passage into the left bronchus. The suction catheter should be no larger than half the diameter of the ETT to prevent pulmonic collapse from insufficient ventilation during suctioning. Insert the catheter without suctioning and then slowly remove it while rotating and suctioning over 10 to 15 seconds.
Complications of suctioning include hypoxia/hypoxemia, cardiac dysrhythmias, hypotension, pulmonic collapse, and direct mucosal injury. Intracranial pressure may increase during suctioning due to coughing.
“When in doubt, take it out.”
Mainstem bronchial or esophageal intubation results in hypoxia or hypoxemia and hypercarbia. There is no clinically reliable substitute for directly visualizing the tube passing through the vocal cords. Other clinical assessments, including chest and epigastric auscultation, tube condensation, or symmetric chest wall expansion, are not infallible. “Breath sounds” from the stomach can be transmitted through the chest after gastric insufflation. You should confirm intratracheal tube positioning with an objective measure.
The two basic categories of confirmatory adjuncts either assess expired (end-tidal) carbon dioxide (ETCO2) or assess misplacement by esophageal detection. Both have advantages provided that the operator knows the limits of each approach.
Capnometers and capnographs measure carbon dioxide in the expired air. The most commonly used capnometric devices in the ED are colorimetric, with a pH-sensitive purple filter paper. Hydrogen ions are formed by contact with carbon dioxide, resulting in color changes that vary with the concentration of carbon dioxide. For example, with the Nellcor Easy Cap II (Nellcor, Boulder, CO), the paper turns yellow after exposure to 2% to 5% ETCO2, which is equivalent to 15 to 38 mm Hg partial pressure of carbon dioxide (Pco2). No color change occurs (the filter paper remains purple) if the ETCO2 is <0.5%, equivalent to <4 mm Hg Pco2. Colorimetric capnometers are useful for assessing proper ETT placement but are not accurate enough for precise ETCO2 determinations and cannot exclude bronchial mainstem intubation.
Capnography displays real-time characteristic carbon dioxide waveforms. A persistent positive capnograph formation after clear and direct visualization of tube placement approaches certainty about tube placement. Rarely, a misplaced hypopharyngeal glottic tube tip may result in normal oximetry and capnography in a spontaneously breathing patient. This error is recognized by noting inadequate depth of tube insertion, inadequate ventilatory volumes, or incorrect tube placement on chest x-ray.
Table 29-4 notes conditions associated with false colorimetric or capnographic carbon dioxide readings.
| False-Negative Reading | Comments |
|---|---|
| Low pulmonary perfusion—cardiac arrest, inadequate chest compressions during CPR, massive pulmonary embolism | — |
| Massive obesity | — |
| Tube obstruction | Secretions, blood, foreign bodies |
| False-Positive Reading | Comments |
| Recent ingestion of carbonated beverage | Will not persist beyond 6 breaths |
| Heated humidifier, nebulizer, or endotracheal epinephrine | Transient |
Esophageal detection devices help determine initial tube location and do not depend on adequate cardiac output and pulmonary perfusion—an asset in the cardiac arrest patient. When the ETT is in the esophagus, the soft, noncartilaginous walls will collapse, and air cannot be easily aspirated with an esophageal detector. Esophageal detection devices use a syringe aspiration or a compressible bulb technique. The device is attached to the ETT adapter after intubation but before ventilation. The syringe is then rapidly retracted or the bulb is compressed. Taking advantage of the anatomic differences between the rigid cartilage of the trachea and the collapsible esophagus, syringe aspiration or bulb refilling is rapid when in the trachea. If the ETT tube is in the esophagus, the vacuum causes the esophagus to collapse around the tube, creating resistance to aspiration or preventing the bulb from refilling.
After intubation, obtain a chest x-ray to identify mainstem bronchus intubation and to locate the ETT tip. A chest x-ray does not reliably distinguish ETT placement in the trachea from the esophagus.
Adverse events include unrecognized esophageal intubation, aspiration, oxygen desaturation, hypotension, dysrhythmia, and cardiac arrest. In the ED, first-attempt success is achieved 80% to 95% of the time.1,8,9 Higher first-attempt success is associated with more experienced clinicians, trained emergency physicians, the use of RSI, the use of video laryngoscopy, and the absence of predictors of airway difficulty.4,10 Multiple intubation attempts are associated with increased adverse events; this is why it is important to employ an intubation strategy most likely to lead to first-pass success.9,11
Immediate complications include unrecognized esophageal intubation or mainstem bronchus intubation. Never assume correct positioning and patency after intubation if deterioration is seen. Tube displacement can occur during patient movement or if the tube is not properly secured. Repeated suctioning helps prevent secretions from obstructing the tube or bronchus. Cuff displacement or overinflation obstructs or damages the airway. If tracheal ball-valve obstruction is suspected, deflate the cuff.
If the ETT cuff leaks after the intubation, check the inflation valve. A simple remedy for a leaking inflation valve is to attach a three-way stopcock to the valve, re-inflate the cuff, and turn off the stopcock. If the tube needs to be replaced, use a tube changer. Commercially available tube changers are semi-rigid catheters with 15-mm adaptors or connectors to permit ventilation during the tube exchange. Insert the changer into the ETT, withdraw the ETT, and then insert a new ETT over the catheter and reconfirm placement.
Related posts:


Stay updated, free articles. Join our Telegram channel

Full access? Get Clinical Tree


