INTRODUCTION
Airway management is a critical need in many acutely ill and injured patients. Optimal strategies seek to assist with airway patency, oxygen delivery, and carbon dioxide excretion. Commonly, many classify airway management techniques into two categories: noninvasive (passive oxygenation, bag-valve mask ventilation, supraglottic airways, and noninvasive positive-pressure ventilation) and invasive (endotracheal intubation, cricothyroidotomy, transcutaneous needle jet ventilation, and tracheostomy). This chapter discusses noninvasive airway management strategies. Detailed discussion of invasive airway management strategies is found in the chapters 29, Intubation and Mechanical Ventilation and chapter 111, Intubation and Ventilation in Infants and Children.
The decision to initiate airway support must often be made rapidly based on the patient’s clinical condition. Laboratory testing or other studies should not delay the decision to initiate airway management strategies.
First, assess every patient for airway obstruction, which can be functional (e.g., unconscious patient) or mechanical (e.g., foreign body). The ability to spontaneously swallow and speak provides a basic indication of airway patency, and the absence is a potential sign of obstruction. Other potential signs of airway obstruction include anxiety, wheezing or stridor, and coughing. Many conditions can cause airway obstruction (Table 28-1).
| Congenital/Genetic | Infectious | Medical | Trauma/Tumor |
|---|---|---|---|
| Large tonsils | Tonsillitis | Cystic fibrosis | Laryngeal trauma |
| Macroglossia | Peritonsillar abscess | Angioedema | Hematoma/masses |
| Micrognathia | Pretracheal abscess | Laryngospasm | Smoke inhalation |
| Neck masses | Epiglottitis | Inflammatory | Thermal injuries |
| Large adenoids | Laryngitis/respiratory syncytial virus Ludwig angina Retropharyngeal abscess | Airway muscle relaxation | Foreign body/hemorrhage |
Some obstructions, such as foreign bodies or masses, are subglottic, or below the vocal cords.
Laryngospasm is obstructive closure of the glottis by constriction of laryngeal muscles. Laryngospasm may result from stimulation of the upper airway receptors on the tongue, palate, and oropharynx. Other causes include chemical irritation, secretions, blood, water, and vomitus in the upper airway and traction on the pelvic/abdominal viscera. Laryngospasm can persist after the causative stimulus has departed.
SIGNS AND SYMPTOMS OF RESPIRATORY FAILURE
Patients with hypoventilation (inadequate carbon dioxide excretion) and hypoxia (inadequate alveolar oxygen content) can present with a variety of symptoms including weakness, fatigue, chest pain, or shortness of breath. Inadequate oxygenation and ventilation can lead to altered mentation, including anxiety, confusion, obtundation, or coma. Patients with respiratory distress can present with audible wheezing, stridor, or a silent chest. A subjective gauge of respiratory distress is the patient’s respiratory effort or “work of breathing.”1 Dyspnea, tachypnea, hyperpnea, or hypopnea, accessory muscle use, and cyanosis are signs of increased work of breathing.
There are two types of respiratory failure. Type 1 respiratory failure is characterized by hypoxia without hypercapnia. Type 1 respiratory failure may be the result of conditions that affect oxygenation but not necessarily ventilation (e.g., pneumonia, pulmonary embolism). Patients with type 1 respiratory failure require assistance with oxygenation. Treatment of type 1 failure focuses on optimizing oxygenation. Type 2 respiratory failure is characterized by hypoxia with hypercapnia. Type 2 respiratory failure is often the result of conditions that affect ventilation (e.g., chronic obstructive pulmonary disease). Treatment of type 2 failure requires not only optimizing oxygenation but also supporting ventilation.
PREPARATION FOR AIRWAY MANAGEMENT
Having key equipment at the bedside is a fundamental requirement for optimal airway management. Table 28-2 provides a model list of equipment.
Oxygen source and tubing Tongue blade Bag-valve mask device Clear facemasks—various sizes and shapes Oropharyngeal airways—small, medium, large Nasopharyngeal airways—small, medium, large Suction catheter Suction source Pulse oximetry End tidal carbon dioxide detector Laryngoscope blades and handles Syringes Magill forceps Water-soluble lubricant or anesthetic jelly CPAP/BiPAP mask and machine Supraglottic airways: laryngeal mask airway, intubating laryngeal mask airway, ShileyTM esophageal tracheal airway (Covidien, Boulder, CO), King LT® (King Systems, Noblesville, IN) Backup equipment in the case of unsuccessful NIPPV*† |
Anticipating challenges with airway management is best done before any attempts to intervene. Table 28-3 lists some factors that may complicate noninvasive airway management.
| BVM ventilation | |||
| M | Mask seal | Beard, trauma, or other situations that may cause BVM to not seal | |
| O | Obesity or Obstruction | ||
| A | Age | Age >55 years | |
| N | No teeth | ||
| S | Stiff lungs or chest wall | ||
| Supraglottic airway | |||
| R | Restricted mouth opening | ||
| O | Obesity or Obstruction | ||
| D | Disrupted or Distorted airway | ||
| S | Stiff lungs or cervical spine | ||
Provide supplemental oxygen to all critically ill patients requiring airway management. The method of oxygenation used depends on the patient’s clinical condition and oxygen requirement (Table 28-4). Even if the patient is apneic, providing supplemental oxygenation with nasal cannulae can extend the time to hypoxia and hypoxemia, allowing providers additional time to prepare for or attempt airway maneuvers.3
The first step in airway management is to optimize patient positioning to facilitate airway patency and subsequent airway management efforts.
Upper airway obstruction occurs in the unconscious patient as the intrinsic muscles of the neck and upper airway relax, causing the epiglottis to obstruct the laryngeal inlet. Although the tongue displaces posteriorly during anesthesia in supine patients, it may not always occlude the pharynx.4
The first relief step in upper airway obstructions is extension of the neck with anterior displacement of the mandible. This maneuver moves the hyoid bone anteriorly and, in turn, lifts the epiglottis away from the laryngeal inlet. Forward flexion of the neck in addition to extension (“sniffing” position) may also help to relieve upper airway obstructions and requires less neck extension. This can be accomplished by placing a folded towel (not rolled) or foam rubber device underneath the patient’s occiput. Neither maneuver should be attempted in patients when there is concern for cervical spine injury.
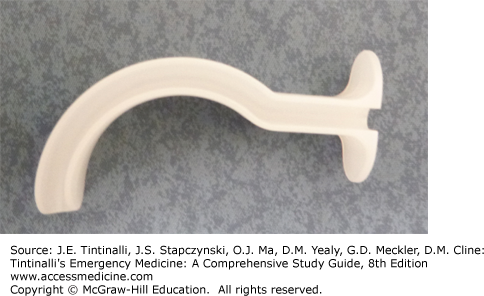
An oropharyngeal or oral airway (Figure 28-1) is a curved, rigid instrument used to prevent the base of the tongue from occluding the hypopharynx. Use only in a comatose or deeply obtunded patient without a gag reflex. Properly sized oral airways should reach from the corner of the mouth to the angle of the mandible. Place an oral airway with the concave portion of the airway cephalad and rotated 180 degrees after passing the tongue. Alternatively, the concaved portion can be oriented horizontally and rotated 90 degrees, following the curvature of the tongue, after insertion.
A nasopharyngeal or nasal airway (Figure 28-2) is made of pliable material and is placed into the nostril, displacing the soft palate and posterior tongue. Nasal airways are helpful in patients with an intact gag reflex absent any midface trauma. Properly sized nasal airways should reach from the corner of the mouth to the angle of the mandible. After lubrication, insert the nasopharyngeal airway in the most patent nostril and horizontal to the palate with the bevel oriented toward the nasal septum.

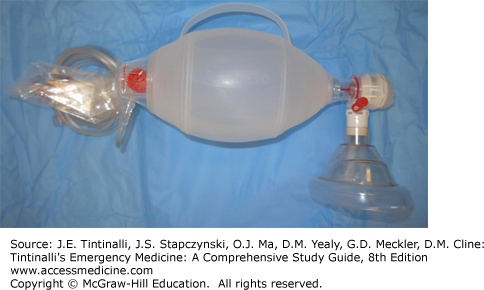
Bag-valve masks (BVMs) (Figure 28-3) contain a self-inflating insufflation bag coupled with a facemask and a valve to prevent re-inhalation of exhaled air. Effective BVM ventilation requires a good seal and a patent airway. Although typically used with supplemental oxygen, the BVM can aid even when used with room air. Most BVM systems deliver approximately 75% oxygen. A demand valve attached to the reservoir port of the ventilation bag may help to a deliver higher concentration of oxygen.5 Adequate oxygenation and ventilation with a BVM require a good face–mask seal, which may be difficult in patients with facial trauma, facial hair, or anatomic anomalies or in those who are edentulous.
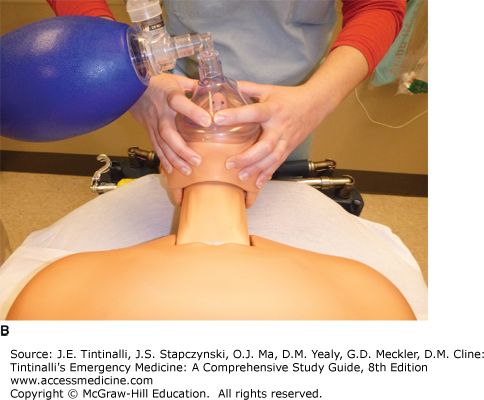
BVM ventilation is performed using one- or two-person techniques. Two-person techniques deliver greater tidal volumes than one-person techniques and are preferred if possible.6
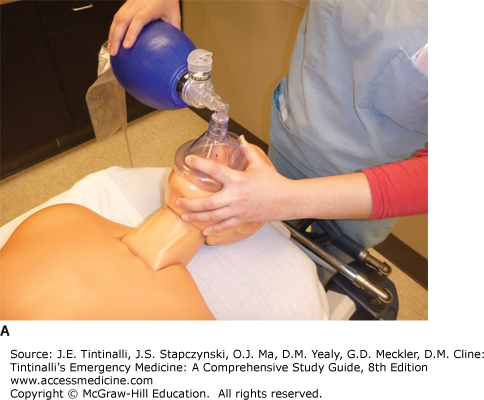
With the one-person approach, the rescuer uses one hand to grasp and seal the mask and the other hand to squeeze the BVM reservoir bag. A common mask-sealing technique is to grasp the mask with the thumb and index finger in a “C” shape while placing the third, fourth and fifth digits in an “E” shape to lift the mandible. During mask ventilation, be careful to keep the fingers on the mandible, not compressing the soft tissue beneath (and hence compressing the airway) (Figure 28-4A).
FIGURE 28-4.
A. One-person bag-valve mask ventilation. B. Two-handed mask seal. C. Modified two-handed mask seal.
Related posts:


Stay updated, free articles. Join our Telegram channel

Full access? Get Clinical Tree


