Epidural Catheter Analgesia
When most people hear the word epidural they think of what is administered to a woman for pain control before she delivers her baby. However, epidural simply refers to the epidural space. The outermost space in the spinal canal, the epidural space, lies outside the dura mater inside the surrounding vertebrae (Fig. 17-1). Its superior limit is the foramen magnum, where the spine meets the skull and its inferior limit is the end of the sacrum. The epidural space is important because it is possible to obtain access to the nerve roots to provide
pain relief. There are several approaches to this space and different medications that can be injected into it. This chapter addresses the placement of a catheter into the epidural space to deliver pain medications (Fig. 17-2).
pain relief. There are several approaches to this space and different medications that can be injected into it. This chapter addresses the placement of a catheter into the epidural space to deliver pain medications (Fig. 17-2).
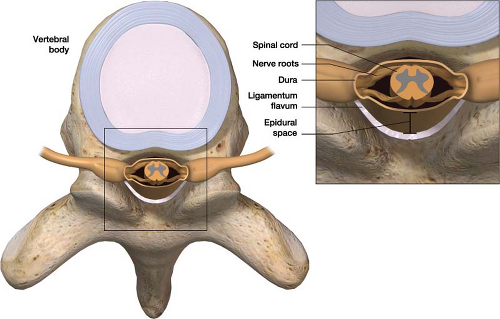 Figure 17-1 The epidural space and surrounding anatomy. The epidural space lies outside the dura mater inside the surrounding vertebrae. |
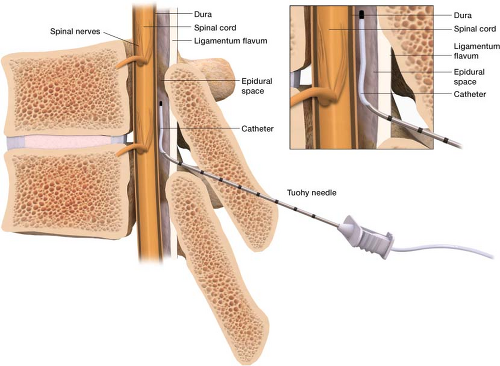 Figure 17-2 Epidural catheters are placed for pain control in the surgical setting and childbirth setting. |
The first step in placing the catheter is choosing the proper location. The goal is to place the catheter at the spinal level most closely associated with the site of pain. Analgesia can be targeted best from five to seven continuous dermatomal regions. Table 17-1 presents information about proper epidural catheter placement location.
Table 17-1 Epidural Catheter Placement for Surgical Procedures | ||||||||||
|---|---|---|---|---|---|---|---|---|---|---|
|
Without fluoroscopy the best way to determine the spinal level of interest is by palpating the spinous processes. These anatomic landmarks can help you locate an appropriate level to enter: The prominent cervical spinous process is C7, the bottom of the scapula is T7, and the last rib is T12. As long as the catheter is in the generalized area you are targeting, you can provide analgesia throughout the area by increasing the rate of infusion.
Once suitable location has been chosen the procedure can begin. With the patient sitting at the end of the bed and slightly leaning forward, the skin over and below the predetermined spinal level is prepped with betadine and drapes are placed over the area in standard sterile fashion. This procedure can also be done with the patient in the lateral decubitus position. When possible the space between two spinous processes is then palpated, and the skin and subcutaneous tissue is anesthetized with 2% lidocaine using a 1.5-in, 25G needle. In larger patients you may not be able to
palpate the spinous process; in these cases, use the 25G needle after you have anesthetized the skin to locate the spinous process. After the skin is anesthetized and spinous process located, an 18G Tuohy epidural needle (Fig. 17-3) is placed in a perpendicular fashion to the skin. A small tilt of the needle tip in the cephalad direction may make catheter placement easier. Advance the needle through the skin, fascia, supraspinal ligament and interspinal ligament until it enters the ligamentum flavum, a typically thick ligament that “grabs” the needle as it enters. At this point, the stylet of the Tuohy needle is removed and a glass syringe is attached to the Tuohy needle (Fig. 17-4). I fill the glass syringe with 3 mL of saline; some doctors use air. When the needle is in the ligamentum flavum, the saline stays in the syringe despite application of light pressure to the plunger (Fig. 17-5). It is best to advance the needle in millimeter increments using the hand that is touching both the needle and the patient’s back. This technique will guard against any sudden movements by either patient or physician that could result in a sudden excessive needle depth.
palpate the spinous process; in these cases, use the 25G needle after you have anesthetized the skin to locate the spinous process. After the skin is anesthetized and spinous process located, an 18G Tuohy epidural needle (Fig. 17-3) is placed in a perpendicular fashion to the skin. A small tilt of the needle tip in the cephalad direction may make catheter placement easier. Advance the needle through the skin, fascia, supraspinal ligament and interspinal ligament until it enters the ligamentum flavum, a typically thick ligament that “grabs” the needle as it enters. At this point, the stylet of the Tuohy needle is removed and a glass syringe is attached to the Tuohy needle (Fig. 17-4). I fill the glass syringe with 3 mL of saline; some doctors use air. When the needle is in the ligamentum flavum, the saline stays in the syringe despite application of light pressure to the plunger (Fig. 17-5). It is best to advance the needle in millimeter increments using the hand that is touching both the needle and the patient’s back. This technique will guard against any sudden movements by either patient or physician that could result in a sudden excessive needle depth.
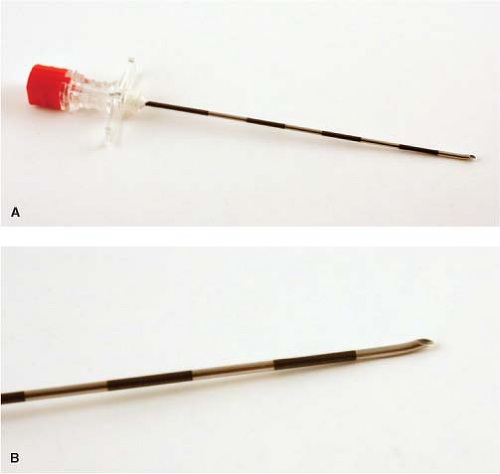 Figure 17-3 A. Tuohy epidural needle. B. The slight curve at the end of the needle allows the catheter passing through the needles lumen to exit laterally at a 45 degree angle. This safety feature makes it less likely the dura will be punctured |
As the needle advances, it eventually encounters the epidural space where the preservative free saline is sucked into the epidural space by negative pressure. This is known as the loss of resistance technique (Fig. 17-6). As long as the needle is in the process of being advanced, the syringe should be under continuous pressure or the physician should be checking intermittently for a loss of resistance. A novice may feel more comfortable attaching the syringe to the needle well before encountering the ligamentum flavum. The drawback to this is the hollow needle can pick up tissue as it is advanced over increasing distances. It is a good idea to disconnect the glass syringe and reinsert the stylet every couple of centimeters if a loss of resistance
has not yet been obtained to ensure that the needle is not clogged. Then reattach the syringe and check for loss of resistance as you advance.
has not yet been obtained to ensure that the needle is not clogged. Then reattach the syringe and check for loss of resistance as you advance.
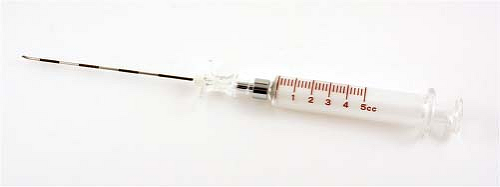 Figure 17-4 Tuohy epidural needle with glass syringe attached. |
 Figure 17-5 Using the classic loss of resistance technique to find the epidural space, light pressure is applied to the glass syringe. While the needle is in the ligament flavum the tip of the needle is blocked by thick ligament tissue. |
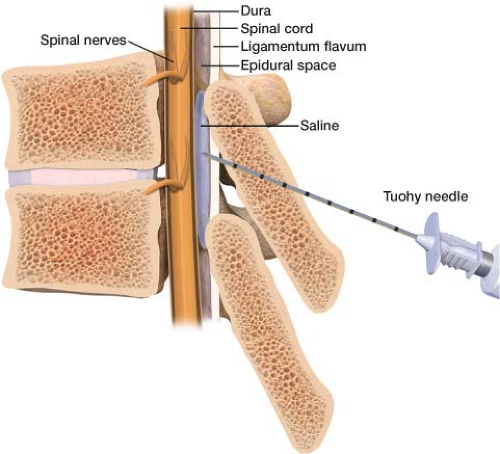 Figure 17-6 When the tip of the Tuohy needle pushes through the ligamentum flavum preservative free saline is sucked into the epidural space by negative pressure indicating proper needle position. |
If you do not get a good loss of resistance, there are options to troubleshoot this. Detach your syringe and drain it of the normal saline. Fill it with 0.5 mL of air and check for loss of resistance this way. A second option is to redirect the needle more medially. You may be deep enough, but your needle is too lateral. If the needle is hitting bone before reaching the epidural space (usually very superficial), you are most likely hitting the spinous process and the needle should be redirected more cephalad or caudad. Pull the needle back a few centimeters and redirect. If the needle is contacting bone past the level expected of the spinous process, it is most likely touching lamina and needs to be directed cephalad or medial and cephalad.
After obtaining loss of resistance, the epidural catheter is then fed through the Tuohy needle into the epidural space (Fig. 17-7). Five centimeters of the catheter should be fed into the epidural space; the catheter has markings for every 1 cm for measurement purposes. To decide how much catheter will be needed, add the distance the needle had to transverse through tissue to reach the epidural space by counting the rungs on the needle still in view and subtracting it from 10. Then add 5 to that number. If the needle transverses 6 cm of tissue to reach the epidural space, 4 rungs on the needle will be still showing, the catheter should exit the skin at the 11-cm mark, leaving 5 cm in the epidural space. There are special marks at 5, 10, and 15 cm on the catheter to help you determine your depth. The luer lock cap is then attached to the free end of the catheter (Fig. 17-8). Aspiration of the catheter is performed to rule out cerebral spinal fluid (CSF) or blood return, making sure that the catheter is neither intrathecal nor in a blood vessel. After confirming negative aspiration, the luer lock cap is removed and the needle is pulled out over the catheter. The luer lock cap is put back on the catheter.
Related posts:


Stay updated, free articles. Join our Telegram channel

Full access? Get Clinical Tree


