Endotracheal Intubation and Management of the Difficult Airway
Kane High
When emergency health care providers cannot maintain an airway or support ventilation with a bag-mask or other airway devices, insertion of an endotracheal tube by experienced providers is indicated. Importantly, only experienced and continually qualified individuals should perform endotracheal intubation after a careful assessment of the risks and benefits in an emergency setting.
When and how to intubate during cardiac arrest
“Crash” endotracheal intubation
Anticipating complications during emergency airway intubation
Confirming endotracheal tube placement and displacement
Indications for Endotracheal Intubation
When emergency health care providers cannot maintain an airway or support ventilation with a bag-mask or other airway devices, insertion of an endotracheal tube by experienced providers is indicated. Importantly, only experienced and continually qualified individuals should perform endotracheal intubation after a careful assessment of the risks and benefits in an emergency setting. Urgent or emergent endotracheal intubation will pose additional challenges.
Currently, advanced cardiac life support (ACLS) experts consider the cuffed endotracheal tube the ventilation adjunct of choice for providers who are skilled and experienced in its use. The cuffed endotracheal tube
Keeps the airway patent
Allows suctioning of airway secretions
Ensures delivery of a high concentration of oxygen
Provides a route for administration of certain drugs
Facilitates delivery of a specific tidal volume
Protects the airway from aspiration of gastric contents
Protects the airway from aspiration of blood and mucus from above the trachea.1
Indications
Indications for insertion of an endotracheal tube in an emergency situation include cardiac arrest and acute respiratory insufficiency. General indications in these settings are:
Inability of the provider to ventilate the unconscious patient with less invasive methods. In general, attempt to provide oxygenation and ventilation of the lungs with exhaled-air methods, simple airway adjuncts, or bag-mask ventilation before attempting endotracheal intubation.
Inability of the patient to protect the airway (e.g., because of coma, absent reflexes, or cardiac arrest). To provide adequate lung inflation, rescuers often generate airway and esophageal pressures that exceed the closing pressure of the gastroesophageal junction. This can lead rapidly to gastric inflation and subsequent regurgitation. When the airway is unprotected, regurgitated gastric contents can enter the lungs.2,3,4,5
Prolonged need for chest compressions during resuscitation. Simple, noninvasive airway adjuncts may be used to maintain oxygenation and ventilation during cardiac arrest of short duration such as ventricular fibrillation (VF) or pulseless ventricular tachycardia (VT) arrest responsive to defibrillation. When resuscitation is prolonged, however, gastric inflation often becomes problematic and airway control is needed. As soon as practical during the resuscitative effort, intubate the trachea or insert one of the two acceptable alternative advanced airways—the laryngeal mask airway (LMA) or Combitube.
Endotracheal Intubation in Cardiac Arrest
The principles of assessment and management of airway emergencies are complex; the specific approach required is influenced by the training,
skills, and experience of emergency health care providers, the assistance and resources available in different clinical settings, and local protocols.
skills, and experience of emergency health care providers, the assistance and resources available in different clinical settings, and local protocols.
Rapid Sequence Intubation Versus “Crash Airway” (Cardiac Arrest) Intubation
“Rapid sequence intubation” (RSI) and “rapid sequence induction” both describe a sequential protocol for the rapid induction of anesthesia and intubation in patients at risk for aspiration of gastric contents. Peter Safar’s pioneer description of such a protocol used both terms: “rapid induction/intubation for prevention of gastric-content aspiration.”6 The more inclusive term “rapid sequence intubation” is preferred now because “induction” currently refers only to the step of “inducing” anesthesia via sedative agents.
Crash Airway Intubation for Cardiorespiratory Arrest
Obvious differences exist between a patient who is breathing spontaneously—the usual candidate for RSI—and someone in cardiac (cardiorespiratory) arrest. The term “crash airway” describes patients who are unresponsive (no airway protective reflexes), without effective respirations or circulation.
Assess the Patient: The Primary and Secondary ABCD Surveys On arriving at the scene of a cardiac arrest or respiratory emergency in any setting, ACLS personnel follow the steps of the primary ABCD survey: assess/ manage airway, breathing, circulation, and ventricular fibrillation—with an automatic external defibrillator (AED) or conventional defibrillator.
The steps of endotracheal intubation are part of the secondary ABCD survey. Correct performance of the primary ABCD survey, however, accomplishes a number of critical steps required for endotracheal intubation:
Open airway. If patient is unresponsive, insert oropharyngeal airway.
Administer high-flow (10–15 L/min) 100% oxygen.
Provide positive-pressure ventilation with bag and mask if spontaneous ventilation is absent or inadequate (see “Preoxygenation,” below).
If bag-mask ventilation is provided for the unresponsive patient (with no airway protective reflexes), provide cricoid pressure if personnel are available.
Begin the secondary ABCD survey:
Designated intubator verifies effectiveness of ventilation and oxygenation and prepares to intubate (secondary A and B).
Designated IV accessor/medication provider gains peripheral vein access (see Table 18-1) to provide appropriate resuscitation medications and premedications for intubation if needed.
Initial Steps of Crash Airway (Cardiac Arrest) Intubation
The patient with a crash airway requires chest compressions and positive-pressure ventilation before and after endotracheal intubation. In such circumstances several steps in the sequence of RSI—such as preoxygenation, premedication, defasciculation, and sedation—are either unnecessary or have a lower priority. When endotracheal intubation is performed for the crash airway, the intubation steps (see below) are modified according to the following steps:
Step 1. Preparation per routine appropriate for the setting
Step 2. Assessment
Step 3. Preoxygenation, accomplished during resuscitation
Step 4. Premedication, omitted because the “LOAD” agents (lidocaine, opioids, atropine, and defasciculating agents) add little if any clinical value to benefit the cardiac arrest patient
Step 5. Induction of anesthesia and paralysis, omitted because the patient is already unresponsive and flaccid due to cerebral anoxia from lack of blood flow
Use of Paralytic Agents With the Crash Airway
Although the paralysis step is often omitted for patients with crash airway, residual muscle spasm and hypertonicity during the first minutes after cardiac arrest may complicate attempted endotracheal intubation. In one emergency medical services (EMS) system in which paramedics were not allowed to use paralytic agents, 49% of failed intubations were due to “inadequate relaxation.”7 Some EMS systems have initiated programs that train and protocols that authorize advanced life support (ALS) personnel to administer sedative agents,8 paralytic agents,9 or both.10 Many such protocols are based on published experience in air medical transport systems, involving trauma patients11,12,13 and others who require a crash airway.14 Because most experience with RSI protocols using sedatives and paralytic agents in the prehospital setting have actually involved management of the crash airway, the need for—and effects of—RSI medications has not been demonstrated. There have been no reports of outcomes of airway management by systems that have prospectively studied the use of paralytic agents in cardiac arrest.9 In fact, many published protocols for the use of succinylcholine specifically exclude patients in cardiac arrest.15 Intubation of some victims of cardiac arrest may be facilitated by the use of neuromuscular blocking agents if protocols and programs are based on the consensus guidelines of organizations such as the National Association of EMS Physicians.16,17
The “RAPIDS” Approach to Endotracheal Intubation for Crash Airway Patients18
In the crash airway situation usually presented to health care responders, the patient is unresponsive without effective respiration (agonal gasps may be present) and no circulation.14 No monitoring or treatment action other than basic CPR is ongoing. The following approach is one method to rapidly intubate the trachea and control the airway.
R: Resuscitate Patient
Continue CPR while planning to establish a definitive airway.
Personnel. Two or preferably three persons are assigned to airway management. One person is designated in advance as the intubator; this person must have proper training and experience and documented intubation success.
Equipment and medications. Regular (daily or every shift) review of the checklist is essential (see the pre-event checklist at the end of this chapter).
Begin primary ABCD survey: assess and support
Airway: Insert oropharyngeal airway.
Breathing: Administer supplementary oxygen. Provide bag-mask (or mouth-to-mask/shield) ventilation. Apply cricoid pressure (see Chapter 17).
Circulation: Ensure that adequate chest compressions are performed. Evaluate rhythm.
Defibrillate: Attempt defibrillation as appropriate.
A: Access
Establish peripheral venous access and start secondary ABCD survey.
Establish peripheral vein access.
Designated intubator prepares to intubate.
P: Position Patient
Align the respiratory axes to best facilitate laryngoscopy.
Flex the neck relative to the thorax.
Extend the head relative to the neck (see Fig. 18-1).
I: Intubate
Intubator makes one oral intubation attempt without using pharmacologic agents.
If successful, see step D—“Determine tube location.”
If unsuccessful on first attempt, resume bag-mask ventilation:
Bag-mask ventilation: Consider: do the bag-mask ventilations produce effective chest rise per clinical evaluation? If yes, see step 2; further endotracheal tube attempts are OK. If no, make only one more attempt; then go to step 3.
Review relaxation/flaccidity: During the first intubation attempt, was there complete skeletal muscle relaxation? If yes, more intubation attempts are OK. If no, see step 3: succinylcholine 1.5 mg/kg.
Paralyze the patient: Administer succinylcholine 1.5 mg/kg to ensure complete relaxation of the patient for intubation.
Give one dose only; no sedative or anesthetic.
After 30 to 40 seconds, check jaw and neck muscles for flaccidity.
If flaccid, attempt endotracheal intubation.
D: Determine Tube Location
Perform confirmation with physical examination and five point auscultation.
Perform confirmation with a device such as a CO2 detector or esophageal detector device (EDD).
S: Secure Tube
To prevent dislodgment, use tape or a commercial tube holder. Monitor position of the tube frequently.
Rapid Sequence Intubation
Initial Steps of Rapid Sequence Intubation
RSI is used primarily for patients who need to be intubated but who are usually breathing spontaneously, are variably responsive to stimuli, have intact airway protective reflexes, and—most critically—may have a full stomach. Consequently the recommended RSI steps incorporate actions to prevent pain, anxiety, and distress; to blunt multiple adverse physiologic responses to laryngoscopy and endotracheal intubation; and to reduce the risk of aspiration of gastric contents.
Step 1 is pre-event preparation.
Step 2 is preoxygenation. A high concentration of inspired oxygen is administered to the spontaneously-breathing patient to maximize arterial and alveolar oxygen content. To prevent gastric inflation, bag-mask ventilation is not routinely provided at this time. If adequate spontaneous ventilation is present.

Figure 18-1 • Aligning axes of upper airway. 1, oral axis; 2, pharyngeal axis; 3, tracheal axis. A. Normal position. B. Neck flexed on the shoulders to align axis 2 with axis 3, and head extended on the neck to align axis 1 with axes 2 and 3.
Step 3 is premedication. Pharmaceutical agents are administered to blunt specific reflex reactions to airway manipulation. The Airway Course, an advanced emergency airway management course,19 has developed the mnemonic “LOAD” as a memory aid for the premedication (pretreatment) agents: lidocaine, opioids, atropine, and defasciculating agents. (See the next section for further information about the use of these medications.)
Step 4 is induction of anesthesia or sedation and paralysis.
The Seven “Ps” of Rapid Sequence Intubation
The “Seven P’s of Rapid Sequence Intubation” was developed as a memory aid for advanced airway providers.18 As modified for ACLS use, seven steps or “Ps” are as follows:
Pre-event Preparation. Prepare personnel, equipment, medications, and monitoring and begin primary ABCD survey. Note any history that will influence intubation procedure or choice of medication. This preparation will be influenced by the setting and acuity of the intubation procedure.
Preoxygenate.
Pretreatment/Premedication.
Paralyze after sedation. Induce anesthesia.
Protection/Positioning. Cricoid pressure applied: just as airway protective reflexes (cough, gag) are lost and before positive-pressure ventilation.
Placement of endotracheal tube with both clinical conformation and a device.
Postintubation management, including securing of tube and radiographic verification of tube placement; continuous monitoring of tube position, oxygenation, and ventilation.
Step 1: Pre-event Preparation
Multiple advanced resuscitation interventions must be performed simultaneously during an intubation procedure. This is particularly true when intubation is required during resuscitation. Resuscitation teams should have predesignated responsibilities so that in the event of an emergency, rescuers can act without waiting for instructions.
Personnel
Two or preferably three providers should be assigned to airway management, with one of the providers designated to perform intubation. As the designated provider prepares for the intubation attempt, the other “airway” providers perform bag-mask ventilation (see discussion of bag-mask ventilation in preceding pages) and assist with intubation.
One provider is typically assigned to establish vascular access. Vascular access will be needed during resuscitation to provide vasoactive and other medications and will be needed during intubation of the responsive patient if sedatives and paralytic agents are used during RSI.
Inexperienced providers should use only those airway management devices for which they have adequate training. Providers who perform endotracheal intubation require either frequent experience or frequent retraining.1,20,21
Advanced skills are required to place an endotracheal tube and verify correct position.
Delays in intubation or failure to intubate will adversely affect the outcome of cardiac arrest. Failure-to-intubate rates are as high as 50% in EMS systems with low patient volume and providers who perform intubation infrequently.22,23
Intubation attempts may produce serious complications that are more common when the provider is inexperienced. These potential complications include trauma to the oropharynx, hypoxia and hypercarbia from long interruptions in ventilation, delayed or withheld chest compressions, esophageal intubation, failure to secure the tube, and failure to recognize tube misplacement or displacement.
EMS systems should establish a system of quality improvement monitoring for intubation attempts, documenting for each provider and patient the number of intubations attempted, number of confirmed successful intubations, complications, and outcomes.
One successful model for out-of-hospital response to cardiac arrest is a two-tier response: a two- to three-member BLS-D response team followed by a two-member ALS response team. In this system it is common for BLS responders to perform chest compressions, bag-mask ventilation, and defibrillation. One member of the two-person ALS team gains intravenous access and administers medications, and the other performs endotracheal intubation and airway management. This should be the default response model for emergencies both in and out of hospital. In the absence of procedural delays, one ALS provider should be ready to attempt intubation when the other ALS responder is ready to administer IV medications after ensuring chest.
Equipment
Cuffed Endotracheal Tube
A typical cuffed endotracheal tube
Is open at both ends
Is measured in length (cm) from the distal end and marked at several intervals (in adults the tube depth mark visible at the front teeth should be approximately 20–22 cm)
Has size markings indicating the internal diameter of the tube in millimeters. For an average-sized woman, the tube size should be 7 mm; for an average-sized man, 8 mm.
Has a standard 15-mm/22-mm end connector that will fit positive-pressure ventilation devices.
Has a high-volume, low-pressure inflatable cuff attached to an inflating tube with a one-way valve for the cuff-inflation syringe.
Has a pilot balloon between the one-way valve and inflating syringe to indicate cuff inflation.
Always check the inflatable cuff for integrity by testing it just before insertion. Use the same syringe that will be used to inflate the cuff after insertion.
Stylet
A stylet is typically a plastic-coated, malleable metal rod that can be inserted through the endotracheal tube to curve and stiffen the tube to the desired configuration. This procedure will facilitate insertion of the tube into the larynx and trachea by allowing easier manipulation of the direction of the tube. Apply a water-soluble lubricant to the stylet before inserting it to a point 1 to 2 cm from the end of the tube. Do not allow the end of the stylet to extend beyond the end of the tube, because it could injure the vocal cords and laryngeal mucosa. Once the stylet is properly positioned in the tube, bend the stylet over the edge of the connector to prevent inadvertent advance of the stylet during attempted intubation.
Gum Elastic Bougie
The Eschmann endotracheal tube introducer, more commonly called the gum elastic bougie, is another device used to assist with placement of the endotracheal tube24 (Fig. 18-2). Currently the gum elastic bougie is used by trained providers only for difficult or unsuccessful oral intubations. It is a semirigid, resin-coated device, about 2 feet long (60 cm), made of braided polyester. As seen in Figure 18-2, use of the gum elastic bougie is quite analogous to the Seldinger wire technique for inserting intravascular catheters. The device is inserted with a laryngoscope, but only partial visualization of laryngeal structures is required. The small-diameter flexible device is inserted in the trachea largely by “feel”; the design allows the provider to feel the bumping of the tracheal rings when the device enters the trachea. Once the bougie has been passed into the trachea, it essentially acts as a “guidewire” over which an endotracheal tube is passed and advanced blindly into position in the trachea. The endotracheal tube is then stabilized and the rescuer slides the bougie back out.25,26,27,28,29,30 The tip of the endotracheal tube sometimes gets caught on laryngeal structures and cannot be advanced. In such cases, rotation of the tube with gentle pressure will allow it to advance into the trachea. Some endotracheal tubes (e.g., the Parker endotracheal tube) are designed to reduce this problem by having a curved bevel that causes the tip of the tube to more closely follow the introducer.
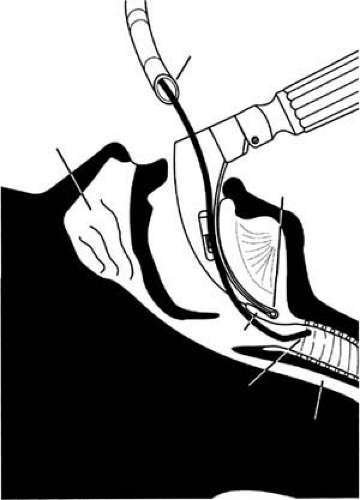 Figure 18-2 • The gum elastic bougie is used to assist endotracheal intubation by the oral route. (Figure is reprinted with permission from Annals of Emergency Medicine. 1996; 27:665–667. © 1996 Annals of Emergency Medicine.) |
Laryngoscope (Handle/Blade-Holder Plus Curved and Straight Blade)
The laryngoscope is used to expose the glottis and allow direct visualization of the vocal cords and the tracheal entrance (see Fig. 18-2). The laryngoscope consists of three parts:
The handle, which holds batteries for the light source
The blade, which has a bulb in the distal third of the blade
The fitting, which is the connection point between the blade and the handle where electrical contact is made
Always check that the light is working.
Related posts:
 Emergency Department Management of Acute Coronary Syndromes
 Heart Failure and Acute Pulmonary Edema in the Emergency Department
 Circulatory Adjuncts to Improve Coronary Perfusion Pressure
 Oxygen Administration and Supraglottic Airways
 Life-Threatening Arrhythmias: Evaluation, Identification, and Assessment
Stay updated, free articles. Join our Telegram channel

Full access? Get Clinical Tree


