CHAPTER 49 Emergency Airway Management
MAINTENANCE OF adequate gas exchange is the fundamental responsibility of the physician managing the airway in emergency (i.e., “code blue”) situations. Failure to maintain a patent airway for more than a few minutes can lead to brain injury or death.1 This chapter reviews the principles of emergency airway management, placing special emphasis on the critically ill or cardiac intensive care unit (CICU) patient.
Requirements for Safe Airway Management
Regardless of the emergent nature of the “code blue,” some key drugs and several pieces of emergency airway equipment should be available before manipulation of the airway (Table 49-1).
Table 49–1 Essential Preparatory Requirements for Safe Airway Management “Code Box”
| Requirement | Equipment |
|---|---|
| Oxygen | BVM with oxygen inflow tubing |
| Ventilation | Soft nasal airway |
| Rigid oral airway | |
| Emergency cricothyroidotomy device, or transtracheal jet ventilation (TTJV) equipment, LMA, ETC | |
| Intubation | Laryngoscope with new tested batteries |
| No. 3 and No. 4 Macintosh blades with functioning light bulbs | |
| No. 2 and No. 3 Miller blades with functioning light bulbs | |
| Endotracheal tubes – various sizes styletted with balloon pretested | |
| Laryngeal mask airway | |
| Esophageal-tracheal Combitube | |
| Tracheal tube guides (semirigid stylets, ventilating tube changer, light wand) | |
| Flexible fiberoptic intubation equipment | |
| Retrograde intubation equipment | |
| Adhesive tape or umbilical tape for securing ETT | |
| Suction | Yankauer, endotracheal suction |
| Monitor | PETCO2 monitor, esophageal detector device |
| Drugs | IV induction and paralytic medication |
| Topicalization drugs | |
| DeVilbiss sprayer for application of topical drugs | |
| Resuscitation drugs (epinephrine, atropine, etc.) | |
| Miscellaneous | Various syringes, needles, stopcocks, IV connector tubes |
Abbreviations: BVM, bag-valve mask; EDD, esophageal detector device; ETC, esophageal tracheal Combitube; ETTs, endotracheal tubes; IV, intravenous; LMA, laryngeal mask airway; PetCo2, end tidal Co2; TTJV, transtracheal jet ventilation.
Supplemental Oxygen
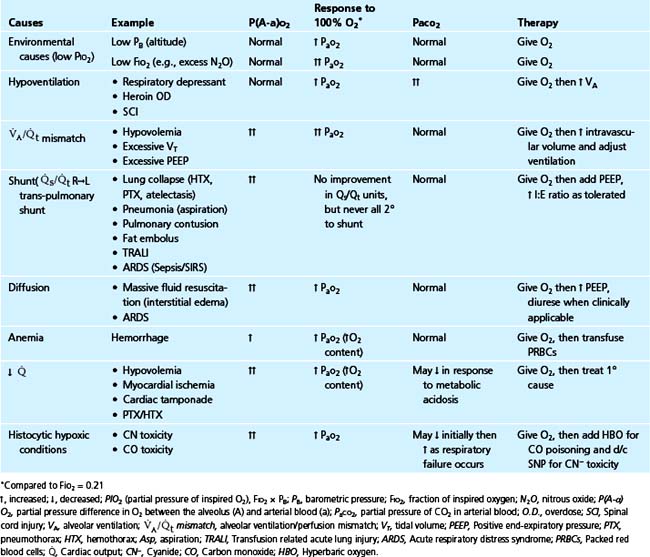
The primary reason for oxygen administration is the prevention or treatment of hypoxemia. Numerous causes of hypoxemia exist and all are improved with the administration of 100% O2 (Table 49-2).
 ) may lead to hypoxia. Oxygen delivery depends upon cardiac output (
 ), hemoglobin concentration (Hgb), and arterial oxyhemoglobin saturation (Sa
 decreases below adequate levels because of impaired myocardial function, anemia, or hypoxemia (due to decreased fraction of inspired O2 [F
 until anemia, myocardial dysfunction, or right-to-left transpulmonary shunting abates.
Preoxygenation (Before Induction and Intubation)
Preoxygenation of the lungs is an essential component of any intubation technique that might involve a period of apnea. Preoxygenation is especially important for a rapid-sequence intubation because it allows for a reserve of oxygen in the lungs during apnea. For a patient who has been rendered apneic there is a finite period before arterial oxyhemoglobin desaturation. This period is related to the reservoir of oxygen in the lungs, or functional residual capacity (FRC), and is inversely related to the oxygen consumption (Fig. 49-1). Preoxygenation with 100% O2 allows for up to 10 minutes of oxygen reserve following apnea (in a patient with healthy lungs); however, the patient who is preoxygenated with only room air (21% O2) would have only about one fifth the time (or 2 minutes) before desaturation. Patients in respiratory failure frequently desaturate sooner owing to higher O2 consumption, reduced FRC, and possibly lung disease with increased right-to-left transpulmonary shunting (Fig. 49-2).
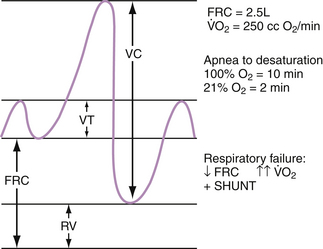
 is approximately 250 mL/min. If the patient is breathing 100% oxygen, then there is theoretically 10 minutes before desaturation. Whereas, if the patient is breathing room air (21% oxygen), there is only 2 minutes before desaturation. Furthermore, ICU patients are typically sicker with lower FRCs, increased, and increased shunting, all of which can cause more rapid desaturation following apnea.
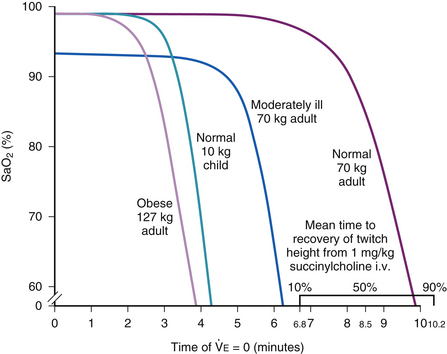
Mask Ventilation Capability
It is critical to ensure the ability to apply oxygen in the CICU using positive pressure via a bag-valve-mask (BVM) device, along with oral and nasal airway adjuncts. BVM ventilation devices, such as an AMBU bag, deliver a significantly higher FIO2 than either nasal cannulae or a mask alone (Table 49-3). Additionally, a BVM device enables one to ventilate a patient who is apneic or to assist ventilation in the patient with respiratory failure. The keys to using BVM devices are to provide adequate flow (10 to 15 L/min) and to ensure a tight seal between the mask and the patient’s face so as not to entrain any room air during ventilation.
Table 49–3 Actual FIO2 Achievable with Commonly Used Oxygen Administration Devices in Patients with Normal Ventilatory Breathing Patterns
| Device | Flow Rate (L/min) | Achievable FIO2 |
|---|---|---|
| Nasal prongs | 2 | 0.28 |
| 6 | 0.44 | |
| Simple face mask | 5-6 | 0.44 |
| 7-8 | 0.6 | |
| Bag-mask device | 6 | 0.6 |
| 10 | 0.8+ | |
| 15 | 0.9+ |
FIO2, fraction of inspired O2.
Data from Gibson RL, Comer PB, Beckham RW, et al: Anesthesiology 1976;44:71-73.
Intubation Equipment Check
Typically, the anesthesiologist, or other airway expert, brings the essential emergency intubation equipment to the resuscitation site in a “code box” (see Table 49-1). The user must inspect the “code box” each time he or she comes on call to make sure that the items listed in Table 49-1 are present and in working order before he or she is summoned to respond to a “code blue” situation and use the equipment.
All of the items listed in Table 49-1 are essential and constitute the minimum airway equipment that the anesthesiologist or other airway expert should bring to the “code blue” situation.
Suction
Patients in respiratory failure may have thick secretions and/or may have vomited. To protect against aspiration and to better visualize the laryngeal anatomy, suctioning of the airway is frequently required during a “code blue.” The suction apparatus should be continuous (not intermittent) and of sufficient force to allow rapid clearance of thick oropharyngeal secretions or vomitus. During initial airway management, a Yankauer suction tip should be used to suction debris out of the oropharynx. After tracheal intubation, however, endotracheal suction catheters may be useful to clear secretions and aspirated material out of the airways.
Airway Evaluation
Before attempting endotracheal intubation, the clinician should obtain historical and physical examination information to assess the patient’s airway for technical ease of ventilation/intubation. If evaluation reveals that the patient’s airway will be difficult to intubate, the patient should be intubated while awake. Several outstanding reviews on evaluation of the difficult airway exist.2–4 In this section, a definition of the difficult airway is provided, and historical and physical examination keys for predicting airway difficulty are described.
Definition of Difficult Airway
Airway difficulty can occur during mask ventilation or during endotracheal intubation. The two are not synonymous, and indeed, some patients who are difficult to ventilate with a mask (edentulous, large-jawed) may be quite easy to intubate. The difficulty of maintaining gas exchange with mask ventilation can range from zero to infinite (Fig. 49-3, top).
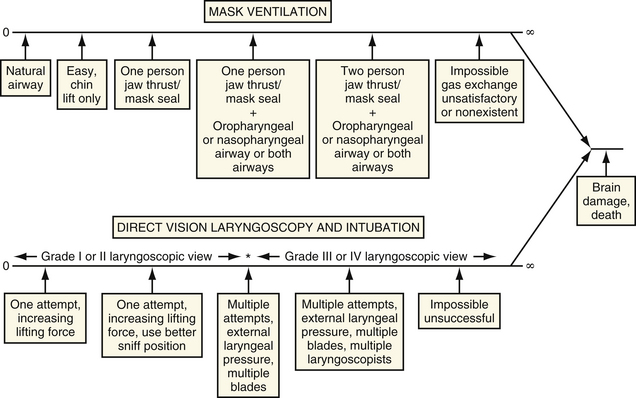
Figure 49-3 Degree of airway difficulty continuum for mask ventilation and direct vision laryngoscopy at intubation. This illustration serves to provide a conceptual frame work for the definition of airway difficulty with mask ventilation (top) and direct vision laryngoscopy (bottom). The degree of difficulty ranges from zero degrees of difficulty to the impossible or infinitely difficult airway. The amount of difficulty can vary in the same patient with different anesthesiologists using various techniques. The grade of laryngoscopic view refers to grades defined by Cormack and Lehane (see Fig. 49-4).
(From Benumof JL: Management of the difficult airway. Anesthesiology 1991;75:1087, with permission.)
Difficulty of intubation using direct laryngoscopy proceeds along a similar continuum from easy to nearly impossible (Fig. 49-3, bottom). Difficult intubation has been defined as requiring multiple attempts with multiple maneuvers, including external laryngeal pressure, multiple blades, and/or multiple endoscopists.
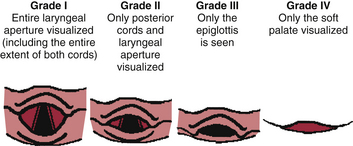
Probably the best definition of difficult intubation for documentation (from one anesthesiologist to another) or for research purposes involves the grading of laryngoscopic views (Fig. 49-4): Grade I is visualization of the entire laryngeal aperture; grade IV is visualization of the soft palate only; grades II and III are intermediate views.3 Grade III or IV laryngoscopic views correlate well with difficult intubations in the vast majority of patients.3,5 There are, however, some clinically relevant situations that provide exceptions to this rule. First, the skill of the endoscopist in manipulating the endotracheal tube and laryngoscope may have a significant effect on the grade of laryngoscopic view. Second, a grade III laryngoscopic view has been described differently by different investigators.3,6 Third, the blade used for laryngoscopy affects the grade applied to the situation. A long floppy epiglottis may yield a high grade view (III or IV) with a MacIntosh blade and a relatively low grade (I or II) with a straight blade. Finally, traumatic conditions such as cervical spine injury (inability to move the neck into “sniffing” position), laryngeal fractures, or expanding hematomas may disassociate the laryngoscopic view from the difficulty of tracheal intubation.
Pathologic and Anatomic Predictors of Airway Difficulty
Pathologic Causes of Airway Difficulty
Several pathologic causes of airway difficulty are known to cause difficulty with mask ventilation (bull neck, thick beard, massive jaw, edentulousness, large tongue, mandibular fractures). Only some of these (bull neck and large tongue), however, are associated with difficulty of intubation. Indeed, edentulousness and mandibular fractures can actually make intubation of the trachea easier.
Anatomic Characteristics That Impair Laryngoscopy
Anatomic characteristics that are known to impair direct laryngoscopy are listed in Table 49-3. Of the seven predictors shown in Table 49-3, none is by itself predictive of airway difficulty. However, when taken in combination, airway difficulty can be predicted. Receding mandible or anterior larynx is evaluated in the fully extended adult neck. When the distance between the mandible and the upper border of thyroid cartilage is less than 6 cm, visualization of the vocal cords is predictably difficult.6
Airway Examination Principles
The 11-Step Airway Exam of Benumof
Currently, the American Society of Anesthesiologists Difficult Airway (ASA DA) guidelines have endorsed an easily performed 11 step airway physical examination, as originally proposed by Benumof (Table 49-4).7 The decision to examine all or some of the components listed in Table 49-4 depends upon the clinical context and judgment of the practitioner. The order of presentation in the table follows the “line of sight” that occurs during conventional oral laryngoscopy and intubation. Of note, several of the examination components listed in Table 49-4 require an awake, cooperative patient. Even in the noncooperative, semiurgent situation, the airway expert can check the length of the upper incisors, the mandibular space compliance, thyromental distance, and neck length and neck thickness to assess the relative difficulty of intubation, as the aforementioned components do not require patient cooperation. Because certain elements of this 11-step examination cannot be practically evaluated in the all critically ill patients, an abbreviated airway examination is recommended.
Table 49–4 Anatomic/Pathologic Predictors of Difficult Intubation/Ventilation
| Anatomy | Difficult Ventilation | Difficult Intubation |
|---|---|---|
| Neck | ||
| Tongue | Large tongue | Large tongue |
| Mandible | Thick beard | |
| Teeth | Edentulousness | Buck teeth |
| Pathology | ||
| Maxillofacial | ||
| Oropharyngeal | ||
| Glottis | ||
| Neck |
Three Easy Airway Evaluation Tests
Relative Tongue/Pharyngeal Size (Mallampati Class)
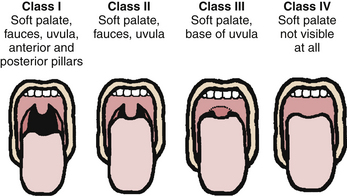
Mallampati and associates8 in 1985 proposed the size of the tongue in relation to the size of the oral cavity as a clinical sign of the difficulty of tracheal intubation (Fig. 49-5). Lewis and colleagues9 have demonstrated that the Mallampati classification is best obtained with the patient in the sitting position, with the head in full extension, with tongue out, and with phonation, because the test is more predictive and easier to perform under these conditions.
Thyromental Distance or Mandibular Space
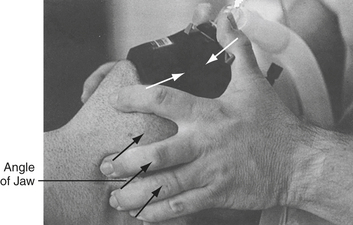
Space anterior to the larynx—thyromental distance—greater than 6 cm suggests that direct laryngoscopy will be relatively easy.10 Because the tongue must be moved anteriorly and caudad (in a supine patient) by the laryngoscope, the mandibular space must be large enough to accommodate the tongue and allow exposure of the glottis.
Evaluating the Airway of the Trauma Patient
In trauma patients (with suspected cervical spine injury), the neck must not be moved until radiographically and clinically confirmed as uninjured. Thus, such patients are analogous to those with little or no AO extension. Fortunately, the combined power of a favorable thyromental distance (>6 cm) and low Mallampati classification (I or II) provides quite strong predictors of an easy intubation.12,13
Patient Preparation and Positioning
“Sniffing” Position (Preparation for Rapid-Sequence Technique)
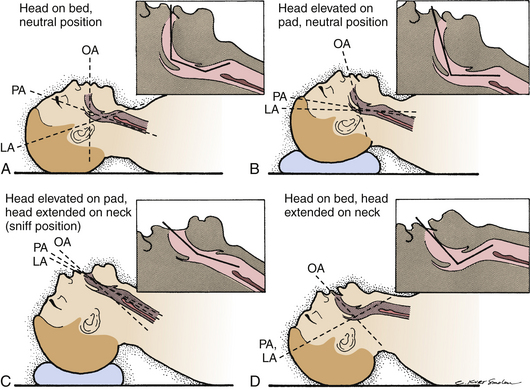
The “sniffing” position is the optimum position for direct laryngoscopy and endotracheal intubation using a rapid-sequence technique. One of the most common reasons for difficulty with laryngoscopy and intubation is failure to place the patient in an adequate sniffing position. The sniffing position involves forward flexion of the neck on the chest and atlanto-occipital extension of the head at the neck. This maneuver aligns the oropharyngeal, laryngeal, and tracheal axes (Fig. 49-6). The easiest way to accomplish this is to place at least two folded towels under the head of the supine patient. The first attempt at laryngoscopy should be a well-prepared one. Once the patient is placed in an adequate sniffing position, a helper should apply cricoid pressure to protect against regurgitation of gastric contents.
Techniques of Emergency Airway Management
Mask Ventilation
Mask Ventilation Technique
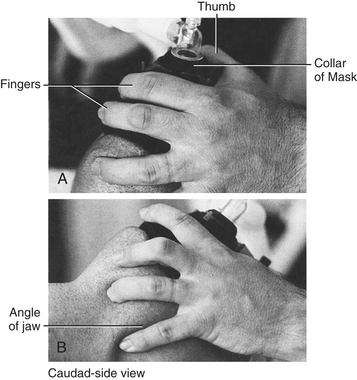
The face mask must be applied firmly to the patient’s face to ensure an adequate seal, although care must be taken not to injure the bridge of the nose with excessive pressure. A single-hand technique is acceptable if the airway is easy to ventilate (Fig. 49-7). If, however, ventilation is not easy, two hands should be used to hold the mask in place while another person depresses the bag in an attempt to ventilate the patient (Fig. 49-8). Frequently, the application of jaw thrust (backward and upward pull of the jaw in a supine patient) opens an airway and allows ventilation.
Oropharyngeal and Nasopharyngeal Airways
When the tongue and other soft tissues are maintained in the normal forward position, the posterior pharyngeal wall remains nonobstructed, and the airway is generally open (Fig. 49-9, A).
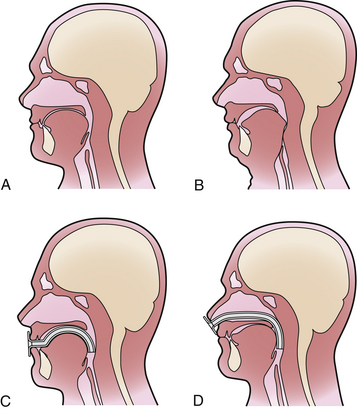
The most common cause of airway obstruction is falling back of the tongue and epiglottis in supine, unconscious patients (Fig. 49-9, B). This can be alleviated by the jaw thrust maneuver. Regardless of whether jaw thrust is successful, an oral or nasal airway as an adjunct to bag-mask ventilation can open up a closed airway.
Both oral (Fig. 49-9, C) and nasal (Fig. 49-9, D) airways restore airway patency by separating the tongue from the posterior pharyngeal wall. A rigid oral airway may elicit a gag response from an awake patient, which may be followed by emesis. Soft nasal airways provoke less gag response than rigid oral airways. Soft nasal airways are commonly inserted in patients suffering from ventilatory failure, who are more awake and prone to gagging on the rigid oral airway. Coagulopathies and nasal or basilar skull fractures are relative contraindications to nasal airways.
Laryngeal Mask Airway (LMA)
Ventilatory obstruction above the level of the cords (supraglottic) can be alleviated by the LMA because of its supraglottic placement (Fig. 49-10). However, the LMA is not an effective ventilatory device in cases of periglottic or subglottic pathology (e.g., laryngospasm, subglottic obstruction).14
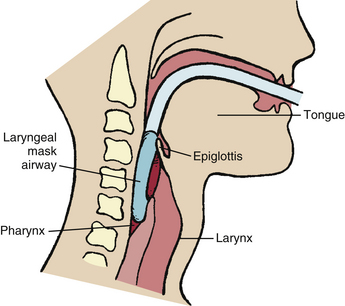
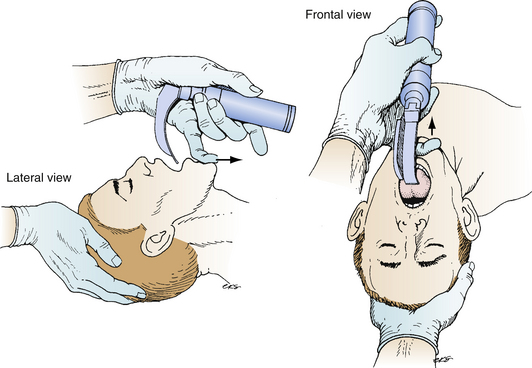
The LMA is inserted blindly into the oropharynx forming a low pressure seal around the laryngeal inlet, thereby permitting gentle positive pressure ventilation with a leak pressure in the range of 15 to 20 cm H2O. Therefore, LMA is relatively contraindicated in the presence of a known supraglottic hematoma or other expanding lesion (e.g., abscess) that might rupture. However, it can be very useful in other supraglottic obstructive conditions such as those due to swelling, edema, or redundant tissues. Placement of an LMA requires a completely anesthetized airway or an anesthetized patient.15 The LMA has been shown to rapidly restore efficient ventilation in numerous cannot intubate-cannot ventilate situations.15–17
Rigid Direct Laryngoscopy
Before performing laryngoscopy, the airway expert should test the laryngoscope blade and handle to ensure proper functioning. The laryngoscope is held in the left hand, so that the right hand is free to place the styletted endotracheal tube through the cords and into the trachea. The patient’s mouth is opened by simultaneously extending the head on the neck with the right hand, and using the small finger of the left hand (while holding the laryngoscope) to push the anterior part of the mandible in a caudal direction and opening the mouth (Fig. 49-11).
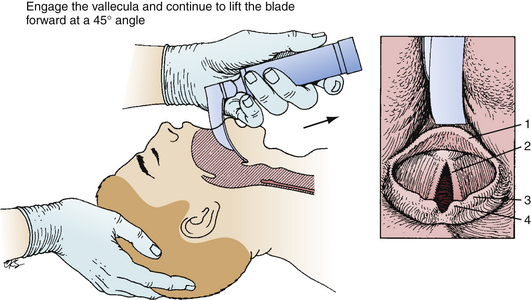
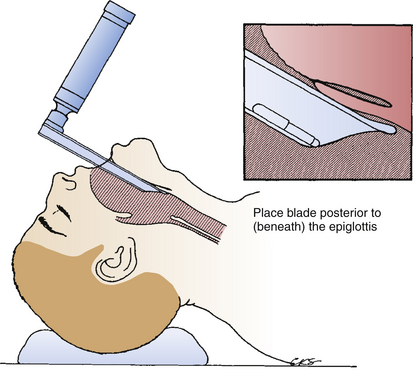
As the blade enters the oral cavity, gentle pressure is applied on the tongue, sweeping it leftward and anteriorly (Fig. 49-12) so as to expose the glottic aperture. Two basic types of blades are in common use: a curved (MacIntosh) blade and a straight (Miller and Wisconsin) blade. The curved MacIntosh blade (Fig. 49-13) tip is placed in the vallecula after the tongue is slid leftward and anteriorly and while the laryngoscope handle is lifted in a forward and upward direction (stretching the hyoepiglottic ligament). This causes the epiglottis to move upward, exposing the arytenoid cartilages and eventually the vocal cords. The straight Miller blade (Fig. 49-14) is inserted until the epiglottis is visualized, and then the epiglottis is elevated to expose the glottic aperture.

Six common errors can occur during RDL use. First, the blade can be inserted too far into the pharynx, elevating the entire larynx which exposes the esophagus instead of the glottis. Second, for optimal laryngoscopy, the tongue must be completely swept to the left side of the mouth with the flange on the RDL blade. This is slightly more difficult to accomplish with the Miller blade because the flange is less prominent. Third, novice laryngoscopists frequently rock the RDL in the patient’s mouth using the upper incisor as a fulcrum in a self-defeating attempt to visualize the glottis. This can chip the patient’s upper incisors and moves the glottic aperture further anterior out of view. The correct approach is to lift the handle anterior and forward at an approximately 45o angle (see Fig. 49-14). Fourth, proper sniffing position is not always achieved or indicated. Fifth, in obese barrel-chested patients and large breasted women, it can be difficult to insert the blade in the mouth. Use of a short handled RDL or removal of the blade from the scope handle and reattaching once the blade is positioned in the mouth helps with this predicament. Finally, improper blade selection may hinder laryngoscopy and intubation. If the patient has a long floppy epiglottis, a Miller blade may be best; a large wide tongue may be best managed using a Macintosh blade.
Numerous developments have been made in the last decade combining fiberoptic technology with various configurations of the laryngoscope, with the goal of improving intubation success, and decreasing the need to move the neck when manipulating the airway. Such laryngoscopic devices as the Bullard Laryngoscope (Circon, ACMI, Stamford, Conn.) and the WuScope (Achi Corp., Dublin, Calif.) are representative of this approach and have been in use for more than a decade. More recent innovations include the GlideScope (Verathon, Inc., Bothell, Wash.) (Fig. 49-15, 49-16). In recent studies of simulating easy and difficult airways with novice GlideScope users, the laryngoscopic view was either the same or superior in the difficult intubation scenario.18

Figure 49-15 GlideScope video laryngoscope Cobalt. Single-use, sterile Cobalt GVL Stat with reusable Video Baton.
(Images courtesy of Verathon, Inc.)
Related posts:
 Evolution of the Coronary Care Unit: Past, Present, and Future
 Elevated Cardiac Troponin in the Absence of Acute Coronary Syndromes: Mechanism, Significance, and Prognosis
 Hemodynamically Unstable Presentations of Congenital Heart Disease in Adults
 Conduction Disturbances in Acute Myocardial Infarction
 Antiplatelet Therapy
 Invasive Hemodynamic Monitoring in the Cardiac Intensive Care Unit
Stay updated, free articles. Join our Telegram channel

Full access? Get Clinical Tree


