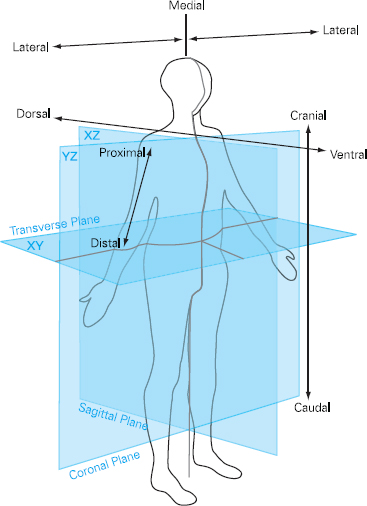
Helen Pickard This chapter will describe: • the process of clinical examination • the techniques and tools used in examination • specific examination process of the cardiovascular, respiratory and abdominal systems. The aim of this chapter is to consider clinical examination using a body systems approach which enables the practitioner to undertake a comprehensive examination in a logical fashion. In conjunction with the clinical history, this allows the practitioner to make a diagnosis and work out a clinical management plan. The chapter will focus on the three main systems which are of primary importance to the preoperative assessment clinician: the respiratory system, the cardiovascular system and the abdomen, to illustrate the systematic approach. These principles can then be applied to other body systems. Such skills have traditionally been the remit of medically trained clinicians but, as discussed in previous chapters, nurses and other Allied Health Professionals (AHPs) are increasingly being asked to develop their roles to include these skills. This chapter is aimed at re-familiarising those who have the skills and need to apply them to the preoperative patient and those who are new to the role and require direction. It is important that those new to these skills are prepared for the new responsibilities and accountability that arise from expansion into this area of clinical practice so that they feel competent and confident to meet these new challenges. Thus, familiarising oneself with the medical model approach will facilitate the cohesive work required to function as an effective team. Of paramount importance is the ability to scrutinise the minute detail in order to reach a diagnosis and yet also understand which clinical signs are significant and which are not. With practice and experience it is possible to incorporate a holistic perspective, which considers psychological, spiritual and social wellbeing in addition to physiological processes, in order to establish a management plan that is truly patient-centred. For the novice the most effective method of learning such skills is to practise. Once a basic understanding of the process has been established, it is advisable to link up with an experienced clinician and work alongside them for as long as required to gain confidence and competence. Agreeing a programme of mentorship and supervision is essential if novice practitioners are to become effective and safe practitioners. Approximately 70 per cent of the information needed to make a diagnosis comes from the history-taking process (see Chapter 3). The subsequent clinical examination is designed to confirm the diagnosis suggested by the history, and therefore determine the plan of care. It is essential that the practitioner maintains an open mind during the process of examination so that the discovery of an unexpected finding does not confuse or obliterate the initial impression. There is often more than one diagnostic possibility and the clinical examination can help to determine the most likely option. Indeed, the most difficult part of any assessment is making sense of the clinical findings. The examination itself is a relatively simple process that can be learnt. The interpretation and analysis of examination results is less straightforward and requires knowledge of normal and abnormal physiology, in order that clinical findings can be explained and a diagnosis reached. Accurate clinical examination is important but it forms only a small part of the diagnostic and clinical decision making process. The need for underpinning knowledge must not be overlooked. This can only be acquired from relevant experience and extensive reading. An important part of clinical examination involves the accurate documentation of findings. The record of the consultation is likely to be accessed by numerous health professionals and will stand as a legal record of the care given. It is worth taking the time to document findings accurately using appropriate terminology. It should be comprehensive but succinct and should utilise appropriate anatomical descriptions wherever possible. For example, it is much better to write ‘right medial malleolus’ than ‘inner ankle on right foot’, as it more clearly describes the site in question. Moreover, such language helps to ensure that non-medical practitioners are better able to communicate unambiguously with their medical colleagues and to demonstrate their clinical credibility, which will ensure that their professional opinion is taken seriously. The location of body structures is always described in relation to other structures and these terms are used in pairs. They are: • anterior – nearer the front surface of the body • posterior – nearer the back surface of the body • superior – nearer the crown of the head • inferior – nearer the soles of the feet • medial – nearer the midline of the body • lateral – further from the midline of the body • proximal – nearer to the trunk • distal – further from the trunk The terms ‘superficial’ and ‘deep’ specify distance from the surface of the body. Figure 4.1 Anatomical planes It is important to understand and become familiar with these terms, as they are extensively used in clinical examination and pathophysiology textbooks. When embarking upon a clinical examination it is important to build a rapport with the patient so they trust you and feel able to cooperate. It is necessary to explain what is going to happen so that the patient knows what to expect and is able to assist during the examination. If the practitioner is calm, relaxed and unhurried, the patient will be reassured. A relaxed patient is easier to examine than a tense patient and the clinical findings will be more accurate. The examination should take place in a warm, well-lit environment that is as private as possible to maintain comfort and dignity for the patient. The practitioner should try to avoid asking the patient to undergo unnecessary physical effort during the examination, especially if they are feeling breathless or unwell. For this reason it is important to work out an examination sequence that does not overtire the patient.
Chapter 4 Clinical examination
SUMMARY
INTRODUCTION
Terminology
Before you start
| Box 4.1 Examination sequence |
|---|
| 1. Greeting and introduction |
| 2. Note general appearance |
| • AVPU, MEWS, GCS (see page 59) as appropriate |
| • Hands and nails |
| • JVP (see page 62) |
| • Face and eyes |
| • Mouth |
| 3. Anterior chest |
| • Lungs |
| • Heart |
| • Breasts |
| 4. Posterior chest and back |
| • Lungs |
| • Spine and sacral area |
| 5. Abdomen |
| 6. Lower limbs |
| • Oedema |
| • Circulation and pulses |
| • Movement |
| • Neurology |
| 7. Upper limbs |
| • Circulation and pulses |
| • Movement |
| • Neurology |
Examination sequence
Adopting a systematic approach is the key to effective clinical examination, as it reduces the possibility of missing important findings. Box 4.1 gives an example of an examination sequence that may be used, although each clinician will establish their personal preferences in accordance with their particular clinical specialty. A generalised assessment should always be undertaken even if the patient’s abnormality seems to be localised to a specific area. The temptation to ‘cut corners’ in an effort to be more efficient should be resisted in order to minimise the risk of forgetting to ask an important question, which could hold the key to the diagnosis.
First impressions
The examination begins as soon as the practitioner meets the patient. Clinical information is continually gathered throughout the consultation. For example, if the patient walked into the room, were there any problems with their gait? Do they walk with a stick? Do they need help from someone else? Are they able to stand up? Do they appear to be breathless? Can they complete sentences when they talk? Does their facial expression or body position suggest they are in pain? Such unobtrusive observation ensures that a clinical impression begins to form even before the history-taking process is started.
This type of clinical information should not, however, be gathered in a haphazard way. The practitioner must know what to look for and must consciously observe and record findings in a logical way in order to inform their final diagnosis and treatment plan. It is also worth utilising specific tools to establish the status of the patient. For example the AVPU score is a very quick assessment and can be used to describe the patient’s conscious level:
A = alert and orientated
V = responsive to voice or speech
P = responsive to pain
U = unresponsive.
There are many other such tools, including the Modified Early Warning Score (MEWS)*, which consider the standard observations of pulse, blood pressure, respiratory rate and temperature, alongside other parameters such as oxygen saturation and urine output, added together to produce a score which gives the practitioner an indication of the severity of the presenting condition. With MEWS, a score of 4 or more is usually indicative of a more serious condition requiring early intervention (see Table 4.1). The Glasgow Coma Scale (GCS) is another tool that considers level of consciousness and measures responses to stimulation in terms of eye opening, best verbal response and best motor response (see Box 4.3). The GCS gives a reliable and standardised assessment of level of consciousness and should always follow if there are any concerns with the AVPU assessment. Documenting such scores during the assessment will allow a baseline to be established and indicate the urgency of the care/treatment required.
Table 4.1 Modified Early Warning Score1
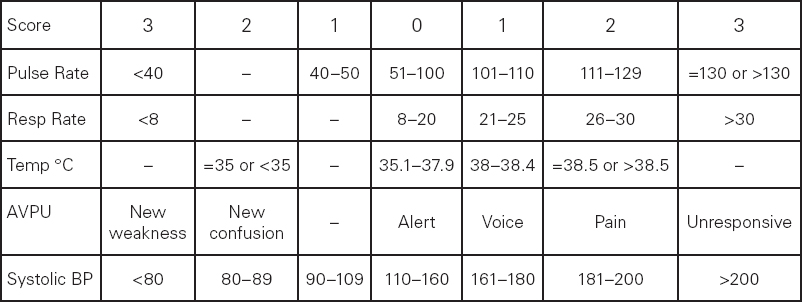
Source: C.P. Subbe, M. Kruger, L. Gemmel (2001)
Box 4.2 Glasgow Coma Scale2
Best eye response (E) – 4 grades starting with the most severe:
1. No eye opening
2. Eye opening in response to pain. (Patient responds to pressure on the patient’s fingernail bed; if this does not elicit a response, supraorbital and sternal pressure or rub may be used.)
3. Eye opening to speech. (Not to be confused with the awaking of a sleeping person; such patients receive a score of 4, not 3.)
4. Eyes opening spontaneously.
Best verbal response (V)– 5 grades starting with the most severe:
1. No verbal response.
2. Incomprehensible sounds. (Moaning but no words.)
3. Inappropriate words. (Random or exclamatory articulated speech, but no conversational exchange.)
4. Confused. (The patient responds to questions coherently but there is some disorientation and confusion.)
5. Oriented. (Patient responds coherently and appropriately to questions such as the patient’s name and age, where they are and why, the year, month, etc.)
Best motor response (M) – 6 grades starting with the most severe:
1. No motor response.
2. Extension to pain (adduction of arm, internal rotation of shoulder, pronation of forearm, extension of wrist, decerebrate response).
3. Abnormal flexion to pain (adduction of arm, internal rotation of shoulder, pronation of forearm, flexion of wrist, decorticate response).
4. Flexion/Withdrawal to pain (flexion of elbow, supination of forearm, flexion of wrist when supraorbital pressure applied; pulls part of body away when nailbed pinched).
5. Localises to pain. (Purposeful movements towards painful stimuli; e.g., hand crosses mid-line and gets above clavicle when supraorbital pressure applied.)
6. Obeys commands. (The patient does simple things as asked.)
Source: G. Teasdale and B. Jennett (1974)
There is no single correct way to carry out a physical examination and each practitioner over time develops his or her own style. The most common examination sequence is:
• inspection
• palpation
• percussion
• auscultation.
This sequence can be utilised for most of the major body systems. In general the clinician stands to the right of the patient during clinical examination.
NB. Sternal pressure or rub is not recommended in some organisations and suborbital pressure is not recommended in suspected/confirmed facial fracture.
Cardiovascular examination
Inspection
Hands
This section will attempt to separate the clinical signs according to the body system in question, although in reality most clinicians complete their inspection of the hands at the beginning of the examination process. Examination of most body systems starts with inspection of the hands, from a cardiovascular perspective, looking for signs of nicotine staining which will demonstrate a smoking habit. Check for signs of clubbing, characterised by an increase in the amount of soft tissue in the nailbed and fingertip. This sign can best be detected if the patient aligns one nail from each hand back to back. The normal diamond-shaped gap between the two nails is obliterated in early clubbing. Although the physiological cause of the condition is not well understood, it is often seen in congenital heart conditions and bacterial endocarditis. It is also common in respiratory conditions including carcinoma of the bronchus, cystic fibrosis and bronchiectasis. It may also be present in patients with gastro-intestinal conditions such as Crohn’s disease or ulcerative colitis.
Inspect for signs of peripheral cyanosis, a blue discoloration at the peripheries, commonly associated with decreased circulation and increased extraction of oxygen in peripheral tissues. Pale palmar creases could suggest anaemia.
Inspection of the nails may reveal koilonychia, where the nails become ‘spoon shaped’, a condition often associated with iron deficiency anaemia. In leukonychia the nails become white as a result of low albumin levels or severe anaemia. Splinter haemorrhages, lines running lengthways down the nail, are caused by bleeding from small blood vessels under the nails and may be the result of trauma due to heavy manual labour or infective endocarditis. Infective endocarditis may be suspected if either Osler’s Nodes, characterised by painful lesions on the fingertips, or Janeway Lesions, red macules on the palm of the hands, are noted, although these are quite rare.
Yellow-coloured deposits in the tendons of hands and arms, known as tendon xanthomata, suggest hyperlipidaemia.
Face
Next observe the face. Check for signs of pallor or cyanosis. Central cyanosis is observed as a bluish tinge to the lips and tongue usually caused by cardiovascular or pulmonary disease. Skin pallor could be suggestive of anaemia which is also indicated by pale mucous membranes of the lower eyelid. Rosy cheeks with bluish tinge due to dilation of capillaries known as mitral facies, might suggest pulmonary hypertension and low cardiac output typical of severe mitral stenosis.
Observe for signs of pain or discomfort, breathlessness or sweating all of which can be significant indicators of cardiovascular disease.
The presence of xanthalasma, yellow deposits on the eyelid can indicate hyperlipidaemia, as can corneal arcus, a white line surrounding the iris.
Jugular venous pressure (JVP)
Next inspect the neck for evidence of raised jugular venous pressure (JVP). The internal jugular vein is the vessel used to assess JVP. This enters the neck just behind the angle of the jaw and runs downwards behind the sternomastoid muscle and enters the thorax at the head of the clavicle before draining directly into the right side of the heart. The JVP can only be inspected if the neck muscles are relaxed. It should be assessed from the righthand side whilst the patient relaxes at an angle of 45 degrees (see Figure 4.2).
In normal venous pressure the column of blood in the internal jugular vein, with the patient lying in this position, should not be visible more than 4–5cm above the sternal angle, although the JVP becomes more prominent if the patient lies flat.
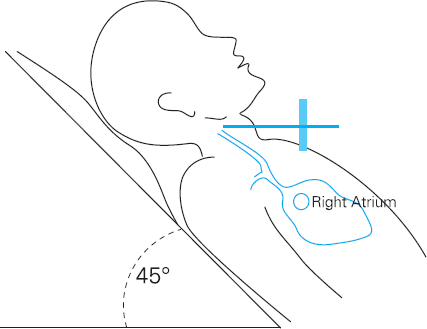
Figure 4.2 JVP Measurement
Venous pulses are distinguishable from arterial pulses in the neck because they cannot be palpated and they have two or more flickering movements with each impulse. Each of these flickering waves is associated with specific points in the cardiac cycle. Experienced clinicians can inspect these waves to establish the cause of the raised JVP although it is sufficient to be able to simply identify a raised JVP.
Causes of a raised JVP:
• Right-sided heart failure due to the inability of the right side of the heart to cope with the venous blood returning to the heart, causing a backflow and hence raised JVP.
• Tricuspid valve incompetence causing a backflow of blood from the right ventricle into the right atrium and then upwards to the jugular vein.
• Increased blood volume for example, in patients following excessive intravenous fluid administration.
• SVC (superior vena cava) obstruction by a large mass or space occupying lesion which obstructs venous return to the heart. This usually results in a raised JVP, which is static and not pulsatile.
Chest wall inspection
Inspect the chest for any obvious scars, which might suggest previous surgery or trauma, presence of pacemaker or implantable defibrillator, abnormal masses or pulsations and assess the breathing pattern. Skeletal abnormalities such as pectus excavatum (funnel chest) and kyphoscoliosis (curvature of the spine) can cause a shift in the position of the heart and large vessels, displacing the apex beat.
Palpation
This should begin with examination of the pulses which should consider the following:
• Rate
• Rhythm
• Volume
• Pulse character
Rate
In healthy adults the heart rate is usually between 60 and 100 beats per minute. A rapid pulse rate of 100 or greater can be the result of a variety of physiological situations including exercise, severe haemorrhage, systemic sepsis, severe anaemia and certain cardiac arrhythmias such as atrial fibrillation. Linking the tachycardia with the history that has been discussed can lead to identification of the most likely cause. Bradycardia, a slow pulse rate of 50 beats per minute or less, can be caused by extreme fitness or cardiac problems such as complete heart block, or the effects of drugs such as beta-blockers or digoxin.
Rhythm
The pulse rhythm may be regular or irregular. It is important to feel the pulse for a full minute in order to ascertain the rhythm. In healthy individuals it is described as being regularly regular in which the beats are consistently evenly spaced.
A pulse that is regularly irregular follows a repetitive pattern of unevenly spaced beats. This is not uncommon where there are regularly occurring ventricular ectopic beats, for example.
An irregularly irregular rhythm, where there is no discernible pattern, is most common in atrial fibrillation. A 12-lead ECG should be performed if there is any suspicion of a cardiac arrhythmia. This should always be discussed with another clinician until competence is obtained in ECG interpretation.
Volume
Pulse volume refers to the amount of movement detected by the palpating finger. A small pulse volume is found in conditions where blood flow is reduced. This can include low circulating volume following haemorrhage or conditions in which cardiac output is reduced such as myocardial infarction.
Pulse character
There are a number of different characteristics that can be detected through palpation including a collapsing pulse, caused by having a large difference between the systolic and diastolic blood pressure. It can be detected by raising the arm whilst monitoring the pulse. This causes a change in the ‘feel’ of the pulse so that it appears to ‘jerk’. It is commonly found in patients with aortic incompetence, or in any condition necessitating an increase in cardiac output. This includes fever and thyrotoxicosis.
Pulsus paradoxus is a reduction in pulse volume during inspiration. It can be associated with restrictive pericarditis or pericardial effusion. It can also be a normal variant in some individuals, especially children.
Pulsus alternans is characterised by alternating normal and small volume pulses. It is commonly found in left ventricular failure where there is an inability of the left ventricle to contract consistently.
Palpating pulse points
It is important to ensure that you palpate pulse points across a range of anatomical sites in order to ensure that the circulation is adequate (see Figure 4.3). These include:
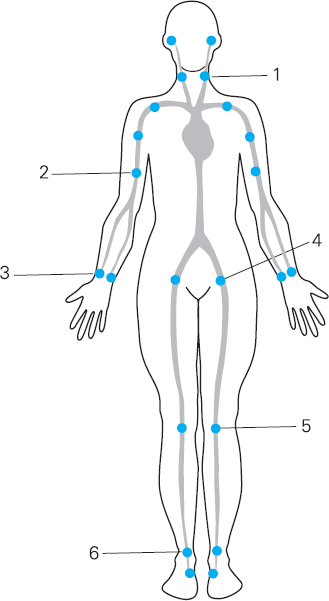
Figure 4.3 Pulse pressure points
1 Carotid pulse
2 Brachial pulse
3 Radial pulse
4 Femoral pulses
5 Popliteal pulses – located behind the knee and best felt with the leg bent slightly
6 Pedal pulses – dorsalis pedis located on the top (dorsal) surface of the foot – posterior tibialis which is behind the ankle on the medial aspect of the lower leg
Check both corresponding pulses to ensure they are consistent with each other but do not occlude both carotid pulses at the same time as this can result in collapse due to reduced cerebral blood flow. There are a number of ways to document findings. One method is to draw findings on a diagram, indicating a ‘+’ for pulses that were present.
Blood pressure
Obtaining the patient’s blood pressure will provide further information regarding the patient’s cardiovascular status. Do not be tempted to allow the electronic vital signs machine to do all the work. The machine may have difficulty in detecting a reading, as in patients who have compromised circulation or perhaps have a tremor; thus manual equipment and competence in using it is still a necessity. An awareness of white coat hypertension and local guidance regarding parameters of acceptable blood pressure recordings is essential.
Apex beat
The apex beat is usually taken to be the lowest and most lateral point on the chest where the cardiac impulse can be easily palpated. In healthy individuals this is usually at the fifth intercostal space, in midclavicular line (below the fifth rib), found by counting downwards from the sternal angle at the junction of the sternum and second rib (see Figure 4.4). To palpate the apex beat, the practitioner should gently place their fingers along the contour of the ribs, ensuring that the tip of one finger rests over the space below the fifth rib. Gently move the fingers laterally until the apex beat can be palpated. If the apex beat is found to be displaced laterally this suggests that there may be some underlying pathology. Often this indicates cardiac enlargement, which can often be confirmed by a chest X-ray, but it could also be indicative of mediastinal shift as in tension pneumothorax or large pleural effusion.
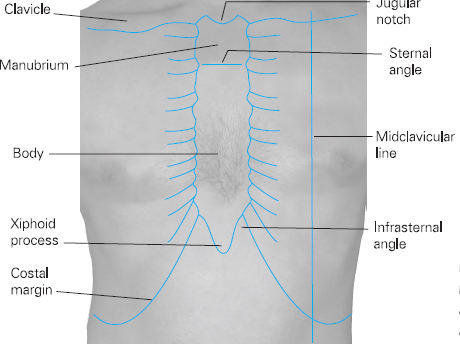
Figure 4.4 Midclavicular line and other chest anatomical points
Character of the apex beat
Palpation of the apex beat can lead to detection of other signs such as heaves or thrills. A heave is a strong, thrusting palpable impulse, which lifts your hand from the chest wall, and can indicate left ventricular hypertrophy, which can occur in hypertension or aortic stenosis. If the heave is detected nearer to the sternum than the apex (parasternal heave) it can indicate right ventricular hypertrophy or dilatation such as that found in pulmonary hypertension. A thrill is a palpable murmur, the sensation of which is likened to a purring cat. The most common thrill is due to aortic stenosis and is often palpable at the apex. Such findings should be highlighted to ensure further cardiac assessment is undertaken.
Ankles and sacrum
Palpate the lower limbs for signs of pitting oedema. Use the forefinger and thumb to gently squeeze the limb. If the imprint of the digits remains after release then pitting oedema is present. If noted bilaterally this can be a sign of heart failure or hypoproteinaemia. It is important to determine the extent of pitting, as it is not uncommon for it to extend up to the sacral and genital areas. To detect sacral oedema sit the patient forward and press gently onto the sacral area looking for residual indentation of the skin. Unilateral leg pitting is commonly seen in deep vein thrombosis.
Percussion
Percussion of the lung fields is relevant to the cardiovascular status of the patient, as it may elicit the presence of pulmonary oedema caused by heart failure. It is possible to percuss the chest wall to determine the position of the heart but this is not carried out routinely. Further details of percussion are given on pages 75–6.
Auscultation of heart sounds
A good-quality stethoscope is essential and will make cardiac auscultation much easier and more effective. The stethoscope will have a number of components. Firstly it will have two earpieces, which should point forward slightly when inserted into the ears. The tubing should be around 25cm in length and will be attached to the bell and diaphragm at the end. The bell enables the clinician to hear low-pitched sounds such as diastolic murmurs or the third heart sound in cardiac failure. The diaphragm emphasises high-pitched sounds and is useful to identify the second heart sound and early diastolic murmurs.
Some stethoscopes have an integrated bell and diaphragm apparatus whilst others are separate and require the operator to rotate the endpiece through 180 degrees to engage the different components. Some more sophisticated stethoscopes have built-in electronic apparatus so that heart sounds can be enhanced and recorded. Selection of the style is based upon personal preference but it is advisable to select one that is not too complicated initially, as these may be more difficult to use and are certainly more expensive.
Sound is transmitted in the direction of blood flow; therefore specific sounds are best heard in areas where the blood flows after it has passed through a valve or where turbulent flow radiates. For this reason it is important that the stethoscope is aligned to specific landmarks on the chest wall in order to hear all four valves (see Figure 4.5).
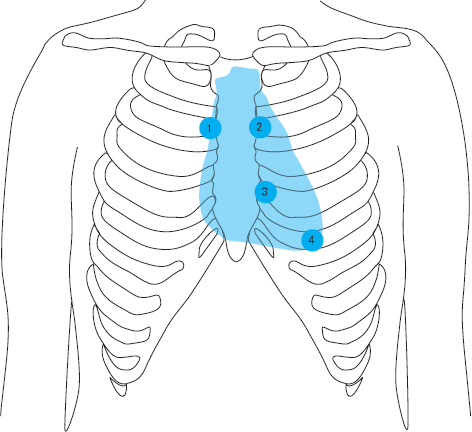
Figure 4.5 Points of auscultation
1. Aortic valve area 2nd intercostal space, right sternal edge
2. Pulmonary area 2nd intercostal space, left sternal edge
3. Tricuspid area 4th intercostal space, left sternal edge
4. Mitral area 5th intercostal space, midclavicular line
In order to understand the sounds that are heard on auscultation it is necessary to be familiar with the anatomy of the heart, the blood flow and the cardiac cycle.
Cardiac cycle
The heart consists of four chambers, two atria at the top and two ventricles below. These are connected by two sets of valves, the atrioventricular and semilunar valves.
The atrioventricular valves are situated between the atria and the ventricles. The tricuspid valve is on the right and mitral valve on the left.
Atrial and ventricular muscular contractions alternate. The different phases are termed ventricular systole, during which the ventricles contract and atria relax, and ventricular diastole, characterised by atrial contraction and ventricular relaxation. As ventricular systole begins, ventricular contraction raises the pressure in the ventricles. The leaves of the atrioventricular valves are forced to snap shut, preventing backflow into the atria.
This gives rise to the first heart sound (S1) characterised by the sound ‘lubb’. It is not usually possible to discern two sounds although there are in fact two valves closing. This is because they close almost simultaneously, giving rise to only one sound (see Figure 4.7).
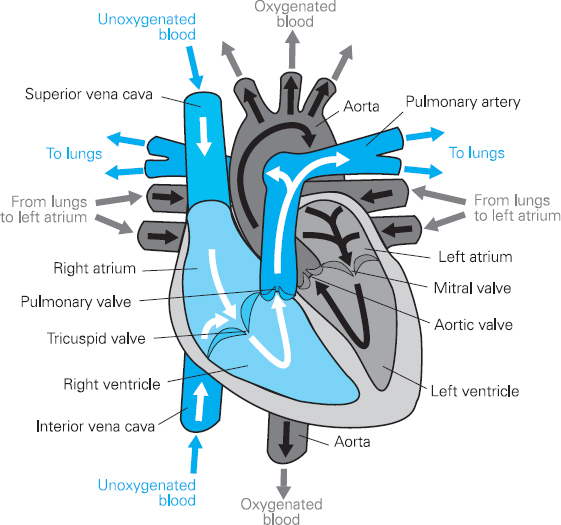
Figure 4.6 Heart anatomy
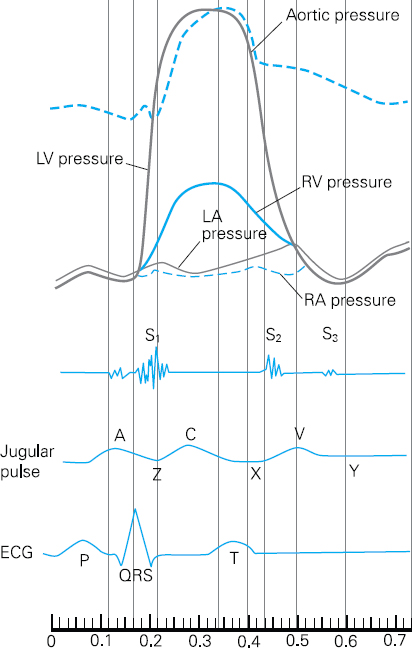
Figure 4.7 Cardiac cycle
Once the mitral and tricuspid valves close, the pressure in the contracting ventricles rises until it exceeds that in the aorta and pulmonary artery.
The second set of valves, the aortic and pulmonary valves, also termed semilunar valves, separate the right and left ventricles from the pulmonary artery and the aorta respectively. These are forced open by the rising pressure in the ventricles. Blood is squeezed into the pulmonary artery on the right, where it enters the pulmonary circulation in readiness for oxygenation, and the aorta on the left, which enables oxygenated blood to be circulated to the body tissues. Valve opening is usually a silent event and is therefore not usually heard on auscultation.
When the ventricles are almost empty they begin to relax and the pressure within them drops. Eventually the pressure within the two large blood vessels exceeds that in the ventricles and the column of blood forces the semilunar valves shut, preventing backward flow into the ventricles. This gives rise to the second heart sound (S2) characterised by the sound ‘dubb’.
Once again this normally occurs simultaneously in both ventricles and only one sound is heard on auscultation. However, as the pressure in the right side of the heart is slightly lower than that on the left, the second heart sounds may have two distinct components, the first produced by the aortic valve and the second by the pulmonary valve. The sound of the closing aortic valve tends to mask that of the pulmonary valve so that only one sound is heard. However, during inspiration both components may be heard. This is referred to as a ‘split S2’ and can be a perfectly normal variation.
As the ventricular pressure falls below that of the atrial pressure, the mitral and tricuspid valves are forced open to allow blood from the atria to refill the ventricles. The filling of the ventricles sometimes produces a third heart sound S3.
The subsequent contraction of the atria, which ensures ejection of the remaining blood into the ventricles, can sometimes be heard as a fourth heart sound S4.
In summary:
| S1 ‘Lubb’ | Atrioventricular valves close |
| S2 ‘Dubb’ | Semilunar valves close |
| S3 | Filling of ventricles |
| S4 | Contraction of atria |
The cycle then begins again.
Murmurs
Valve disease can often be detected on auscultation. The flow of blood through a narrowed or stenosed valve or indeed a ‘floppy’, leaky or incompetent valve will sound different from the crisp sharp ‘lubb-dubb’ elicited by a healthy valve. The distorted ‘whooshing’ sound is described as a murmur and can be evident at different parts of the cardiac cycle depending upon the valve affected and the valve disorder present.
Murmurs are either systolic or diastolic. When assessing for a murmur it is important to note the:
1. Site: The site of the loudest sound will help to identify the valve affected. Also check whether the sound radiates anywhere else. Aortic murmurs often radiate to the right side of the neck, whilst pulmonary murmurs radiate to below the clavicle and the neck. Tricuspid murmurs radiate to the lower left sternal border and mitral murmurs radiate to the axilla.
2. Character: Whether the sound is loud or soft, early, late or occurring mid cycle.
3. Relationship to posture: Sitting forward makes an aortic incompetence louder whilst lying on the left side makes mitral stenosis louder.
4. Relationship to respiration: Inspiration increases right heart murmurs, whilst expiration increases left heart murmurs.
5. Timing: Every murmur must be timed against the carotid pulse to establish if it is a systolic or diastolic event.
Systolic murmurs are usually soft and are caused either by incomplete closing of mitral or tricuspid valves or poor opening of aortic or pulmonary valves. Pansystolic murmurs are caused by leakage of blood through a valve that is meant to be closed during systole. The intensity of the murmur is constant throughout systole. This type of murmur occurs in:
• mitral regurgitation (incompetence)
• tricuspid regurgitation (incompetence).

Figure 4.8 Pansystolic murmur
Ejection systolic murmurs are caused by restricted flow through a valve which is normally open in systole but which has become narrowed. The murmur starts quietly and rises to a crescendo mid-systole and then becomes quiet towards the end of systole. This type of murmur occurs in:
• aortic stenosis
• pulmonary stenosis.

Figure 4.9 Ejection systolic murmur
Diastolic murmurs are usually caused by incomplete closure of the aortic or pulmonary valve or narrowing of the mitral and tricuspid valves. They are not always easy to hear for the novice practitioner.
Early diastolic murmurs are described as a ‘whispering letter R’ heard loudest at the beginning of diastole. This is caused by aortic or pulmonary incompetence. It is heard best if the patient is asked to sit forward and hold their breath at the end of expiration. It is heard best at the left sternal edge.

Figure 4.10 Early diastolic murmur
Mid-diastolic murmur is described as a low-pitched rumbling throughout diastole. It is caused by blood flow through a narrowed mitral or tricuspid valve and is best heard with the patient lying in the left lateral position, using the bell at the apex.

Figure 4.11 Mid-diastolic murmur
Additional heart sounds
Pericardial rub – caused by inflammation of the pericardial sac. It occurs in both systole and diastole. It sounds like creaking leather and is widely heard but more distinct at the apex.
Ejection click – occurs during systole and is a high-pitched ringing which follows S1. It is a feature of aortic and pulmonary valve stenosis.
Opening snap – a diastolic sound occurring after S2. It occurs in mitral stenosis and is caused by the movement of the rigid valve.
Such sounds can be difficult for novice practitioners to discern and describe, but any unusual or unexpected sounds should be noted, even if they cannot be immediately identified, so that more extensive investigations can be arranged. It is likely that patients presenting with unexpected anomalies on auscultation may require an echocardiogram to further assess their cardiac status.
Respiratory examination
Inspection and general observation
Begin with the hands. This should be done at the same time as the cardiovascular examination to avoid repetition for the patient.
The presence of clubbing can suggest bronchial cancer, lung abscess cystic fibrosis and bronchiectasis, whilst nicotine staining alerts the clinician to the likelihood of a significant smoking habit. Tremor of the hands can indicate stimulation of beta receptors in skeletal muscle caused by the administration of bronchodilators. A flapping tremor could suggest carbon dioxide retention in type 2 respiratory failure. Peripheral cyanosis is once again significant as it may suggest a diminished oxygen supply to the tissues caused by respiratory inadequacy.
Evidence of cachexia characterised by muscle wasting, evidence of weight loss, dry and wrinkled skin could be a sign of an underlying malignancy, neurological condition or chronic disease, all of which can involve dyspnoea.
Observe the patient at rest and also whilst talking to assess the severity of any dyspnoea. Listen for evidence of wheeze or stridor and for cough, observing whether this is dry or productive. Observe sputum colour and quantity. Also listen to voice quality. Hoarseness can indicate recurrent laryngeal nerve problems.
Central cyanosis can be present in either diseases of the lungs or heart. Check for evidence of Horner’s syndrome, characterised by a slight drooping of one of the upper eyelids (ptosis) and pupillary constriction of the affected eye. The patient may also report impaired sweating on the same side of the face (ipsilateral side). These signs can be caused by paralysis of the cervical sympathetic nerve, one of the causes of which is a tumour in the lung apex.
Next inspect the chest and thorax as previously mentioned. Look for evidence of scars, which might suggest previous pulmonary surgery including chest drains and deformities of the spine or chest wall. A pigeon chest (pectus carinatum) is characterised by an outward bowing of the chest, often the result of chronic childhood respiratory illness, whilst a funnel chest (pectus excavatum) is a developmental defect resulting in a depression of the lower part of the sternum. In severe cases this can result in restriction of lung capacity. Spinal deformities include kyphosis, a forward bending of the spine, and scoliosis, a lateral bending of the spine. These can lead to asymmetry of the chest and can restrict lung movement. They can be simultaneously present in a condition known as kyphoscoliosis.
Observe chest movements for symmetry. Unilateral diminished chest movements will provide a clue as to which side the abnormality is located. Intercostal recession, characterised by a drawing in of the tissue above the intercostal spaces with respiration, may indicate severe upper airway obstruction. Also look for rate, rhythm, depth and effort of respiration. Respiratory rate should always be timed for one full minute. Normal respiratory rate at rest is 14–16 breaths per minute. Tachypnoea is an increased respiratory rate, whilst apnoea means cessation of breathing.
Palpation
Start by feeling for the position of the trachea. This is done by placing two fingers either side of the trachea and judging whether the distances between the trachea and the sterno-mastoid tendons are the same on either side. This should be done gently as it can be uncomfortable for the patient. Deviation of the trachea in either direction is an indication of underlying disease, e.g. a pneumothorax can displace the mediastinum and therefore the trachea towards the affected side although a tension pneumothorax can displace the trachea away from the affected side, especially as the pressure increases within the chest cavity. Consolidation and subsequent lung tissue collapse caused by pneumonia can also cause tracheal deviation towards the affected side. Masses in the region of the neck, e.g. thyroid enlargement can also displace the trachea. If tracheal deviation is suspected a chest X-ray is vital to help identify the underlying cause.
The chest wall should be gently palpated to ascertain any areas of tenderness which may indicate disease or inflammation in muscle, bone or cartilage which are often characterised by localised areas of tenderness. It is important to be careful when identifying tender areas, as it is likely to cause discomfort to the patient.
Observe for symmetrical chest expansion by palpation. This is usually performed from behind the patient by placing the hands either side of the chest, ensuring the palms and fingers are firmly in contact with the chest wall. The thumbs should be fairly closely aligned in the middle of the chest and should be pointing upwards free from the chest wall. Ask the patient to take a deep breath in. The thumbs should move apart equally if both sides of the chest are expanding equally.
Chest expansion can be reduced on one side more than the other for a number of reasons. For example in pneumothorax, pleural effusion (a collection of fluid in the pleural space) and pneumonia where there is a large amount of collapse or consolidation and therefore very little air entering the lung tissue. Reduced movement on both sides suggests a chronic respiratory problem such as chronic obstructive pulmonary disease or pulmonary fibrosis. If there is any concern about lung expansion a chest X-ray should be undertaken to seek further clarification.
Percussion
The purpose of percussion is to detect ‘hollowness’ of the chest, which is termed the ‘percussion note’, and to compare it with the reciprocal area on the opposite side of the chest. Differences in the ‘note’ detected will give clues to the underlying pathology, which can then be considered with other findings to enable the clinician to establish the most likely diagnosis. This is a new skill for most non-medical practitioners that requires practice in order to obtain competence and confidence in the clinical situation.
The practitioner should place the outstretched hand (left hand for a right-handed practitioner) on the chest wall, ensuring that the middle finger is firmly placed in an intercostal space. Lift the other fingers up off the chest wall slightly, as they may absorb some of the sound and make it more difficult to distinguish the note.
Using the tip of the middle finger on the right hand, strike the middle phalanx of the middle finger of the left hand as it lies on the chest wall, using a loose swing action from the wrist. The percussing finger should be quickly moved out of the way so that it does not dampen the sound generated. The note generated by this action is quite subtle and can only be appreciated if it is compared with the note generated in a similar position on the other side of the chest wall.
For this reason it is important to identify several complementary points on either side of the chest, both front and back, to percuss.
By moving from the left to the right and comparing one side to the other, it is possible to detect subtle changes in the percussion note that can give clues to the underlying pathology. It is important to percuss the lung apices, which can be done by directly striking the clavicles rather than the left hand.
Avoid percussing the midline over the sternum or the region overlying the scapulae at the back, as these bony structures will prevent any meaningful assessment of the lung fields.
The percussion note will vary subtly depending on the underlying structure. In normal lung fields the percussion note elicited is described as resonant. This suggests that the underlying healthy tissue is a mixture of air-filled sacs, lung tissue and blood vessels. A hyper-resonant percussion note, which sounds drum-like, is usually suggestive of an air-filled cavity as in pneumothorax.
A dull percussion note indicates that the underlying structure is rather more solid. This could be suggestive of an underlying organ such as liver, which is often detectable anteriorally at the level of the fifth intercostal space in the right midclavicular line. This would be a normal finding. However, an area of consolidation or a tumour could also be detectable from a dull percussion note.
If the percussion note is extremely dull or stony dull, such as the sound that would be heard if a stone were percussed, it is likely that there is underlying fluid such as that found in a pleural effusion or haemothorax.
Auscultation
Breath sounds are auscultated using the bell of the stethoscope. As with percussion of breath sounds, it is important to assess the lung fields anteriorly and posteriorly in a systematic way, comparing one side with the other.
Place the stethoscope firmly on the chest wall and ask the patient to breathe in and out slowly through the mouth. Listen carefully to the complete breath sound. There are different components to the breath sound, which will vary according to the position of the stethoscope. Listen to the quality of the sound and its intensity. Also make note of any added sounds that may be heard. Try to avoid rapid breathing or prolonged examination as the patient may begin to feel light headed.
Breath sounds
In order to interpret what is heard on auscultation an understanding of the origin and variation of breath is required. Breath sounds are generated by turbulent airflow in the large airways. Normal breath sounds have distinctive inspiratory and expiratory phases that vary slightly depending upon the area being auscultated. If the stethoscope is placed over the trachea the sounds will be loud with a blowing quality. The sounds are similar in length and are separated by a pause. These are known as bronchial breath sounds. In contrast normal breath sounds heard at the lung bases are known as vesicular breath sounds, and have a quieter rustling quality. They have a long inspiratory phase and a shorter expiratory phase that follows immediately with no gap in between. These sounds are transmitted from the upper airways to the alveolar sacs or vesicles, hence their name. The sound is different at the bases because lung tissue is largely air filled and, in accordance with the laws of physics, air is not as good at transmitting sound as solid matter. The importance of this is that in the presence of consolidation, such as pneumonia, a lung abscess or a tumour, breath sounds will be transmitted much more easily. The result is that bronchial breath sounds will be heard at the bases. This alerts the clinician that there may be some abnormal pathology requiring further investigation.
The absence of breath sounds suggests that there is no airflow in the underlying tissue. This can be due to the presence of pneumothorax or a pleural effusion (fluid in the pleural space) and warrants further investigation.
Vocal resonance
If the clinician suspects some abnormal underlying pathology it can be further assessed using a technique known as vocal resonance. With the stethoscope on the chest wall the clinician asks the patient to say ‘99′. The sound heard can be compared with a reciprocal site on the other side of the chest. If the sound is clearer on one side than the other, very likely the same side as the bronchial breath sounds were heard, this supports the clinician’s suspicion that there may be some underlying pathology. The clarity of the sound will vary depending on the underlying tissue and will again be louder where there is solid matter underlying.
Added sounds
In addition to breath sounds it is often possible to hear other sounds that may help the clinician to reach a diagnosis. For example wheezes are continuous sounds that have a musical quality, usually louder on expiration. They are abnormal sounds suggestive of airway narrowing and may be high pitched or low pitched depending upon the diameter of the airway from which they originate. High-pitched sounds originate in smaller airways and low-pitched suggest larger airway narrowing. Inspiratory wheeze suggests severe airway narrowing or partial airway obstruction. Wheeze is common in conditions such as asthma and COPD. In contrast crackles (sometimes referred to as crepitations or rales) are interrupted non-musical sounds usually caused by collapsing peripheral airways on expiration. They vary in quality and can be described as being coarse or fine. Fine crackles are said to sound like hair being rubbed between the fingers, whereas coarse crackles are more like the sound made by blowing air through a liquid with a straw. It is important to note the timing of crackles as well as their quality, since this can give a clue as to their origin. Fine crackles occurring late in inspiration may suggest pulmonary fibrosis, whereas pulmonary oedema or bronchial secretions may cause coarse crackles heard in the middle of the expiratory phase. Crackles heard throughout both inspiratory and expiratory phases are characteristic of bronchiectasis. A pleural rub is said to sound like creaking leather on auscultation and is heard when there is a problem with the outer layers of the lungs. Normally the pleura are separated by a lubricating liquid and therefore slide over each other during respiration. However, the pleura can become inflamed and stiff, giving rise to a rub. The patient may complain of pleuritic chest pain, which has a sharp, stabbing quality and is worse on movement or deep inspiration.
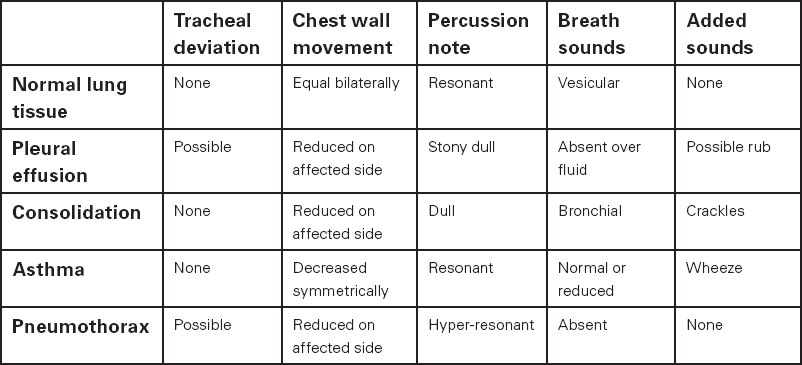
Putting it all together
It is worth remembering that findings, either from percussion or auscultation, can be very subtle and it is important that the clinician pieces together all the bits of the jigsaw to help them make sense of their findings and reach a differential diagnosis. Table 4.2 is used to demonstrate this. It is, however, worth bearing in mind that not all clinical presentations follow textbook rules and that in some situations one or more signs may be absent, and indeed additional or contradictory signs might be present. This can make diagnosis challenging, emphasising the need for an accurate clinical history. Often the history can provide information to confirm the diagnosis despite apparent anomalies on examination. Clinical judgement and decision making in such circumstances require experience and practice.
Table 4.2 Respiratory examination findings and diagnosis
Abdominal examination
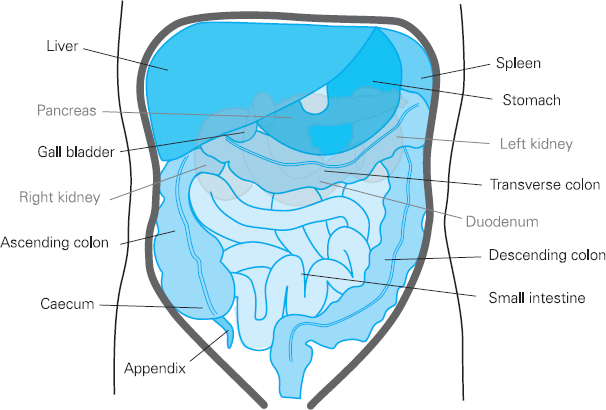
Figure 4.12 Abdominal organs
Since there are a great many different structures within very close proximity in the abdominal cavity, diagnosis of abdominal complaints can be very difficult. This is compounded by the fact that very few of the organs in the abdomen have their own sensory nerve supply, which makes it difficult for the brain to accurately distinguish the source of the pain. The patient is not always able to give a very clear description of their pain, although other symptoms may indicate which organ system is involved. Clinical examination is required to help establish the source of the pain. However, the clinician must also acknowledge that some organs are not easily accessible to palpation because they are situated behind other organs or are protected by bony structures such as the rib cage or pelvis. Because of these restrictions, correct positioning of the patient and clinical examination technique are of vital importance if the clinician is to succeed in obtaining necessary information.
Before embarking on abdominal examination it is essential to obtain a clear understanding of the anatomical position of the many organs and their relationships to each other.
Much of the liver, stomach and all of the spleen are protected by the rib cage. The duodenum and the pancreas lie deep in the upper abdomen, where they are not normally palpable. The kidneys are posterior organs, lying behind and outside the peritoneal cavity (retroperitoneal). The upper portions of the kidneys are protected by the rib cage and because the right kidney is slightly lower than the left, being displaced by the liver, it is sometimes possible to palpate its lower pole on examination in a healthy individual. The pelvis protects the bladder and reproductive organs, which means they are not usually palpable, although a very full bladder can often be palpated above the level of the pelvis. The area between the ribs and the pelvis contains the large and small intestines and the major blood vessels including the aorta and inferior vena cava.
Abdominal examination is best carried out with the patient lying flat on the examination couch or bed. If this is uncomfortable, begin the examination with the patient sitting and lay the patient flat when the abdomen is being examined. One pillow under the head for comfort and also one pillow under the knees to ensure the abdominal muscles are relaxed can be helpful. Ideally patients should have their arms by their sides, be warm, comfortable and the room well lit. It is difficult to elicit any clinical signs if the abdominal muscles are tense.
Inspection
It is important to look for any clinical signs that may suggest an abdominal problem so once again the examination begins with general observation. Note whether the patient looks to be in pain. Also look for evidence of weight loss and muscle wasting, sweating and bruising. Look at skin colour for evidence of jaundice. Jaundice can be seen as a yellow discoloration of the skin or the sclera and can indicate obstruction of the common bile duct by either a gallstone or mass, or liver disease.
Once again the presence of clubbing could suggest an inflammatory bowel disorder such as Crohn’s disease. Koilonychia or spoon-shaped nails could suggest iron deficiency anaemia whereas leukonychia or white nails could indicate hypoproteinuria often associated with liver disease. The presence of liver palms, which is a reddening of the palm due to peripheral vasodilatation, can be associated with liver disease, pregnancy or thyrotoxicosis. Also look for spider naevi, which are small red vascular malformations easily identifiable because they fill from a central arteriole. They characteristically blanche from the middle when gentle pressure is applied. They are commonly distributed on the hands, face, upper chest and back and if seen in excess (i.e. more than five) are frequently associated with chronic liver disease.
Next look at the mouth, for signs of inflammation, ulceration or bleeding. This could be caused by malnourishment but is also found in immuno-suppressed patients, or those with inflammatory bowel disease. Occasionally ulcers can indicate oral cancer, especially if they persist for several weeks. The tongue should be observed for abnormalities such as thrush, white patches caused by candidal yeast infection. These can be easily scraped off with a tongue depressor. If they are not easily removed, the cause of the white patches could be leukoplakia, a premalignant condition requiring further investigation. A smooth red tongue may be caused by iron or vitamin B12 deficiency.
Abdominal inspection
Look at the abdomen from the right side of the bed, observing for scars, and note their location. Also note any old silver stretch marks, which could suggest previous weight loss or often pregnancy. The presence of purple stretch marks (striae), may be suggestive of Cushing’s syndrome.
Check for evidence of dilated veins, which could be indicative of obstruction in the inferior vena cava or portal systems. Obstruction in the inferior vena cava or common iliac veins usually causes longitudinally aligned veins to appear at the sides of the abdomen. This is the result of blood flow bypassing the obstruction and travelling from the lower limbs to the thorax via the superficial veins of the abdominal wall. If the obstruction is in the portal circulation of the liver, which may be caused by cirrhosis, the engorged veins are more centrally placed and can form a cluster of vessels flowing in all directions away from the umbilicus. This is termed caput medusa and is the result of the reopening of the umbilical vein.
Note the shape of the abdomen and observe for distension, which may be generalised or caused by a localised swelling. Asymmetry caused by localised swelling is best seen from the foot of the bed. Look for rashes or lesions and note the presence of stomas.
Palpation
There are nine named regions, which should be referred to when describing any clinical findings.
The anatomical quadrants and regions, used in the examination to describe areas in the clinical record and as an aid to diagnosis, can be seen in Figure 4.13.
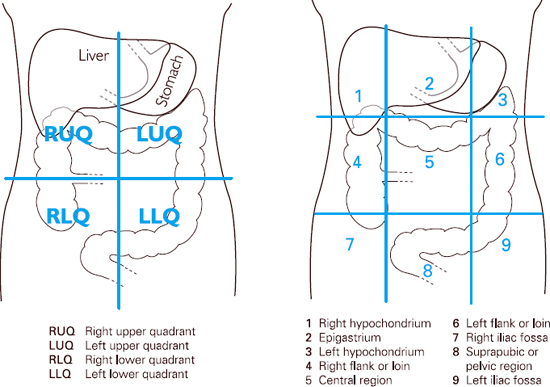
Figure 4.13 Anatomical quadrants and regions
Abdominal palpation should take each of the areas into account. Palpation is usually done from the patient’s right side and with the examiner’s right hand. Before starting, check whether the patient has any tender areas and start in an area where tenderness is not reported.
Light palpation
Start by gently palpating all nine regions with the right hand, whilst at the same time trying to visualise the underlying organs. Use the flat of the hand and the fingers rather than the fingertips. Note the patient’s facial expression, which might indicate the presence of any tenderness. If tenderness is elicited assess the extent and whether there is any guarding present (guarding occurs when the overlying abdominal muscles contract). This can be a voluntary response in an anxious patient, but in the presence of underlying inflammation, such as in peritonitis, reflex muscle contraction occurs (involuntary guarding). Observe for rebound tenderness, which can indicate intra-abdominal disease, by gently pressing the abdomen with the hand, then quickly removing it. If rebound tenderness is present the pain will be worse as the hand is removed. Note the site of tenderness as this can indicate the organ responsible. For example, right iliac fossa pain can often indicate appendicitis, whereas tenderness in the right hypochondrium may suggest cholecystitis. However, it is not impossible for pain to be referred from one area to another so tenderness can be felt some distance away from the cause.
Deep palpation
Provided the patient is not too uncomfortable, proceed to deeper palpation in order to ascertain whether any abnormal mass or swelling is present. Place the left hand over the right and allow the right hand to feel the abdomen using a slow rocking motion, whilst the left hand applies pressure. Again examine all the different areas, taking note of the location of masses or swellings that may be present and identify the presenting characteristics. The checklist below is pertinent to any swelling or ‘lump’, not only abdominal abnormalities. Such characteristics may be present in a breast or testicular lump.
Characteristics of a ‘lump’
1. Note the anatomical site of the swelling and the depth in relation to the skin surface.
2. Record the size in centimetres and the shape of the swelling.
3. Is the surface of the swelling smooth or irregular on palpation? Does it have a clearly defined edge?
4. Is there any trans-illumination? You can check this by shining a light through the swelling to ascertain whether the lump is fluid filled or solid. This technique is particularly useful in testicular examination. Abdominal masses rarely trans-illuminate unless they are very superficial.
5. Check whether the skin temperature at the site of the swelling is raised. Does the local area feel hot? Is the skin superficial to the swelling red or discoloured?
6. Ascertain whether there is localised tenderness. Is the lump painful?
7. What is the consistency of the lump? Is it hard or soft and pliable?
8. Is the swelling fixed or does it move around when palpated?
9. Is the mass pulsatile? If the swelling is due to an aneurysm caused by a weakened arterial wall it may be possible to feel it pulsate under the fingertips. A pulsatile mass should be very carefully palpated in order to minimise the risk of damaging it.
10. Is there any fluctuation in the characteristics of the swelling? Does the patient report intermittent coming and going of the swelling, or does it appear to have changed on repeat examination?
11. Is it possible to reduce the swelling by applying gentle pressure to it?
12. Is there any obvious lymph node enlargement in the local area, for example in the groin?
13. Does the patient look unwell?
It is possible that swelling may be caused by stools in the colon, in which case it may appear to have changed or resolved on repeated examination. An area of localised infection such as an abscess is likely to be hot to touch, red and tender. The patient may also appear systemically unwell. In contrast a well patient with a painless lump may have a malignancy. A comprehensive description of the characteristics of the swelling helps to identify the cause and will direct the practitioner towards the process of further investigation. Specific organs within the abdomen should be located and features noted.
Liver
The liver extends from the fifth intercostal space on the right of the midline down to the lower edge of the rib cage (costal margin). It can become enlarged in a number of diseases, and thus it is possible to palpate the liver below the costal margin. Hepatic enlargement, or hepatomegaly, may be the result of early cirrhosis, the liver is often shrunken in end-stage cirrhosis and therefore not palpable. It can also be the enlarged due to excess alcohol, fatty liver. Malignancy, either primary or metastatic, can also cause hepatomegaly, as can congestive heart failure, viral hepatitis, haematological conditions such as leukaemia and lymphoma.
As the liver can become excessively enlarged, it is necessary to start the examination at a considerable distance from the edge of the normal liver. Use either the tips of the fingers or the edge of the hand with the fingers parallel to the costal margin and start at the right iliac fossa. Ask the patient to take a deep breath in and apply gentle pressure upwards towards the liver. As the patient breathes out, lift the hand and move further up towards the costal margin. Repeat this process until the costal margin is reached. If the liver is enlarged it will move downwards on inspiration to meet the hand, allowing the practitioner to identify the position of the liver edge. This can be described in terms of centimetres or finger widths from the costal margin. If the liver is identified, it is important to ascertain its texture. It may be described as smooth, irregular, firm or nodular. Check whether the patient experiences pain or discomfort on palpation, as some conditions give rise to a tender liver.
Spleen
The spleen lies against the diaphragm at the level of the ninth to the eleventh ribs, mostly posterior to the mid-axillary line. It is lateral to the stomach and just above the left kidney. It is not usually possible to palpate the spleen; however, in some conditions the spleen can become grossly enlarged and it may extend across the abdomen towards the umbilicus. Causes of splenic enlargement include portal hypertension, infections such as glandular fever and malaria, haematological conditions including leukaemia, lymphoma and haemolytic anaemia.
For this reason it is important to start palpation, using the fingertips, from the right iliac fossa, moving diagonally across the abdomen towards the left costal margin. This time, because of the posterior-lateral position of the spleen, a bimanual technique is used (this uses both hands). It is helpful to support the left flank with the left hand as this moves the spleen gently towards the costal margin. Once again move the palpating hand gradually across the abdomen in time with the patient’s respiration 2cm at a time. If the spleen edge is felt, note its position. In general if the spleen is enlarged it may be difficult to get one’s fingers underneath the costal margin, due to the abnormal position of the spleen.
Kidneys
The kidneys lie towards the posterior of the abdomen. Thus any tenderness is often felt in the back. The area between the spine and the lower border of the twelfth rib, the costovertebral angle, defines the region to assess for kidney tenderness. The kidneys are not usually palpable on examination as they are retroperitoneal organs (lying towards the back of the abdomen behind the peritoneal cavity which contains the gut and most of the other organs of the abdomen), and are protected by the rib cage. The right kidney is slightly lower than the left as it is slightly displaced by the liver. It is possible to palpate the kidneys if they become abnormally enlarged, for example, in the presence of renal tumours, hydronephrosis and polycystic kidney disease. If the latter is present the kidney surface will have a distinctive nodular surface that can be detected on palpation.
Once again a bimanual technique is needed to palpate kidneys. To palpate the right kidney, place the left hand at the back, just below and parallel to the twelfth rib, with the fingertips just reaching the costovertebral angle. Gently push upwards, trying to displace the kidney anteriorly. At the same time place the right hand gently in the right upper quadrant. Ask the patient to take a deep breath. At the peak of inspiration press the right hand firmly and deeply into the right upper quadrant, just below the costal margin, and try to capture the kidney between the two hands. If it is palpable it should be possible to ‘ballot’, or bounce, the kidney between the upper and lower hands, taking care not to cause any damage. As the patient breathes out, the kidney may be felt to slide back into its original position. The same process is used to palpate the left kidney, by repositioning the hands in the corresponding positions on the opposite side.
Aorta
The aorta is the main artery running from the heart, carrying oxygenated blood to the extremities. It lies slightly to the left of the mid-line and is situated deep within the abdomen and the width can be assessed by pressing deeply in the upper abdomen with one hand either side of the aorta. Use the fingertips to detect the pulsations. This is particularly important in patients over the age of fifty who may be susceptible to vascular disease. The normal aorta should be about 3cm in diameter. If it feels wider than this and pulsates outwards towards the fingers it is possible that the patient has an aortic aneurysm. The ease with which aortic pulsations are felt varies greatly with the thickness of the abdominal wall. In slim people it is not uncommon to see the abdomen pulsate, due to the relative closeness of the aorta to the body surface. Examination of the aorta should be undertaken with care in order to prevent damage to delicate structures. If an aneurysm is suspected it might be preferable to avoid palpation but to alert a vascular expert.
Percussion
Percussion of the abdomen is performed using a two-handed technique similar to chest percussion. General percussion over the abdomen will detect abnormal gas, fluid collection or possibly masses.
In the abdomen the percussion note is predominantly tympanic or drum-like in character because of the distribution of gas in the gastrointestinal tract, but scattered areas of dullness due to faeces and fluid are also typical. Note any large areas of dullness that may indicate an underlying mass or enlarged organ. Always try to percuss from an area of resonance to the area of dullness to identify the position of the underlying organ or mass accurately. Try to establish the position of the liver through percussion; the upper border is usually identified at the fifth intercostal space in the midclavicular line on the right. Start at the third intercostal space and gradually percuss downwards to identify the upper border of the liver. The lower border is usually in line with the costal margin. Percuss upwards from the right iliac fossa to ensure any enlargement is accurately detected. Ask the patient to breathe in and the dullness should move down as the liver descends.
Because enlargement of the spleen occurs anteriorly and medially, it can produce a dull percussion note that replaces the tympany of the stomach and colon which it overlies. Percuss downwards from the left lower anterior chest wall, around the ninth intercostal space, between lung resonance above and the costal margin below (Traube’s Space), noting any dullness. Percussion alone cannot usually confirm splenomegaly but it can raise the examiner’s suspicions of it. Once again, a full and thorough examination is needed to build up a complete picture.
Shifting dullness
This is a test to demonstrate the presence of free fluid or ascites in the abdominal cavity. Ascites can be caused by a number of conditions, for example alcoholic liver disease, and can cause severe abdominal distension due to the many litres of fluid that have accumulated.
Percussion for ascites depends upon detecting shifting dullness on change of position. Start with the patient lying flat. Percuss from the midline to the flank until the note becomes dull, suggesting the presence of fluid. Keep the hand on the abdomen at that point and ask the patient to roll over to the opposite side. Wait for about 10 seconds until any fluid present resettles with the new position, then percuss again over the marked area. If this now elicits a tympanic note then ‘shifting dullness’ has been demonstrated and the presence of ascites confirmed.
Auscultation
With the patient lying flat, listen for bowel sounds by placing the diaphragm of the stethoscope slightly to the right of the umbilicus and wait for up to a minute until you hear gurgling noises, which are caused by peristaltic activity in the gut. The pitch of the sound depends upon the distension of the bowel and the proportion of gas and fluid. Normal bowel sounds are low-pitched gurgles occurring every few seconds. In intestinal obstruction the frequency of the sounds increases and they are usually described as ‘tinkling’. An absence of bowel sounds can suggest paralytic ileus or peritonitis.
Listen over the major vessels for bruits, or turbulent blood flow, indicating narrowing of the vessel. Listen just above the umbilicus for the aorta, and 2–3cm above and lateral to the umbilicus for the renal arteries to establish whether there is evidence of renal artery stenosis. Listen over the liver for bruits associated with hepatic disease and for friction rubs which are sometime associated with inflammation.
This essentially completes the abdominal examination apart from a rectal examination, which is not described here.
CONCLUSION
This chapter aims to provide an insight into the knowledge and detail required to undertake a clinical examination. It is essential that the clinician has a sound understanding, not only of the examination technique but also the pathophysiology of diseases and conditions within their scope of practice.
There is clearly a great deal not covered in this chapter, including neurological examination, examination of the eye, ear, nose and throat, lymph nodes, breast and musculoskeletal system, to name but a few. However, it is hoped that the systematic approach demonstrated illustrates the process that can be applied to other body systems.
Learners are advised to invest in a detailed clinical examination textbook, of which there are many examples. This will provide a detailed explanation and description of all the required skills, regardless of specialist interest. However, learners are also advised to seek mentorship and support from medical colleagues to enable them to become competent in their field.
REFERENCES
1. C.P. Subbe, M. Kruger and L. Gemmel (2001). Validation of a Modified Early Warning Score in medical admissions. Quarterly Journal of Medicine 94: 521–6.
2. G. Teasdale and B. Jennett (1974). Assessment of coma and impaired consciousness. A practical scale. The Lancet 13(2) (7872): 81–4.
FURTHER READING
G. Douglas, F. Nicol and C. Robertson (2005). Macleod’s Clinical Examination (11th edn). Edinburgh: Churchill Livingstone.
O. Epstein, G.D. Perkin, J. Cookson and D.P. De Bono (2003). Clinical Examination (3rd edn). Oxford: Mosby, Elsevier.
J.T. Talley and S. O’Connor (2006). Clinical Examination. A Systematic Guide to Physical Diagnosis (5th edn). Edinburgh: Churchill Livingstone.
* Modified Early Warning score (MEWS) systems employed have local hospital variation for physiological triggers of each parameter.
Related posts:
 The evolving role of the preoperative assessment team Liz Kenny
Developing a competency framework for preoperative assessment Hilary Walsgrove
Audit and evaluation of a perioperative service Ciaran Hurley
The evolving role of the preoperative assessment team Liz Kenny
Developing a competency framework for preoperative assessment Hilary Walsgrove
Audit and evaluation of a perioperative service Ciaran Hurley
 Preoperative pharmacological optimisation Jonathan Thompson and Simon P. Young
 The role of haematology in preoperative assessment Andrew Blann
 Preoperative testing and perioperative management of endocrine and renal disease Sudarshan Ramachandran, David Kennedy and Munirul Haque
Stay updated, free articles. Join our Telegram channel

Full access? Get Clinical Tree


