Airway Management: Introduction
Airway Anatomy
The nose is lined with vessel-rich mucosa designed to warm and humidify the air. Bypassing the nose causes dry gases to reach the respiratory tract and necessitates warming and humidification of gases during mechanical ventilation.
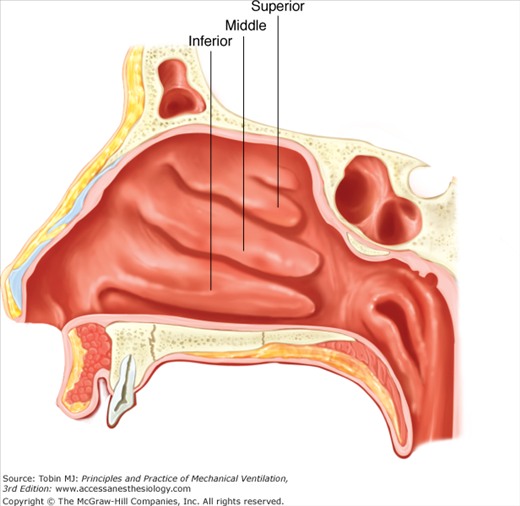
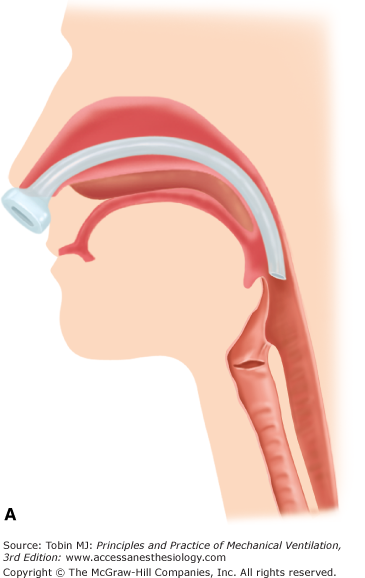
The two nares are divided by a nasal septum that is often not midline. In each naris are three turbinates (Fig. 38-1) that help to condition the inspired gases. Underneath each turbinate lies the opening of perinasal sinus. When these openings are occluded by nasogastric or nasotracheal tubes, fluid tends to accumulate in the sinuses as reflected by a high incidence of radiographic sinus opacification.1
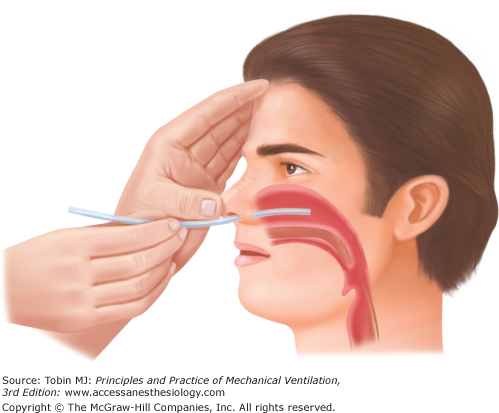
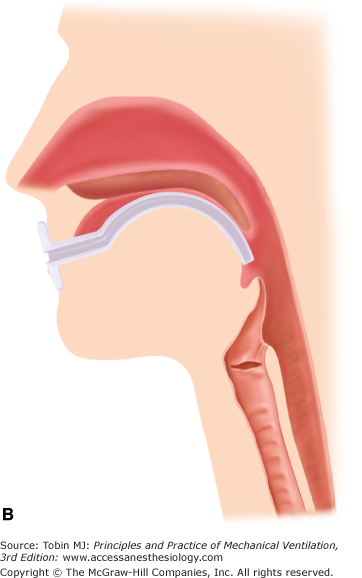
The floor of the nose leading to the nasopharynx is in the same plane as the nasal orifices. When a tube is introduced into the nose, it should be directed straight back rather than caudad (Fig. 38-2), and advanced carefully to avoid injuring the turbinates.
Oral structures relevant to airway management include the lips, teeth, and tongue as each may either impede introduction of airway devices into the pharynx or diminish upper airway patency or both during artificial breathing.
The pharynx is shaped like a cone (Fig. 38-3) and includes the nasopharynx and the oropharynx, which join to form the hypopharynx. The walls of the pharynx are typically soft and compliant, but may become stiff, increase in volume, or both when inflamed from any cause.
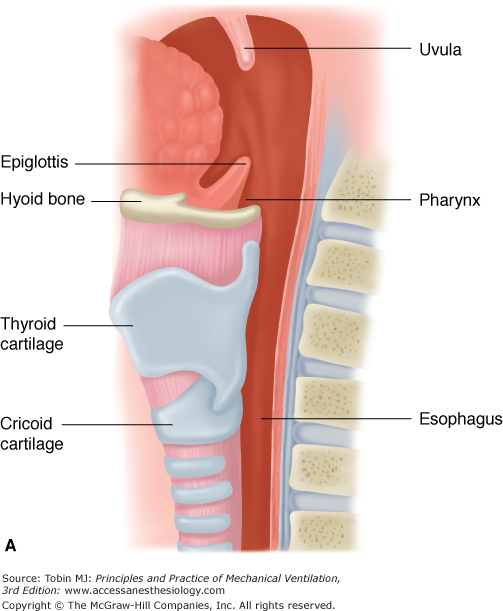

The digestive and respiratory tracts share a common lumen in the pharynx. The posterior portion of the pharynx continues to form the esophagus whereas the anterior portion ends in a series of pouches or fossae surrounding the larynx. The epiglottis forms the posterior wall of the anterior pouch. The region anterior to the epiglottis is called the vallecula and is an important landmark for endotracheal intubation as the tip of a curved laryngoscope blade is typically placed in this fossa.
The epiglottic cartilage is shaped like a leaf and is attached to the posterior surface of the thyroid cartilage. Functionally, the epiglottis directs food away from the larynx by sitting like a tent over the epiglottic opening. This represents an impediment to visualization of the laryngeal aperture and must be lifted out of the way, either by traction or direct lifting from underneath.
The laryngeal skeleton consists of a group of cartilages extending between the fourth and sixth cervical vertebrae. The major portion of the laryngeal body consists of the thyroid cartilage anteriorly and the cricoid cartilage posteriorly. The cricoid cartilage is actually a complete ring with a wide posterior portion and a narrow anterior portion, which is palpable just inferior to the thyroid cartilage. Between the two cartilages is a small depression that represents the cricothyroid membrane.
The arytenoid cartilages sit posteriorly atop the cricoid cartilage. These small paired cartilages provide support to the posterior portions of the true vocal cords. The mucosa of the vocal cords covers these cartilages, and movement of the cartilages occurs during respiration. The arytenoids are an important landmark insofar as they may be the only portion of the glottic inlet visible during attempted laryngoscopy.
Airway Management Without Intubation
Face-mask ventilation, commonly referred to as bag-valve-mask ventilation, is an essential airway management skill. Although considered a “basic” skill, it is not always easy and requires considerable practice, best mastered in a controlled setting such as the operating room. Face-mask ventilation may be required as an initial resuscitative measure, when the need for ventilation is very brief, or when tracheal intubation proves difficult or impossible. Face-mask ventilation may be difficult or impossible because of imperfect patient–face-mask interface or airways obstruction, chiefly of the upper airways but also of the lower airways. If there is high risk of regurgitation of gastric contents (“full stomach”), active vomiting, or bleeding that might result in massive aspiration, face-mask ventilation should only be used as a rescue technique when severe hypoxemia is present.
Currently, there is no accepted, single definition of what constitutes difficult mask ventilation. Lack of clinical signs of gas exchange, such as “adequate chest rise” or an oxygen saturation by pulse oximetry less than 90%, and the need for oral or nasal airways or the use of a second operator to help with face-mask ventilation are the most referenced surrogates for difficulty.2 Using these definitions, difficult mask ventilation has been reported in less than 2% of patients.3 Impossible mask ventilation is a rare event, reported in only 1.5/1000 patients.4 Caution is advised, however, as these data come from the operating room environment, chiefly in the setting of elective surgery, in patients with stable, managed, or anticipated comorbidities who have been well preoxygenated, rather than in the emergency setting. Risk factors may be segregated by considering operator-dependent factors and patient-related factors, which themselves can be split into those that inhibit proper mask fit and those that may result in upper or lower airways obstruction. Table 38-1 summarizes reported risk factors for difficult and impossible mask ventilation; these factors are highly predictive of difficult mask ventilation, in contrast to the poor positive and negative predictive value of external exams to predict difficult laryngoscopy.3–6 When a patient exhibits multiple risk factors for difficult mask ventilation, immediate tracheal intubation (“rapid-sequence”) or an alternative to facemask ventilation, such as placement of a supraglottic airway, should be performed, preferentially at the outset of airways management.
| Difficult Mask Ventilation |
|
| Impossible Mask Ventilation |
|
Most modern face masks are teardrop shaped, made of clear plastic with large, highly compliant, inflatable borders that conform to a wide variety of faces. A tight seal between the mask and the patient’s face is critical to achieve adequate ventilation. This is most commonly attempted using a generic left-handed technique in which the operator grips with the fifth finger at the left mandibular angle and the third and fourth fingers on the left mandibular ramus while controlling the mask with their first finger and thumb (Fig. 38-4). In the event that initial face-mask ventilation is difficult or impossible, knowledge of the common anatomic locations of upper airway obstruction allows the airway manager to rapidly perform a variety of maneuvers to relieve the obstruction specific to the site.
Figure 38-4
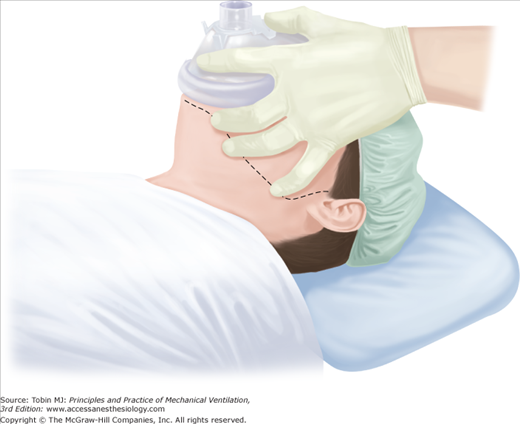
The generic, single, left-handed mask-hold technique. The operator grips with the fifth finger at the left mandibular angle and the third and fourth fingers on the left mandibular ramus (in the shape of a letter E) while controlling the mask with his or her first finger and thumb (in the shape of a letter C). The dotted line represents the line of the jaw. (Image courtesy A. Joffe.)
As consciousness is lost, upper airway caliber diminishes and obstruction may occur. The so-called sniffing position, used to optimize visualization during direct laryngoscopy, is ideal for providing face-mask ventilation because it decreases the passive collapsibility of the pharynx and pulls the epiglottis and tongue away from the posterior pharynx.7 Another maneuver that may open the glottis is to advance the mandible so that the bottom teeth are anterior to the upper teeth.
The insertion of an oropharyngeal airway maintains the mouth in an open position and bypasses the nasopharynx and base of the tongue. Hypopharyngeal patency may also be augmented. Nasopharyngeal airways relieve obstruction at the level of the nares and soft palate with the potential to improve the patency of the airway at the level of the base of the tongue and hypopharynx (Fig. 38-5). Oropharyngeal airways are tolerated by anesthetized patients, whereas a nasopharyngeal airway is better tolerated in awake individuals. The major hazards of inserting a nasopharyngeal airway are bleeding or fracture of a turbinate. In nonemergent situations, prior application of a topical vasoconstrictor will ease insertion and prevent bleeding. Thrombocytopenia or a coagulation disorder are relative contraindications to insertion of a nasal airway. Proper sizing and careful placement of all pharyngeal airways is important. Improperly placed oropharyngeal airways can push the base of the tongue down into the hypopharynx, while both oropharyngeal and nasopharyngeal airways that are too large for the patient’s airway have the potential to displace the epiglottis caudad toward the vocal cord inlet, causing worsened upper airway obstruction.
If initial maneuvers prove unsuccessful in allowing adequate face-mask ventilation, additional techniques include placing the base of the face-mask just caudad to the lower lip rather than into the mandibular groove in edentulous patients; this decreases the leak around the mask and may substantially increase tidal volume (Fig. 38-6).8 As Figure 38-7 shows, a two-handed face mask technique with one person securing the mask and a second operator (out of view in the figure) providing ventilation by squeezing the bag may also increase tidal volumes.9 A solo operator can also utilize a two-handed mask technique by using an intensive care unit ventilator set to deliver pressure-control ventilation with a limit of 20 cm H2O as the “second operator.”10 In patients with factors that predict difficult mask ventilation, it may be advisable to employ all available maneuvers initially to provide for an optimal first attempt at face-mask ventilation.
Figure 38-6
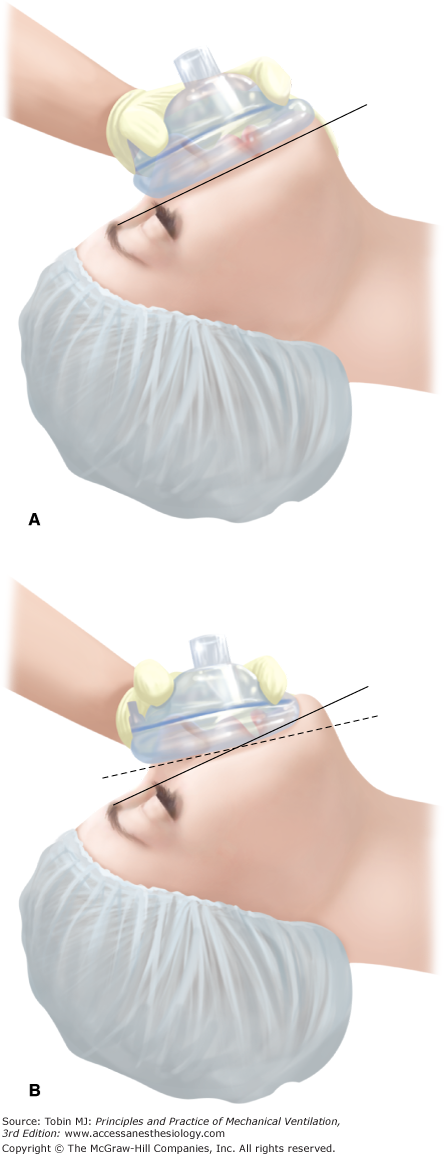
A comparison of the traditional location of the mask in relation to the patient’s face (top) with the top of the mask over the bridge of the nose and the base of the mask over the mandibular groove. The continuous line represents the plane between the nose and the mandible. When the mask is moved caudally (bottom), the base of the mask becomes positioned above the lower lip. The dashed line represents the contact between the mask and the face. This “lower lip” placement is particularly advantageous in edentulous patients. (Images courtesy A. Joffe.)
Figure 38-7
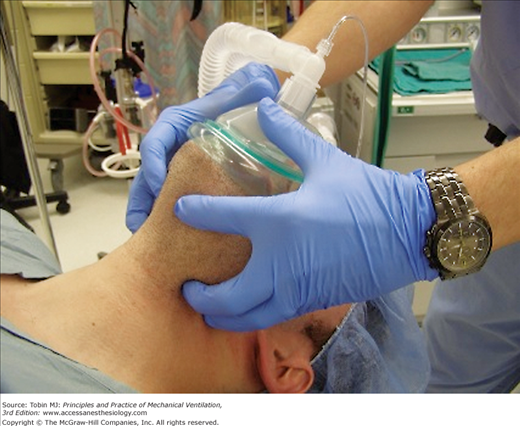
A two-handed jaw-thrust mask-hold technique. The key to the maneuver is providing sufficient anterior traction to effect maximal mandibular advancement such that the mandibular teeth are forward of the maxillary teeth. This pulls the tissues supported by the mandible—the tongue and epiglottis—away from the posterior pharynx, thereby increasing the airway caliber. In addition, traction may increase the patency of the glottic aperture. (Photograph courtesy A. Joffe.)
Tracheal Intubation: Indications, Preparation, and Standard Techniques
The indications for tracheal intubation are varied, but for the most part can be categorized into (a) the need for maintenance and protection of the airway, (b) the need for high inspired oxygen concentrations, or (c) the need for application of positive pressure to the airway. Significant overlap may exist in individual patients. Specific etiologies of respiratory failure and the need for mechanical ventilation are covered in detail in Chapter 4.
A substantial body of research has been directed toward identification of patients with “difficult airways”; unfortunately, anatomy-based predictors of the difficult airway are notoriously insensitive and have only moderate specificity.11–13 Nonetheless, a basic history should be obtained and an airway examination performed to the extent possible in all patients to identify risk factors for difficult ventilation and/or intubation. Factors associated with difficult intubation include a previous history difficult intubation; morbid obesity;14,15 obstructive sleep apnea;16,17 and gross physical abnormalities, including marked prognathia or retrognathia, other congenital deformities, a marked overbite, facial swelling, postradiation fibrosis, and facial dressings. A basic examination includes a view of the patient’s facial anatomy from the frontal and lateral perspectives, an oral examination with the mouth maximally open and tongue extended, an assessment of neck extension, and measurement of the distance from the tip of the mandible to the thyroid cartilage. Additional factors to consider in evaluating the airway are discussed below.
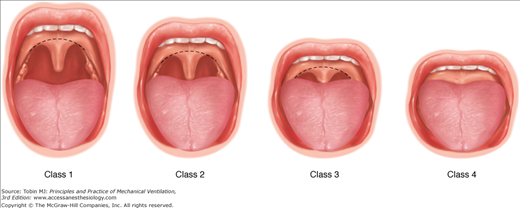
Based on oral examination, Mallampati devised a classification scheme to predict difficult intubation (Fig. 38-8).18 In general, the likelihood of difficult intubation increases from Class 1 to Class 4, although the test has only approximately 50% sensitivity at identifying difficult airways, and is most useful as a positive predictor at the extreme (Class 4).18,19 In addition, this test is often impractical in emergency settings, where patient cooperation with the examination is not possible.
The size of the mandible provides some measure of the space available to displace the tongue during laryngoscopy (Fig. 38-9). This can be assessed by measurement of the distance between the tip of the mandible and the thyroid cartilage (thyromental distance) using either a ruler or finger-breadths that have previously been calibrated against a ruler. A thyromental distance of less than 6 to 7 cm has a specificity of approximately 90% in identifying the difficult airway, but the test has very poor sensitivity (approximately 30%).12 Complementary to the absolute distance between the mentum and thyroid cartilage is the potential distance as assessed by the upper-lip bite test. To perform the test, the patient is simply asked to bite his or her upper lip and is classified as follows: Class 1, lower incisors can bite the upper lip above the vermilion line; Class 2, lower incisors can bite the upper lip below the vermilion line; and Class 3, lower incisors cannot bite the upper lip (Fig. 38-10). Specificity and accuracy of the upper-lip bite test are significantly higher than that reported for thyromental distance alone.20
Figure 38-9
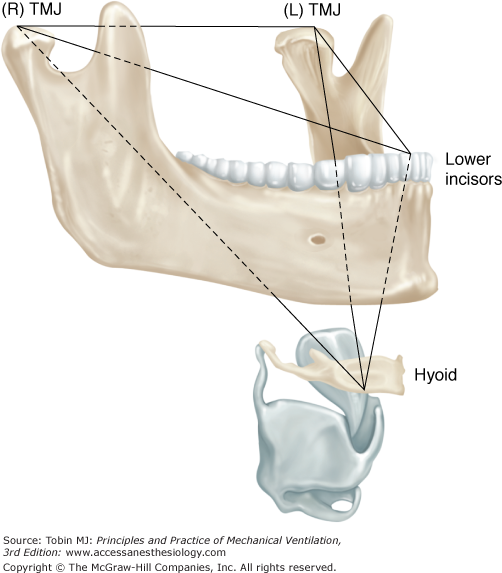
The submandibular space represented by an inverted pyramid bounded by the right and left temporomandibular joints (TMJs), lower incisors, and hyoid bone. This represents the potential space for tissues to be displaced anteriorly and away from the posterior pharynx and lines of sight during airway-management maneuvers. (Adapted, with permission, from Greenland KB. A proposed model for direct laryngoscopy and tracheal intubation. Anaesthesia. 2008;63:156–161.)
Figure 38-10
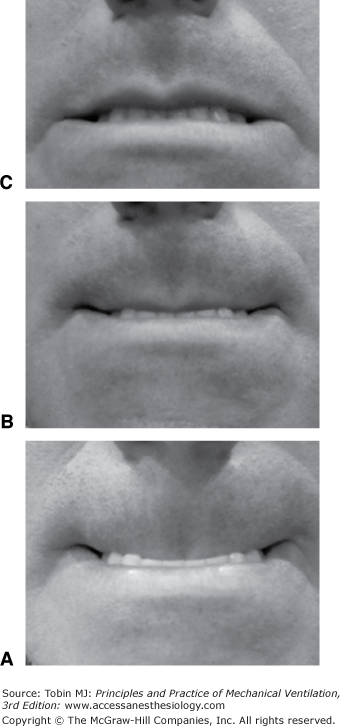
A frontal view of the upper-lip bite test. From bottom to top (best to worst): In Class 1, the lower incisors are able to bite the upper lip past the vermilion border, making the mucosa of the upper lip totally invisible (A). In Class 2, a portion of the lip below the vermilion border remains visible (B). In Class 3, the lower incisors fail to bite any portion of the upper lip (C). (Images courtesy A. Joffe.)
Extension of the head on the neck is necessary to bring the pharyngeal and laryngeal axes into alignment during direct laryngoscopy. Head and neck mobility can be assessed by simple examination, or quantitated by measuring the distance from the sternum to the tip of the mandible (sternomental distance) at maximum neck extension.21 A sternomental distance of equal to or less than 13.5 cm has greater than 50% sensitivity and specificity at predicting difficult intubation, although this test has not been studied as extensively as either the Mallampati classification or the thyromental distance.20
Common sense dictates that a combination of the above tests may prove more useful at predicting the difficult airway than the individual tests. There is some literature to support this notion, although the predictive value of these tests remains modest even when used in combination.22,23 When possible in the context of the critically ill patient, a minimal exam, which assesses mouth opening, the size of the tongue, cervical spine motion, and mandibular protrusion may be helpful to assess potential problems with laryngoscopy.
Other factors that may complicate emergency intubation and require special consideration include:
Risk factors for regurgitation and tracheal aspiration of gastric contents, including recent oral intake; gastroparesis because of drugs; intraabdominal infection, trauma, or diabetic neuropathy; increased intraabdominal pressure (pregnancy, ascites); and bowel obstruction. Most critically ill patients should be considered at risk for regurgitation and aspiration during intubation.
Hypovolemia and/or shock predisposes to severe hemodynamic depression during tracheal intubation because of sedative/hypnotic drugs and the initiation of positive pressure ventilation. Vascular access, drugs, fluids, and equipment for resuscitation should be present.
Increased intracranial pressure, which can be exacerbated by direct laryngoscopy and tracheal intubation.
Acute trauma poses multiple problems during attempted intubation, including possible airway injury, head and brain injury, cervical spine injury, and hypovolemia. Intubation in the presence of known or possible cervical spine injury must proceed without movement of the spine (inline manual spine stabilization).
Severe hypoxemia reduces the time available for laryngoscopy and intubation before severe oxyhemoglobin desaturation occurs.
Table 38-2 lists supplies that should be present at the site of tracheal intubation, some of which may be institution specific, particularly the equipment available for the anticipated or unanticipated difficult airway. In emergent situations, the endotracheal tube (ETT) should be prefitted with a stylet with a slight anterior bend on the tip (“hockey stick”), which may facilitate placement if the laryngeal view is suboptimal.
| Routine Supplies |
|
| Medications |
|
| Additional Difficult Airway Equipment |
|
Preparation for emergency tracheal intubation by following a checklist or bundle is recommended. Use of an intubation bundle incorporating preoxygenation, the presence of two operators, a rapid sequence induction, cricoid pressure, postintubation capnography, low-tidal volume lung-protective ventilation, fluid loading, and preparation and early administration of sedative and vasopressor infusions has been reported to significantly reduce the occurrences of cardiac arrest or death, severe cardiovascular collapse, and hypoxemia occurring within 60 minutes of emergency intubation in the intensive care unit (Table 38-3).24
| Preintubation |
|
| Intubation |
|
| Postintubation |
|

The decision to place an oral or nasal tracheal tube is based on a variety of considerations. In general, the oral route is preferred. A larger tube can be placed orally than nasally, resulting in less airways resistance,25 higher minute ventilation, easier passage of fiber-optic bronchoscopes, and more effective pulmonary toilet. Nasal tubes occlude the sinus ostia, potentially leading to a higher incidence of bacterial sinusitis compared to oral tubes.1,26 Nasal intubation is contraindicated in the presence of coagulopathy or anticoagulation, basilar skull fracture, or significant nasal or sinus deformity.
In most cases, the most rapid way to secure the airway is to induce general anesthesia with a sedative and/or hypnotic, followed by administration of a neuromuscular blocking drug, followed by direct laryngoscopy with tracheal intubation. Table 38-4 describes a “rapid sequence induction.” This approach, when combined with the application of cricoid pressure (Sellick maneuver) (Fig. 38-11), may minimize the chances of massive aspiration. Note that recent investigations have determined that the mechanism by which cricoid pressure may prevent regurgitation of gastric contents into the pharynx is related to occlusion of the hypopharynx (rather than the esophagus) by downward pressure on the cricoid cartilage.27,28
|
Figure 38-11
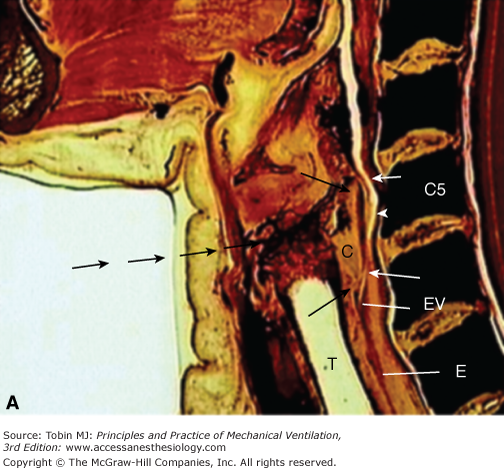
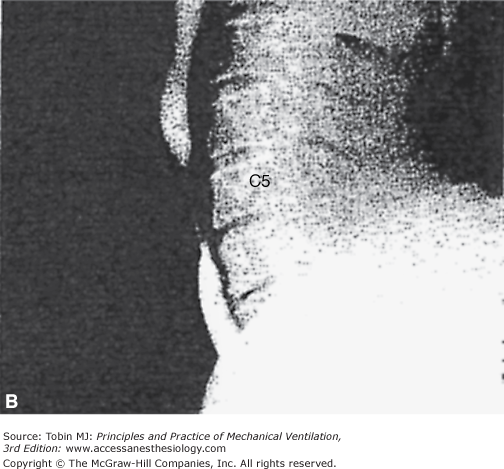
(A) A sagittal cadaver image of the cricoid pressure anatomic unit. The cricoid cartilage (C) is the foundation of the cricoid-pressure unit with its superior and inferior aspects indicated by black arrows. The postcricoid hypopharynx muscular wall and lumen (white arrowhead) and its superior and inferior limits (white arrows) have a constant and intimate relationship with the cricoid cartilage. As pressure is applied anteriorly (serial black arrows), the unit is compressed against the vertebral body (C5), sealing off the esophagus (E) at the esophageal verge (EV). Because the esophagus is well below the level of the seal, its position is irrelevant to the integrity of the seal produced by the pressure on the unit. (B) An image from Sellick’s original report showing obliteration of the lumen by cricoid pressure at the fifth cervical vertebra. T, trachea. (Used, with permission, from Rice MJ, Mancuso AA, Gibbs C, et al. Cricoid pressure results in compression of the postcricoid hypopharynx: the esophageal position is irrelevant. Anesth Analg. 2009;109(5):1546–1552.)
“Preoxygenation,” or “denitrogenation,” consists of allowing the patient to breathe 100% oxygen for 3 to 5 minutes before induction of anesthesia. Preoxygenation allows utilization of the functional residual capacity as an oxygen reservoir. When functional residual capacity and oxygen consumption are normal, preoxygenation allows 8 or more minutes of apnea before oxyhemoglobin desaturation, and greatly increases the margin of safety should there be difficulties in managing the airway.29 Preoxygenation, however, is far less effective in patients with acute hypoxemic respiratory failure,30 and increasing the duration of preoxygenation from 4 to 8 minutes is of only marginal benefit in these patients.31 On the other hand, the use of noninvasive positive-pressure ventilation in critically ill, hypoxemic patients provides more thorough denitrogenation and longer apnea times than tidal breathing with a non–rebreather mask, and should be considered when staff and equipment are readily available.32 At a minimum, if patients are already receiving noninvasive positive-pressure ventilation before intubation, it should be continued until laryngoscopy rather than switching to conventional face-mask preoxygenation.
If rapid sequence induction of anesthesia is not indicated, induction may proceed at a more measured pace, without application of cricoid pressure. On the other hand, preoxygenation should be attempted in all emergency intubations, recognizing that it may be neither possible nor effective in some circumstances.
Intubation using direct laryngoscopy may be the fastest and surest way of securing an airway. This may be particularly true where use of video laryngoscopes or a fiber-optic bronchoscope may be hindered by airway soiling with secretions, blood, or vomitus. This important lifesaving skill, however, can result in great harm if performed incorrectly. The major, feared complications are failure to ventilate and intubate the trachea, and unrecognized esophageal intubation, both of which can lead to severe neurologic injury and death. The likelihood of successful intubation is increased with experience, in addition to the use of proper equipment and suitable pharmacologic adjuncts. Gaining expertise in manual face-mask ventilation and direct laryngoscopy in a controlled setting before attempting these maneuvers in an emergency cannot be overemphasized. The specifics and technical considerations of direct laryngoscopy are beyond the scope of this chapter. A brief description of the basic technique follows.
Numerous laryngoscope blades have been devised for various special situations but most intubations are performed using one of two categories of blades: (a) blades intended to be used to lift the epiglottis directly (“straight” blades); (b) blades designed to lift the epiglottis indirectly by placing anterior traction on the hyoepiglottic ligament in the vallecula (“curved” blades) (Fig. 38-12). In our experience, the curved laryngoscope blade is more easily mastered and more commonly used than the straight blade, although facility with both is ideal as each has distinct advantages. Laryngoscope blades are most commonly designed to be held by the left hand (for right-handed individuals), although right-handed blades are available.
Figure 38-12
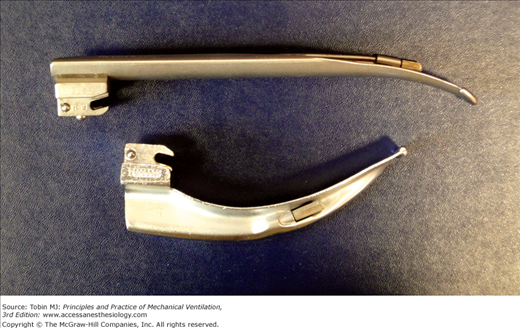
Typical straight (“Miller,” top) and curved (“Macintosh,” below) blades for direct laryngoscopy. Straight blades directly lift the epiglottis. Although this often provides a clear view of the glottis, the room available for inserting the endotracheal tube into the mouth is limited compared to curved blade. The curved blade, the most common variant of which is the Macintosh, is directed into the vallecula and then pulled forward. This lifts the epiglottis away from the glottis. (Photograph courtesy S. Deem.)
Before starting, the patient’s head should be positioned near the top of the bed so the laryngoscopist’s arms are not fully extended. The force applied during the average intubation is 25 newtons (N),33 the equivalent of lifting a mass of approximately 2.5 kg. This force is most easily applied when the elbow is flexed and relatively close to the laryngoscopist’s body.
Classical teaching is that laryngoscopy is facilitated by flexion of the neck at the cervical–thoracic junction and extension of the neck at the atlantooccipital joint (“sniffing position”); this position brings the laryngeal and pharyngeal axes into alignment. The sniffing position is accomplished by raising the occiput with a firm pillow, folded towels, or other support. Recent studies, however, suggest that cervical extension is the most important component of this maneuver, and that the addition of neck flexion on the thorax improves the laryngoscopic view only in patients with limited neck extension and/or morbid obesity.34,35
Laryngoscopy proper begins by positioning the blade in the right side of the patient’s mouth; the mouth opening can be facilitated with the right hand. The right hand can then move to the occiput to extend or flex the neck into optimal position. The blade is then slowly advanced and the tongue swept to the left. The uvula and then the epiglottis should be identified, and are useful landmarks for maintaining a midline position. The blade should be advanced either into the vallecula (curved blade), or beyond the epiglottis toward the glottis (straight blade), and traction then applied at a 45-degree angle with floor. The wrist should remain firm, as flexing the wrist may cause pressure on the upper incisors and will push the epiglottis in front of the larynx. Traction at a 45-degree angle pulls the epiglottis forward to reveal the glottic opening. If the glottis is still not visible, external application of backward (toward the spine), upward (toward the head), rightward (toward the patient’s right side) pressure on the thyroid cartilage (“BURP” maneuver) may push the larynx into view; an assistant can then hold the larynx in this position.36
Related posts:


Stay updated, free articles. Join our Telegram channel

Full access? Get Clinical Tree


