INTRODUCTION
Multiple factors determine the route and site for vascular access, and knowing the basic anatomy, techniques, indications, and contraindications is essential to emergency care.
Infusion rate is key in the resuscitation of those with severe hypovolemia or hemorrhage.1 Infusion rates through a medical catheter behave according to Poiseuille’s law:
The rate of flow is directly proportional to the catheter radius and the pressure gradient, and inversely proportional to the dynamic fluid viscosity and catheter length. Flow rates increase with larger catheter radius, use of more pressure (gravity, manual push-pull devices, pressure bag application, or commercial rapid infusing devices), decreasing viscosity (co-administration of crystalloid with viscous blood products), or decreasing catheter length (peripheral angiocatheter vs triple-lumen catheter). Flow rates are maximized by using the largest internal diameter catheter possible.
PERIPHERAL VENOUS ACCESS SITES
The most commonly accessed veins for peripheral catheterization of the upper extremity are the dorsal hand veins and the veins of the antecubital fossa (Figure 31-1).
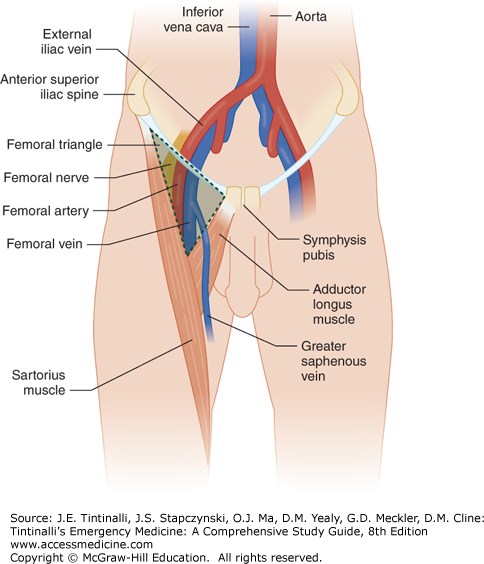
Peripheral catheterization of the superficial veins of the lower extremity can require cutdown of the great and small saphenous veins. The femoral vein is the primary deep vein of the lower extremity. It is located medial to the femoral artery.
Gather all equipment before beginning the procedure (Table 31-1). Observe universal precautions. The procedure for peripheral IV line insertion is summarized in Table 31-2.
| Step | Comment |
|---|---|
| 1. Apply tourniquet. | Apply tourniquet tightly enough to facilitate adequate venous filling and distention without causing patient discomfort or ischemia. |
| 2. Locate vein. | Inspect and palpate the vein. Warm the skin, tap the vein, or apply topical nitroglycerin ointment to ease identification. |
| 3. Clean area with either an alcohol swab or povidone iodine solution. | — |
| 4. Apply gentle traction with the nondominant hand to anchor the vein. | — |
| 5. Insert catheter needle into skin and vessel at a 15- to 30-degree angle with dominant hand. | Peripheral veins are easiest to access at the apex of the “Y” formed by merging veins or where veins are straight for several centimeters. Use a more obtuse (60-degree) angle for deeper veins. |
| 6. Observe for blood flash in catheter hub. | This indicates successful vessel penetration. |
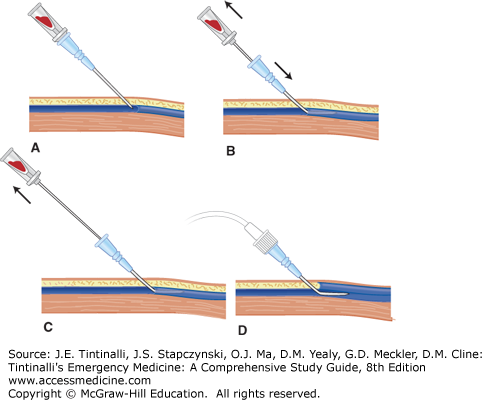
| 7. Gently advance catheter into vessel lumen until the hub is flush against the skin. | See Figure 31-2. If you meet resistance, withdraw the catheter slightly, as it may have penetrated the posterior vessel wall. |
| 8. Remove tourniquet. | — |
| 9. Attach IV tubing and monitor for flow. | — |
| 10.Secure catheter with tape and a sterile transparent dressing. | — |
Avoid venous access through or distal to areas of infection, injury, or sites of potential vascular disruption (e.g., injury to the inferior vena cava from abdominal trauma). Also avoid using extremities with arteriovenous fistulas or grafts or those in which there have been previous lymph node dissections. If possible, avoid IV access of the lower extremity in diabetics due to an increased risk of infection and phlebitis. Do not use peripheral venous access to administer vasopressors for infusion, sclerosing solutions, concentrated electrolyte or glucose solutions, or cytotoxic chemotherapeutic agents.
Flush peripheral catheters with normal saline every 8 hours; change dressings that are damp or soiled, and change the catheter site every 72 to 96 hours.2 Risk of infection and thrombophlebitis increases with time. Assess the skin for signs of infection (erythema) or infiltration (induration, edema). Reassess catheter function and neurovascular status of the distal extremity frequently.
The complications of peripheral venous access are listed in Table 31-3. The first step in treating all complications is catheter removal.
| Complication | Comment |
|---|---|
| Hematoma formation and pain | Prevent hematomas by removing the tourniquet before needle removal and applying direct pressure to site after removal. |
| Extravasation of fluids | Apply cool or warm compresses and elevate extremity. Monitor site for tissue damage and necrosis. |
| Phlebitis (vein inflammation) | Occurs in 2%–13% of catheterized veins.3,4 Presents as discomfort or pain at the catheter site with warmth, erythema, and tenderness along the vein. A palpable cord may also be present. Give anti-inflammatory medications. Apply warm compresses. |
| Cellulitis | Infection rates with peripheral IVs are relatively low. Typical organisms include Staphylococcus epidermidis, S. aureus, and Candida. Treat with antibiotics effective against suspected pathogens. Infection can be reduced by using sterile technique during IV placement and routine handling. |
| Neurovascular injury | — |
| Bacteremia/sepsis | — |
| Deep vein thrombosis | — |
| Tissue necrosis | — |
US can localize veins with inconsistent anatomic relationships or those too deep to palpate. US-guided peripheral IV placement results in high success rates, few complications, and a decreased need for central vein cannulation.5,6 The cephalic and brachial veins, which are not readily palpable, are easily located and cannulated using US guidance.
When inserting an IV using US guidance, use a high-frequency linear transducer. Vascular structures are anechoic (black) in US imaging. Key sonographic characteristics help distinguish veins from arteries. Veins are more easily compressed, have thinner walls, and have no arterial pulsation. Color flow may also help differentiate between the two structures. A centimeter scale on the US monitor indicates the depth of the vessel.
To locate a vessel, view it in short axis (transverse plane) and long axis (sagittal plane), then center the vessel on the screen. The midpoint of the screen correlates with the midpoint of the transducer. Introduce the catheter into the skin at the transducer’s midpoint and direct it toward the vessel lumen. Use a longer catheter (2.5 in. or 6.4 cm) for deeper vessels. Watch the screen as the catheter enters the vessel lumen. Secure the catheter and apply a sterile dressing to the IV line.
CENTRAL VENOUS ACCESS
The indications for central venous catheterization are listed in Table 31-4. The indication for direct central venous access in the setting of resuscitation of cardiac arrest is debated.
Inability to obtain peripheral access Access to central circulation needed for procedures (pulmonary artery catheter placement, transvenous pacemaker placement, or urgent hemodialysis) Measurement of central venous pressure (sepsis, congestive heart failure, pericardial effusion) Administration of sclerosing medications, continuous vasopressors, concentrated ionic solutions, or cytotoxic chemotherapeutic agents |
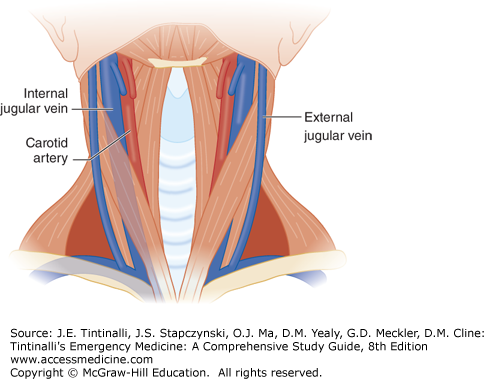
The most frequent sites used for central venous access are the internal jugular, subclavian, and femoral veins (Figures 31-3 and 31-4). The external jugular vein, a superficial structure, also provides a route to the central circulation but is technically a peripheral site.
The clavicles, first ribs, sternum, sternocleidomastoid, platysma, and other strap muscles of the neck overlie the internal jugular and subclavian veins (Figure 31-3). The internal jugular vein lies lateral to the internal carotid artery inside the carotid sheath. The internal jugular vein joins the subclavian vein to form the brachiocephalic vein.
The subclavian vein crosses under the clavicle at the medial to proximal third of the clavicle. The subclavian artery lies posterior and superior to the brachiocephalic vein. The thoracic duct joins the left subclavian vein at its junction with the left internal jugular vein. The domes of the pleura lie posterior and inferior to the subclavian veins and medial to the anterior scalene muscles.
The femoral vein is the most accessible central vein below the waist. It travels in the femoral sheath with the femoral artery, nerve, and lymphatics deep to the medial third of the inguinal ligament. A mnemonic for the anatomy of the femoral structures from lateral to medial is NAVEL: nerve, artery, vein, empty space, and lymphatics.
After gaining consent if possible, identify the access site and approach and position the patient. Prepare all materials before the procedure (Table 31-5). Use a procedure checklist to optimize infection prevention practices.
Sterile personal protective gear (gloves, gown, mask, hair cover) Sterile drape and towels Sterile prep solution (povidone-iodine or chlorhexidine) 3 × 10-mL syringes containing sterile normal saline flush Central venous catheter set containing: 1% Lidocaine, small-gauge needle and syringe 18-Gauge introducer needle Guidewire #11 Blade scalpel Venodilator Single- or multilumen catheter 4 × 4 gauze pads 3-0 or 4-0 silk suture with straight needle or with needle driver Sterile transparent dressing |
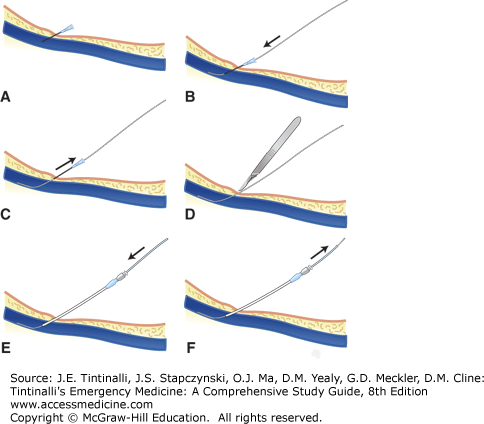
The technique for all approaches is summarized in Table 31-6 and depicted in Figure 31-5.
| Step | Comments |
|---|---|
| 1. Gown in sterile fashion. | Use sterile gloves and gown. Wear mask and hair covering. |
| 2. Identify vessel—US guidance preferred over landmarks. | — |
| 3. Prep and drape patient using standard sterile procedure. | Prep a wide area so an alternate site can be used if initial attempts fail. Prep the entire ipsilateral neck and upper chest when preparing to insert an internal jugular or subclavian catheter. |
4. Open the central catheter kit.
| — |
| 5. Anesthetize area in all conscious patients. | Inject area with 1%–2% lidocaine. Anesthetize the periosteum of the clavicle if using the subclavian approach. Reorient to landmarks after injection. |
| 6. Hold the 18-gauge introducer needle on a 10-mL syringe in the dominant hand and align the needle to the target. | — |
| 7. Advance the needle slowly though the skin and subcutaneous tissue until a flash of dark venous blood appears. | Maintain steady constant aspiration of syringe. |
| 8. Stabilize the needle with the nondominant hand. | — |
| 9. Check for continued free venous flow with aspiration. | If no flow is noted, withdraw the needle slightly, as the needle may have breached the posterior vessel wall. |
| 10. Remove the syringe attached to the needle and immediately occlude the catheter with a finger. | This maneuver helps to prevent introducing air in the catheter and subsequent central system air embolism. |
| 11. Insert the guidewire gently through the needle. Always maintain a firm grip on the wire—do not let go of the wire for any reason. | The wire should advance with minimal resistance. Do not force the wire for any reason. If the wire does not pass easily, reattach the syringe and aspirate to confirm continued venous flow. Reposition the needle as needed. Premature ventricular contractions or dysrhythmias during wire advancement may indicate that the wire is in the right atrium or beyond. |
| 12. Remove the needle over the wire when the guidewire is inserted at least 10 cm into the vessel. | — |
| 13. Incise the skin with a #11 blade scalpel at the entry site to accommodate the venodilator or catheter. | Do not cut the guidewire. |
| 14. Advance the dilator or catheter over the guidewire into the vessel lumen with a gentle twisting motion. | — |
| 15. Remove the dilator (if used), and advance the catheter over the wire until the wire is advanced through the distal port. | Maintain a grip on the guidewire during this procedure. |
| 16. Grab the end of the guidewire. | — |
| 17. Advance the catheter to the appropriate depth. | — |
| 18. Remove the guidewire. | It is easy to “lose” the wire; if you cannot find it after a procedure, immediately obtain an x-ray to seek retention. |
| 19. Aspirate and flush all ports to confirm catheter function. | — |
| 20. Secure catheter with suture and apply a sterile transparent dressing. | — |
| 21. Confirm catheter placement in the superior vena cava with chest x-ray. | A catheter tip in the right atrium can perforate the right atrium and cause hemothorax or hemomediastinum with pericardial tamponade. Examine the chest x-ray for signs of complications. |
FIGURE 31-5.
Seldinger technique. A. Needle is inserted through skin and vessel until venous blood is aspirated. B. Guidewire is inserted gently through the needle and advanced. C. Needle is removed over guidewire. D. The skin is incised. E. Dilator or catheter is inserted over the guidewire. F. The guidewire is removed.
Complications of central venous catheterization are listed in Table 31-7.
Stay updated, free articles. Join our Telegram channel

Full access? Get Clinical Tree


