ULTRASOUND
JASON LEVY, MD, RDMS, JOANNA S. COHEN, MD, ALYSSA M. ABO, MD, RACHEL REMPELL, MD, RDMS, AND J. KATE DEANEHAN, MD, RDMS
INTRODUCTION
Emergency bedside ultrasound has been used in the emergency department for over three decades. Its beginnings are rooted in the adult population, which has well-established, evidence-based applications such as the focused assessment with sonography in trauma (FAST), and evaluation for abdominal aortic aneurysm. It is now a required component of emergency medicine residencies and is considered core content by the American Board of Emergency Medicine and the American College of Emergency Physicians (ACEP).
Traditionally, ultrasound performed by imaging specialists involves comprehensive examinations in which entire anatomic areas are evaluated. In contrast, emergency bedside ultrasound is intended to answer a more focused, limited clinical question (e.g., “Is there cardiac activity or not?”) or assist with a specific procedure. Consequently, the approach to both training and patient evaluation is different.
Pediatric emergency medicine has been slower to adopt bedside ultrasound into everyday clinical practice. In recent years, however, it has gained more widespread acceptance as the body of literature has expanded and training has become more accessible. There are now consensus educational guidelines for point-of-care ultrasound training in pediatric emergency medicine fellowship. Besides the obvious advantage of being done directly at the patient’s bedside, emergency ultrasound offers several other benefits to the pediatric patient. It is painless, readily available, does not require sedation, and does not expose the patient to ionizing radiation. Furthermore, published data supports its use with respect to better patient care, improved patient satisfaction, and decreased wait times. Although a substantial amount of pediatric specific research exists, its growing use will necessitate further investigation to determine which adult applications can be generalized to children and to develop and implement bedside ultrasound examinations specific to the pediatric patient.
ADMINISTRATIVE ASPECTS
Starting an Ultrasound Program
Before implementing an ultrasound program, several administrative requirements should be addressed. First, a point person should be identified who either is already well trained in bedside ultrasound, or is prepared to undertake additional ultrasound training. This person will ultimately be responsible for the training of staff, residents, and fellows, as well as assume roles around quality assurance and interdepartmental communication. Second, an ultrasound system should be purchased designed for the purposes of emergency department use. Staff and trainees must be able to put what they have learned into use and only those who perform ultrasound scans routinely will gain sufficient facility to incorporate it into their everyday practice. There are now many companies that recognize the need for emergency department specific machines and have products that cater to this niche. Third, starting a program is best done in concert with hospital leadership and credentialing committees. A collaborative relationship with Radiology is important. Whenever possible, evidence-based data should be employed to justify implementation of specific bedside ultrasound examinations with the ultimate goal of improving patient care.
Once the lead person has been trained, teaching of the staff and trainees can commence. Although some standards for training in ultrasound have been published, there is still debate among different governing bodies as to minimal requirements to achieve competency. Guidelines from the American College of Radiology and the American Institute of Ultrasound in Medicine are geared toward comprehensive, diagnostic examinations and are not applicable to emergency bedside ultrasound. ACEP has published consensus guidelines based on expert opinion and previous published data which have now become the current standard for emergency medicine. In general, programs should establish a minimum number of didactic hours, a minimum number of overall ultrasound examinations, and a minimum number of examinations to look for a specific finding. These requirements will form the basis of the credentialing process for staff physicians.
Equipment Considerations
Most importantly, the anticipated type of ultrasound scans should guide the purchasing of equipment. If a machine is being purchased for vascular access only, then one with a high-quality cardiac application would not be justified. There are numerous ultrasound systems that are tailored to the practice of emergency medicine and the technology is constantly advancing. All machines should be portable and maneuverable enough to fit into the cramped spaces of an emergency department. A cart-based system is ideal for ease of movement, changing of probes, storage space, and housing considerations. Furthermore, one must consider a device’s ease of use, as the more complicated systems may intimidate novice users and be a roadblock to gaining experience. Other factors to consider when buying a system include durability, image quality, power supply (battery option), boot up times, and service plans.
There are numerous types of transducers (probes) from which to choose. Transducers are generally classified based on frequency, with low-frequency probes for improved penetration (but poorer image quality) and high-frequency probes for better image resolution (but weaker penetration into deep tissue). Transducers should be purchased based on the anticipated type of ultrasound examinations. For example, if a significant percentage of patients present with pregnancy-related complaints, an endocavitary probe may be warranted. The footprint of the probe should also be considered. The footprint is that portion of the probe that comes into contact with the skin and sends out the ultrasonic waves. Probes with a large footprint can give a wider field of view, but are difficult to fit into the small intercostals spaces of infants and children. Generally speaking, at least two probes should be considered essential when purchasing an ultrasound machine, a low-frequency probe that can be used for abdominal and cardiac examinations, and a high-frequency linear probe which can be used for procedural applications and ultrasound of superficial soft tissues (Fig. 142.1).
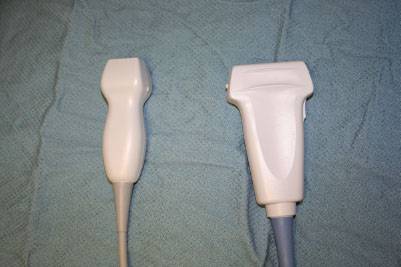
FIGURE 142.1 On the left is a low-frequency, phased array probe commonly used in cardiac or abdominal applications. On the right is a high-frequency, linear probe used for procedures and identifying superficial structures.
ULTRASOUND BASICS
Ultrasound Physics
A complete review of ultrasound physics is beyond the scope of this chapter. Knowledge of the basic principles, however, will lead not only to a higher comfort level with machine operation, but also to greater facility with image acquisition and interpretation.
Ultrasound refers to sound waves with frequency greater than 20,000 Hz (the upper range of audible sound). Frequencies used in diagnostic and procedural ultrasound generally range from 2 to 15 MHz. The general principle of diagnostic ultrasound is the pulse-echo effect. Sound waves are generated from the transducer and sent into a medium (the body). The transducer then “listens” for the return, or echo, of that sound. The emitted sound wave encounters different tissues, with different densities and different distances from the surface of the skin. Some of the sound is reflected back to the transducer footprint. Once the transducer “hears” a returning echo, the ultrasound system calculates the distance of an object from the transducer based on the amount of time it took the echo to return. The intensity of the returning sound wave determines the grayscale assignment on the image. For example, fluid does not reflect sound waves at all, thus a fluid-filled bladder will appear black or anechoic (i.e., the transducer did not “hear” any sound waves reflected back). The diaphragm, however, is highly reflective and appears bright on the screen (Fig. 142.2). Each pixel on the screen is generated in this fashion, thus creating an overall image.
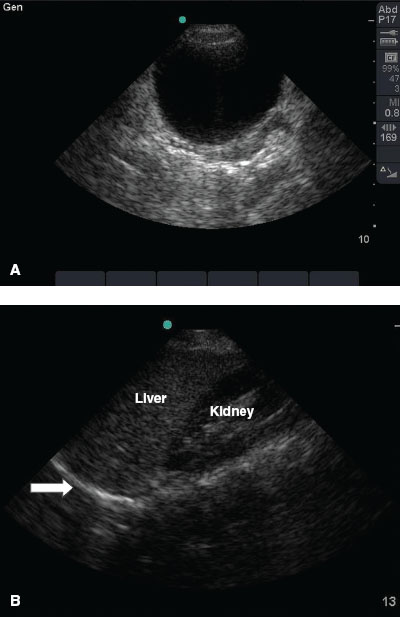
FIGURE 142.2 A: A full bladder. Note that fluid is anechoic (black). B: Morison pouch. Note the bright reflection of the diaphragm adjacent to the liver (arrow).
Basic Controls
Ultrasound machines, upon first glance, can appear daunting and overwhelming. There are scores of buttons and knobs, and the inexperienced user can often be disheartened. Keeping in mind the basic sonography concepts, however, and understanding that these controls simply allow one to adjust and optimize the image, should prevent even the most novice sonographer from feeling intimidated.
Gain refers to the intensity of the returning echoes on the display screen. Adjusting the gain essentially changes the brightness without improving the quality of the image. Depth of the image can be adjusted as well. For superficial structures, decreasing the depth allows for greater image quality, larger images of the structure under scrutiny, and less wasted space on the screen. Increasing the depth allows for visualization of deeper structures (i.e., farther away from the skin and transducer). The freeze button allows the sonographer to hold a still image, usually for purposes of studying an image, performing measurements, or saving. On most machines, several seconds of memory are saved and can be toggled forward and backward to find a desired image seen moments before.
Other control panel functions on ultrasound machines vary widely, but often include color, Doppler, motion-mode (m-mode), focus and tissue harmonics. As the practitioner gains more experience, these machine capabilities will become more familiar and allow for more advanced applications.

FIGURE 142.3 Image of femoral anatomy. Note the marker on the screen (arrow) is a green dot. By convention, the marker should always be on the left, upper side of the monitor.
General Scanning Techniques
One of the greatest advantages to ultrasound is that it is dynamic, with the ability to capture images in multiple imaging planes from multiple orientations. This also could lead to confusion when reviewing and interpreting images. For that reason, standard and consistent orientation should be used whenever possible.
Generally speaking, the standard ultrasound examination is performed with the sonologist on the right side of the patient’s bed. The probe should be held in the right hand and ultrasound system adjustments made with the left hand during scanning.
All transducers have some marking that correlates with a dot (or some other identifier) on the monitor screen (Fig. 142.3). By convention, the transducer marker is always kept to the patient’s right in transverse views or head in sagittal and coronal views and the dot on the screen is located at the top, left side of the monitor (with the exception of cardiac scanning). Adhering to this principle allows for uniformity of images and makes interpretation and review more seamless. Objects that are closer to the probe marker appear closer to the dot on the monitor, and vice-versa.
Most ultrasound imaging is performed in B-mode (brightness), which is the standard, two-dimensional representation of the reflected ultrasound waves. As mentioned above, each pixel represents the intensity and distance (determined by time) of a returning sound wave. M-mode (motion) essentially creates a single line of a sound wave through an object of interest, and then displays that image with respect to time (on the horizontal access). M-mode is useful to document movement of a structure, such as cardiac valves or the fetal heart.
Finally, D-mode (Doppler) and Color Flow Doppler sense the movement of the ultrasound waves as they encounter a moving medium, represented by either color changes or sound from the ultrasound machine. Color Flow Doppler ultrasound is especially useful when identifying vessels and discerning between arterial and venous flow. The colors represent flow away from or toward the probe and does not correlate with arterial or venous flow ( Video 142.1).
DIAGNOSTIC APPLICATIONS
Focused Assessment with Sonography in Trauma
The use of sonography in trauma was one of the very first applications of emergency bedside ultrasound, and many now consider it a standard part of the evaluation of the injured patient. The basic sonographic question when performing the FAST examination is “Is there free fluid in the peritoneum or pericardium?” The enhanced FAST, or eFAST, includes evaluation of the pleural space as well. The overarching principle of the examination is that hemoperitoneum or hemopericardium is an indication of organ injury in the setting of blunt or penetrating torso trauma. Blood in the abdomen or thorax will appear hypoechoic or anechoic (dark) against the hyperechoic (bright) background of the internal organs (Fig. 142.4). Thus, the detection of peritoneal or pericardial fluid by sonography may be evidence of injury to the abdominal organs or heart, respectively.
Although computed tomography (CT) remains the study of choice for the stable pediatric patient with suspected intra-abdominal injury, the FAST scan has several distinct advantages. First, it can be performed immediately at the bedside and is interpreted by the person performing the test, who is privy to the clinical context. Second, there is no exposure to the ionizing radiation of CT, and sedation is not needed for FAST. Additionally, the FAST scan can be repeated with serial examinations as the patient condition changes. Last, for unstable patients, CT is often not a viable option and the FAST scan can frequently provide valuable information that may guide therapeutic or operative interventions.
Research pertaining to the FAST scan has been plentiful, mainly focused in the adult population, with several pediatric studies. Published data indicate that the sensitivity of FAST scan in children is not as robust as in adults but the specificity remains very high. Thus, a positive FAST scan should always prompt either further investigation or therapeutic intervention. A negative FAST scan does not necessarily obviate the need for CT scan but can still be valuable in patients with a low pretest probability of intra-abdominal injury.
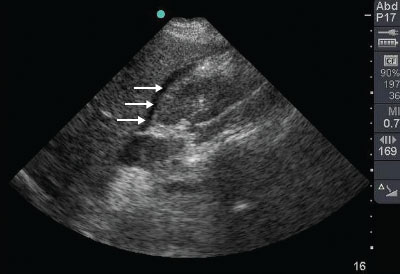
FIGURE 142.4 A positive FAST examination. Note the anechoic stripe of fluid (arrows) in Morison pouch, between the liver and kidney.
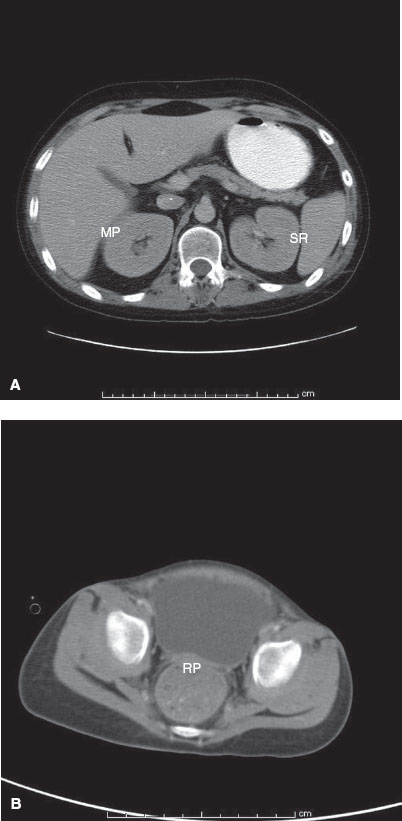
FIGURE 142.5 A: CT cross section of abdominal anatomy. Note the dependent areas of Morison pouch (MP) and the splenorenal recess (SR). B: Pelvic anatomy. Note the dependent rectovesical pouch (RP) between the posterior wall of the bladder and stool-filled rectum.
Anatomy
When supine, there are several dependent areas of the peritoneal cavity where blood or fluid has a tendency to accumulate (Fig. 142.5). The hepatorenal recess, also known as Morison pouch, is the space located between the liver and right kidney. In a normal person, this is a potential space and, thus, fluid is not usually found here. The splenorenal recess is the space located between the spleen and left kidney. Again, no fluid should be seen here in the healthy person. The rectovesical pouch (male patients) and the pouch of Douglas (female patients) are formed by the space between the rectum and bladder or uterus, respectively. These potential spaces form the basis of the FAST abdominal views.
In the supine patient, free fluid from the right upper quadrant will tend to collect in Morison pouch first, but free fluid from the left upper quadrant will often accumulate in the left subphrenic space initially (i.e., not the splenorenal recess). The amount of intraperitoneal fluid needed for detection by ultrasound has been reported to be as little as 100 mL in adults and will depend on the source of the bleeding and patient positioning.
Technique
Probe selection is the first step. A low-frequency (2 to 5 MHz) probe should be chosen for adequate penetration, most commonly a large footprint curvilinear probe. In pediatric trauma, however, the smaller head of a phased array probe or microconvex probe may be more useful to obtain images between the small intercostal spaces.
There are four views of the FAST examination: (a) hepatorenal recess or Morison pouch, (b) splenorenal recess, (c) pelvic/bladder view, and (d) subcostal (subxyphoid) pericardial view (Fig. 142.6). Many are now also incorporating views of the thorax to assess for hemothorax or pneumothorax, referred to as the enhanced FAST or eFAST. The sonographer should perform the FAST examination in a systematic manner in a standard sequence. This will allow greater focus on image acquisition and optimization as the examination order becomes routine.
A view of Morison pouch can be obtained by placing the probe coronally (marker toward the patient’s head) in the anterior axillary line between the seventh and ninth ribs on the patient’s right-hand side. If rib shadows prevent optimal images, the probe can be rotated slightly in a counterclockwise fashion such that the head is oriented in between and parallel to the ribs. Once the hepatorenal recess comes into view, the probe can be moved or fanned superiorly toward the head and inferiorly toward the feet to visualize Morison pouch completely, as well as the inferior portions of the liver and kidney ( Video 142.2). As mentioned earlier, blood will tend to accumulate in these dependent portions of the peritoneal cavity initially (
 Video 142.3).
The splenorenal recess is a more difficult view to obtain. Because the left kidney sits more superior and posterior than the right kidney, starting position for the probe is the coronal plane (marker to the patient’s head) between the fifth and seventh ribs in the posterior axillary line on the left. Rotation of the probe slightly should help avoid rib shadows. In this view, blood will frequently accumulate between the spleen and diaphragm, so it is important to visualize the superior portion of the spleen in addition to the splenorenal junction ( Videos 142.4 [normal] and 142.5 [abnormal]).
The pelvic view is obtained by placing the probe transversely (marker to the patient’s right), just above the symphysis pubis and angling the probe inferiorly toward the feet. A full bladder will appear as a large anechoic structure and free fluid will be seen either posterior to or superior to the bladder wall. For this reason, a sagittal view visualizing the superior bladder wall is always necessary for a complete examination ( Videos 142.6 [normal] and 142.7 [abnormal]).
Finally, the subcostal or subxiphoid view of the heart is obtained. It is important to remember that the heart sits slightly rotated in the thorax, with the right ventricle most anterior and the left ventricle posterior and toward the patient’s left hip. The transducer should lie almost parallel to the abdomen, just below the xiphoid process, with the marker to the patient’s right-hand side and angled toward the left shoulder (Fig. 142.6). The probe can be slid rightward along the inferior portion of the rib to avoid the acoustic artifacts caused by air in the stomach, using the liver as an acoustic window instead. The normal pericardium is seen as a hyperechoic (bright) line surrounding the heart (Fig. 142.7). Pericardial fluid will appear as an anechoic collection between the myocardium and bright pericardium ( Video 142.8). A more detailed description of bedside echocardiography is discussed in the next section.
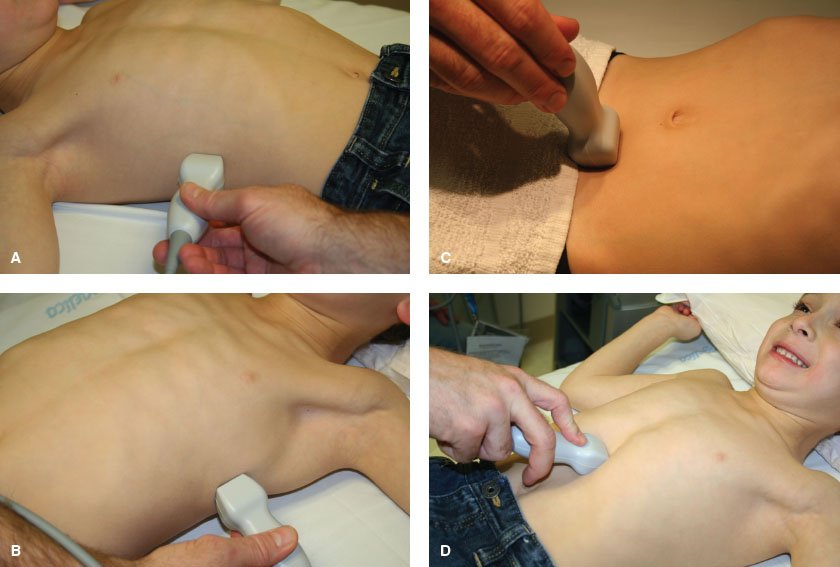
FIGURE 142.6 Probe positions for the abdominal FAST scan. A: Morison pouch, (B) splenorenal recess, (C) pelvic, and (D) subcostal cardiac.
Pitfalls
For the Morison pouch and splenorenal recess views, the most common difficulty arises from rib shadows. The probe can be rotated about 20 degrees such that the orientation of the head is parallel to the course of the rib above and below. The probe can also be moved either anterior or posterior to optimize images. It is also important to recognize the inferior vena cava and the gallbladder in the right upper quadrant scan. Both of these structures typically appear anechoic and can mimic free fluid in Morison pouch for the inexperienced sonographer.
The splenorenal recess is more difficult to visualize than Morison’s pouch because of the relative superior position of the left kidney and smaller spleen size. Often, the probe is not positioned posterior or cephalad enough to visualize these structures.
A frequent pitfall with the pelvic view is the inability to visualize the bladder. Sometimes the bladder is empty (i.e., when a Foley catheter has been placed). More often, the probe is positioned too superior and should be slid and/or angled toward the feet. Less commonly, the bladder is off of midline to the right or left.
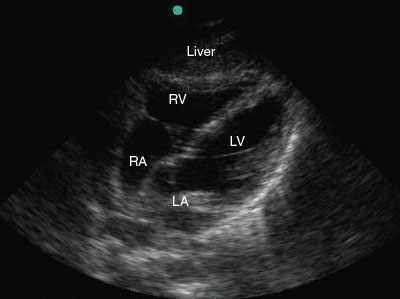
FIGURE 142.7 Normal subxiphoid cardiac view. RV, right ventricle; LV, left ventricle; RA, right atrium; LA, left atrium.
There are several reasons why a sonographer may not view the heart during the cardiac examination. First, the depth has not been adjusted from the abdominal scans. The abdominal organs lie relatively closer to the skin than the heart does to the subxiphoid process, and thus, the heart will often be deeper than the maximal depth set on the monitor. By increasing the depth prior to the cardiac scan, the heart will come into view easily. Second, the angle of the probe may be too steep. Remember that from the subcostal position, the heart lies superiorly and the head of the transducer must be pointed in that direction. Third, air from the stomach can scatter the ultrasound beams, rendering the image unreadable. The probe should be slid to the patient’s right, away from the stomach, thereby using the liver as an acoustic window instead.
Cardiac
Cardiac ultrasound as part of the FAST examination was one of the first applications of bedside ultrasound. Subsequently, there has been increasing use of cardiac examinations for nontraumatic conditions. The basic questions asked when performing focused bedside echocardiography are (i) “Is the heart beating?” and (ii) “Is there a pericardial effusion?” Consequently, the two most common indications for bedside cardiac ultrasound are (i) evaluating for cardiac activity in patients with cardiac arrest or pulseless electrical activity (PEA), and (ii) assessing for pericardial effusions. Although these scenarios are much less common than in the adult patient, their relative clinical importance makes cardiac ultrasound an invaluable tool when examining pediatric patients with these conditions. Evaluating global cardiac function and overall volume status can also have an immediate impact on patient care. These echocardiographic skills however, are more difficult to acquire and beyond the scope of this chapter. Consequently, practitioners should know their limits and use ultrasound accordingly. The purpose of focused echocardiography is to provide the clinician with immediate bedside information and is not meant to replace comprehensive, cardiology-performed echocardiograms.
Numerous studies of both adult and pediatric patients have shown that emergency or critical care physicians can accurately identify pericardial effusions in the setting of both traumatic and nontraumatic etiologies. In penetrating chest trauma, early identification of pericardial effusion has been shown to dramatically improve patient outcomes. In adult patients with cardiac arrest, those with PEA who have cardiac activity demonstrated on bedside ultrasound are more likely to survive when compared with patients with cardiac standstill. Bedside ultrasound may also identify life-threatening causes of PEA such as cardiac tamponade. Because cardiac arrest is such a rare event in children, prospective studies have not been performed and single-institution investigations may not be practical in pediatric patients.
Anatomy
The standard terminology used in other ultrasound examinations is less useful when discussing cardiac ultrasound due to the position of the heart in the thorax. Instead, standard views are along two different cardiac planes. The cardiac long-axis views the heart along its plane from the atria to apex. The short axis cuts across the heart from anterior to posterior, along the plane from the right hip to the left shoulder (Fig. 142.8). These axes form the basis for the standard cardiac views used in emergency bedside echocardiography.
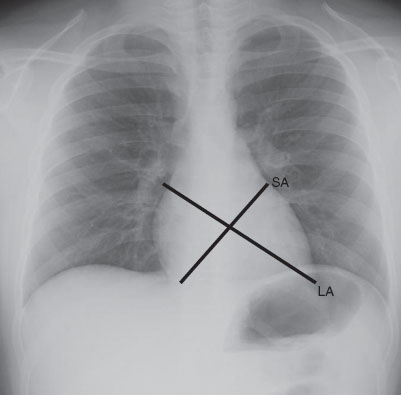
FIGURE 142.8 Ultrasound axes of the heart. LA, long axis; SA, short axis.
Technique
The subcostal or subxiphoid view is the same view as obtained when performing the FAST examination. A low-frequency (2 to 5 MHz) curvilinear or phased array probe should be chosen. Phased array probes are better for moving structures such as the heart. Smaller footprint probes may prove useful when attempting cardiac views in between the rib spaces of pediatric patients.
Some controversy still exists in emergency medicine as to the direction of the probe marker and location of the marker indicator on the monitor. We have generally found that for the novice sonographer, keeping the marker indicator or “dot” on the left side of the screen and marker toward the patient’s right for the subcostal four-chamber view maintains consistency and convention. Classic echocardiography dictates the opposite approach, with the probe marker directed leftward and the marker indicator on the right side of the machine. In both instances, the same image orientation will appear on the screen.
Recall that the heart lies obliquely in the chest, with the apex pointed toward the left hip. The subcostal view cuts across the heart from its atria to apex and is thus considered a long-axis image. The transducer position is the same as for the cardiac portion of the FAST examination, and should lie almost parallel to the abdomen, just below the xiphoid process and the head of the probe angled toward the left shoulder (Fig. 142.6). The probe can be slid rightward along the inferior portion of the last rib to avoid the acoustic artifacts caused by air in the stomach, using the liver as an acoustic window instead. As the ultrasound wave moves toward the left shoulder from the subxiphoid space, it will encounter the liver first, then right ventricle and right atrium, followed by the left ventricle and left atrium. The image obtained will correlate such that the liver is at the top of the screen and the left ventricle is near the bottom of the screen (Fig. 142.7). Normally, the bright white pericardium abuts the gray myocardium. When a pericardial effusion is present, a hypoechoic (dark) stripe will appear between the two (Fig. 142.9,  Video 142.8).
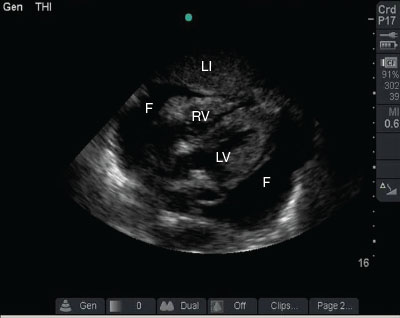
FIGURE 142.9 Pericardial effusion: an anechoic fluid collection (F) surrounds the myocardium. Note the liver (Li), right ventricle (RV), and left ventricle (LV).
The left parasternal long view is obtained by placing the probe in the third or fourth intercostal space, immediately left of the sternum, with the marker pointed toward the left hip. Unlike the subcostal view in which the probe can lie almost flat, it should be perpendicular to the chest wall in the parasternal long view (Fig. 142.10). The image acquired should cut across the long axis of the heart, from the atria (right shoulder) to apex (left hip). This view can be quite useful in obese patients, in whom the subcostal view is often difficult to obtain. Just as in the subcostal view, the right ventricle is the first cardiac structure encountered by the sound wave as it lies most anterior and closest to the probe (Fig. 142.11,  Video 142.9).
Related posts:


Stay updated, free articles. Join our Telegram channel

Full access? Get Clinical Tree


