To evacuate abnormal collections of air or fluid from the pleural space in the following conditions:
![]() Pneumothorax
Pneumothorax
![]() Hemothorax
Hemothorax
![]() Chylothorax
Chylothorax
![]() Empyema
Empyema
![]() Recurrent pleural effusion
Recurrent pleural effusion
![]() Prevention of hydrothorax after cardiothoracic surgery
Prevention of hydrothorax after cardiothoracic surgery
CONTRAINDICATIONS
![]() None for unstable injured patients
None for unstable injured patients
![]() Relative Contraindications
Relative Contraindications
![]() Anatomic abnormalities—pleural adhesions, emphysematous blebs, or scarring
Anatomic abnormalities—pleural adhesions, emphysematous blebs, or scarring
![]() Coagulopathy
Coagulopathy
LANDMARKS
![]() The fourth or fifth intercostal space at the mid- to anterior axillary line, but multiple sites are possible (FIGURE 14.1)
The fourth or fifth intercostal space at the mid- to anterior axillary line, but multiple sites are possible (FIGURE 14.1)
![]() Intercostal nerve and vessels are located along the inferior margin of each rib; therefore, the tube should pass immediately over the superior surface of the lower rib
Intercostal nerve and vessels are located along the inferior margin of each rib; therefore, the tube should pass immediately over the superior surface of the lower rib
SUPPLIES
![]() Antiseptic solution, drapes, and towel clips
Antiseptic solution, drapes, and towel clips
![]() 1% Lidocaine, 20 mL
1% Lidocaine, 20 mL
![]() 25- and 22-gauge needles and 10-mL syringe
25- and 22-gauge needles and 10-mL syringe
![]() No. 10 scalpel blade with handle, Kelly clamps (two), and forceps
No. 10 scalpel blade with handle, Kelly clamps (two), and forceps
![]() Thoracostomy tube selection
Thoracostomy tube selection
![]() Trauma: No. 36–40 French
Trauma: No. 36–40 French
![]() Nontraumatic: No. 24–32 French
Nontraumatic: No. 24–32 French
![]() Children: No. 20–24 French
Children: No. 20–24 French
![]() Infants: No. 18 French
Infants: No. 18 French
![]() Pleur-evac (collection bottle, underwater seal, suction control)
Pleur-evac (collection bottle, underwater seal, suction control)
![]() Connecting tubing
Connecting tubing
![]() Gauze pads, adhesive tape, 4˝ × 4˝ pads, Xeroform gauze dressing
Gauze pads, adhesive tape, 4˝ × 4˝ pads, Xeroform gauze dressing
![]() 2, 1, or 0 suture (not 2-0 or 1-0), needle driver, and suture scissors
2, 1, or 0 suture (not 2-0 or 1-0), needle driver, and suture scissors
![]() General Basic Steps
General Basic Steps
![]() Analgesia
Analgesia
![]() Incision
Incision
![]() Blunt dissection
Blunt dissection
![]() Verification
Verification
![]() Insertion
Insertion
![]() Securing the tube
Securing the tube
![]() Confirmation
Confirmation
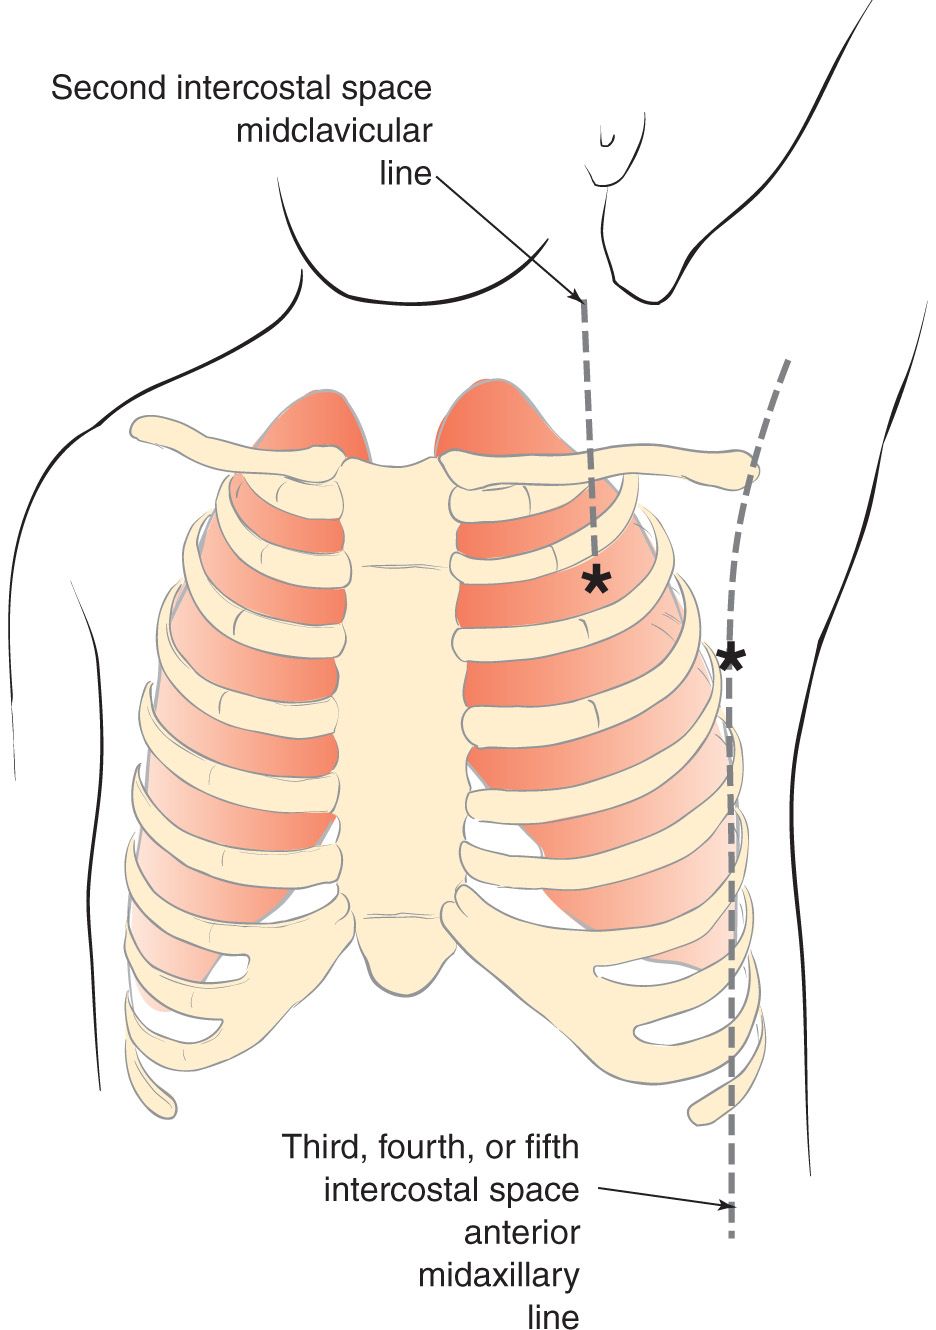
FIGURE 14.1 Possible sites for chest tube placement. (From Connors KM, Terndrup TE. Tube thoracostomy and needle decompression of the chest. In: Henretig FM, King C, eds. Textbook of Pediatric Emergency Procedures. Philadelphia, PA: Lippincott Williams & Wilkins; 1997:399.)
TECHNIQUE
![]() Preparation
Preparation
![]() Oxygen and continuous pulse oximetry monitoring
Oxygen and continuous pulse oximetry monitoring
![]() If the patient is stable, administer parenteral analgesics or procedural sedation
If the patient is stable, administer parenteral analgesics or procedural sedation
![]() Elevate the head of the bed to 30 to 60 degrees
Elevate the head of the bed to 30 to 60 degrees
![]() Arm on the affected side is placed over the patient’s head
Arm on the affected side is placed over the patient’s head
![]() Sterilize the area where the tube will be inserted with povidone–iodine or chlorhexidine solution
Sterilize the area where the tube will be inserted with povidone–iodine or chlorhexidine solution
![]() Drape the area with sterile towels
Drape the area with sterile towels
![]() Assemble the suction-drain system according to manufacturer’s recommendations; adjust the suction until a steady stream of bubbles is produced in the water column
Assemble the suction-drain system according to manufacturer’s recommendations; adjust the suction until a steady stream of bubbles is produced in the water column
![]() Analgesia
Analgesia
![]() Produce local anesthesia using up to 5 mg/kg of 1% lidocaine with epinephrine (1:100,000)
Produce local anesthesia using up to 5 mg/kg of 1% lidocaine with epinephrine (1:100,000)
![]() Inject the subcutaneous area with a small-bore (25-gauge) needle
Inject the subcutaneous area with a small-bore (25-gauge) needle
![]() Generously infiltrate the muscle, periosteum, and parietal pleura in the area of the tube’s eventual passage using a larger-bore needle
Generously infiltrate the muscle, periosteum, and parietal pleura in the area of the tube’s eventual passage using a larger-bore needle
![]() Incision
Incision
![]() Using a no. 10 scalpel blade, make at least a 3- to 4-cm transverse incision through the skin and subcutaneous tissue
Using a no. 10 scalpel blade, make at least a 3- to 4-cm transverse incision through the skin and subcutaneous tissue
![]() One method is to make the incision at an intercostal space lower than the thoracic wall entry site so that the tube may be “tunneled” up over the next rib
One method is to make the incision at an intercostal space lower than the thoracic wall entry site so that the tube may be “tunneled” up over the next rib
![]() Blunt Dissection
Blunt Dissection
![]() Use a large Kelly clamp or scissor (this often takes considerable force)
Use a large Kelly clamp or scissor (this often takes considerable force)
![]() Track is created over the rib by pushing forward with the closed points and then spreading and pulling back with the points spread
Track is created over the rib by pushing forward with the closed points and then spreading and pulling back with the points spread
![]() Push through the muscle and parietal pleura with the closed points of the clamp until the pleural cavity is entered
Push through the muscle and parietal pleura with the closed points of the clamp until the pleural cavity is entered
![]() A palpable pop is felt when the pleura is penetrated, and a rush of air or fluid should occur at this point
A palpable pop is felt when the pleura is penetrated, and a rush of air or fluid should occur at this point
![]() Verification
Verification
![]() Once the pleura is penetrated, insert a gloved finger into the chest wall track to verify that the pleura has been entered and that no solid organs are present
Once the pleura is penetrated, insert a gloved finger into the chest wall track to verify that the pleura has been entered and that no solid organs are present
![]() The finger can be left in place to serve as a guide for tube insertion
The finger can be left in place to serve as a guide for tube insertion
![]() Insertion
Insertion
![]() It is recommended that the tube be held in a large curved clamp with the tip of the tube protruding from the jaws
It is recommended that the tube be held in a large curved clamp with the tip of the tube protruding from the jaws
![]() Pass the tube over, under, or beside the finger into the pleural space
Pass the tube over, under, or beside the finger into the pleural space
![]() The tube is advanced superiorly, medially, and posteriorly until pain is felt or resistance is met; then it is pulled back 2 to 3 cm
The tube is advanced superiorly, medially, and posteriorly until pain is felt or resistance is met; then it is pulled back 2 to 3 cm
![]() Ensure that all the holes in the chest tube are within the pleural space
Ensure that all the holes in the chest tube are within the pleural space
![]() Securing the Tube (numerous methods are acceptable)
Securing the Tube (numerous methods are acceptable)
![]() Close the remainder of the incision using a large 0 or 1 silk or nylon suture, keeping the ends long
Close the remainder of the incision using a large 0 or 1 silk or nylon suture, keeping the ends long
![]() Suture ends are wrapped and tied repeatedly around the chest tube, then knotted securely. The sutures are tied tightly enough to indent the chest tube slightly to avoid slippage.
Suture ends are wrapped and tied repeatedly around the chest tube, then knotted securely. The sutures are tied tightly enough to indent the chest tube slightly to avoid slippage.
![]() A horizontal mattress (or purse-string) suture is placed approximately 1 cm across the incision on either side of the tube, essentially encircling the tube. This suture helps secure the tube and eventually facilitates closing the incision when the chest tube is removed.
A horizontal mattress (or purse-string) suture is placed approximately 1 cm across the incision on either side of the tube, essentially encircling the tube. This suture helps secure the tube and eventually facilitates closing the incision when the chest tube is removed.
![]() Place occlusive dressing of petroleum-impregnated gauze where the tube enters the skin; then cover with two or more gauze pads
Place occlusive dressing of petroleum-impregnated gauze where the tube enters the skin; then cover with two or more gauze pads
![]() Wide cloth adhesive tape can be used to hold the tube more securely in place
Wide cloth adhesive tape can be used to hold the tube more securely in place
![]() Confirmation
Confirmation
![]() Indicators for correct placement are as follows:
Indicators for correct placement are as follows:
![]() Condensation on the inside of the tube
Condensation on the inside of the tube
![]() Audible air movement with respirations
Audible air movement with respirations
![]() Free flow of blood or fluid
Free flow of blood or fluid
![]() Ability to rotate the tube freely after insertion
Ability to rotate the tube freely after insertion
![]() Attach tube to previously assembled water seal or suction
Attach tube to previously assembled water seal or suction
![]() Observing bubbles in the water seal chamber when the patient coughs is a good way to check for system patency
Observing bubbles in the water seal chamber when the patient coughs is a good way to check for system patency
![]() Obtain a chest radiograph
Obtain a chest radiograph
COMPLICATIONS
![]() Hemothorax
Hemothorax
![]() Pulmonary edema
Pulmonary edema
![]() Bronchopleural fistula
Bronchopleural fistula
![]() Empyema
Empyema
![]() Subcutaneous emphysema
Subcutaneous emphysema
![]() Infection
Infection
![]() Contralateral pneumothorax
Contralateral pneumothorax
![]() Subdiaphragmatic placement of the tube
Subdiaphragmatic placement of the tube
![]() Localized hemorrhage
Localized hemorrhage
SAFETY/QUALITY TIPS
![]() Procedural
Procedural
![]() The more urgent the chest tube, the less local anesthesia and the more systemic sedation/analgesia, for purposes of speed. In a chest tube required for emergent hemodynamic stabilization, it is reasonable to skip local anesthesia completely and place the chest tube after, for example, a dissociating dose of ketamine.
The more urgent the chest tube, the less local anesthesia and the more systemic sedation/analgesia, for purposes of speed. In a chest tube required for emergent hemodynamic stabilization, it is reasonable to skip local anesthesia completely and place the chest tube after, for example, a dissociating dose of ketamine.
![]() The more urgent the chest tube, the larger the size of the initial skin incision, for purposes of speed
The more urgent the chest tube, the larger the size of the initial skin incision, for purposes of speed
![]() Do not use the trocar that comes with many chest tubes. Trocar use is associated with solid organ injury.
Do not use the trocar that comes with many chest tubes. Trocar use is associated with solid organ injury.
![]() We recommend inserting the chest tube over a finger that remains in the thorax, to minimize the likelihood of a misdirected chest tube. When a chest tube is advanced blindly through a track, subcutaneous placement is a common complication.
We recommend inserting the chest tube over a finger that remains in the thorax, to minimize the likelihood of a misdirected chest tube. When a chest tube is advanced blindly through a track, subcutaneous placement is a common complication.
![]() Clamp both ends of the tube during insertion to avoid being contaminated by fluid
Clamp both ends of the tube during insertion to avoid being contaminated by fluid
![]() Gently but assertively advance the chest tube completely into the pleural space
Gently but assertively advance the chest tube completely into the pleural space
![]() Avoid causing a contralateral pneumothorax by not directing the tube toward the mediastinum
Avoid causing a contralateral pneumothorax by not directing the tube toward the mediastinum
![]() Cognitive
Cognitive
![]() Tube thoracostomy for unstable patients, as well as tube thoracostomy for stable patients without complicated lung disease (e.g., primary spontaneous pneumothorax), is well within the domain of emergency medicine. Caution and consultation are advised in placing chest tubes on stable patients with complicated lung disease.
Tube thoracostomy for unstable patients, as well as tube thoracostomy for stable patients without complicated lung disease (e.g., primary spontaneous pneumothorax), is well within the domain of emergency medicine. Caution and consultation are advised in placing chest tubes on stable patients with complicated lung disease.
![]() Primary spontaneous pneumothorax can and often should be managed with less invasive strategies such as placement of a pigtail catheter, needle aspiration, or, in some cases, observation alone
Primary spontaneous pneumothorax can and often should be managed with less invasive strategies such as placement of a pigtail catheter, needle aspiration, or, in some cases, observation alone
![]() Stable patients (especially older patients or patients with underlying lung disease) thought to have pneumothorax may benefit from computed tomography imaging, as blebs can mimic the appearance of pneumothorax on plain film
Stable patients (especially older patients or patients with underlying lung disease) thought to have pneumothorax may benefit from computed tomography imaging, as blebs can mimic the appearance of pneumothorax on plain film
![]() For a pneumothorax, direct the tube superiorly and anteriorly. For hemothorax, direct the tube posteriorly.
For a pneumothorax, direct the tube superiorly and anteriorly. For hemothorax, direct the tube posteriorly.
![]() If there is no lung reexpansion after chest tube placement, consider the following: (1) the tube may not be in the pleural cavity; (2) the most proximal hole is outside the chest cavity; and (3) there is a large air leak from the tracheobronchial tree.
If there is no lung reexpansion after chest tube placement, consider the following: (1) the tube may not be in the pleural cavity; (2) the most proximal hole is outside the chest cavity; and (3) there is a large air leak from the tracheobronchial tree.
![]() Immediate drainage of more than 1,000 mL of blood from the pleural cavity or continued output of at least 200 mL/h is an indication for thoracotomy
Immediate drainage of more than 1,000 mL of blood from the pleural cavity or continued output of at least 200 mL/h is an indication for thoracotomy
Related posts:
Stay updated, free articles. Join our Telegram channel

Full access? Get Clinical Tree


