![]() Diagnostic: Acquisition of pleural fluid for analysis
Diagnostic: Acquisition of pleural fluid for analysis
![]() Therapeutic: Relief of respiratory distress caused by pleural fluid
Therapeutic: Relief of respiratory distress caused by pleural fluid
CONTRAINDICATIONS
![]() Absolute
Absolute
![]() Traumatic hemo- or pneumothorax (tube thoracostomy is more appropriate)
Traumatic hemo- or pneumothorax (tube thoracostomy is more appropriate)
![]() Relative
Relative
![]() Platelet count <50,000
Platelet count <50,000
![]() Prothrombin time (PT)/partial thromboplastin time (PTT) >2 × normal
Prothrombin time (PT)/partial thromboplastin time (PTT) >2 × normal
![]() Cutaneous infection (e.g., herpes zoster)
Cutaneous infection (e.g., herpes zoster)
![]() Mechanical ventilation (small pneumothorax can become a tension)
Mechanical ventilation (small pneumothorax can become a tension)
![]() Uncooperative or agitated patient
Uncooperative or agitated patient
![]() Effusion contralateral to a prior pneumonectomy side
Effusion contralateral to a prior pneumonectomy side
RISKS
Generally an elective procedure. Informed consent is required.
![]() Injury to lung (tube thoracostomy may be required if a pneumothorax develops)
Injury to lung (tube thoracostomy may be required if a pneumothorax develops)
![]() Infection (sterile technique will be utilized)
Infection (sterile technique will be utilized)
![]() Injury to liver or spleen
Injury to liver or spleen
![]() Pain (local anesthesia will be given)
Pain (local anesthesia will be given)
![]() Local bleeding
Local bleeding
LANDMARKS
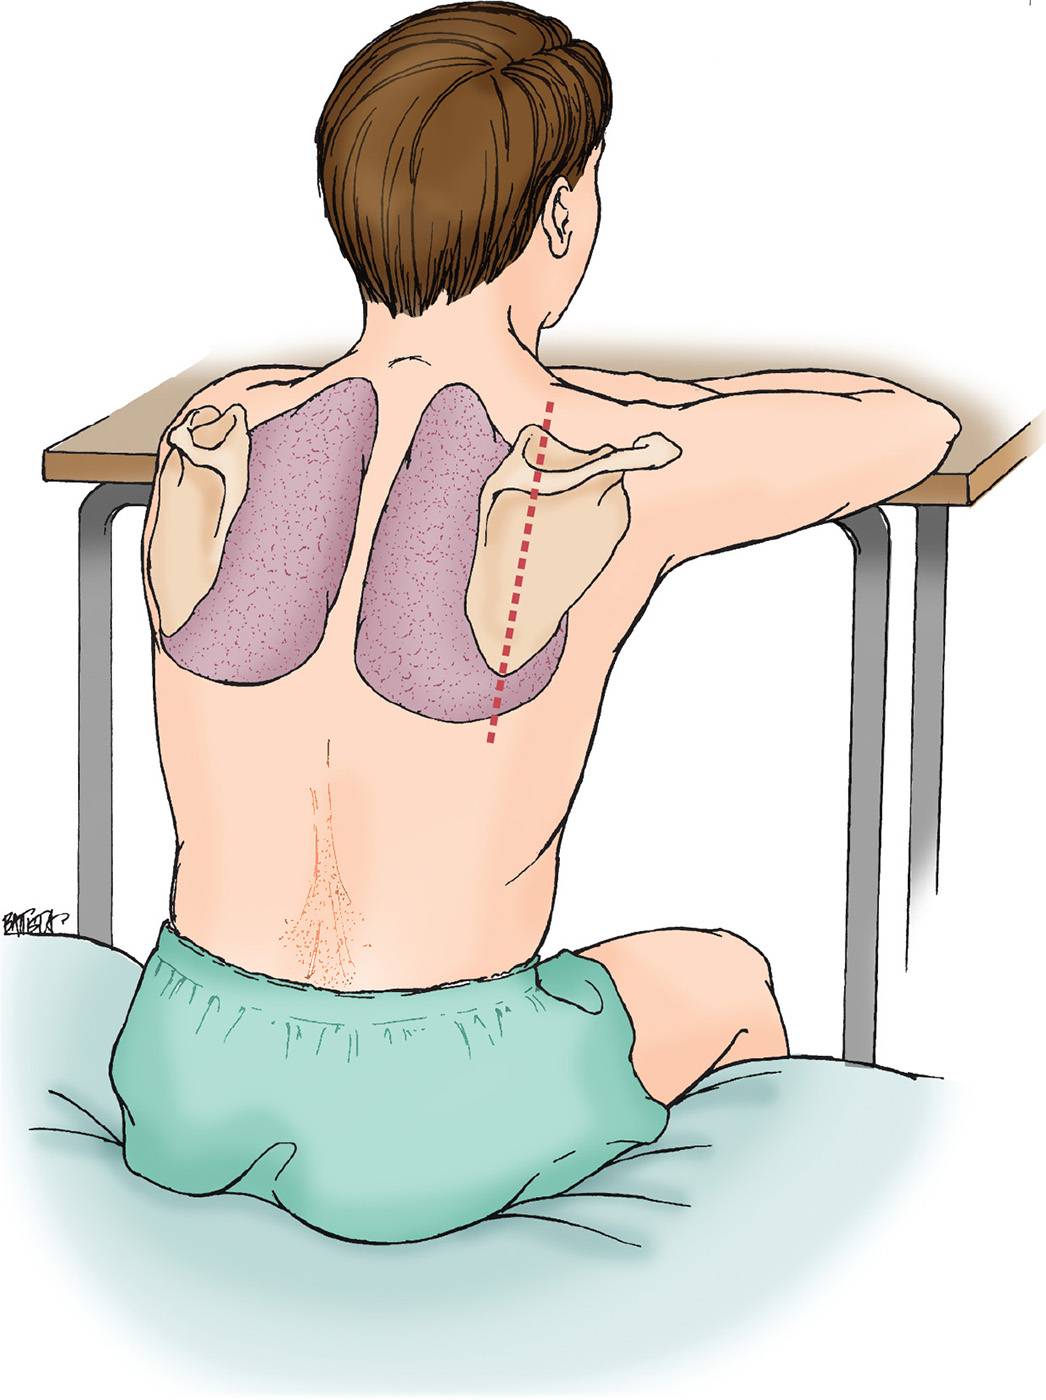
![]() Posterior approach is most common
Posterior approach is most common
![]() Identify the midscapular line and mark the site one to two rib spaces below the superior portion of the effusion
Identify the midscapular line and mark the site one to two rib spaces below the superior portion of the effusion
![]() Intercostal neurovascular bundle runs along the inferior portion of the rib. The needle should be inserted superiorly (FIGURE 8.1).
Intercostal neurovascular bundle runs along the inferior portion of the rib. The needle should be inserted superiorly (FIGURE 8.1).
![]() Hemidiaphragm changes level with respiration. A thoracentesis should not be performed below the eighth intercostal space, given the risk for splenic or hepatic injury.
Hemidiaphragm changes level with respiration. A thoracentesis should not be performed below the eighth intercostal space, given the risk for splenic or hepatic injury.
TECHNIQUE
![]() General Basic Steps
General Basic Steps
![]() Preparation
Preparation
![]() Identify site
Identify site
![]() Sterilize
Sterilize
![]() Analgesia
Analgesia
![]() Needle insertion
Needle insertion
![]() Aspiration
Aspiration
![]() Preparation
Preparation
![]() Place the patient on oxygen
Place the patient on oxygen
![]() Place the patient in upright (most common), lateral decubitus, or supine position
Place the patient in upright (most common), lateral decubitus, or supine position
![]() Arrange materials on a sterile towel (FIGURE 8.2)
Arrange materials on a sterile towel (FIGURE 8.2)
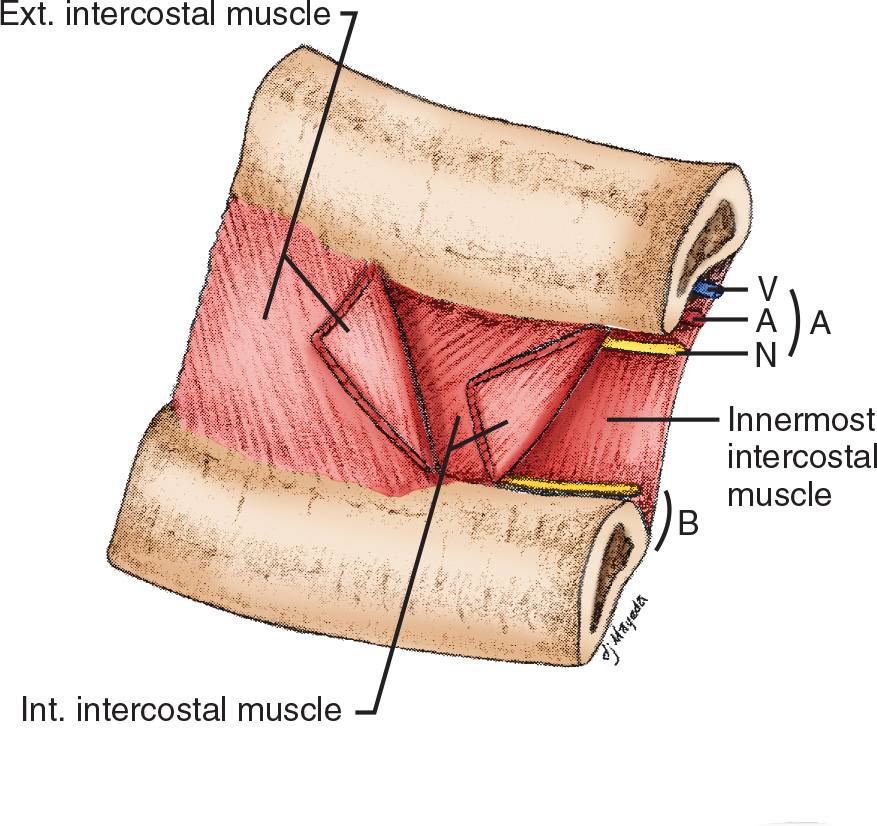
FIGURE 8.1 Relations of structures within an intercostal space (A). Intercostal vessels and nerves are shown in (B). Collateral vessels are shown. A, artery; V, vein; N, nerve.
![]() Identify the Thoracentesis Site
Identify the Thoracentesis Site
![]() Dullness to percussion, decreased breath sounds, and decreased tactile fremitus can be used to identify the superior margin of the effusion
Dullness to percussion, decreased breath sounds, and decreased tactile fremitus can be used to identify the superior margin of the effusion
![]() Ultrasound is more accurate than physical examination for identifying effusions
Ultrasound is more accurate than physical examination for identifying effusions
![]() Mark needle insertion site one to two rib spaces below the superior margin of the effusion
Mark needle insertion site one to two rib spaces below the superior margin of the effusion
![]() Sterilize
Sterilize
![]() Sterilize a wide area surrounding the insertion site
Sterilize a wide area surrounding the insertion site
![]() Drape the area with sterile towels
Drape the area with sterile towels
![]() Observe sterile technique for the remainder of the procedure
Observe sterile technique for the remainder of the procedure
![]() Analgesia
Analgesia
![]() Use lidocaine with epinephrine (1% lidocaine is 10 mg/mL of solution). Usually 5 to 10 mL is required.
Use lidocaine with epinephrine (1% lidocaine is 10 mg/mL of solution). Usually 5 to 10 mL is required.
![]() Inject the subcutaneous tissue with a small-bore (25-gauge) needle and raise a wheal at the superior margin of the selected rib in the midscapular or posterior axillary line
Inject the subcutaneous tissue with a small-bore (25-gauge) needle and raise a wheal at the superior margin of the selected rib in the midscapular or posterior axillary line
![]() Alternating between aspiration and injection, advance to the superior portion of the posterior rib and anesthetize the periosteum
Alternating between aspiration and injection, advance to the superior portion of the posterior rib and anesthetize the periosteum
![]() Gently advance the needle over the superior portion of the rib while infiltrating with lidocaine
Gently advance the needle over the superior portion of the rib while infiltrating with lidocaine
![]() Slowly advance the needle while aspirating, until pleural fluid is aspirated. Withdraw the needle 1 to 2 mm and inject 2 to 4 mL of lidocaine to anesthetize the parietal pleura. Though the visceral pleura are not innervated with pain fibers, the parietal pleura are quite sensitive.
Slowly advance the needle while aspirating, until pleural fluid is aspirated. Withdraw the needle 1 to 2 mm and inject 2 to 4 mL of lidocaine to anesthetize the parietal pleura. Though the visceral pleura are not innervated with pain fibers, the parietal pleura are quite sensitive.
![]() Mark the depth of the chest wall by grasping the needle at the level of the skin with either your thumb and index finger or a Kelly clamp and withdraw the needle
Mark the depth of the chest wall by grasping the needle at the level of the skin with either your thumb and index finger or a Kelly clamp and withdraw the needle
![]() Needle Insertion
Needle Insertion
![]() Make a stab incision parallel to the rib at the marked site for easier insertion of the thoracentesis needle
Make a stab incision parallel to the rib at the marked site for easier insertion of the thoracentesis needle
![]() Attach a 60-mL syringe to the catheter-clad needle. Insert the thoracentesis needle, with the bevel inferiorly, through the skin over the selected rib.
Attach a 60-mL syringe to the catheter-clad needle. Insert the thoracentesis needle, with the bevel inferiorly, through the skin over the selected rib.
![]() Advance the needle over the superior portion of the posterior rib, aspirating until pleural fluid is encountered
Advance the needle over the superior portion of the posterior rib, aspirating until pleural fluid is encountered
![]() As the catheter enters the pleural space, angle the needle caudally and push the catheter off the needle into the pleural space
As the catheter enters the pleural space, angle the needle caudally and push the catheter off the needle into the pleural space
![]() Occlude the lumen of the catheter (FIGURE 8.3)
Occlude the lumen of the catheter (FIGURE 8.3)
![]() Drain Pleural Fluid
Drain Pleural Fluid
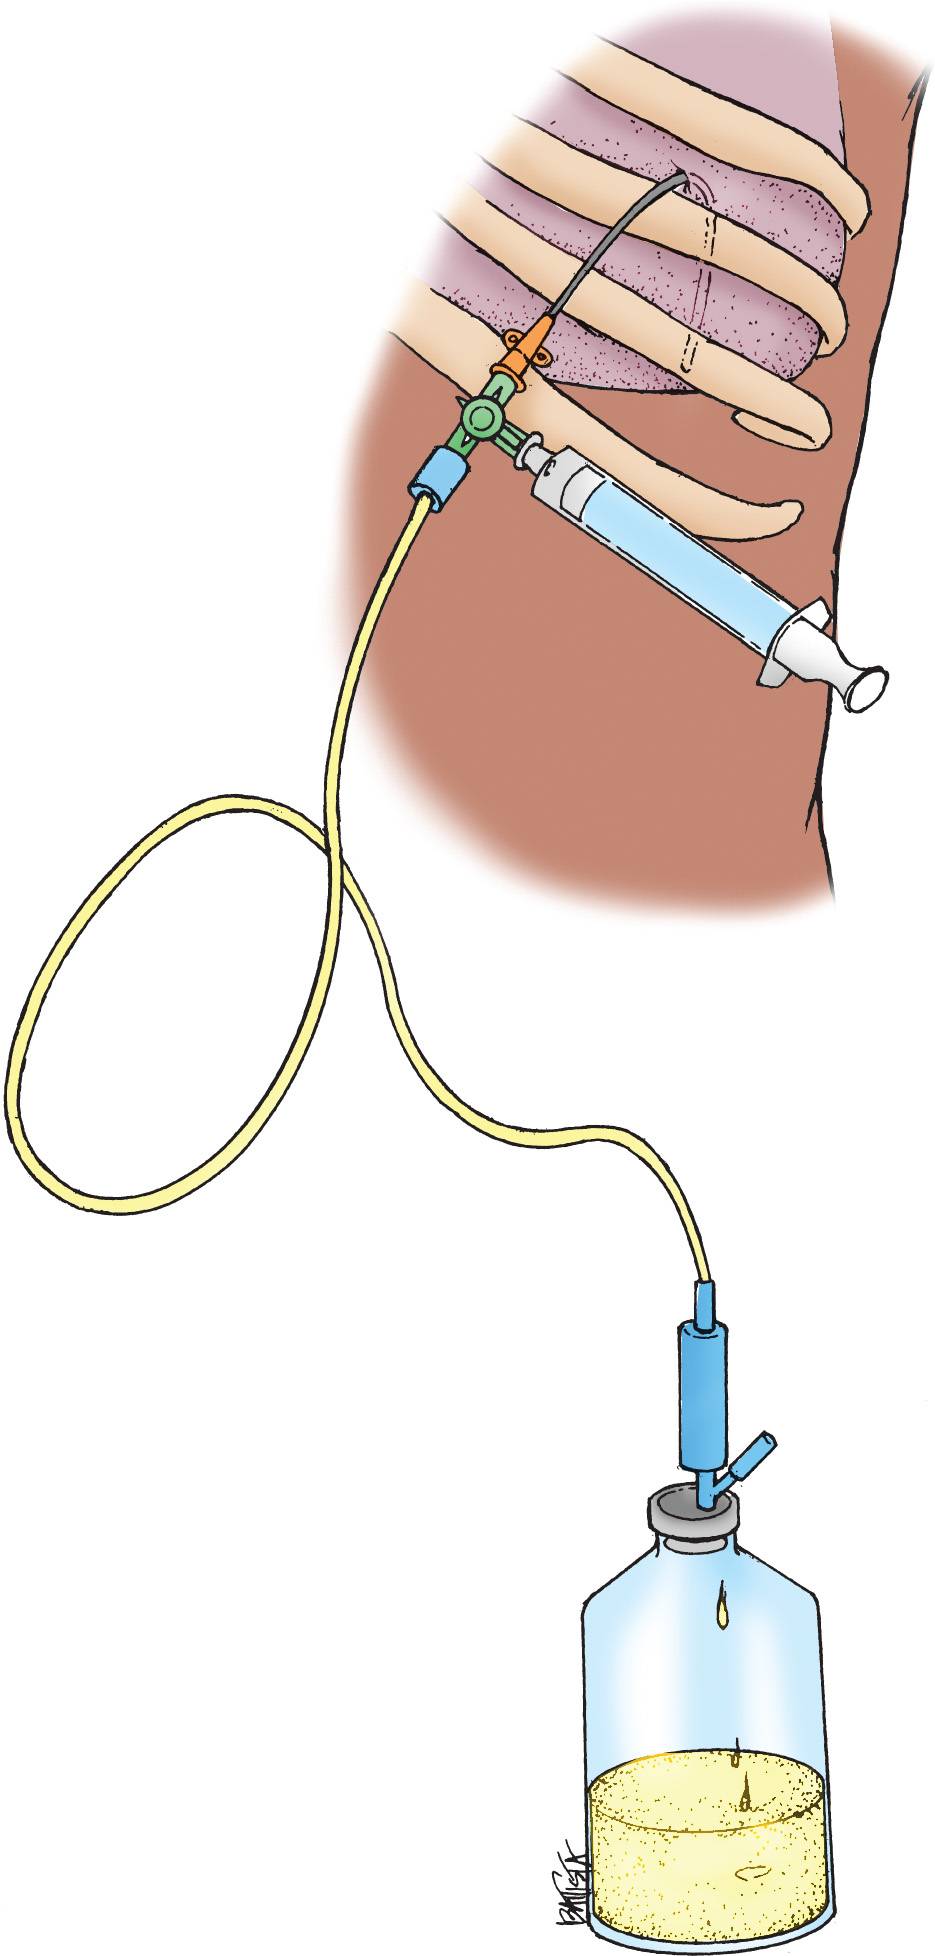
![]() Attach the three-way stopcock to the catheter hub. Set the stopcock valve to occlude the catheter port.
Attach the three-way stopcock to the catheter hub. Set the stopcock valve to occlude the catheter port.
![]() Attach the 60-mL syringe to one port of the three-way stopcock
Attach the 60-mL syringe to one port of the three-way stopcock
![]() Turn the stopcock valve to connect the syringe with the catheter and withdraw fluid from the pleural space. Turn the stopcock to connect the syringe to the intravenous tubing and empty the syringe into the collection bag or bottle. Continue this procedure until no further fluid drainage is desired.
Turn the stopcock valve to connect the syringe with the catheter and withdraw fluid from the pleural space. Turn the stopcock to connect the syringe to the intravenous tubing and empty the syringe into the collection bag or bottle. Continue this procedure until no further fluid drainage is desired.
![]() Postprocedure
Postprocedure
![]() When no further fluid can be withdrawn, ask the patient to hum/exhale while the catheter is removed
When no further fluid can be withdrawn, ask the patient to hum/exhale while the catheter is removed
![]() Cover the insertion site with a sterile dressing or adhesive bandage (Band-Aid)
Cover the insertion site with a sterile dressing or adhesive bandage (Band-Aid)
![]() Send a Red-top specimen tube (for Gram staining and culture) and a Purple-top specimen tube (for cell count) to the laboratory
Send a Red-top specimen tube (for Gram staining and culture) and a Purple-top specimen tube (for cell count) to the laboratory
![]() Indications for chest radiography are:
Indications for chest radiography are:
![]() Aspiration of air
Aspiration of air
![]() Hemodynamic instability
Hemodynamic instability
![]() Shortness of breath during the procedure
Shortness of breath during the procedure
![]() Multiple needle passes
Multiple needle passes
![]() Prior chest radiation therapy
Prior chest radiation therapy
![]() Prior thoracentesis
Prior thoracentesis
![]() Hemodynamic and respiratory monitoring for 1 to 2 hours is recommended
Hemodynamic and respiratory monitoring for 1 to 2 hours is recommended
Related posts:
Stay updated, free articles. Join our Telegram channel

Full access? Get Clinical Tree


