Emergency venous access for fluid resuscitation and drug infusion
 Central venous pressure and oxygen monitoring
 Infusions requiring central venous administration (vasopressors, hyperosmolar solutions, hyperalimentation)
 Routine venous access due to inadequate peripheral IV sites
 Introduction of pulmonary artery catheter
 Introduction of transvenous pacing wire
CONTRAINDICATIONS
 No absolute contraindications
 Relative Contraindications
 Coagulopathic patients (inability to compress)
 Overlying infection, burn, or skin damage at puncture site
 Distorted anatomy or trauma at the cannulation site
 Combative or uncooperative patients
 Penetrating trauma with suspected proximal vascular injury
 Pneumothorax on contralateral side (risk of bilateral pneumothoraces)
 Chronic obstructive pulmonary disease (COPD)
RISKS/CONSENT ISSUES
 Pain
Pain
 Local bleeding and hematoma
 Infection
 Pneumothorax/hemothorax (necessitating chest tube)
 General Basic Steps
 Analgesia
 Insertion
 Seldinger technique
 Dilation
 Catheter insertion
 Confirmation
 Flush and secure
LANDMARKS
Right subclavian vein (SCV) approach is preferred because (1) pleural dome is lower on the right and (2) thoracic duct is on the left.
 Infraclavicular Approach (FIGURE 24.1)
 Place the left index finger on the suprasternal notch and the thumb on the costoclavicular junction
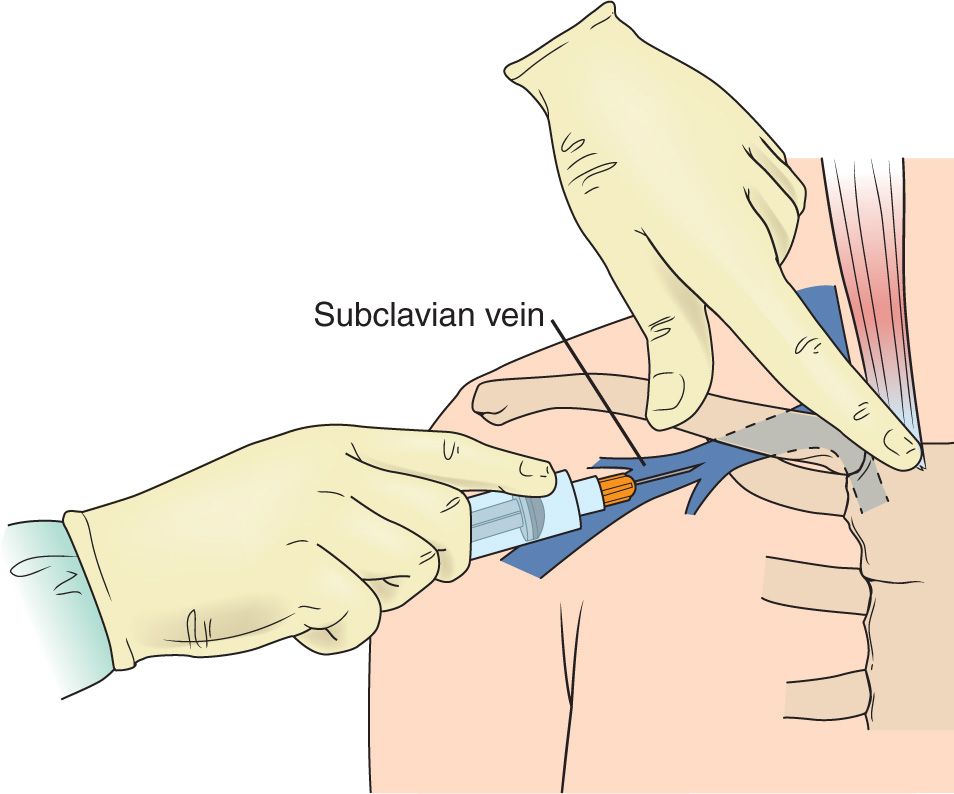
FIGURE 24.1 Infraclavicular approach to subclavian vein cannulation. Needle insertion at the bisection of the medial and middle thirds of the clavicle. Aim the needle toward the suprasternal notch.
 Needle insertion is at the bisection of the medial and middle thirds of the clavicle
 Aim the needle toward suprasternal notch
 Needle bevel is oriented inferomedially to facilitate wire entry
 Supraclavicular Approach (FIGURE 24.2)
 Needle insertion is just above the clavicle, 1 cm lateral to the insertion of clavicular head of sternocleidomastoid (SCM)
 Aim to bisect angle between SCM and clavicle with the needle tip pointing toward the contralateral nipple
 Needle bevel is oriented medially
SUPPLIES
 Central Venous Catheter Kit
 Drapes, chlorhexidine prep (2), gauze
 Catheter (multiport, cordis, or hemodialysis)
 Guidewire within plastic sheath
 Lidocaine, anesthesia syringe, and small-gauge needle
 Three-inch introducer needle and syringe
 Dilator
 Scalpel
 Suture
 Sterile gloves, sterile gown, sterile cap and mask
 Sterile drapes
 Sterile saline flushes
 Sterile port caps
 Ultrasound machine (optional)
 Sterile ultrasound probe cover with sterile gel (optional)
TECHNIQUE
 Patient Preparation
 Cardiac monitoring to detect dysrhythmias triggered by the wire being advanced into the right ventricle
 Supplemental oxygen and continuous pulse oximetry monitoring
 Lower the head of the bed to 15 to 30 degrees in Trendelenburg position
 Place a rolled up towel or sheet in between the patient’s shoulder blades to elevate the patient’s clavicle and provide better access to the SCV (optional)
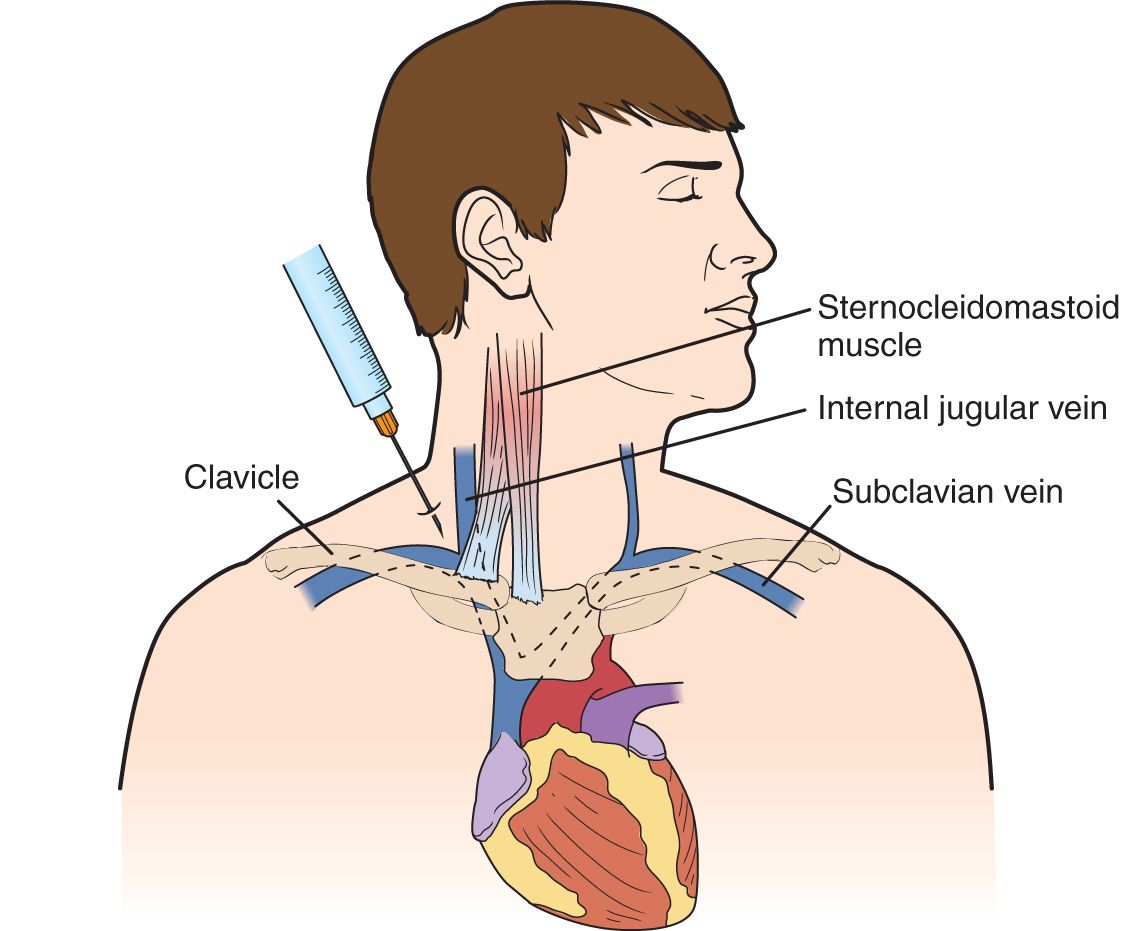
FIGURE 24.2 Supraclavicular approach to subclavian vein cannulation. Needle insertion is just above the clavicle, 1 cm lateral to the insertion of clavicular head of sternocleidomastoid (SCM). Aim to bisect angle between SCM and clavicle with the needle tip pointing toward the contralateral nipple. The needle tip is pointed 10 degrees above horizontal.
 Place the ipsilateral arm in abduction
 Sterilize clavicular insertion site, including ipsilateral neck in case subclavian vascular access fails and internal jugular (IJ) vascular access is necessary
 Wear surgical cap, eye protection, mask, sterile gown and gloves
 Drape with sterile sheets to cover the patient’s head and legs
Note: Unless immediate emergent access is necessary, the procedure must be performed in full sterile technique (i.e., cap, eye protection, mask, sterile gown, and sterile gloves).
 Analgesia
 Use a small-bore needle (25 gauge) to anesthetize the skin and subcutaneous tissue with 1% lidocaine
 Insertion
 Infraclavicular Approach
 Place the left index finger on the suprasternal notch and the thumb on the costoclavicular junction
 The needle insertion is at the bisection of medial and middle thirds of the clavicle
 Aim the needle toward the suprasternal notch with the bevel oriented inferomedially
 At a shallow angle to the skin, advance the needle just posterior to the clavicle at the junction of middle and medial thirds
 Apply posterior pressure on the needle to direct it under the clavicle, aiming toward suprasternal notch
 The needle should be parallel to the bed as it is advanced. Avoid advancing the needle posteriorly into the dome of the lung.
 Aspirate continuously while advancing the needle
 If redirecting the needle, always withdraw the needle to the level of skin first
 Once the vessel is located, free-flowing venous blood is aspirated
 Stabilize and hold the introducer needle in place with the nondominant hand
 Gently remove the syringe from the needle and occlude the hub with your thumb to minimize the risk of air embolism
 Supraclavicular Approach
 The needle insertion is just above the clavicle, 1 cm lateral to the insertion of clavicular head of SCM
 Aim to bisect the angle between SCM and clavicle with the tip pointing just caudal to the contralateral nipple
 Direct the needle 10 to 15 degrees upward from the horizontal plane, just posterior to the clavicle, again aiming just caudal to the contralateral nipple
 The needle bevel is oriented medially
 Note that the SCV is found more superficially in the supraclavicular approach than in the infraclavicular approach
 Aspirate continuously while advancing the needle
 If redirecting the needle, always withdraw the needle to the level of skin first
 Once the vessel is located, free-flowing venous blood is aspirated. Successful puncture usually occurs at a depth of 2 to 3 cm.
 Stabilize and hold the introducer needle in place with the nondominant hand
 Gently remove the syringe from the needle and occlude the hub with your thumb to minimize the risk of air embolism
 Seldinger Technique
 Advance the guidewire through the introducer needle. The wire should pass easily. Do not force the guidewire.
 Always hold on to the guidewire with one hand. Never let go of the guidewire.
 If resistance is met, withdraw the wire and rotate it, adjust the angle of needle entry, or remove the wire and reaspirate with the syringe to ensure the needle is still in the vessel
 When at least half of the guidewire is advanced, remove the needle over the wire. Keep one hand holding the wire at all times.
 Make a superficial skin incision with the bevel of the scalpel blade angled away from wire
 Ensure the incision is large enough to allow easy passage of the dilator
 Dilation
 Thread the dilator over the guidewire, always holding on to the wire
 Advance the dilator through the skin into the vessel with a firm, twisting motion while holding the guidewire with the nondominant hand
 Remove the dilator, leaving the guidewire in place
 Catheter Insertion
 Thread the catheter over the wire and retract the wire until it emerges from the catheter’s port
 While holding the guidewire, advance the catheter through the skin into the vessel to the desired depth. Optimal depth depends on patient size and is typically 10 to 15 cm for the right SCV and 14 to 19 cm for the left SCV.
 Withdraw the guidewire through the catheter
 Use a syringe to aspirate blood from the catheter to confirm placement in the vein
 Confirmation
 Manometry
 Blood gas analysis
 Sonographic confirmation of the catheter in the vein
 Post procedure chest x-ray (CXR)
 Confirm the catheter tip is in the superior vena cava just proximal to the right atrium
 Rule out pneumothorax
 Flush and Secure
 Aspirate, flush, and heplock all central line lumens
 Suture the catheter to the skin by using silk or nylon sutures
 Cover the skin insertion site with sterile dressing (bacteriostatic if available)
COMPLICATIONS
 Dysrhythmias
 Arterial puncture or cannulation
 Vessel laceration or dissection
 Pneumothorax or hemothorax
 Brachial plexus injury
 Phrenic nerve injury
 Tracheal puncture or endotracheal cuff perforation
 Guidewire embolism
 Air embolism
 Catheter tip embolism
 Catheter malposition
 Venous thrombosis
 Insertion site cellulitis
 Line sepsis
 Local hematoma
ULTRASOUND-GUIDED CENTRAL VENOUS ACCESS
 Use of ultrasound guidance to place IJ and femoral central venous catheters has been shown to increase success rates and decrease complications
 Current literature suggests that the use of ultrasound guidance can be helpful when placing subclavian central venous catheters
SONOGRAPHIC TECHNIQUE
 Place a high-frequency linear probe (5–10 MHz) just inferior to the middle and medial thirds of the clavicle with the probe marker pointed cephalad (a probe with a smaller footprint will allow better visualization of the subclavian anatomy)
 Obtain a transverse view of SCV inferior to the clavicle and superior to the 1st rib. Use color flow and/or Doppler to distinguish the artery from vein (FIGURE 24.3).
 Rotate the probe 90 degrees, visualizing the vein continuously, and obtain a longitudinal view of SCV. Because of the clavicle, the probe may need to be moved laterally to visualize the SCV as it becomes the axillary vein distal to the 1st rib.
 Use color flow and/or Doppler to distinguish the vein from artery (FIGURE 24.4)
 Maintain a longitudinal view of the SCV (stabilize the hand holding the probe on the patient’s chest to keep the probe in position)
 Insert the introducer needle at a 30- to 45-degree angle to the skin in line with the long axis of the ultrasound probe
 Note that the probe marker is facing the needle entry site and the needle should enter the skin directly next to the probe (FIGURE 24.5)
 The needle must be parallel to the long axis of the ultrasound probe to be visualized
 This in-plane approach allows direct visualization of the entire needle shaft and tip as it enters the vein and decreases the risk of pneumothorax and arterial puncture
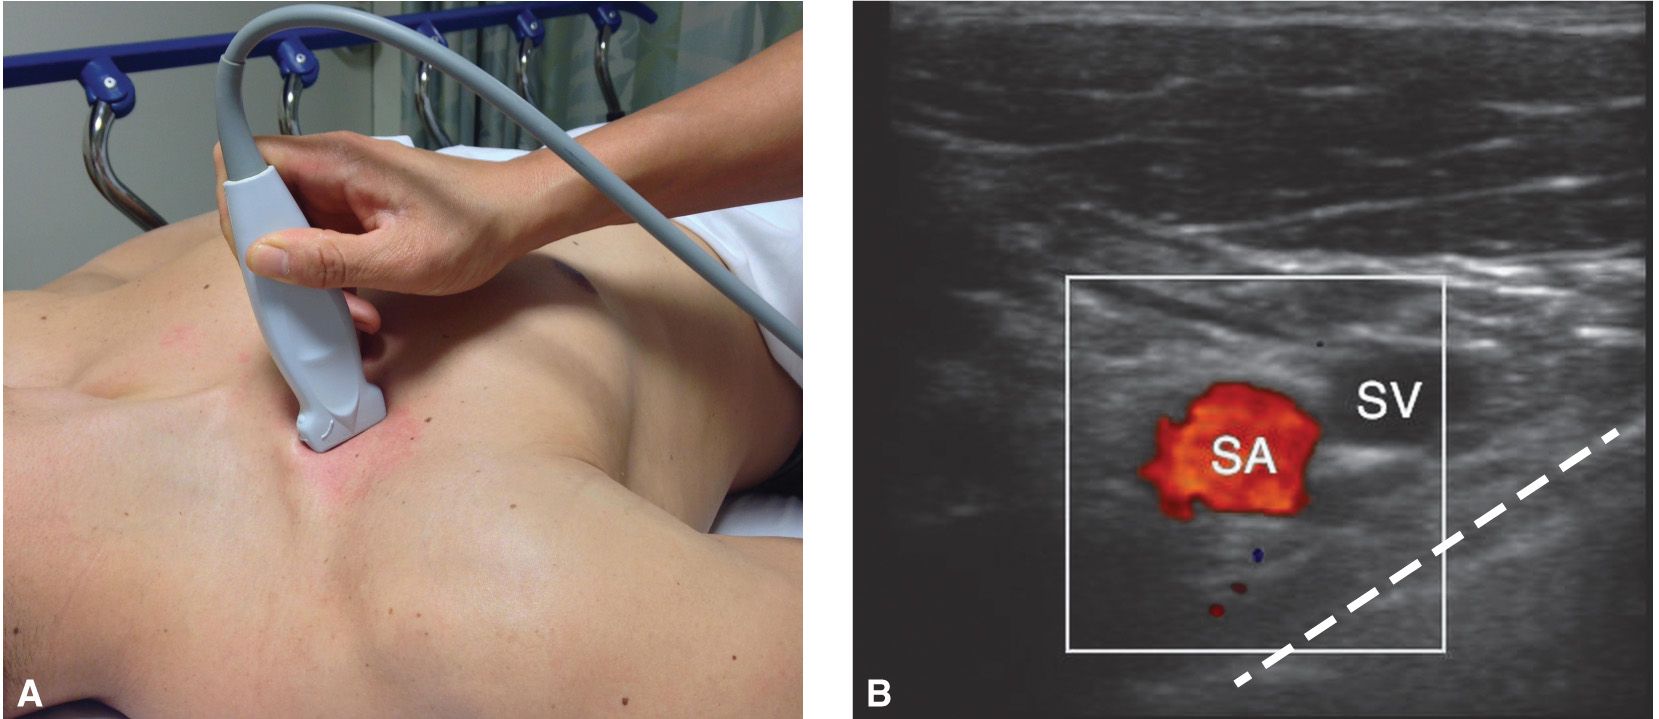
FIGURE 24.3 A: Ultrasound probe inferior to the clavicle with probe marker pointed cephalad. B: Subclavian artery (SA, red) and subclavian vein (SCV) with color flow just superior to the 1st rib and pleural line (dashed line).
Related posts:



Stay updated, free articles. Join our Telegram channel

Full access? Get Clinical Tree