CHAPTER 28
Sacroiliac Joint Denervation by Using Simplicity III
INTRODUCTION
The Simplicity III procedure is a technique to denervate the sacroiliac (SI) joint by creating a thermal “strip” lesion along the sacrum lateral to the S1-S4 neural foramina and medial to SI jointline. The procedure is usually combined with radiofrequency ablation of the ipsilateral L5 primary dorsal ramus. Though multiple methods have been endorsed to denervate the SI joint, the Simplicity III procedure is a convenient and effective alternative for achieving maximal disruption of nociceptive input from the SI joint. The Simplicity III is a rigid tripolar probe with a sharp-tip that creates an adequate strip lesion that is technically easy to perform. Its pre-curved shape closely approximates the curvature of the sacrum, and it does not require an introducer.
ANATOMY
• The sacroiliac (SI) joint is the largest axial joint in the body and functions to provide axial stability and to dissipate truncal loads to the lower extremities.
• It displays a great deal of inter- and intrapatient anatomical variability with respect to size, shape, and contour (Figure 28-1A, B).
• The SI joint is classified as a diarthrodial joint because it contains synovial fluid however, only the anterior third of the joint at the interface of the sacrum and ilium is truly synovial. The remainder of the joint is a fibrous articulation of the sacrum and ilium, comprised of ligamentous and cartilaginous connections.
• The joint is supported by muscles that also serve to deliver regional muscular forces to the pelvic bones. As the musculature of the SI joint is shared with the hip joint (eg, gluteus medius/minimus, biceps femoris, and piriformis), it cannot function independently.
• The joint is subject to shearing forces in a multitude of directions, but rotates only minimally about all 3 axes.
• From puberty onward, the joint begins to display degenerative changes, which are inevitable by the eighth decade of life.
• Though the exact mechanism of SI joint pain is likely multifactorial and not completely understood. The pathology of the joint has been implicated as a cause of chronic low back pain in up to 30% of all afflicted patients.
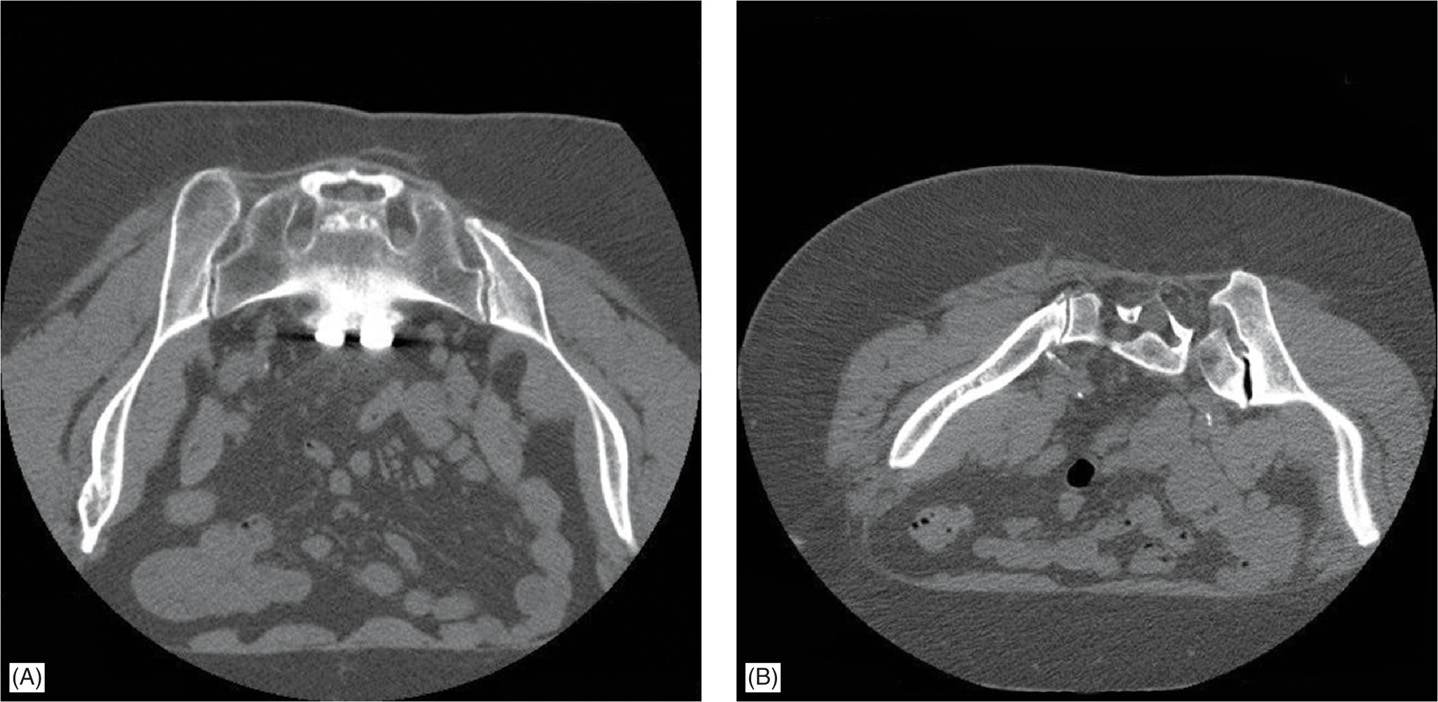
Figure 28-1. (A) Side-to-side anatomical variation in CT scan of the same patient. (B) Side-to-side anatomical variation in CT scan of the same patient. (Used with permission from Harold Cordner, MD)
NEUROANATOMY
• The innervation of the SI joint continues to be a topic of great debate.
• The posterior surface of the joint has been described to have sensory innervation originating as cephalad as the medial branches of the posterior primary ramus of L4 with contributions from L5 primary dorsal ramus.
• The lateral branches from sacral nerve roots from S1 to S4 supply most of posterior surface of the SI joint.
• The anterior joint has also been postulated to be innervated by a variety of sources, ranging from the ventral ramus of L4 to the ventral ramus of S2.
• Along the dorsal aspect of the joint, the nerves may run along the periosteum or as far as 8 mm from the bone.
• The diagnostic or therapeutic injections and denervation procedures are targeted to the nerve supply of the posterior aspect of the SI joint.
INDICATIONS
The radiofrequency denervation of the SI joint for the treatment of chronic low back pain secondary to sacroilitis is effective, as adequate evidence exists to support the therapy. However, uniform criteria to identify those patients who would benefit most from the procedure have yet to be developed. The Simplicity III procedure is relatively safe; however, the following criteria should be fulfilled before the denervation of the SI joint:
• Referred pain pattern consistent with a clinical diagnosis of sacroilitis.
• Two or more positive, provocative tests consistent with sacroilitis on physical examination.
• Greater than 50% relief from two diagnostic SI joint injections, with positive intra-articular and periarticular spread of contrast documented, when possible.
BASIC CONCERNS AND CONTRAINDICATIONS
Like any intervention, the risks and benefits of this procedure should be weighed before proceeding, and care should be taken to rule out serious diagnoses that may be coexisting with sacroiliitis, eg, neoplasm, infection, autoimmune disease, fracture. Close attention should be paid to fluoroscopic anatomy to avoid advancing the Simplicity III probe into one of the sacral, neural foramina, and to avoid advancing the probe anteriorly past the sacrum subsequently entering the pelvic cavity. It should be noted that placement of the Simplicity III probe and the creation of its subsequent strip-lesion are often associated with a certain degree of soft-tissue damage causing postoperative myofascial pain and muscle spasm. Patients should be informed to expect these sequalae, and appropriate medications should be prescribed.
Contraindications to Simplicity III radiofrequency neuroablation are as follow:
• Coagulopathy
• Pregnancy (teratogenic effects of radiation)
• Systemic infection, skin infection over puncture site, or immunodeficiency
• Refusal/inability to give informed consent
• Inability to tolerate the prone position
• Inability to tolerate the procedure due to coexisting medical conditions
Preoperative Considerations
• Informed consent should be obtained explaining of all complications including postoperative discomfort secondary to soft-tissue damage, muscle spasm, and periosteal irritation.
• Adherence to strict aseptic technique is of utmost importance. Operating surgeons should be fully gloved and gowned, and the patient should be surgically prepared and sterilely draped.
Selection of Anesthesia
Placement of the Simplicity III probe is inherently associated with disruption of muscular and ligamentous tissue, as well as the periosteum along with process of denervation. Patients will differ in their ability to tolerate the sensations accompanying placement of the probe and prone position necessary for the procedure. Anesthetic techniques aimed at maximizing patient comfort range from local anesthetic infiltration only, to intravenous sedation, monitored anesthesia care (MAC) and general anesthesia. Care must be taken not to exceed appropriate dosage limits of local anesthetic. It is re-recommended to have discussion with an anesthesiologist to determine appropriate anesthetic technique:
• Local anesthetic infiltration only
• Local anesthetic infiltration with intravenous sedation (MAC)
• Neuraxial anesthesia with intravenous sedation.
• General anesthesia with laryngeal mask airway (LMA) or tracheal intubation.
Fluoroscopic Guidance
Two fluoroscopic views are used for placement of the Simplicity III probe:
Anterior-Posterior (AP) View
Start with a straight AP view of the sacrum centering on the ipsilateral SI joint and sacral neural foramina (Figure 28-2). It is of extreme importance to identify the sacral foramina and the ipsilateral SI joint as the lesion track will lie between these two anatomic landmarks. Care must be taken to avoid advancing the probe into one of the sacral neural foramina.
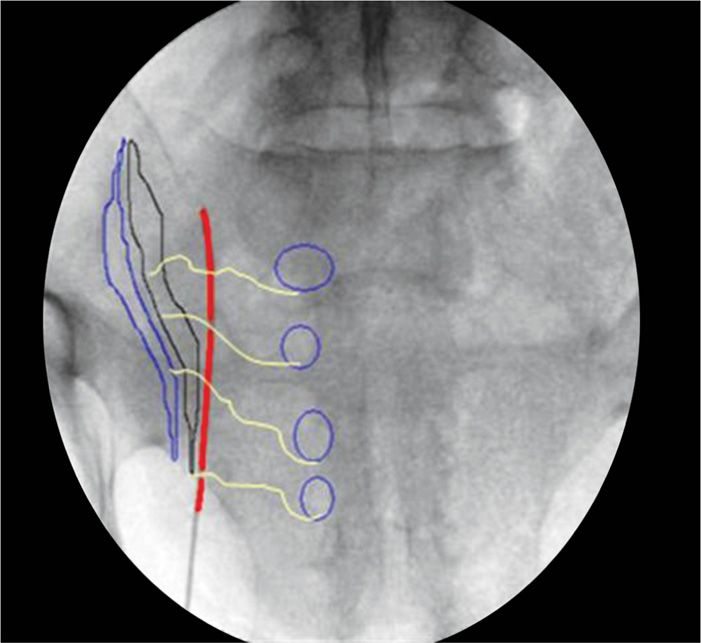
Figure 28-2. AP view of the sacrum with expected final position of the Simplicity III probe. Note the position of the probe lateral to the sacral neural foramina, but medial to the SI joint. The sacral foramina have been outlined in blue, the lesion track along the simplicity 3 probe has been highlighted in red, and the articulating portions of the SI joint have also been traced out.
Lateral View
A true lateral view of the sacrum is also of extreme importance to aid in proper placement of the Simplicity III probe. Care must be taken to ensure that the probe is no more than 1 cm away from the sacrum at any point along the lesion track, and also to ensure that the tip of the probe has advanced to the sacral ala.
• Equipment
• 22-gauge 3.5, 5, and 7-in spinal needles
• 25-gauge skin needle
• 18-gauge needle
• 10-cc syringe for local anesthetic
• Simplicity III radiofrequency probe
• Simplicity III cable NT1100 NeuroTherm generator
• Dispersal (grounding) pad
• 10-in RF cannula with 10 mm active tip and 10-in RF probe for radiofrequency lesioning of the L5 primary dorsal ramus
• Medications
![]() Local anesthetic—lidocaine 1%, with or without 1:200,000 epinephrine
Local anesthetic—lidocaine 1%, with or without 1:200,000 epinephrine
![]() Triamcinolone or methylprednisone (for L5 primary dorsal ramus and for SI joint)
Triamcinolone or methylprednisone (for L5 primary dorsal ramus and for SI joint)
![]() Bupivacaine 0.5% (for L5 primary dorsal ramus)
Bupivacaine 0.5% (for L5 primary dorsal ramus)
The Simplicity III Probe (Figure 28-3)
• It is a rigid tripolar probe with a sharp tip that fits the curvature of sacrum.
• The probe is placed transversely over the lateral branches.
• It provides multiple, independent contacts programming to create total 5 lesions.
• First 2 lesions are bipolar lesions and created in-between first, second, and third electrodes.
• The next three lesions are unipolar and created by individual electrodes.
• Needs separate radiofrequency cannula probe for L4-5 dorsal ramus.
• After activating RF lesioning, it takes 8 minutes to create sacroiliac lesion and 90 seconds for L5 dorsal ramus lesion.
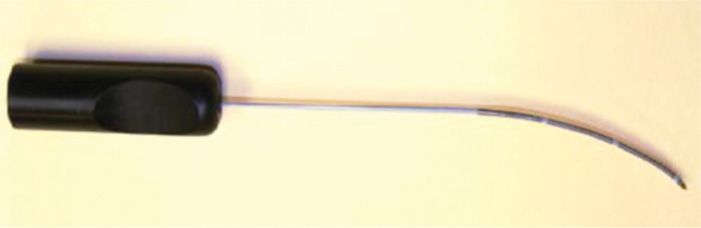
Figure 28-3. Simplicity III probe.
Technique
Patient positioning. The patient should be placed in the prone position on the fluoroscopy table with a pillow under the abdomen to reduce lumbar lordotic curvature. Dispersal (grounding) pad should be placed on the patient’s thigh, and connected to the NT1100 NeuroTherm generator. The patient should then be surgically prepared and sterilely draped.
Selection of skin entry point. Entry point for the Simplicity III probe should be chosen in the AP fluoroscopic view. The optimal entry point is at the lateral, inferior border of the ipsilateral sacrum, approximately 1 cm lateral to and 1 cm caudal to the ipsilateral S3 neural foramen (Figure 28-4).
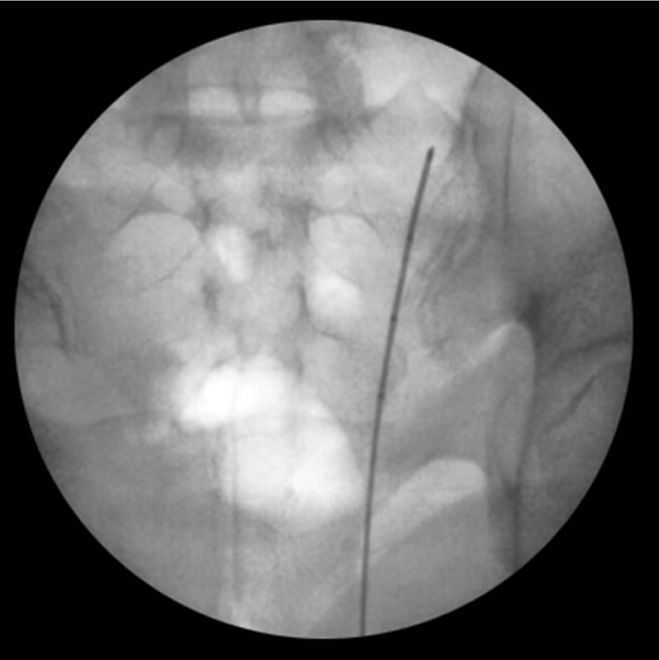
Figure 28-4. AP view of the sacrum with final position of the Simplicity III probe. Note skin entry point and the position of the probe lateral to the sacral neural foramina, but medial to the SI joint. The 3, radio-opaque contacts approximate the lesion track of the “strip” lesion. The yellow “X” marks approximates the entry point for the probe.
Define the lesion track. The lesion track should also be identified in this view, specifically a track lateral to the S1-S4 neural foramina but medial to the SI joint.
Anesthetizing the lesion track. After selecting an entry point, a local anesthetic skin wheal should be created there with the 25-gauge skin needle and lidocaine 1%. Subsequently, the 3.5-in spinal needle should be advanced through the wheal until it comes into contact with periosteum lateral to the S3 foramen, where more local anesthetic is given. Thereafter, a curved 22-gauge 5- or 7-in spinal needle is entered through the skin wheal and directed to come into contact with the periosteum at 1 to 1.5 cm intervals along the lesion track. Each time the needle comes into contact with the periosteum, a 1- to 2-mL aliquot of local anesthetic should be given in the vicinity of the periosteum.
An alternative method of anesthetizing the lesion track has been described, wherein a 3.5-in spinal needle is maneuvered to lay transversely across the lesion track, and a mixture of local anesthetic and steroid is injected as the needle is withdrawn. In our opinion, this is a technically more challenging and time-consuming method, and the former method is preferred in our practice.
PLACEMENT OF THE SIMPLICITY III PROBE
• The Simplicity III probe should be inserted through the previously created skin wheal and advanced to contact with the periosteum at the inferior and lateral portion of the sacrum lateral to S3 foramen.
• It is very important to advance the probe with intermittent fluoroscopic guidance in the anteroposterior (AP) and lateral views to avoid the entry of the probe into a sacral foramen and pelvic cavity.
• Lateral fluoroscopic views are mandatory to ensure that the probe is not advanced below the inferior border of the sacrum into the pelvic cavity.
• The probe is then advanced in a cephalad direction midway between a line passing through sacral foramina and medial border of posterior sacroiliac joint line, keeping constant contact with the sacrum along the previously anesthetized lesion track.
• The probe is advanced through the fibrous ligamentous tissue between the sacrum and ilium along the anesthetized track lateral to the neural foramen and medial to the SI joint.
• Intermittent fluoroscopy in the lateral view is also useful to ensure the probe remains in close contact (>1 cm) with the sacrum along its entire course, and that the probe is dorsal to the ilium. The probe should be advanced until it contacts the sacral ala, and further advancement is impossible.
• The final position of the probe should be verified in the AP and lateral views (Figures 28-4 and 28-5).
• The three active radio opaque electrodes of the probe should lie adjacent to the S1-S4 pathways in the AP view.
• In the lateral view, the probe should lie in close contact (>1 cm) with the sacrum along its curvature, with the most dorsal contact away from the dermis to prevent skin injury.
• If the depth of the last electrode is not adequate and there is risk of skin burns, program the probe to Simplicity II protocol to inactivate the last electrode.
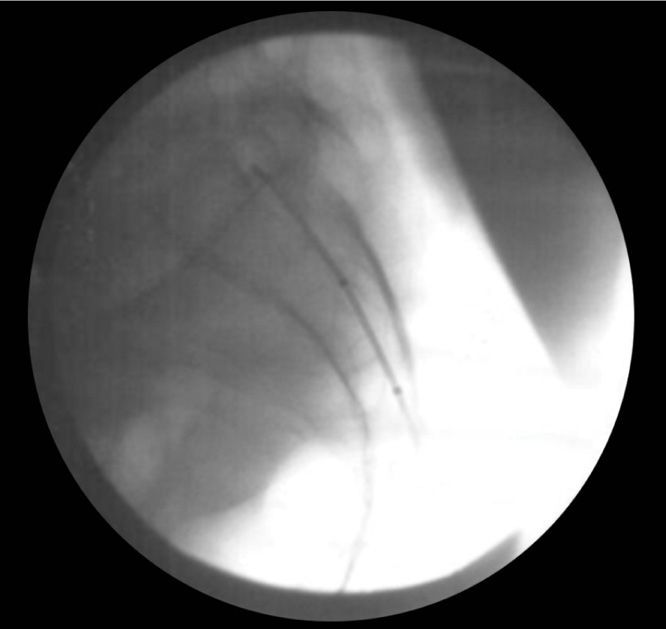
Figure 28-5. Lateral view of the sacrum with final position of the Simplicity III probe. Note the lack of separation between the probe and the dorsal sacrum and the tip of the probe against the sacral ala. Also note that none of the contacts are close to the dermis, ensuring skin injury is prevented.
SIMPLICITY III RADIOFREQUENCY LESIONING PROTOCOL
The Simplicity III probe should be connected to the NT1100 NeuroTherm module with the provided cable, and the preprogrammed Simplicity III, lesioning protocol carried out.
The Simplicity III protocol creates 5 sequential lesions in 5 steps. First 2 are bipolar lesions and created between the first and second, then second and third active electrodes. Next three are monopolar lesions and are created at each of the three active electrodes sequentially (Figure 28-6). Each of the 5 lesions is performed at 80°C, and is 1.5 minutes in duration. At the end of procedure it creates one homogenous, consistent true strip lesion (Figure 28-7). The lesioning protocol may be adjusted to operator preference. At the end of the protocol, the probe should be allowed to cool to body temperature before removed, and verified to be intact.
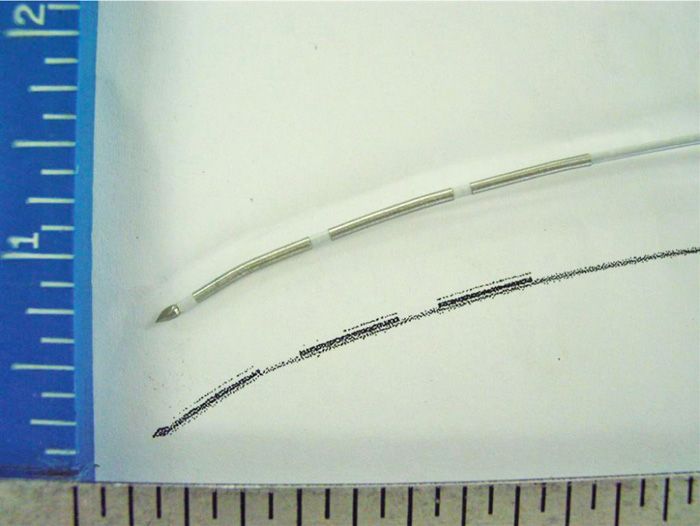
Figure 28-6. Depiction of the Simplicity III lesioning protocol. The first 2 lesions are bipolar lesions between the first/second and second/third electrodes. The next 3 lesions are monopolar lesions at each of the 3 electrodes. The lesions are made sequentially, for 1.5 minutes each at 85°C.
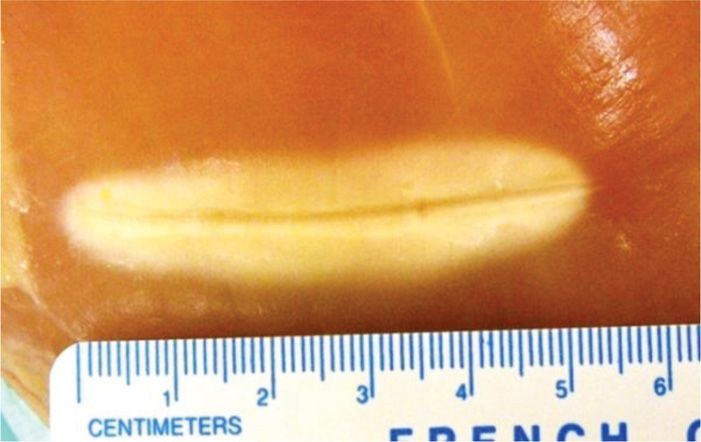
Figure 28-7. Note the strip lesion created by the protocol on a piece of raw meat.
Radiofrequency Lesioning of L5 Primary Dorsal Ramus
This portion of the procedure may be performed prior to Simplicity III probe placement or after Simplicity III lesioning protocol as preferred by the operator (Figure 28-8).
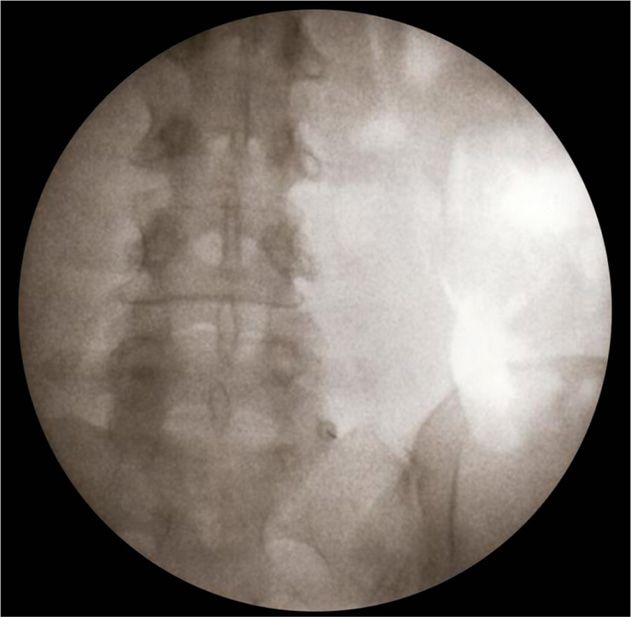
Figure 28-8. Picture of the RF canula in situ for lesioning of L5 dorsal ramus. Use 10-in curved RF with 10 mm active tip.
Postprocedure Follow-Up
The Simplicity III radiofrequency denervation of the SI joint may be performed as an outpatient procedure. The patient should be monitored in the postanesthesia care unit until discharge criteria at the facility are met. The patient may be discharged with a muscle relaxant (eg, diazepam 2-5 mg PO q8h as needed) and an oral analgesic to mitigate postoperative spasm and discomfort. Telephone follow-up 24 hour postprocedure is recommended to ensure lack of complications.
CLINICAL PEARLS AND PITFALLS
• Use an 18-gauge needle to create a stab-incision at the skin-wheal to facilitate percutaneous entry of the Simplicity III probe.
• “Wiggle” the probe from side to side as you advance along the periosteum, so as not to get ensnared. Optimal manipulation of the probe is accomplished using a two-handed technique, with one hand on the probe’s handle, and one hand grasping the probe near the skin. Care should be taken to maintain the curvature of the probe during manipulation.
• Obtain intermittent lateral radiographs as you approach the most convex portion of the sacrum to ensure that the probe remains in close contact with the sacrum at this point and does not begin to advance dorsally over the ilium.
• In extremely slender patients, where the third, active contact is close to the dermis and risks skin injury, use the Simplicity II lesioning protocol. This protocol inactivates the third electrode that is close to skin. It creates one bipolar lesion between the first and second electrodes, followed by two monopolar lesions at the first and second electrodes. As the third contact is not used in the lesioning protocol, the skin remains unharmed. A smaller strip lesion is created, and two such lesions could be created to ensure complete denervation of the S1-S4 lateral branches. The same technique could be used in patients where anatomic variation makes proper probe position impossible (ie, the sacrum is shaped in such a way that all three contacts cannot lie in close proximity to the sacrum).
Related posts:


Stay updated, free articles. Join our Telegram channel

Full access? Get Clinical Tree


