PROCEDURES
MATTHEW R. MITTIGA, MD AND RICHARD M. RUDDY, MD
PREPARATION AND ASSESSMENT OF THE CHILD
A significant challenge to the effective and efficient performance of procedures in pediatric emergency department (ED) patients is the fear and anxiety generated in both children and their caregivers at the prospect of potentially painful procedures. Even when pain can be well controlled, fear can derail even the simplest of procedures. Optimal preparation and assessment of the child and their caregivers can allay fears and anxiety and contribute to procedural success and a positive patient and family experience. Even relatively short procedures can become prolonged and difficult to successfully complete without accurate assessment and optimal preparation.
Certified child life specialists are experts in this preparatory/assessment role and have been increasingly used as part of the care team in EDs with significant pediatric patient volumes. In the absence of a child life specialist, ED staff should be prepared to provide the needed preparation, support with positioning, and distraction techniques to increase success. The child’s developmental maturity and coping skills should be assessed to determine the child’s capability for understanding, tolerating, and cooperating with the procedure. Key considerations for successful preparation of the child and their caregivers include (1) a developmentally appropriate explanation of the procedure using hands-on methods when possible, including pretend medical equipment and models (e.g., dolls); (2) honesty with the child and caregivers about the painful portions of the procedure with details regarding the planned behavioral coping strategies to be employed during the procedure; (3) encouragement of questions about the procedure; and (4) assessment and intervention for parental anxiety, which easily transfers to the pediatric patient if not addressed.
Pain management and coping strategies might include swaddling or oral sucrose in younger infants and breathing techniques, distraction, and visual imagery in preschool and school-aged children. Children are less fearful and distressed when in a sitting position for medical procedures as compared with supine positioning. Positioning a child in a caregiver’s lap can be beneficial if the procedure allows. Potential distraction items include bubbles, toys that light up, books, videos, conversation with the child, and mobile devices with age-appropriate applications. Since younger children are generally in the visual distractor group, something they can see and/or grasp will provide the highest likelihood of successful distraction.
During medical and trauma resuscitation or other acutely life-threatening situations, ED staff should strive to provide a professional staff member to support the family and to address questions in an ongoing fashion. This will allow the medical team to concentrate on the acute care needs of the child while still supporting the family through this difficult situation.
For patients requiring pharmacologic sedation, caregivers should be informed about expected responses based on the patient’s developmental level, potential effects of sedation, the purpose of monitoring equipment that will be attached to their child, and any anticipated discomfort subsequent to the procedure. The assurance that use of these medications can increase safety and may minimize repeated discomfort should be emphasized.
The medical team should consider whether the ED is the appropriate venue in which to perform the procedure. Collaborative discussion with the care team prior to presenting options to the family may be beneficial. Points to consider include the developmental assessment of the child, the anticipated length of the procedure, positioning and management of patient movement, and the need for pharmacologic interventions. Lengthy procedures or a procedure in a patient with a significant inability to cope may deplete resources and might be more safely performed in the operating suite. Consequences and complications of the procedure should be anticipated prior to commencing, with mitigation plans in place as needed, particularly in medically complicated or high-risk patients. Aside from procedures necessary to address immediately life-threatening emergencies, assent and support for the procedure should be sought from the child and parents beforehand. An informative, efficient discussion of risks, benefits, and alternatives almost always reassures the parents of the need for the procedure. Written consent may not be necessary for simple procedures, but standards around which procedures require written consent, what defines an emergency during which written consent can be bypassed, and under what conditions a minor should also assent should be explicitly defined by local ED clinical leadership and hospital policies.
Finally, prior to initiating a procedure on any patient the use of a team time-out before starting should be promoted as part of the ED safety culture. Use of a checklist during the time-out can ensure that the correct procedure is being performed on the correct patient at the correct anatomic location.
POSITIONING AND RESTRAINTS
Indications
Restraint should be considered in the performance of those procedures in which excess movement will be detrimental to the safe and successful completion of the procedure. Excess movement can lead to patient or medical provider injury, prolonged procedural time, and suboptimal procedural outcomes. Physical restraints can be more effective than human restraint and may be necessary in a small proportion of infants, toddlers, and preschool children. Restraint may also carry its own share of psychosocial complications, however, including increased distress, decreased coping, and lasting memories. The risks and benefits of restraint, as well as alternatives, should be weighed appropriately.
In conjunction with restraint, standard methods of pharmacologic sedation and local or regional anesthesia are often indicated. The use of anxiety-reduction techniques by trained staff, typically child life specialists, as well as the continued calm presence of the parents, may be of great benefit to the child.
Complications
1. Erythema, bruising, or edema at points of contact
2. Vascular compromise (restraint too tight or restraint for excessive time)
3. Mistrust and fear at future medical encounters
4. Airway compromise or musculoskeletal injury (rare except in high-risk patients or with unsafe restraint practice)
Procedure
With good distraction and creative positioning, some children will be able to complete procedures without physical restraint. Use the examination prior to the procedure and the period of cleaning and other involvement with the injury to determine how well the patient may tolerate the procedure. If the child is able to remain still during these times, you may be able to avoid restraint altogether. By placing a sheet under the child prior to commencement of the procedure, you can start with the least amount of restraint, but move to the bundling wrap quickly should it become necessary.
Positional Support by Caregiver
Often, the separation from a caregiver may evoke a response that sets the procedure on a difficult course. Child life and other staff may encourage close positioning of the caregiver (i.e., in the bed next to the child or a chair next to the bed) so that the child feels more connected and safe during the procedure. Caregiver presence is often associated with decreased stress, less pain, and increased coping ability in children. Additionally, caregivers want to be present and report less anxiety when in attendance for invasive procedures.
Restraint by Personnel
Various methods can be used to restrain children for simple emergency procedures as listed above. Often, a single assistant can minimize movement of a child. The specific positioning for procedures is illustrated with individual procedures. The assistant’s hold must be firm enough to prevent movement that would make the procedure more difficult to perform or more likely to induce complications. Though uncommon, the use of excessive force may cause superficial or more serious injury. With thorough assessment by the care team, careful preparation and attention to distraction, procedures can be very successful with minimal restraint in a cooperative child.
Bundling Wrap
This is an alternative gentle restraint for use during emergency procedures. With this, the practitioner can easily access the head as well as upper and lower extremities. This method can help infants feel secure and can keep younger toddlers less mobile. Leaving one arm/hand out of the wrap for a parent to hold can make the wrap feel less restrictive as well as increase comfort through parental contact and give the patient an opportunity to hold or touch a distraction item. Older children will generally not tolerate this wrap very well and other methods should be considered. In some settings, using the bundling wrap inside of a papoose (see below) is an acceptable alternative. An injured extremity can be left out of the wrap for better exposure.
Fold a bedsheet on itself so the width measures from the axillae to the heel of the child. Stand the child on the bed and place the bedsheet behind his/her back, under the axilla, and in front of the arms as in Figure 141.1A, with the short end of the sheet tucked behind one arm around the child’s back. With the child standing, wrap the long end of the sheet on the child’s other side, around the back to the front and across the trunk again, finishing behind the child, as in Figure 141.1B. Lay the child supine or prone to best expose the injury to be treated.
Papoose
Figure 141.1C depicts an example of a papoose, which can be used as a last resort for restraint during repair of lacerations and other wounds. It is generally used to expose the head, face, and extremities to maximize efficiency. With increased child life presence and staff support and education, many centers have significantly narrowed their use of this tool. After explaining the procedure to the family, open the papoose across the ED stretcher. Place the child supine on the papoose, and expose the body area necessary for treatment. Beginning with the midabdominal restraints, cover the child across the midline with the Velcro-lined flaps (Fig. 141.1C). Better exposure of the extremities, such as the hand, is obtained by flexion of the area under the harness (Fig. 141.1D). Before starting a wound repair or other procedure, reassess for the safety and adequacy of immobilization of the child and correct it if necessary. Again, leaving an arm/hand free for a parent or staff member to hold can aid in both comfort and distraction.
There is a small group of children with autism spectrum disorders (ASDs) that may find the papoose calming due to the containment and pressure. The papoose may be offered to families with children with an ASD as a first line of restraint as opposed to manual restraint by staff.
EXTERNAL JUGULAR VENIPUNCTURE OR PERIPHERAL CANNULATION
Indications
Venous blood sampling or placement of a peripheral intravenous catheter when peripheral veins on the extremities are inadequate.
Complications
1. Hematoma
2. Infection
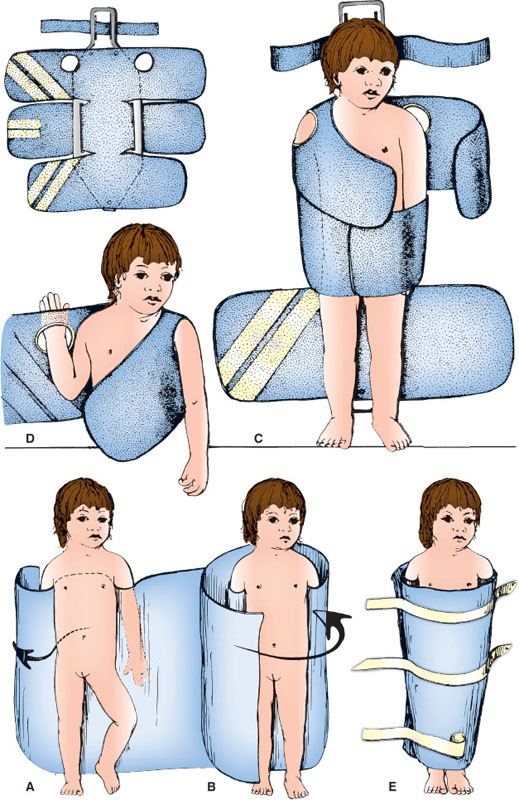
FIGURE 141.1
Equipment
Venous blood sampling: Butterfly (21 to 23 gauge); 5- to 10-mL syringe; povidone-iodine or chlorhexidine antiseptic solution; sterile gauze.
Peripheral intravenous cannulation: over-the-needle catheter, 20 or 22 gauge; povidone-iodine or chlorhexidine antiseptic solution, tape or other securement device.
Ultrasound can be used to guide the procedure (see Chapter 142 Ultrasound).
Procedure
If time allows, apply topical or local anesthetic over the expected puncture site to achieve local anesthesia of the superficial skin. Place the patient on the examining table in the supine position with the patient’s shoulders 7 to 10 cm from the end of the table. Have the assistant lean over the patient to stabilize the trunk. The assistant then holds the shoulder ipsilateral to the external jugular vein to be punctured with one hand and places the other hand over the ipsilateral zygoma and forehead, turning the head toward the contralateral shoulder and dropping the head 15 to 20 degrees over the table top. Alternatively, the bed can be placed in the Trendelenburg position with the head down 15 to 20 degrees.
Attach the butterfly to the syringe and check for patency if venipuncture for blood draw is to be performed. Cleanse the skin over the vein circumferentially with the antiseptic solution. Allow the antiseptic solution to dry. If the vein is not easily visualized in this position, it may be necessary to stimulate an infant to cry or a cooperative patient to perform a Valsalva maneuver to improve filling and visualization of the vein. Slight manual pressure may also be applied parallel to the superior margin of the clavicle by placing a finger along the clavicular border to promote venous filling and improved visualization. Align the butterfly needle (for venipuncture) or the over-the-needle catheter (for venous cannulation) parallel to the vessel as shown in Figure 141.2, and pierce the skin near the white circle shown overlying or just next to the vein approximately one-half to two-thirds of the distance between the angle of the jaw and the clavicle. Then with gentle suction applied if using the syringe, advance the needle (Fig. 141.2, dotted line) or over-the-needle catheter until the external jugular vein is entered. If performing venipuncture, relieve the suction on the syringe and withdraw the needle after withdrawing an adequate blood sample, and apply a sterile gauze dressing. The assistant should bring the infant to the upright position and compress the venipuncture site for 5 minutes. If performing venous cannulation, advance the catheter into the vein, and remove the needle. Secure the catheter with tape or other securement device.
RADIAL ARTERY PUNCTURE OR CANNULATION
Indications
1. Procurement of blood samples (arterial puncture)
2. Frequent blood gas determinations (arterial cannulation)
3. Continuous blood pressure monitoring in cardiovascular collapse/shock syndromes/hypertensive emergencies (arterial cannulation)
Complications
1. Arterial occlusion by thrombosis/hematoma
2. Infection
3. Ischemia (especially if the ulnar collateral circulation is insufficient)
4. Hematoma—from bleeding problems or inadequate application of manual pressure after completing arterial puncture
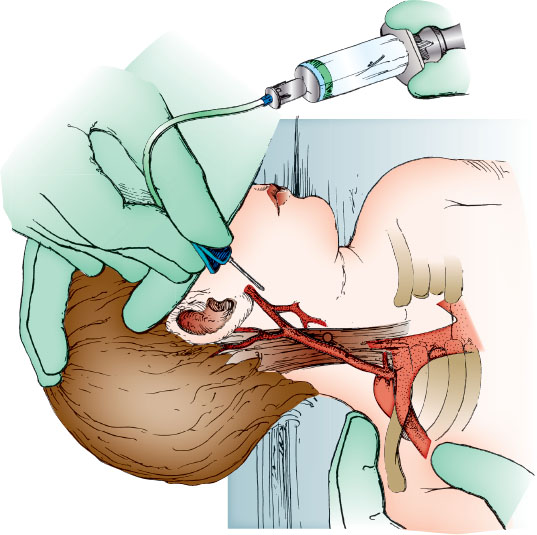
FIGURE 141.2
Caution
No medications or hyperosmolar solutions should be administered through peripheral arterial catheters.
Equipment
Arterial puncture: Butterfly (23 to 25 gauge); 1- to 3-mL syringe or standard blood sample collecting system; heparin flush (10 U per mL); antiseptic solution; sterile gauze.
Arterial cannulation: Arm board; 1- and 2-in tape; 1% lidocaine solution in a 3-mL syringe with a 25-gauge needle; antiseptic solution; gauze pads; catheter (20- to 24-gauge over-the-needle catheter); T-connector, 5- or 10-mL syringe with heparin flush solution (10 U per mL); transparent sterile dressing.
If Seldinger technique to be employed: 22-gauge introducer needle; thin guide wire; 2.5F, 2.5-cm catheter (or intravenous catheter); T-connector, 5- or 10-mL syringe with heparin flush solution (10 U per mL); transparent sterile dressing.
Consider use of ultrasound to identify artery (static approach) or track cannulation (dynamic approach) (see Chapter 142 Ultrasound).
Procedure
For arterial puncture, attach the butterfly to the syringe and flush the system with the heparin solution and empty it. Assess the adequacy of both radial and ulnar arterial flow by palpation before the puncture (the Allen test assesses ulna arterial flow more completely). Have the assistant firmly restrain the infant or child by holding the arm just proximal to the wrist in supination and hyperextending the hand approximately 20 to 30 degrees.
Using gentle pressure with the gloved palpating fingers, locate the vessel. Ultrasound can be useful to identify the vessel or dynamically follow the needle. Cleanse the skin overlying the radial artery with the antiseptic solution. Hold the needle as shown in Figure 141.3 and pierce the skin between index and middle fingers of the palpating hand, directing the needle at 30 to 60 degrees from the horizontal plane. When the needle enters the radial artery, blood will flow into the butterfly tubing. Slight suction should be applied to fill the syringe. If the initial thrust is unsuccessful, attempt to enter the artery from a different angle, either medially or laterally as determined by careful palpation. To reduce the likelihood of vessel injury, the needle should be partially withdrawn before advancing during reattempts and every effort should be made to minimize the number of punctures.
After obtaining the specimen, remove the needle and apply manual pressure to the puncture site for 5 minutes. Any air bubbles must be immediately removed from the sample syringe to achieve accurate blood gas results.
For arterial cannulation, consider a 24-gauge over-the-needle catheter for patients weighing less than 10 kg, 22 gauge for 10 to 40 kg, and 20 gauge for more than 40 kg. Secure the child’s hand and forearm to an arm board with the wrist in moderate extension using a gauze roll under the wrist. Cleanse the wrist with antiseptic solution and allow the area to dry. Locate the radial artery by palpating for the pulse over the distal volar forearm as shown in Figure 141.3. Alternatively, ultrasound may be used. Assess collateral circulation by palpation of the ulnar pulse and performance of the Allen test. After achieving local anesthesia with lidocaine infiltration at the intended puncture site, insert the over-the-needle catheter over the radial artery 0.5 to 1 cm proximal to the distal wrist crease and slowly advance toward the arterial pulse. After puncturing the artery and obtaining blood flow, advance the needle 1 to 2 mm farther, and then hold the needle steady and slowly advance the catheter into the vessel.
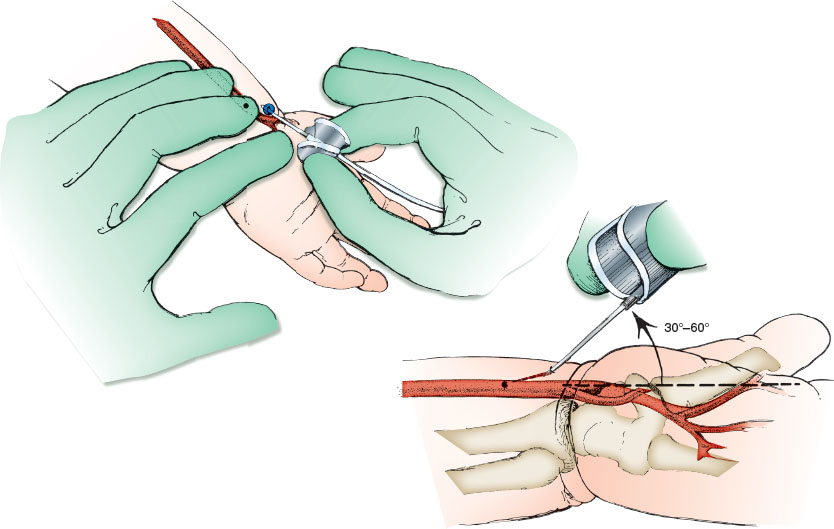
FIGURE 141.3
If blood flow never occurs or stops spontaneously, the needle tip may have penetrated the posterior wall of the vessel, as shown in Figure 141.3. Remove the needle, holding the catheter steady, and begin pulling back the catheter 1 mm at a time until a sudden flash of arterial blood is identified (Fig. 141.3). Then, advance the catheter forward into the artery. If no blood returns, make another attempt starting over again with new equipment as previously described.
If blood flow is satisfactory in the position shown in Figure 141.3, attach the connecting tubing to the catheter with a T-connector, stopcock, and syringe, and recheck arterial flow. The catheter should be securely taped or sewn to the forearm to prevent dislodgment. Use of a transparent sterile dressing is recommended to enhance visibility and security.
Alternatively, the Seldinger technique can be used by passing a thin guide wire through a 22-gauge introducer needle that is used to gain access to the lumen of the radial artery and then removing the needle (leaving the wire in place) and passing a 2.5F, 2.5-cm catheter (or IV catheter) over the wire and into the arterial lumen.
FEMORAL ARTERY/VEIN PUNCTURE
Indications
1. Arterial or venous blood sampling during resuscitation
2. Venous blood sampling in infants with inadequate peripheral veins
Contraindications
Avoid femoral punctures in children who have coagulation defects, hypercoagulable states, or cardiac shunts.
Complications
1. Hematoma of femoral triangle
2. Thrombosis—femoral artery or vein
3. Superficial infection
4. Osteomyelitis/arthritis—proximal femur, hip joint
Equipment
Butterfly needle (1-in, 21- to 23-gauge needle in a child 2 to 3 years of age or older); syringe on 1.5-in, 19- or 21-gauge needle when child is 9 to 10 years of age or older; 5- to 10-mL syringe; povidone-iodine or chlorhexidine antiseptic solution; 70% alcohol; sterile gauze; blood sample containers. Ultrasound may be useful to locate vessel and guide advancement of needle (see Chapter 142 Ultrasound).
Procedure
If time allows, apply topical or local anesthetic over the expected puncture site to achieve local anesthesia of the superficial skin. Have an assistant restrain the infant. This can be done using one of two methods. The first method is illustrated in Figure 141.4A, whereby the trunk and contralateral leg are restrained by the assistant and the ipsilateral leg is restrained by the operator. The second method is diagrammed with the illustration for suprapubic bladder aspiration (see Procedure in Suprapubic Bladder Aspiration section), in which the assistant leans over the infant with arms pressing on the infant’s arms above and holding the distal thighs below in the frog-leg position.
Gently flex the knee and externally rotate the hip to identify the landmarks of the femoral triangle. Locate the inguinal ligament, and gently palpate midway between the anterior-superior iliac spine and pubic symphysis. The femoral artery lies halfway between the two landmarks; the vein lies 0.5 to 1 cm medially (Fig. 141.4B). The empty space between flexor and extensor muscles of the medial thigh will also reveal the location of the vessels. Alternatively, ultrasound can be used to identify the vessels.
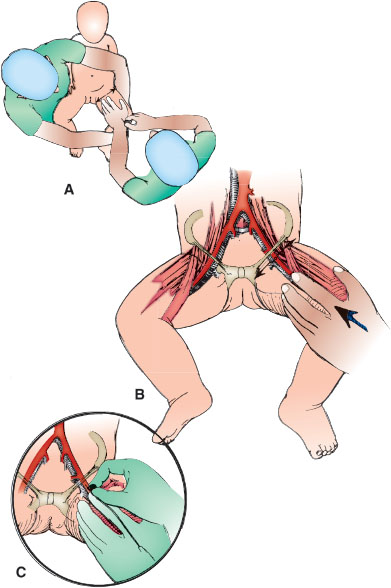
FIGURE 141.4
Cleanse the femoral triangle circumferentially with antiseptic solution several times and allow to dry. With the palpating index finger, relocate the femoral artery approximately 2 cm below the inguinal ligament. Use the palm of this hand to control the movement of the child’s leg. If possible, minimize the infant’s agitation and movement which make the abdominal musculature taut and the transmitted pulse difficult to palpate.
Direct the needle 60 to 75 degrees from the horizontal, just cephalad on the leg to the palpating finger, as shown in Figure 141.4C. Puncture the skin over the pulsatile femoral artery or 0.5 cm medially for the vein, whichever is desired. Apply constant suction to the syringe as the needle is advanced into the thigh to ensure blood is obtained on entering the vessel. The assistant should work to avoid uncontrolled leg movements by the infant leading to loss of alignment of the needle and vessels. If unsuccessful, withdraw the needle to just below the skin surface and reattempt vessel puncture after shifting the medial or lateral alignment of the needle tip. After obtaining the sample, stop suction on the syringe. After needle withdrawal, the assistant should apply constant manual pressure on the puncture site for 5 minutes with sterile gauze.
PERCUTANEOUS FEMORAL VEIN CATHETERIZATION
Indications
Emergency access to central venous circulation. See Chapter 142 Ultrasound for discussion of ultrasound guidance. The femoral vein is more accessible than the internal jugular or subclavian veins during resuscitation.
Complications
1. Inadvertent arterial catheterization
2. Arterial or venous laceration
3. Infection (especially if placed in an emergency situation without reliable use of infection control technique)
4. Hematoma
5. Catheter or wire fragment in central circulation
Equipment
Commercial tray containing introducer needle, 5- to 10-mL syringe, guide wire, no. 11 blade scalpel, dilator, and catheter; 3F (younger than 2 years of age) or 4F (2 to 7 years old) or 5F (older than 8 years of age); sterile drapes and gloves; povidone-iodine or chlorhexidine antiseptic solution; sterile gauze pads; use larger single-lumen set in trauma patients; ultrasound machine if available.
Procedure
If time allows, apply topical or local anesthetic over the expected puncture site to achieve local anesthesia of the superficial skin. Restrain the lower extremities and trunk of the child. Externally rotate the hip to facilitate palpation of the femoral triangle. Consider use of a towel roll under the gluteal muscle to improve exposure of the vein. Palpate the femoral artery 1.5 cm below the inguinal ligament, halfway between the anterior-superior iliac spine and symphysis pubis. The femoral vein lies 0.5 to 1 cm medially. Alternatively, use ultrasound to identify the vein and its relationship to the artery. Catheter length can be estimated as the distance from the insertion site to the umbilicus.
Cleanse the site with antiseptic solution and allow to dry. Wearing sterile gloves, mask, and gown, drape the area. Check all equipment and attach the syringe to the introducer needle. Repalpate the femoral artery. Hold the syringe/introducer needle parallel to the blood vessel and 30 degrees above the horizontal (Fig. 141.5A). Stabilize it with the heel of the lateral aspect of the hand against the child’s leg. Puncture the skin 0.5 to 1 cm medial to the arterial pulsation. Apply gentle suction to the syringe while advancing the needle. When venous blood returns, advance the introducer needle 1 to 2 mm and recheck for flow. Stabilize the needle, and detach the syringe. Place a gloved thumb over the open needle hub to decrease bleeding.
Using the free hand, insert the guide wire (J tip or soft straight tip) through the introducer needle (Fig. 141.5B) into the vein. Pass the wire several centimeters beyond the tip of the introducer needle in a cephalad direction into the vein. If it does not pass easily, the introducer needle tip is usually not in the lumen of the vein. If so, remove the wire and reposition the needle to establish blood flow again. Then reintroduce the wire.
Stabilize the wire with the hand that inserted it, and gently withdraw the introducer needle from the vein along the wire (Fig. 141.5C). Move the hand to stabilize the guide wire proximally once the wire is exposed at the puncture site. Support the wire and pull the introducer needle off the guide wire. Make a small incision at the skin puncture site where the wire emerges, and pass the dilator over the wire to dilate the soft tissue located between the external surface of the skin and the vessel, being careful not to kink the wire. Remove the dilator from the wire, leaving the wire in place. Pick up the infusion catheter at the proximal end and advance it over the wire to the skin entry site. Twist it at the skin entry site (Fig. 141.5D) to facilitate passage through the soft tissue, and advance it over the wire in a cephalad direction while stabilizing the wire distally.
Last, as in Figure 141.5E, withdraw the wire while holding the catheter in place; blood flows immediately if the vein has been cannulated. Suture the catheter in place, and attach the infusion system to the catheter. Location of the catheter should be documented with a radiograph or with ultrasound. Ensure that throughout the procedure, the wire is visible and can be grasped at all times if necessary.
PERCUTANEOUS INTERNAL JUGULAR VEIN CATHETERIZATION
Indications
Emergency access to central venous circulation. See Chapter 142 Ultrasound for discussion of ultrasound guidance. The internal jugular vein is the preferred entry site when abdominal trauma with possible vena cava injury is present. The main delay in early access to the internal jugular vein is the need to stabilize the airway or maintain protection of the cervical spine.
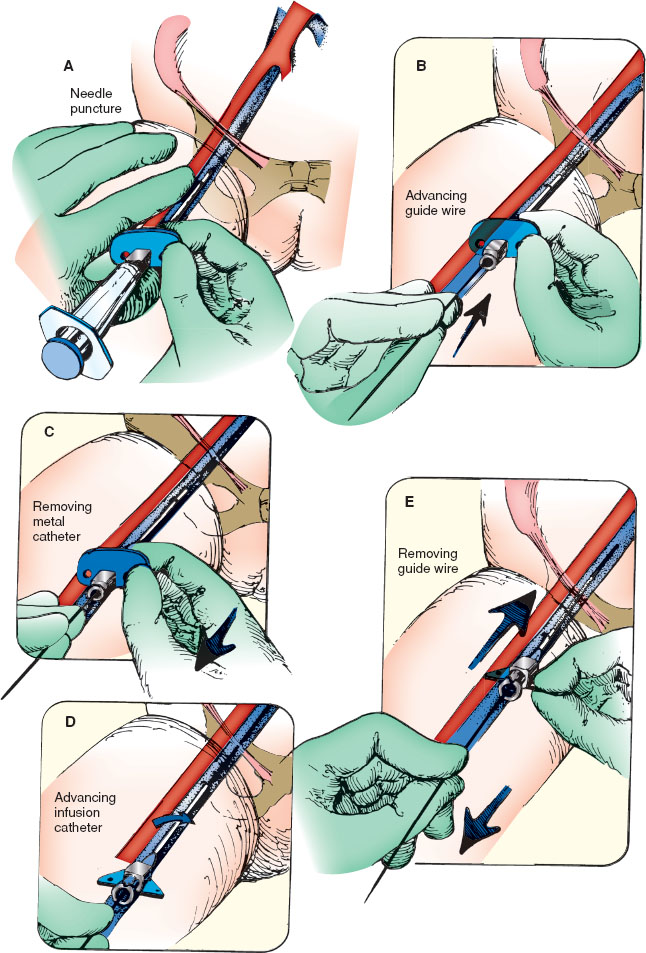
FIGURE 141.5
Complications
1. Inadvertent arterial catheterization
2. Expanding hematoma
3. Arterial or venous laceration
4. Infection
5. Catheter or wire fragment in central circulation
6. Pneumothorax, hemothorax
7. Pneumomediastinum
8. Cardiac trauma
Equipment
See Procedure in Percutaneous Femoral Vein Catheterization section.
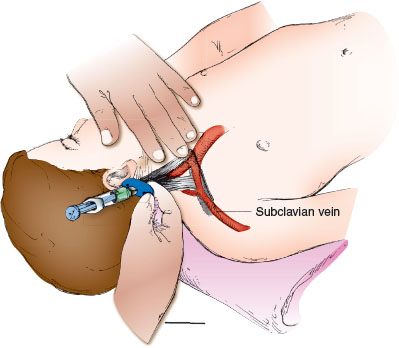
FIGURE 141.6
Procedure
Position the patient in 15 to 20 degrees of Trendelenburg with the head turned over the bed or table edge. Mild hyperextension of the neck tenses the sternocleidomastoid muscle to localize the landmarks. The medial approach uses the apex of the triangle formed by the sternal and clavicular heads of the sternocleidomastoid muscle as the entry site (Fig. 141.6). Catheter length can be estimated as the distance from the insertion site to the nipple line. The vein is lateral to the artery and should be localized by palpation, with ultrasound, or both before puncturing the skin. Using an introducer needle attached to a syringe, advance at a 45-degree angle to the skin in the caudal direction. Aim toward the ipsilateral nipple. Aspirate gently on the syringe as advancing; the vein should be entered at a depth of 1 to 2 cm. If this fails, withdraw the needle slowly with constant traction on the plunger of the syringe. If blood return does not signify venous entry, reattempt cannulation by advancing the needle slightly lateral to the initial attempt (do not advance the needle more medial to the ipsilateral nipple line). After obtaining blood flow, introduce the guide wire and then the catheter, as previously described. Check for blood return, and secure the line with suture and tape. A radiograph of the chest should be examined for line position and for pneumothorax. Ultrasound guidance is the preferred method of catheter insertion into the internal jugular vein.
SCALP VEIN CATHETERIZATION
Indications
To achieve IV access for delivering fluid and/or medication in an infant usually younger than 1 year of age, when peripheral extremity veins are unavailable.
Complications
1. Inadvertent arterial puncture
2. Ecchymoses and hematoma of the scalp
3. Infection
Equipment
Butterfly scalp vein needle no. 23, 25, or 27, or an over-the-needle catheter, 22 or 24 gauge; rubber band with tape; flush solution; 3-mL syringe; tincture of benzoin; tape; razor blade; povidone-iodine or chlorhexidine antiseptic solution; sterile gauze.
Procedure
The infant younger than 1 year of age has several easily accessible scalp veins. These include the frontal, supraorbital, posterior facial, superficial temporal, and posterior auricular veins and their tributaries. Restrain the patient in a supine position and have an assistant stabilize the infant’s head. After assessment for the most accessible veins, shave an area large enough to expose not only the desired veins, but also an area of surrounding scalp for adequate taping of the infusion needle or catheter. In this area, select a vein with a straight segment that is as long as the part of the needle or catheter that is to be inserted. Verify the chosen vessel is a vein by palpating it to ensure it does not pulsate.
Place a rubber band around the infant’s head after attaching a small piece of tape to the rubber band to make it easier to lift and cut the rubber band after successful venipuncture.
Prepare the skin by cleansing with antiseptic solution and allowing it to dry. Grasp a butterfly scalp vein needle by the plastic tabs or “wings” or the over-the-needle catheter at the base. Keep the needle and syringe unattached initially to facilitate evaluation of free blood return. Insert the needle in the direction of blood flow and pierce the skin approximately 0.5 cm proximal to the actual site where entry into the vein is anticipated (Fig. 141.7). While applying mild traction on the skin of the scalp, slowly advance the needle through the skin toward the vein. Blood will enter the clear plastic tubing of the butterfly or the plastic tubing of the catheter with entry into the lumen of the vein. Carefully cut the rubber band tourniquet, attach the syringe filled with saline flush solution, and slowly inject 0.5 mL of flush. If the needle is satisfactorily inserted into the lumen of the vein, the solution will flow easily. For catheterization, thread the catheter over the needle further into the vein continuing to assess for flow. Appearance of a skin wheal when flushing the catheter indicates that the vein has not been satisfactorily cannulated, and another attempt must be made.
After successful catheterization, carefully tape the scalp vein needle or catheter as shown in the diagram. To prevent accidental removal or infiltration of the vein, look for ways to position the infant safely.
UMBILICAL ARTERY CATHETERIZATION
Indications
Respiratory failure or cardiovascular collapse in the newborn infant for whom percutaneous attempts for vascular access have failed. Utilized for resuscitation, arterial blood gas measurements, and continuous blood pressure monitoring. Arterial catheterization is possible until around 1 week of age.
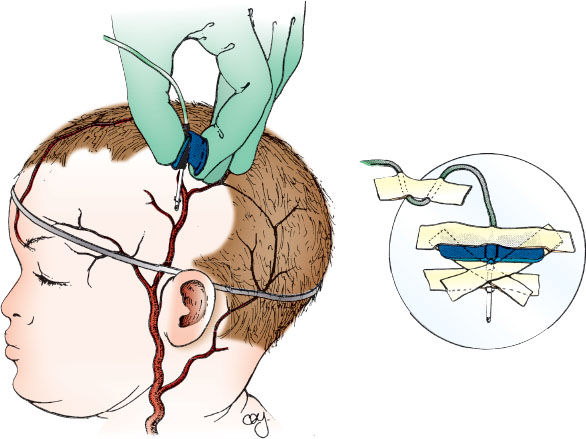
FIGURE 141.7
Complications
1. Embolization or thrombosis—inferior mesenteric, renal, or iliac arteries
2. Infection
3. Ischemia/infarction from vasospasm
4. Hemorrhage—from dislodgment of catheter or perforation of the vessel wall
5. Arrhythmias—from direct cardiac stimulation if the catheter enters the heart
6. Air embolism
Equipment
3-0 or 4-0 silk suture on straight or curved needle; antiseptic solution (povidone-iodine); sterile gauze pads; drapes and gloves; hemostats (four pairs), curved nontoothed iris forceps (4 in) or metal dilator and iris scissors; needle holder, sterile scalpel and no. 11 or 15 blade; 22-gauge needle; 10-mL syringe filled with normal saline; T-connector (optional); three-way stopcock; nonthrombogenic umbilical catheter, 3.5, 4 Fr (premature babies) or, 5F (full-term); infusion solution, often normal saline, containing heparin (1 U per mL).
Procedure
During the catheterization, monitor heart rate and pulse oximetry, and keep the infant under a radiant warmer to maintain normothermia. Figure 141.8A shows the pertinent anatomy. Historically, there has been debate regarding optimal catheter tip location to prevent complications, but emerging evidence suggests that placement of the catheter in the “high” (T6–T9) rather than “low” (L3–L4) position may be preferred.
Place the infant supine in the frog-leg position and restrain him/her as necessary. Gauze pads may be wrapped around the ankles and wrists and either pinned or taped securely to the bed/sheet. Wearing mask, gown, and gloves, hold the sterile umbilical catheter over the infant to measure the vertical distance from the lateral aspect of the clavicle to the umbilicus. The catheter will be advanced into the artery 60% of this distance, beginning at the skin surface, so its tip will reach the bifurcation of the aorta, the subdiaphragmatic (i.e., “low”) position. For catheters to be placed in the “high” position, use the nomogram, Figure 141.8A, to establish the appropriate insertion length. Recommended insertion lengths do not account for the length of catheter that is within the umbilical stump from the abdominal wall. Mark the catheter appropriately and attach it to the T-connector, stopcock, and syringe. Flush it, leaving it full of fluid. While lifting the umbilical cord with gauze in one hand, scrub the lower umbilical cord and abdomen from the xiphoid process to the symphysis pubis with povidone-iodine solution. Drape the infant on both sides by folding two drapes into triangles or use an aperture drape; cover the area below the umbilicus with a third square drape.
At the base of the umbilical stump, suture a 3-0 or 4-0 silk tie around the cord to make a purse string, but leave the knot untied. While holding the gauze on the nonsterile distal umbilicus, sever the cord 1.5 to 2 cm above the abdominal wall with the scalpel as shown in Figure 141.8B, part A. Remove the cut umbilicus and gauze from the sterile area. Bleeding is usually minimal, stopping with gentle pressure or wiping; rarely, the purse string must be tightened.
Locate the umbilical vessels, usually two thick, white-walled arteries on one side, and a larger, thinner-walled vein on the other. If the arteries in the stump are tortuous, cut it closer to the abdominal wall to facilitate cannulation.
Attach two clamps on opposite sides of the umbilicus, being careful to grasp a fibrous portion of the cord and not just Wharton jelly or an artery. Evert the clamps to immobilize and expose the cord, and use the small curved forceps, as in Figure 141.8B, part B, to enter and then stretch the lumen of the artery. Gentle, repetitive stretching is most effective with a solid metal dilator or the curved iris forceps. An attempt at catheter placement should be undertaken when the artery remains dilated to a diameter that is greater than that of the catheter for a depth of 1 cm.
To insert the catheter, hold the distal end near the tip as in Figure 141.8B, part C, and place it in the arterial lumen between the prongs of the forceps that are holding open the artery. An alternative method, pictured in Figure 141.8B, part C, shows the inner wall of the vessel held with a 22-gauge needle (bent in the shape of a hook by a hemostat), allowing the vessel to be entered directly. Pass the catheter under gentle, constant forward pressure to overcome the resistance encountered at the points where the artery turns (just below the skin surface and where the arteries turn upward toward the iliacs; Fig. 141.8A). Blood should flow readily after the second bend when the internal iliac artery is entered.
As shown in Figure 141.8B, part D, advance the catheter to the appropriate depth as previously estimated; confirm blood flow at the final point. Turn the handle of the stopcock toward the infant. Gently tighten and knot the purse string, leaving both ends of the suture long. Approximately 5 cm from the knot at the base of the cord, make a square knot and then loop and tie the suture around the catheter to help secure it in place, as shown in Figure 141.8B, part E. An alternative is to suture in a purse string circumferentially around the umbilical cord. Then tie the knot around the catheter to assist in maintaining it securely. Also place tape on the abdominal wall as shown in the figure. Verify with an abdominal radiograph that the tip of the catheter lies at the desired level.
Infuse solutions containing heparin (1 U per mL) unless contraindicated for bleeding diathesis.
UMBILICAL VEIN CATHETERIZATION
Indications
To gain vascular access rapidly in a newborn with respiratory failure or cardiovascular collapse. Venous catheterization is possible until around 2 weeks of age.
Complications
1. Infection
2. Embolization or thrombosis
3. Vessel perforation
4. Hemorrhage
5. Air embolus
Equipment
Umbilical tape or 3-0 silk suture on straight or curved needle, antiseptic solution (povidone-iodine), sterile gauze pad, drapes, mask, gown, gloves, small curved hemostat.
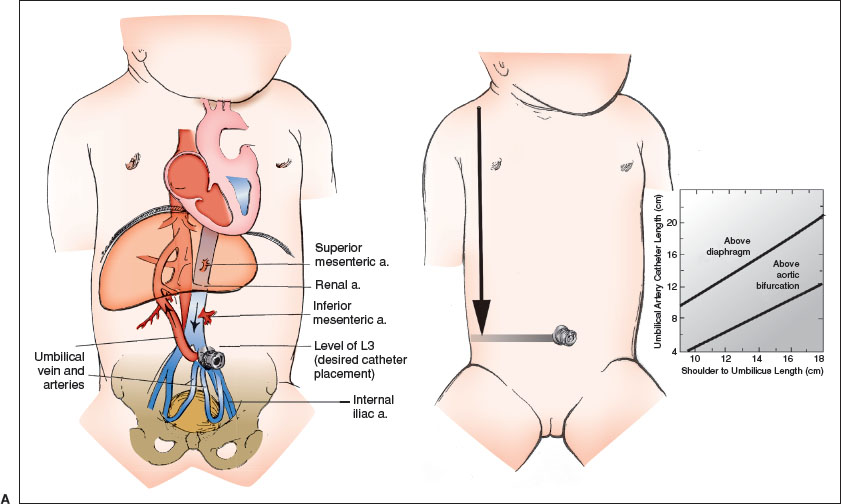
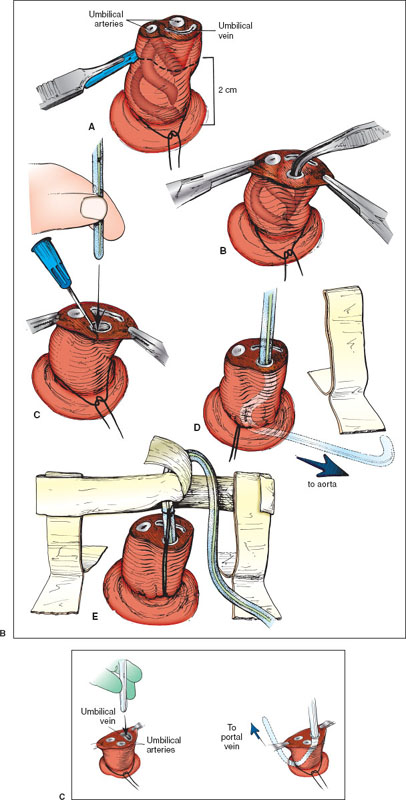
FIGURE 141.8
Sterile scalpel and no. 11 or 15 blade, iris scissors, 5F umbilical catheter three-way stopcock, 10-mL syringe with normal saline, infusing solution.
Procedure
The umbilical vein is preferred for vascular access during neonatal resuscitation because the vessel is readily located and cannulated. Catheterizing the umbilical vein is generally much easier than catheterizing the umbilical artery.
Place the newborn supine and restrain the extremities as necessary. The newborn should be under a radiant warmer, and heart rate and pulse oximetry should be monitored throughout the procedure. Prepare the equipment. Attach a 5F umbilical catheter to a three-way stopcock and a saline-filled syringe. Prime the catheter with normal saline. Wearing mask, gown, and gloves, cleanse the umbilical cord and the abdomen from the xiphoid process to the pubic symphysis with povidone-iodine solution and allow to dry. Hold the sterile umbilical catheter over the infant to measure the vertical distance from the lateral aspect of the clavicle to the umbilicus. The catheter will be advanced into the vein 60% of this distance, beginning at the skin surface, to avoid direct infusion of medications into the liver. At the base of the umbilical cord, loosely tie an umbilical tape or insert 3-0 silk suture around the cord to make a purse string. Cut the cord 1 to 2 cm from the abdominal wall. Locate the vein orifice (larger with thinner wall compared to the arteries) and remove any visible solid clot with fine forceps.
Gently grasp the umbilical vein catheter about 2 cm from the tip with either a small clamp or your gloved fingers (Fig. 141.8C). Introduce the catheter tip into the umbilical vein. Apply gentle pressure and advance the catheter through the venous lumen. The catheter is inserted until blood flows freely. This generally occurs when the catheter tip is just beyond the junction of the umbilicus and the abdominal wall. Advance the catheter to the previously estimated depth.
Tighten the umbilical tape or the purse string suture. Tape the catheter in place to further secure it. It is important to confirm location of the catheter tip with an x-ray. The umbilical vein catheter is usually withdrawn at the end of resuscitation to minimize the danger of infection or portal vein thrombosis; therefore, it is generally not necessary to suture this line in place.
INTRAOSSEOUS INFUSION
Indications
Emergency vascular access. Favored if intravenous access cannot be rapidly obtained in life-threatening situations.
Complications
1. Extravasation of fluids or medications into subcutaneous tissue
2. Subcutaneous abscess, osteomyelitis, and bacteremia
3. Physeal injury or fracture
4. Fat embolus
Equipment
Povidone-iodine or chlorhexidine antiseptic solution; sterile gauze; gloves; drapes; 1% lidocaine; 3- to 5-mL syringe; 18- or 20-gauge intraosseous infusion needle; or commercially available IO device (EZ-IO [Arrow] or bone injection gun [Waismed]); saline flush solution; IV fluids and tubing. Alternatives: bone marrow aspiration needle; 20-gauge lumbar puncture (LP) spinal needle.
Procedure
Preferred locations are the proximal tibia or distal femur for both ease of access and safety. Prepare the selected site by cleansing with antiseptic solution. In the awake patient, infiltrate from the skin to the periosteum with 1% lidocaine for anesthesia. The desired site for placement in the proximal tibia is the flat, medial surface 1 to 2 cm below the tibial tuberosity (Fig. 141.9A). Alternatively, the lower third of the femur in the midline approximately 3 cm above the lateral condyle (Fig. 141.9B) or the distal tibia 1 to 2 cm proximal to the medial malleolus (Fig. 141.9C) can be used. In the absence of an intraosseous needle, a bone marrow sampling needle or a spinal needle with bevel can be utilized.
After penetrating the skin with the needle, direct it at a slight angle 10 to 15 degrees from vertical and away from the growth plate of the long bone (caudad for proximal tibia insertion; cephalad for distal femur insertion). Apply downward pressure with a “to-and-fro” rotary motion to advance the needle. When the needle passes through the cortex of the bone into the marrow cavity, resistance will suddenly decrease (a “trap door effect”). The needle should stand firmly without support. Remove the stylet and connect a 5-mL syringe to the needle. Confirm proper placement by aspiration of bone marrow; then flush the needle with heparinized saline and connect it to conventional IV infusion tubing. Observe the site for extravasation of fluid, which is an indication that either the placement is too superficial or the bone has been pierced through both sides. Restrain the leg and maintain a clean infusion site while the needle is in place.
Use of the EZ-IO for placement involves the same preparatory steps to sterilize the site. Use the 15-gauge, 15-mm needle for patients under 39 kg and the 15-gauge, 25-mm needle for those over 39 kg. There is also a 15-gauge, 45-mm needle available for use when excessive soft tissue overlies the desired insertion site. Load the needle onto the magnetic tip of the drill. Insert the needle through the skin and soft tissue making contact with the anterior surface of the bone prior to actuating the drill. The EZ-IO needles have markings on the needle shaft to indicate depth. Once the drill is actuated, the needle will pass easily into the bone with application of minimal pressure. A slight decrease in resistance may be felt as the marrow space is entered, but this is not as easily appreciated as with manual insertion. Once the needle is firmly seated in the bone, unscrew and remove the inner trocar and attach the tubing that comes in the box with the needle. Attempt to aspirate marrow to confirm placement of the needle tip in the marrow space. If marrow cannot be aspirated, gently attempt to flush with saline and assess for signs of infiltration. If the line can be flushed easily without signs of infiltration, placement is good. Detach the tubing, apply the EZ-IO stabilizer, and reattach the tubing. If marrow cannot be aspirated and the needle cannot be flushed but the needle is firmly seated, the needle tip either remains in the anterior cortex, in which case slight advancement by reattaching the drill is indicated, or it is in the posterior cortex in which case it needs to be removed, and a new site in a different bone identified.
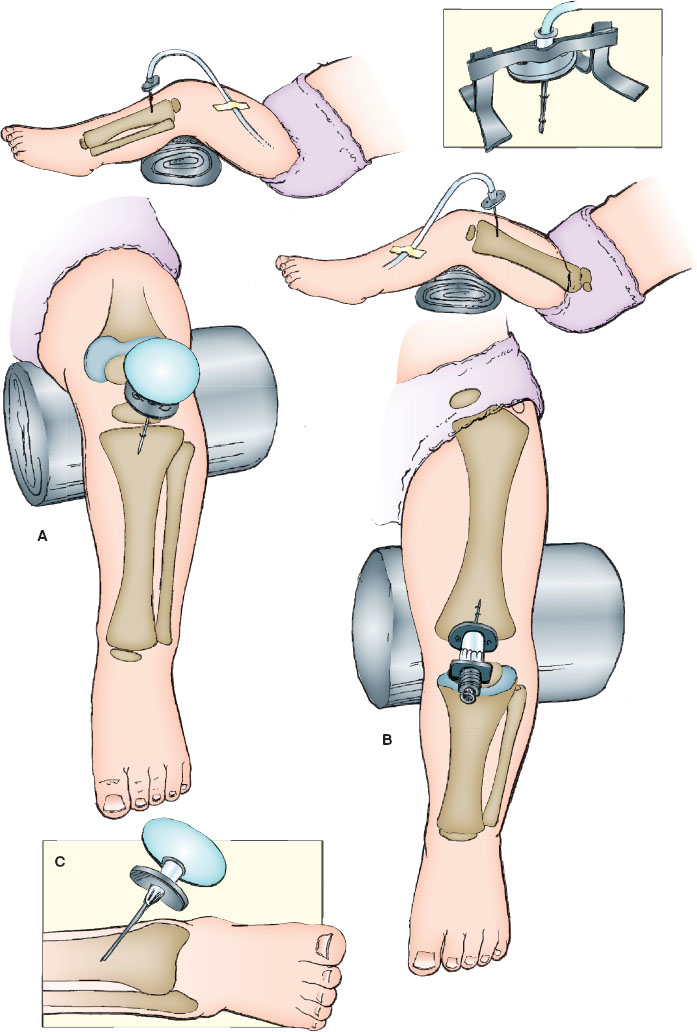
FIGURE 141.9
ACCESSING CENTRAL VENOUS CATHETERS
Types
1. There are multiple tunneled central venous catheter (CVC) brands, including Broviac, Hickman, Bard, and Leonard. Access to the central circulation is via cephalic, external jugular, internal jugular, brachiocephalic, subclavian, or saphenous veins.
2. Implanted venous access catheter brands include Port-A-Cath, Mediport, and Babyport. These devices are surgically implanted under the skin in the upper chest or arm. The catheter is surgically inserted into a vein (usually the jugular, subclavian, or superior vena cava [SVC]). The catheter tip resides in the SVC outside of the right atrium.
3. Peripherally inserted central catheters (PICCs) are devices inserted for long- or short-term medication or intravenous fluid administration. PICCs are often placed in the basilic or cephalic veins by either physicians or nurses. The catheter tip resides in the distal portion of the SVC or at the SVC and right atrial junction.
Indications
1. IV fluid administration
2. Medication administration
3. Blood product administration
4. Blood draws
Complications
1. CVC-associated infection
2. Thrombus
3. Displaced/ruptured/broken catheter
4. Occlusion
5. Phlebitis
6. Cardiac arrhythmias
7. Infiltration
8. Infusion of medications that interact with silicone (e.g., phenytoin or diazepam)
9. Use caution to avoid infusion of incompatible medications
Equipment
Tunneled Central Venous Catheters
1. Sterile gloves, mask, and eyewear
2. Povidone-iodine solution, 70% isopropyl alcohol, or chlorhexidine gluconate (CHG) per institutional protocol depending on if access is through the cap or directly into the line
3. Sterile drapes
4. Catheter clamp
5. Three needles (18-, 19-, or 20-gauge)
6. 10-mL syringe with normal saline flush
7. 5-mL syringe with heparin (100 U per mL)
8. Two sterile 10-mL syringes (for phlebotomy)
9. Fluids and/or medications to be administered
10. 4 × 4 gauze pads
Implantable Venous Access Catheters
1. Sterile gloves, mask, and eyewear
2. Povidone-iodine solution or CHG per institutional protocol
3. Sterile drapes
4. Two Huber needles (19-, 20-, or 22-gauge) with 90-degree bend
5. Extension tubing with clamp or stopcock
6. 10-mL syringe with normal saline flush
7. 5-mL syringe with heparin solution (100 U per mL)
8. 4 × 4 gauze pads
9. Silk tape
10. Protective barrier (e.g., Tegaderm)
11. Fluids and/or medications to be administered
Peripherally Inserted Central Catheters
1. CHG
2. 3-mL syringe with heparin 10 U per mL
3. 5-mL normal saline flush
4. Two 5-mL Luer-Lock syringes
Procedure
Tunneled Central Venous Catheters
Sterile technique should be maintained when accessing a CVC. Clamp the catheter with the catheter line clamp (do not use a hemostat). Hold the CVC tubing with a 4 × 4 in the nondominant hand and remove the cap. Place a 10-mL syringe flushed with normal saline, unclamp, and flush with 5 mL; then withdraw from the CVC to ensure patency. Discard 3 to 5 mL of blood, and then clamp the catheter. Administer medication or fluids as ordered once the syringe or IV tubing is securely attached to the catheter. Set the medication/fluid rate and volume using an infusion pump, unclamp the catheter, and begin the infusion.
When not in use, the CVC should be clamped with the catheter line clamp. When drawing a blood sample, first clean the catheter cap per institutional protocol. Once the needleless access cap is cleaned, attach a Luer-Lock syringe, unclamp, and withdraw 3 to 5 mL of blood to discard. Attach a second syringe and withdraw the necessary amount of blood. Flush the catheter with 5 mL normal saline and 3 to 5 mL of heparin (100 U per mL). In small infants or when frequent sampling is required, consider reinfusing the initial blood sample to clear the line prior to the saline flush and heparin.
If difficulty occurs withdrawing blood from the catheter, this may be caused by catheter placement, clot, or malfunction. Certain maneuvers that may aid in blood flow include placement of the patient in reverse Trendelenburg position, placing slight tension on the catheter, holding the patient’s arms over their head, or use of a Valsalva maneuver. Withdrawing with force will only collapse the catheter tubing. If the aforementioned maneuvers are not successful, gently flush the catheter with 3 to 5 mL of heparin solution (100 U per mL). If this attempt fails, alteplase may be used (see below).
Implantable Venous Access Catheters
Maintain sterile technique at all times (Fig. 141.10). Prepare the overlying skin with antiseptic solution as per institutional protocol. If time allows, consider placement of topical anesthetic over the port site 30 to 40 minutes before access is planned. Connect the Huber needle to extension tubing and flush the tubing and needle lumen with normal saline, then clamp. Stabilize the circular reservoir with the thumb and forefinger of the nondominant hand. Insert the Huber needle slowly through the skin directly into the septum of the circular reservoir until the back of the reservoir is reached. Unclamp and gently withdraw to assess for the presence of blood, then slowly inject saline. Watch for local infiltration, which may occur if the needle is not properly placed. If local infiltration occurs, remove the Huber needle. Blood drawing is accomplished through extension tubing after clearing the line of dead space volume. If blood is being drawn, 3 to 5 mL must be drawn and discarded before collecting the amount necessary for testing. Place a dressing over the site and secure the catheter with chevron-shaped silk tape. Medications or intravenous fluids may be attached. Normal saline flushes should be administered between medications. Flush with 5 mL of heparinized solution when medication or fluid administration is complete or after blood drawing is accomplished. Remove the Huber needle. Place a dressing or adhesive bandage over the site once the needle has been removed.
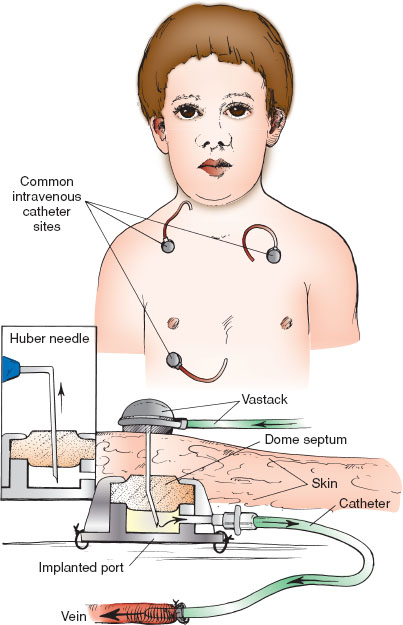
FIGURE 141.10
Peripherally Inserted Central Catheters
To access a PICC, first scrub the access port per institutional protocol, using a twisting, frictional scrub for a minimum of 15 seconds and then allow for complete drying. Using sterile technique, access the port of the lumen with a 10-mL syringe filled with normal saline. Aspirate to confirm blood return. After confirming patency, flush using a pulsatile technique until all flush solution has been administered, thus clearing the line of blood, medication, and/or intravenous fluid. Maintain pressure at the end of the flush to prevent the reflux of blood into the catheter; repeat for each lumen of the catheter. Follow the manufacturer’s instructions for the clamping procedure at the end of the flush.
Nonpatent Catheters—Use of Fibrinolytics
When tunneled CVCs or implantable ports are not readily accessed, the most common reason is presence of a clot. The clinician should consider use of a fibrinolytic to assist in clot dissolution as long as it is not contraindicated.
Alteplase (2 mg per 2 mL)
For patients weighing less than 30 kg, alteplase can be instilled in an amount equal to the catheter priming volume plus 10%, not to exceed 2 mL (2 mg) and should be allowed to dwell within the catheter lumen for 120 minutes. For patients weighing more than 30 kg, a 2-mg dose should be instilled and allowed to dwell within the catheter lumen for 120 minutes. Then, attempt to withdraw blood with a 5- to 10-mL syringe.
For more complex problems, including intraluminal mineral/precipitant occlusion or lipid emulsion occlusion, refer to the staff caring for the catheter.
LUMBAR PUNCTURE
Indications
To obtain cerebrospinal fluid (CSF) for the diagnosis of meningitis, meningoencephalitis, subarachnoid hemorrhage, and other neurologic syndromes. To measure opening pressure to diagnose idiopathic intracranial hypertension.
Complications
1. Contamination of the CSF sample with blood from the epidural venous plexus
2. Local back pain—occasionally with short-lived referred limp
3. Headache (uncommon in children younger than 10 years of age)
4. Apnea/hypoventilation secondary to positioning for the procedure in neonates
5. Spinal epidural/subdural hematoma or spinal cord bleeding—especially in the presence of bleeding diathesis
6. Infection
7. Subarachnoid epidermoid tumor formation
8. Ocular muscle palsy (transient)
9. Epidural CSF leak—ranging from asymptomatic to cauda equina syndrome
10. Brainstem herniation—in the presence of a mass effect or noncommunicating hydrocephalus.
Equipment
Commercial trays; CSF manometers; spinal needle—22 gauge; 3.75 cm (1.5 in) for younger than 1-year old, 6.25 cm (2.5 in) for 1 year to middle childhood, and 8.75 cm (3.5 in) for older children and adolescents; povidone-iodine or chlorhexidine antiseptic solution; topical 4% lidocaine cream.
Procedure
Lateral Decubitus Position
Restrain the patient in the lateral decubitus position. Maximally flex the spine without compromising the upper airway. Often, in infants younger than 3 months, the patient’s hands can be held down between the flexed knees with one of the assistant’s hands. The other hand can flex the neck at the appropriate time.
The spinal cord ends at approximately the level of the L1 and L2 vertebral bodies. Caudal to L2, only the filum terminale is present. The desired sites for LP are the interspaces between the posterior elements of L3 and L4 or L4 and L5. Locate these spaces by palpating the iliac crest (Fig. 141.11A, parts A and D). Follow an imaginary “plumb line” from the iliac crest to the spine. The interspace encountered is L4–L5. Use it or the one cephalad to it.
Employ sterile technique for the LP. Cleanse the skin with antiseptic solution after donning sterile gloves. Using sponges, begin at the intended puncture site and work outward in concentric circles until an area 10 cm in diameter has been cleansed. Repeat this three times. Drape the child beneath his/her flank and over the back with the spine accessible to view (as in Fig. 141.11B). Allow the solution to dry. An alternative to draping the patient, which may obscure key anatomic landmarks, is to cleanse the skin with antiseptic solution all the way onto the iliac crests to create a sterile field that can be palpated again at any time during the procedure without compromising the sterile field.
Use local anesthesia in children—this includes placement of topical anesthetic cream 45 to 60 minutes prior to the LP if time allows. Anesthetize the site by injecting 1% lidocaine intradermally to raise a wheal, then advance the needle into the desired interspace, injecting anesthetic and being careful not to inject into a blood vessel or the subdural space into the CSF.
Check the spinal needle and ensure the stylet is secure. Grasp the spinal needle firmly with the bevel facing “up” toward the ceiling, making the bevel parallel to the direction of the fibers of the ligamentum flavum. Recheck the patient’s position to ensure the needle’s trajectory is midsagittal to the patient’s back. Insert the needle into the skin over the selected interspace in the midline sagittal plane. Two methods of stabilizing and guiding the needle are shown (Fig. 141.11A, parts B and D). Insert the needle slowly, aiming slightly cephalad toward the umbilicus. When the ligamentum flavum and then the dura are punctured, a “pop” and decreased resistance may be felt. Remove the stylet and check for flow of spinal fluid. If no fluid is obtained, reinsert the stylet, advance the needle slowly, and check frequently for the appearance of CSF. An alternative to keeping the stylet in during the procedure is early stylet removal after the needle has passed through the dermis. Removing the stylet early reduces the likelihood of a traumatic tap. Using a hollow needle or removing the stylet too early increases the risk of a small bit of epidermis entering the spinal needle and either blocking CSF drainage or being unintentionally introduced into the CSF space, where an epidermoid tumor may form. When CSF flows, attach the manometer to flexible tubing (if available), and attach the flexible tubing to the needle’s hub if an opening pressure is to be measured. Some kits allow the manometer to be attached directly to the hub of the spinal needle with a 3-way stopcock, rather than using flexible tubing. Allow the CSF to travel up the manometer and reach a point where it stabilizes and varies slightly with respirations. Gently relax the patient’s legs so as not to artificially elevate the pressure reading. Collect 1 mL of CSF in each of the three sterile tubes. Send the CSF for routine culture, Gram stain, glucose and protein determination, and cell count and differential. Collect additional tubes as indicated for specific testing. After CSF collection is complete, a closing pressure can be measured in the same way as the opening pressure. Reinsert the stylet and then remove the spinal needle. Cleanse the back and cover the puncture site. Observe the site for any evidence of ongoing CSF leak.
Sitting Position
Restrain the infant in the seated position with maximal spinal flexion (Fig. 141.11A, part C). Have the assistant hold the infant’s hands between his/her flexed legs with one hand and flex the infant’s head with the other hand.
Place drapes underneath the child’s buttocks and on the shoulders with an opening near the intended spinal puncture site. Choose the interspace as noted earlier and follow the procedure as outlined for the lateral position. Insert the needle so it runs parallel to the spinal cord (Fig. 141.11A, part D). Opening pressure should only be measured in the lateral decubitus position.
PNEUMATIC OTOSCOPIC EXAMINATION
Indications
Evaluation for presence of middle ear effusion.
Complications
Pain or bleeding from contusion or abrasion of the external auditory canal.
Procedure
To safely and accurately evaluate the middle ear structures in infants, minimizing patient movement while performing the examination is critical. In many infants, this requires appropriate restraint. Many young children fear the approach of a physician, particularly to examine their ears. Usually a parent can provide proper immobilization. Place the infant supine on the examination table, and ask a parent to hold the arms firmly against the trunk (Fig. 141.12A) or against the head, grasping them just above the elbow. When assisting, the parent may hold his/her hand across the forehead against his/her own chest to minimize movement. Hold the otoscope as shown in Figure 141.12B, grasping it between the thumb and index finger of the dominant hand. The heel of the hand should rest against the anterior portion of the infant’s head to maintain constant, firm pressure against the temporal skull while bringing the infant’s head horizontal to the table. This assists the operator in ensuring the otoscope will move in conjunction with the child if he/she is not still during the procedure.
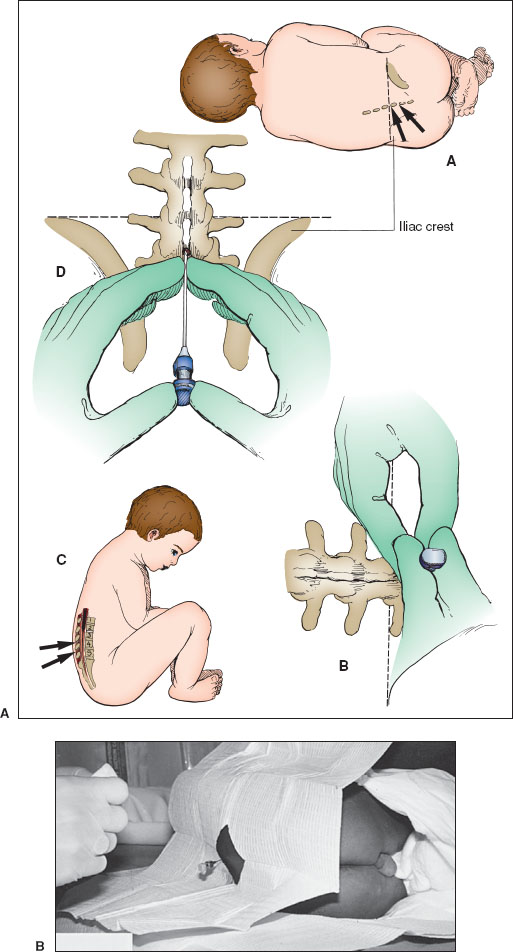
FIGURE 141.11
Once the infant is restrained, use the other hand to grasp the upper portion of the helix, stretching it superiorly and posteriorly in the child to straighten the external canal. In young infants, pull the helix inferiorly and posteriorly to best visualize the tympanic membrane. Simultaneously, observe the entrance to the auditory canal through the otoscope and flex the thumb to direct the speculum down the canal entrance. Then, straightening of the external canal is performed under direct visualization. The removal of cerumen obscuring the field may be necessary (see Procedure in Removal of a Foreign Body From the Ear section). Observe the tympanic membrane for color, contour, and presence of the bony and vascular landmarks (see the “Otitis Media” section in Chapter 53 Pain: Earache).
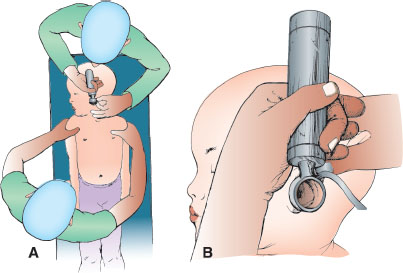
FIGURE 141.12
For evaluation of the compliance of the tympanic membrane, a tight seal is required between the auditory canal and the speculum. If the diameter of the speculum is found to be less than that of the canal, replace it with one of a larger size. Reenter the canal to one-third to one-half of its depth, establish a seal, and lightly squeeze the bulb while observing the tympanic membrane. Lack of movement of the tympanic membrane indicates the presence of a middle ear effusion.
REMOVAL OF A FOREIGN BODY FROM THE EAR
Indications
1. Foreign body
2. Obstruction of the external auditory canal by cerumen
Complications
1. Abrasion of the external auditory canal
2. Perforation of the tympanic membrane
3. Ossicular disruption
Procedure
Multiple methods are available for removal of a foreign body from the external auditory canal; all require cooperation from, or restraint of, the child. Pharmacologic sedation may facilitate safe performance of the procedure, but extreme caution must be exercised in a sedated patient in order to avoid damage to structures of the middle ear. Objects lying on or near the tympanic membrane should be referred to an otolaryngologist. Inorganic materials, with the notable exception of button batteries, may not require emergent removal and can be referred to an ear, nose, and throat specialist for elective removal. Whenever possible, foreign bodies should be removed under direct visualization in order to avoid complications. Minor abrasion and laceration of the external auditory canal is often unavoidable during the procedure, and parents should be made aware of this complication before beginning the procedure. After removal of the foreign body or cerumen by any method, it is important to visualize the tympanic membrane and document its condition.
Curette
Visualize the foreign body with a speculum, preferably using an operating head otoscope or metal ear speculum (Fig. 141.13A). Then, slowly advance the curette just beyond the foreign body as shown. While applying pressure to the foreign body, slowly withdraw the curette until the foreign body is removed. Space to pass the tip of the curette beyond the foreign body is a prerequisite for success with this method.
Forceps
Visualize the foreign body with a speculum, preferably using an operating head otoscope or metal ear speculum, and look for a protruding edge of the foreign material (Fig. 141.13B). Carefully guide the forceps in the closed position under direct visualization through the speculum. Just a few millimeters from the edge of the foreign body, open the forceps and grasp the edge gently. Withdraw the forceps while maintaining visualization of the foreign body and the external auditory canal to minimize the chance of a complication.
Irrigation
Straighten the ear canal and visualize the foreign body directly with a speculum, ensuring the tympanic membrane is intact (Fig. 141.13C). If the foreign body is spongy or could expand when wet, such as a bean or other food material, do not use this method. Do not attempt to remove a button battery with irrigation. Remove the speculum and irrigate the ear canal by injecting a constant stream of water at body temperature. Use a 20- to 50-mL syringe attached to flexible tubing (e.g., a cut section of tubing from a butterfly needle). Repeated irrigation may be necessary to provide complete emptying.
Day Ear Hook
Visualize the foreign body with a speculum, preferably using an operating head otoscope or metal ear speculum. Then, slowly advance the Day ear hook just beyond the foreign body. Once beyond the foreign body, rotate the head of the hook 90 degrees to snag the foreign body. Slowly withdraw the ear hook until the foreign body is removed. Space to pass the tip of the ear hook beyond the foreign body is a prerequisite for success with this method. This method should not be employed if the foreign body is immediately adjacent to the tympanic membrane.
Katz Extractor
Visualize the foreign body with a speculum, preferably using an operating head otoscope or metal ear speculum. Then, slowly advance the deflated balloon of the Katz extractor just beyond the foreign body as shown. Once the deflated balloon is beyond the foreign body, depress the plunger on the syringe to inflate the balloon and slowly withdraw the extractor with the balloon inflated from the ear. The foreign body will be forced out of the external auditory canal by the inflated balloon. Space to pass the balloon beyond the foreign body is a prerequisite for success with this method. This method should not be employed if the foreign body is immediately adjacent to the tympanic membrane.
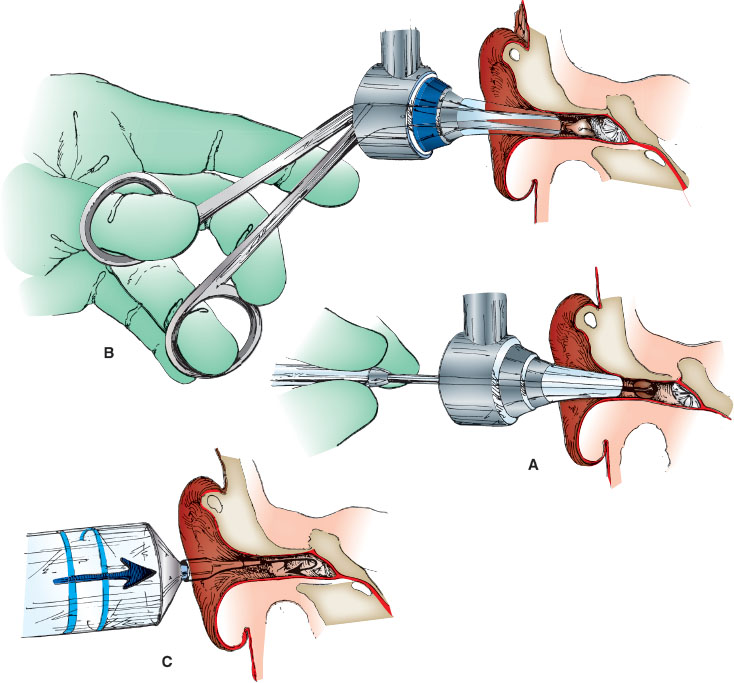
FIGURE 141.13
ASPIRATION OF AN AURICULAR HEMATOMA
Indications
Traumatic auricular hematoma or seroma.
Complications
1. Recurrent hematoma or seroma
2. Infection (abscess)
Procedure
Restrain the child using a standard method if needed. Palpate the hematoma to find the most fluctuant portion. Cleanse the skin over the hematoma with antiseptic solution and allow to dry. Topical anesthesia may be achieved with 4% lidocaine cream directly applied with an occlusive dressing 30 to 45 minutes before aspiration of the hematoma. In very anxious children or those requiring a longer procedure, pharmacologic sedation should be considered.
Use a 10- or 20-mL syringe with an 18-gauge straight needle. While stabilizing the syringe against the scalp with the nondominant gloved hand, puncture the most fluctuant portion of the hematoma with the needle (Fig. 141.14A,B). Maintain negative pressure on the syringe plunger with one hand, while “milking” the hematoma with the thumb and index finger of the other. Withdraw the needle after emptying the hematoma, but continue to maintain pressure on the auricle between the thumb and the finger for 3 to 5 minutes to tamponade any ongoing bleeding. With wet cotton pledgets, reestablish the normal ear contours and apply a pressure or bolster dressing. Arrange for follow-up in 12 to 24 hours to have the dressing unwrapped, check the ear, and redress.
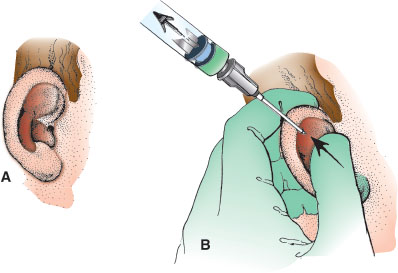
FIGURE 141.14
Related posts:


Stay updated, free articles. Join our Telegram channel

Full access? Get Clinical Tree


