Internal jugular
Subclavian
Femoral
Arterial puncture
6.3–9.4
3.1–4.9
9–15
Hematoma
<0.1–2.2
1.2–2.1
3.8–4.4
Hemothorax
N/A
0.4–0.6
N/A
Pneumothorax
<0.1–0.2
1.5–3.1
N/A
Thrombosis†
7.6
1.9
21.5
Infection*
0.87
1.8
6.9
Table 10.2
Recommendations to avoid complications of central venous catheterization approaches
Complications | Recommendation |
|---|---|
Infectious | Use maximal sterile barrier precautions |
Choose subclavian access when possible | |
Use antimicrobial impregnated catheters | |
Mechanical | Recognize risk factors for difficult catheterization |
Seek assistance from an experienced clinician | |
Avoid femoral venous catheterization | |
Use ultrasound guidance if available |
Knowledge of surface landmarks are critical for success and safety.
Improper insertion position and inadequate landmark identification have been shown as common technical errors.
The use of ultrasound and fluoroscopic guidance decrease the rate of immediate complications.
Ultrasound can detect thrombosed veins and allows safe puncture in patients with coagulopathy, avoiding arterial puncture. However, its use in the subclavian access has had mixed results in clinical trials.
A chest radiograph is mandatory after CVA placement to check the catheter position and to assess for pneumothorax or hemothorax in case of jugular or subclavian access (performed before switching to the contralateral site after failed insertion).
General principles
Most insertions use the Seldinger or modified Seldinger technique
Whenever possible, explain the procedure, the benefits, and risks to the patient or relatives to obtain informed consent.
Check the equipment prior to starting the procedure.
Central venous catheter tray (line kit) containing a 26 gauge needle for injecting anesthesia (may also serve as a finder needle), a 22 gauge needle to access the vein, syringe, flexible guide wire with J-tip, dilator, n° 11 scalpel, and single or multilumen catheter
Antiseptic solution (2 % chlorhexidine in alcohol) with skin swab
Sterile gloves, drapes, and gown
100 ml of saline with heparin
Lidocaine 1 %
Gauze and dressing
Do not to use the patient as a table.
Infiltration of local anesthesia (1 % lidocaine) should be enough, but sometimes analgesia and sedation can be helpful (operator should be familiar with the most commonly used analgesics, sedatives, and reversal agents).
Put on mask, sterile gowns, and gloves, and drape the patient in a sterile fashion.
Flush the catheter with heparinized saline before insertion.
Insert the introducer needle while pulling on syringe piston, slowly advancing until reaching the clavicle and then slide underneath the inferior border of the bone.
When venous blood is aspirated copiously, disconnect the syringe, occlude the lumen of the needle with a finger, and insert the guide wire while observing the heart rhythm (retract it 4 cm if arrhythmias result from the guide wire being deep within the heart).
If resistance is encountered, rotate the guide wire gently.
Unsuccessful passing indicates misplacement and never use force to advance the wire.
Withdraw the introducer needle; make a small stab against the wire to enlarge skin entry site.
Maintaining constant control of the wire, thread the dilator over the wire with a firm and gentle twisting motion.
Remove the dilator and thread the catheter until wire exits the distal lumen.
Push the catheter to desired length while holding the wire.
Hold the catheter in place and remove the wire.
Aspirate blood and flush 2 cc heparinized saline in every catheter lumen.
Attach the catheter to skin with sutures; apply a clean dressing.
10.1.1 Subclavian Access
Most common access because:
Simple
Consistent landmarks
Patient comfort
Low potential for infection
Patient positioned supine, monitored, and Trendelenburg position (to reduce the risk of air embolism)
Landmarks: sternal notch, angle of the clavicle
Prepare the insertion site and the neck as well.
Infiltrate skin, subcutaneous tissue, and clavicular periostium with lidocaine 1 %.
The insertion site is 1 cm below the junction of the middle and medial third of the clavicle, at the deltopectoral groove or one fingerbreadth lateral to the angle of the clavicle.
Direct the insertion needle toward the sternal notch, parallel to chest wall (to reduce the possibility of pneumothorax).
Attention:
If the vein is not reached, remove the introducer needle, flush the clots, and try again.
Never change the needle position while inserted.
Change insertion site after three unsuccessful attempts.
Red pulsatile blood indicates arterial puncture.
Aspiration of air bubbles indicates a pneumothorax.
10.1.2 Internal Jugular (IJ) Access
Optimal patient position is Trendelenburg with head turned to the opposite side of insertion.
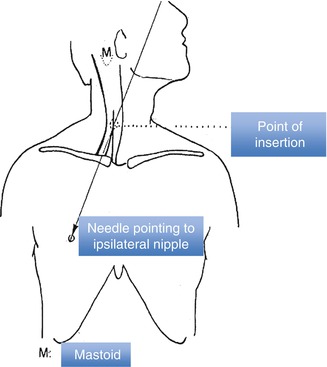
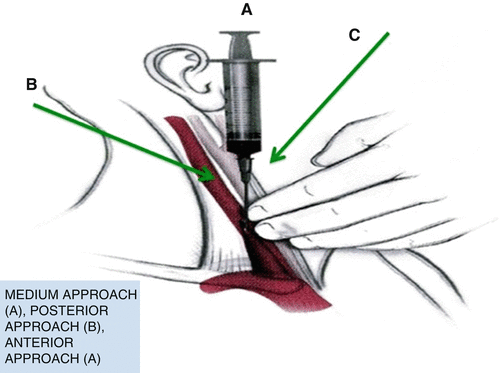
Internal jugular vein lies underneath the triangle formed by the clavicle and the clavicular and sternal heads of the sternocleidomastoid muscle (Fig. 10.1).

Fig. 10.1
Internal jugular vein catheterization landmarks
IJ is best localized at the apex of this triangle but can be also easily accessed cranially medial to the sternocleidomastoid muscle and external to the carotid pulse (anterior approach) or lateral to the muscle (posterior approach).
Ultrasound guidance with a high-frequency, high-resolution probe (7–15 MHZ) has decreased the rate of immediate complications.
Reduces failure rate and misplacement, especially in the obese (for the femoral route) or in hypotensive patients (absence of palpable adjacent (femoral) artery).
But can increase the risk of pneumothorax in inexperienced hands (for subclavian access).
Avoid excessive compression of the skin which will collapse the vein and distort surface landmarks.
Improper insertion position and inadequate landmark identification are common technical errors.
Insert needle at a 45° angle to the skin, pointing to the ipsilateral nipple (or sternal notch with posterior approach)
The line should be tunneled. It is preferable to avoid IJ insertion in patients with previous neck surgery.
As above, beware of multiple attempts for the increased risk of damaging adjacent structures (trachea, esophagus, carotid artery).
10.1.3 Femoral Vein Access
Advantages
Easiest if CVA is needed for resuscitation from shock,
Can be performed quickly.
The femoral artery is an immediate palpable landmark.
No risk for hemothorax or pneumothorax.
The site is directly compressible if bleeding or arterial cannulation occur.
Nerve damage is unlikely.
Local anesthesia may be omitted in an emergent situation.
Disadvantages
Risk of deep venous thrombosis is increased sixfold, unrelated to duration of catheterization.
The perineum is always considered as potentially contaminated.
Formal contraindication: known or suspected thrombosis.
Patient position: supine with the hip in neutral position and the foot in moderate lateral flexion.
Vein lies in the femoral triangle formed by the inguinal ligament superiorly, the adductor longus muscle medially, and the sartorius muscle laterally (Fig. 10.2), medial to the (pulsating) artery.

Fig. 10.2
Femoral triangle and femoral vein anatomic relations
Insert needle 1 cm below the inguinal ligament, 0.5 cm medial to (pulsating) artery.
Enter the skin cephalad at a 45° angle with the 22-gauge needle.
Most frequent complications:


