CHAPTER 32
Percutaneous Disc Decompressions
INDICATIONS
Percutaneous disc decompression (PDD) is a minimally invasive procedure performed under fluoroscopic guidance for the treatment of lower back with or without radiation to the lower extremities secondary to a lumbar herniated nucleus propulsus. There are many different techniques described for performing PDD. These include chemonucleolysis using chymopapain, automated percutaneous lumbar decompression (APLD) using a nucleotome, percutaneous discectomy, laser discectomy, nucleoplasty, and dekompressor.1–12 The primary goal of all of these procedures is to reduce pressure in the disc and remove disc material.
This chapter will discuss PDD using either the Stryker Disc Dekompressor (Figure 32-1) or the ArthroCare Nucleoplasty devices (Figure 32-2). Stryker’s Dekompressor mechanically aspirates disc material. As a result, aspirated disc material can be visually seen and sent for histological examination. ArthroCare’s Nucleoplasty uses Coblation, which uses bipolar radiofrequency energy to generate a plasma field that disintegrates disc material into gases that escape through the needle.

Figure 32-1. Dekompressor.

Figure 32-2. Nucleoplasty probe.
Both procedures are designed to reduce the size of a disc herniation thereby taking pressure off the affected nerve roots. This treatment modality is not considered a first-line therapy and should be considered only after a patient has failed more conservative therapies such as physical therapy, oral anti inflammatory medication, and epidural steroid injections.
Patient selection criteria for treatment with percutaneous disc decompression include:13
• Axial back pain with or without radicular symptoms
• MRI consistent with a contained disc herniation
• Imaging demonstrating greater than 50% preserved disc height
• Failed conservative treatment
• Positive diagnostic selective nerve root block
• Discography positive for concordant pain and post-discography CT scan consistent with a contained disc herniation (this is a relative criteria and depends on surgeon preference)
RELEVANT ANATOMY
A standard percutaneous posterolateral discography approach to the disc is utilized. The Scottie dog image is utilized for initial approach to the disc space (Figure 32-3).
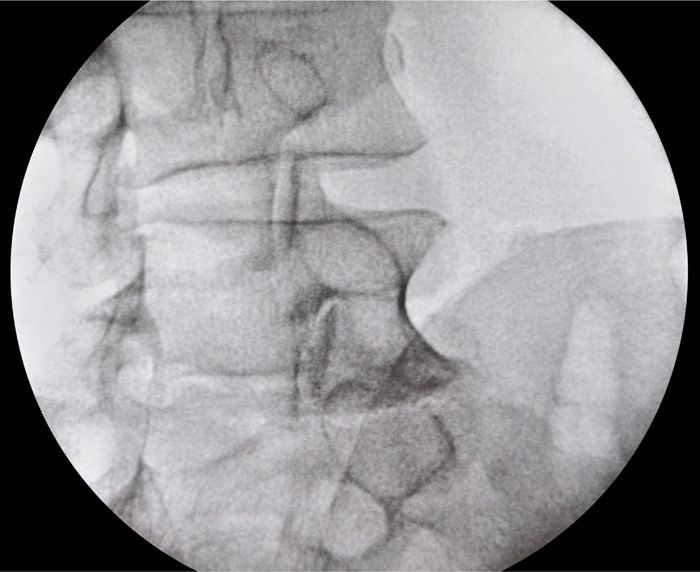
Figure 32-3. Scottie dog view.
In order to minimize the risk of nerve root injury the needle is introduced in the safe triangle described by Kambin.
It is essential to confirm that the patient has a contained disc herniation (Figures 32-4 and 32-5). This is probably the most important thing to keep in mind to ensure success with these procedures. If the targeted disc does not have an intact annulus, the procedure is unlikely to be successful.
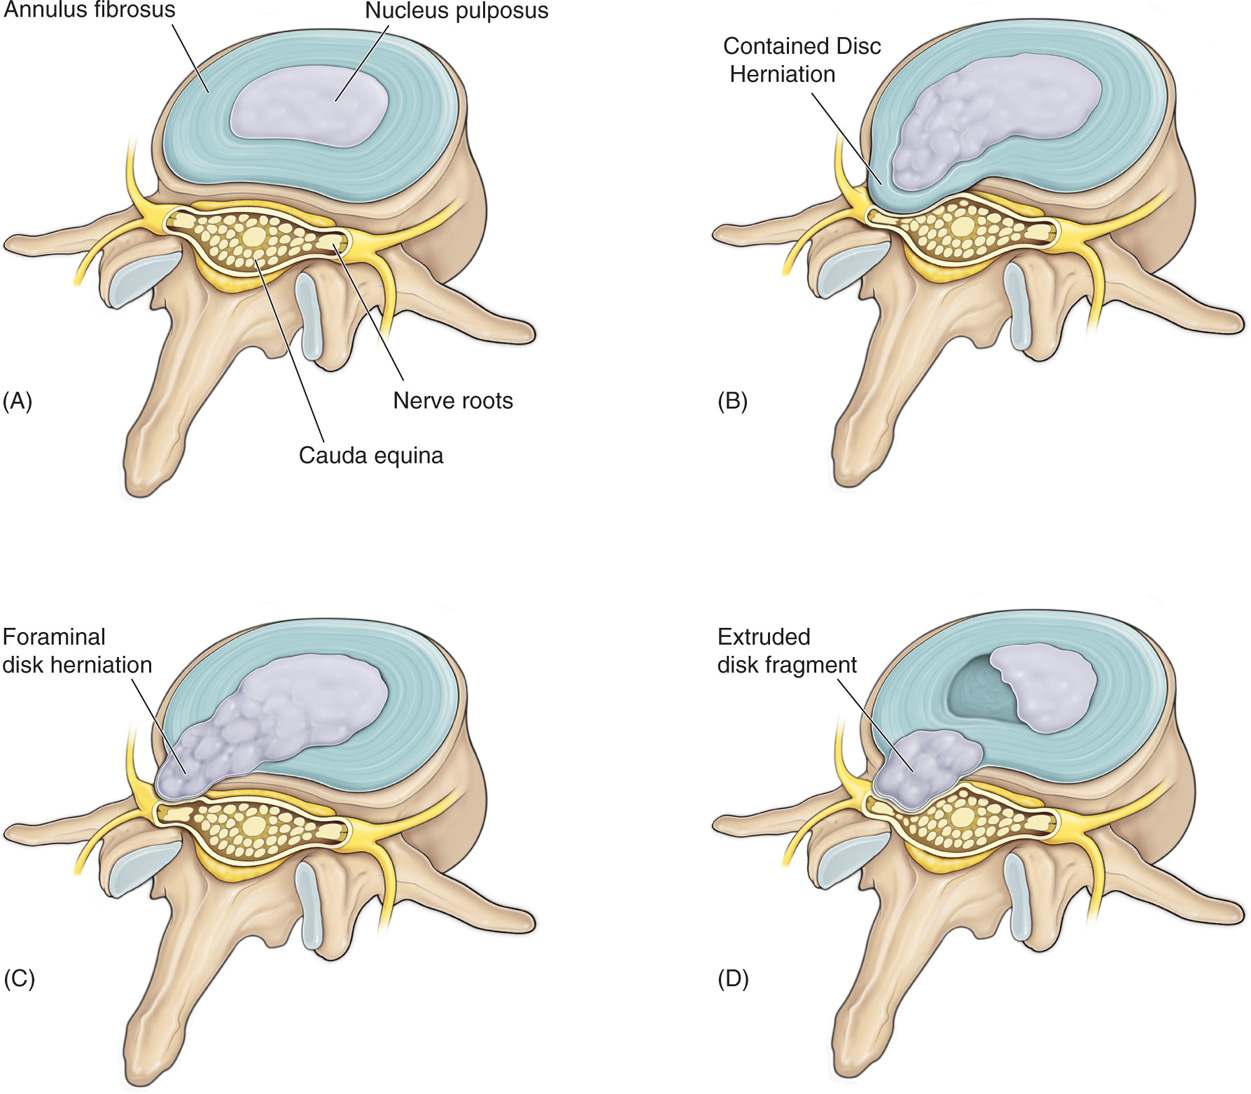
Figure 32-4. Types of disc herniation.
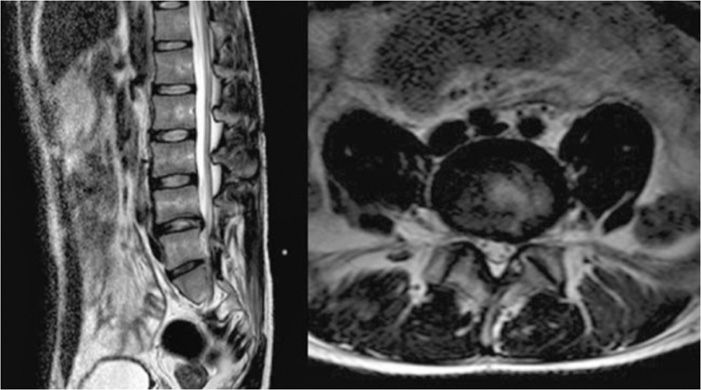
Figure 32-5. MRI picture of contained disc herniation.
BASIC CONCERNS AND CONTRAINDICATIONS
PDD is an elective, minimally invasive spinal procedure, typically performed under monitored anesthesia care (MAC) with sedation. Therefore, a standard preoperative workup including a history and physical, appropriate imaging studies, and tests should be performed. Patients on anticoagulant therapy will have to stop their respective medications in a timely manner prior to the procedure to minimize the risk of bleeding at the procedure site.
Contraindications and exclusion criteria:14
• Spinal infection
• Spinal tumor
• Spinal fracture
• Extruded disc, sequestered disc fragment, or large disc herniation
• Cauda equina syndrome
• Moderate to severe spinal stenosis
• Uncontrolled coagulopathy and bleeding disorder
Fluoroscopic Views
There are basically 3 fluoroscopic views that are utilized for the approach.
Initial needle entry is performed utilizing the oblique view (Figure 32-6). This is the best approach to guide the needle through a proper path.
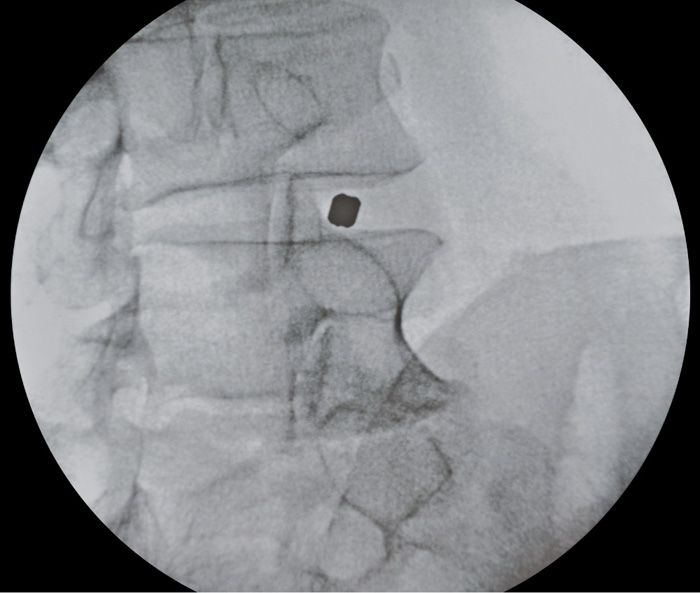
Figure 32-6. Oblique view.
Once the needle is on the right trajectory, the C-arm is rotated to the AP view (Figure 32-7).
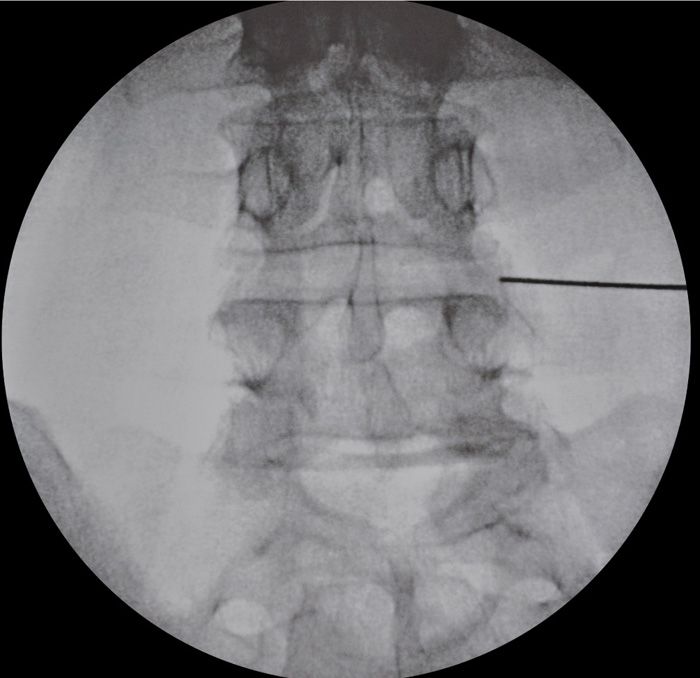
Figure 32-7. AP view.
The final view is the lateral view, which is the most important view to gauge depth (Figure 32-8). This view is the most important view for safety reasons, to ensure the needle does not penetrate the anterior margin of the disc.

Figure 32-8. Lateral view.
Equipment
• 25-gauge 1.5-in needle for local
• Lidocaine 1% or 2%
• Iodinated water soluble contrast such as Omnipaque 240
• Stryker dekompressor probe if performing dekompressor
• Perc-D wand, 17-gauge Crawford needle and ArthroCare power generator if performing nucleoplasty
• C-arm fluoroscopy machine
• Sterile full body drapes
Technique
The basic initial steps are the same for both dekompressor and nucleoplasty. After the entry into the disc space using the introducer needle, the technique is then a little different. With dekompressor, the disc is decompressed mechanically with the dekompressor device. With nucleoplasty, the disc is decompressed by coablation—a combination of coagulation and ablation.
We will first discuss the initial common steps for both the procedures. We will then mention the differences between the steps for dekompressor and nucleoplasty.
Initial Steps
• After informed consent is obtained, patient is taken to the operating room.
• Patient lies on the operating room table in the prone position with a pillow placed under the abdomen.
• The lumbar region is prepped and draped in a sterile fashion.
• IV antibiotics are used for prophylaxis, to decrease the risk of discitis. One gram of cefazolin is the preferred antibiotic. For patients with a history of allergy to penicillin or cefazolin, IV clindamycin or a combination of gentamycin and vancomycin can be used.
• Light sedation is used for the procedure. The main goal of sedation is anxiolysis. The patient should not be too deeply sedated for these procedures due to risk of nerve injury.
• At all times patient should be easily arousable and should be able to report any paresthesias from nerve root contact during the procedure.
• Appropriate disc to be targeted is confirmed by counting down from T12, and confirming with x-rays and MRI of the patient that should be present in the operating room during the procedure. If the patient has had a discogram prior to the procedure, those films should be present as well.
• After the appropriate disc level has been identified, the next step is to square off the end plates at the involved level so that the x-ray beam is perpendicular to the intended disc level.
• Now the C-arm is rotated to the oblique view, which is used to target the needle entry site (Figure 32-6). The superior articular process should be positioned midway between the anterior and posterior disc margins. A skin mark is now made for the needle entry point. This should be in the Kambins safe triangle (Figure 32-9). Needle entry is preferable on the same side as the disc herniation. Local anesthesia is now infiltrated in the skin and subcutaneous tissues. The needle is now advanced under the oblique view of the C-arm.
• Once the needle is advancing toward the target in the oblique projection, the C-arm is rotated to the AP projection (Figure 32-7). The needle is advanced slowly till it reaches the outer edge of the annulus in the AP projection.
• At this point, the C-arm is rotated to the lateral position (Figure 32-8). Entry into the disc space should always be carried out in the lateral position for safety reasons. Advance the needle into the middle of the disc space in the lateral position.
• Careful attention should be taken while advancing the needle into the disc space. If the needle strays too medially, it can go into the spinal canal. If it strays too laterally, it can go into the annulus, or potentially even anteriorly beyond the vertebral margin into the peritoneal cavity. Also, in the lateral position, it is essential to monitor the needle as it enters the disc space to ensure it does not go beyond the anterior border of the disc space.
• Once the needle is in the center of the disc, some people prefer to inject a minimal amount of contrast to outline the margins of the nucleus. If this approach is taken, it is important to use a minimal amount of contrast, to avoid obscuring the field of view (Figure 32-10).15
• During the next steps, the procedure differs slightly when using the Dekompressor probe or the Nucleoplasty wand, and will be discussed separately.
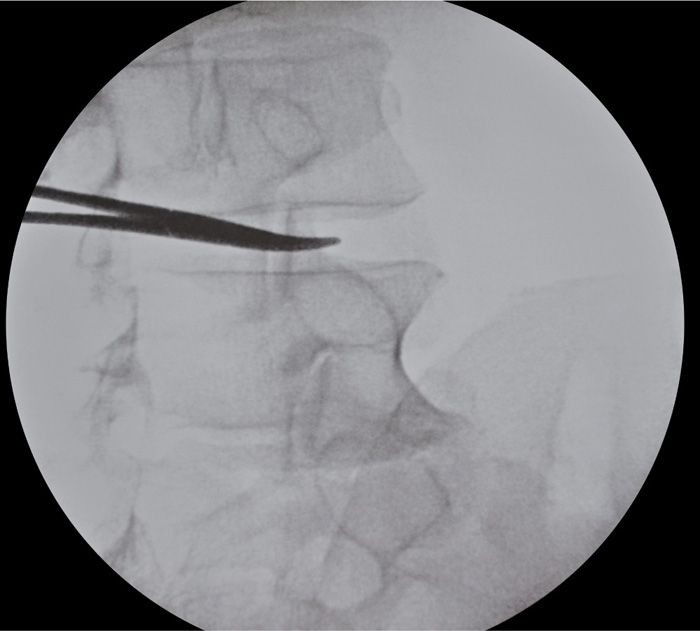
Figure 32-9. Skin mark using clamp.
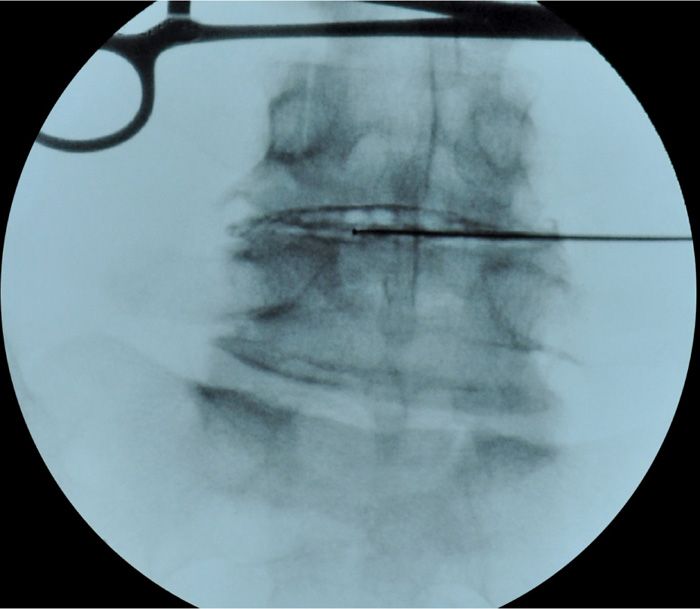
Figure 32-10. Dye into disc to outline disc space.
DEKOMPRESSOR (FIGURES 32-11 THROUGH 32-14)
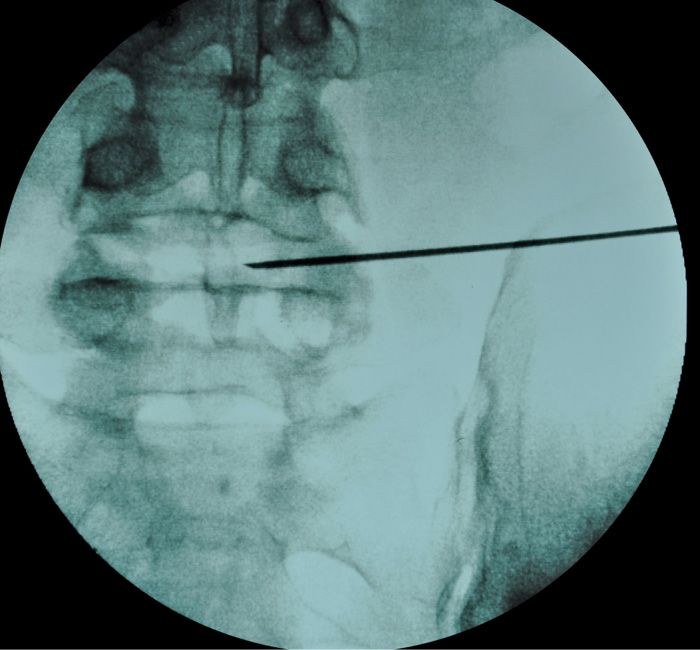
Figure 32-11. Dekompressor at mid-point of disc.
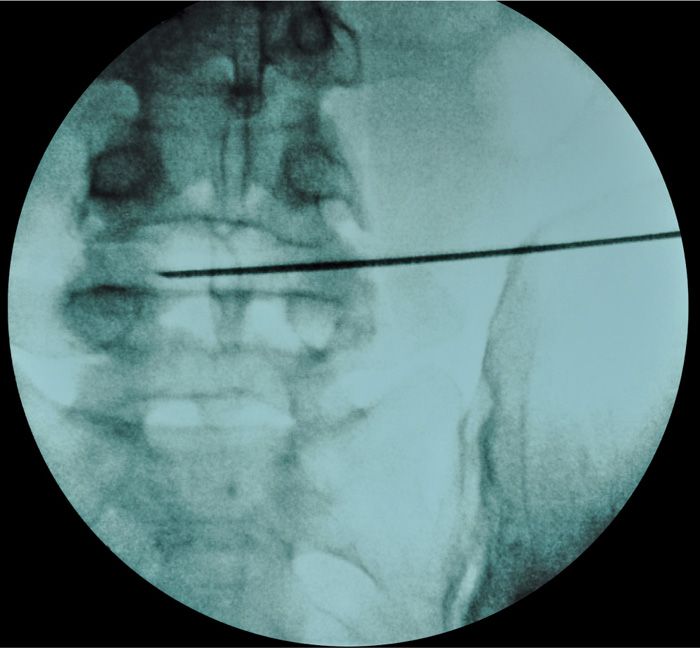
Figure 32-12. Dekompresor at distal end of disc in AP view.
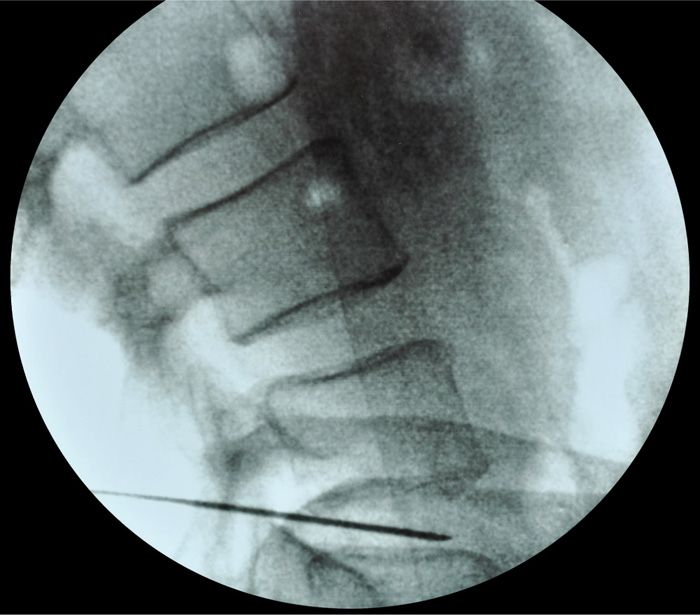
Figure 32-13. Dekompressor in lateral view.
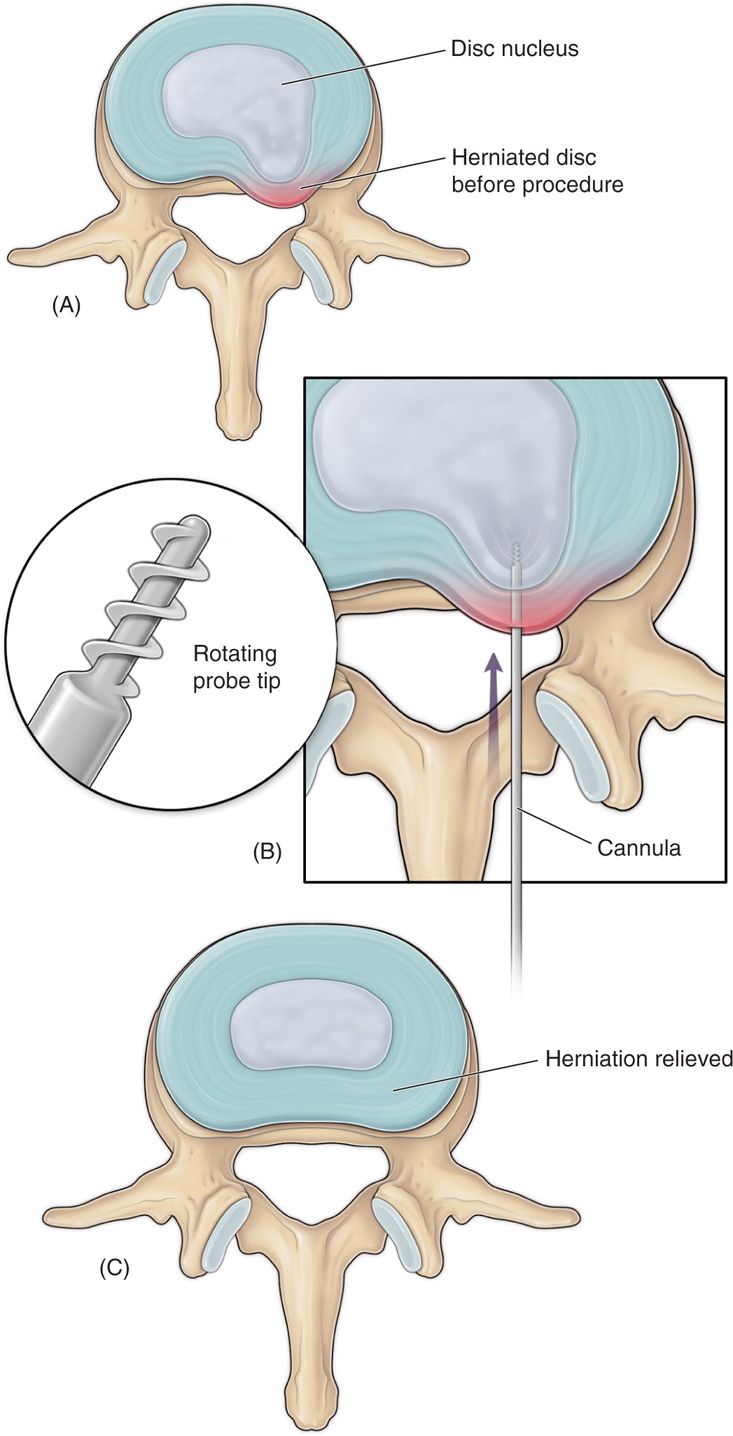
Figure 32-14. Dekompressor animation.
• The Dekompressor device is a mechanical device—it performs disc decompression by rotating at high speeds to extract the disc material from the nucleus.
• The first step is to remove the stylet from the introducer needle previously placed in the center of the disc.
• The Dekompressor device is now introduced through the introducer cannula into the nucleus.
• Confirm using fluoroscopy that the tip of the device extends beyond the introducer needle into the disc space.
• The switch on the device is now turned on to start the discectomy procedure.
• The probe is advanced gently while on to begin decompressing the disc material by its rotating action.
• The anterior and posterior boundaries over which the probe should be passed are marked off by adjusting the depth marker on the skin, which should be marked at the spot, where the probe tip is anteriorly, at the junction of the annulus and the nucleus.
• There is both an audible and tactile response that is felt as the disc material is being aspirated.
• The aspiration procedure is carried out at 15-second periods, and the probe is moved back and forth between the marked boundaries. During this process, careful attention should be paid to make sure the probe does not advance beyond the anterior margin of the disc border.
• The device should be activated while the device is being moved forward.
• Total activation time is usually between 1 and 5 minutes, with a recommended maximum time of 10 minutes.
• Excessive pressure should not be applied to the probe.
• Visualize the collection chamber to ensure that there is nuclear material collecting in the chamber.
• Once tissue is seen at the entrance of the chamber, approximately 1 mL of tissue has been aspirated.
• If no tissue is seen after a few passes, and more than 3 minutes, remove the probe and inspect to see if there is any tissue seen on its shaft. If no tissue is seen, ensure that the introducer cannula is still in the nucleus of the disc.
• Disc material on the probe is removed with the black probe cleaner that is included in the kit.
• End point is reached when:
![]() Sufficient material has been aspirated.
Sufficient material has been aspirated.
![]() No disc material is aspirated after 3 minutes.
No disc material is aspirated after 3 minutes.
![]() 10 minutes of activated time has expired.
10 minutes of activated time has expired.
![]() Collection chamber is full.
Collection chamber is full.
• The probe and introducer cannula are usually taken out as 1 unit.
• A band aid is applied at the entry site.
• The aspirated disc material is sent for pathology.
NUCLEOPLASTY (FIGURES 32-15 THROUGH 32-19)
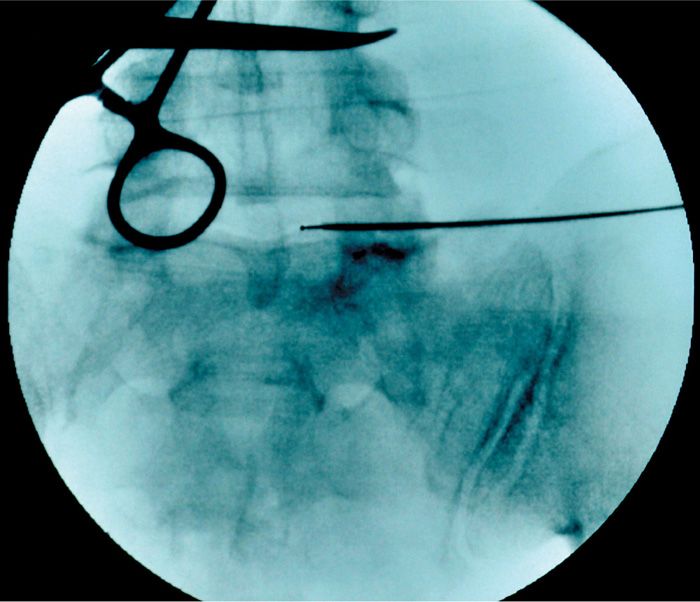
Figure 32-15. Nucleoplasty probe entering disc space.
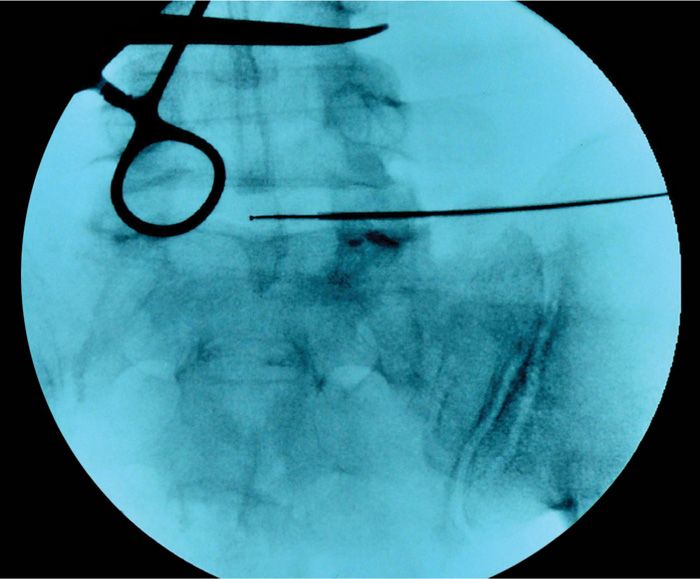
Figure 32-16. Nucleoplasty probe further into disc space.
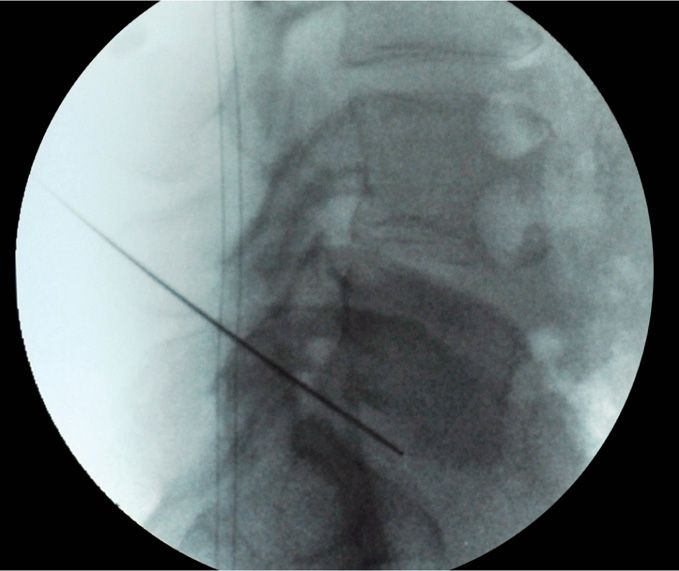
Figure 32-17. Nucleoplasty probe into disc in lateral view.
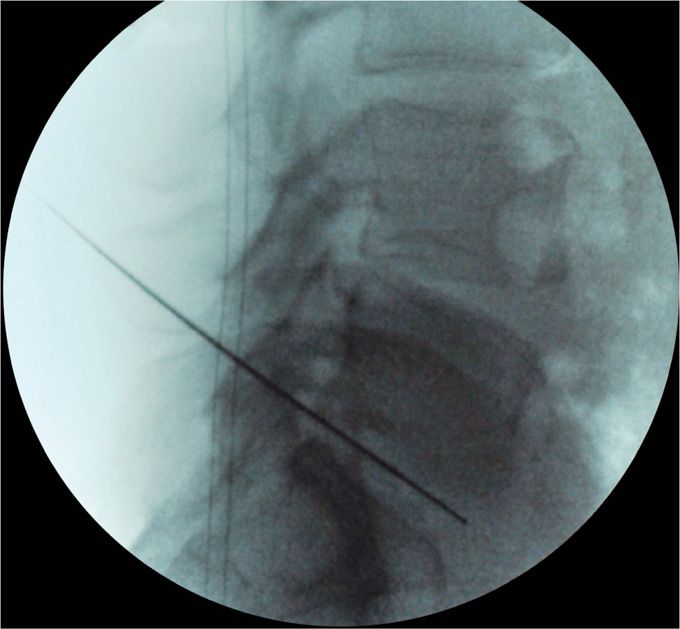
Figure 32-18. Nucleoplasty probe in distal end of disc in lateral view.
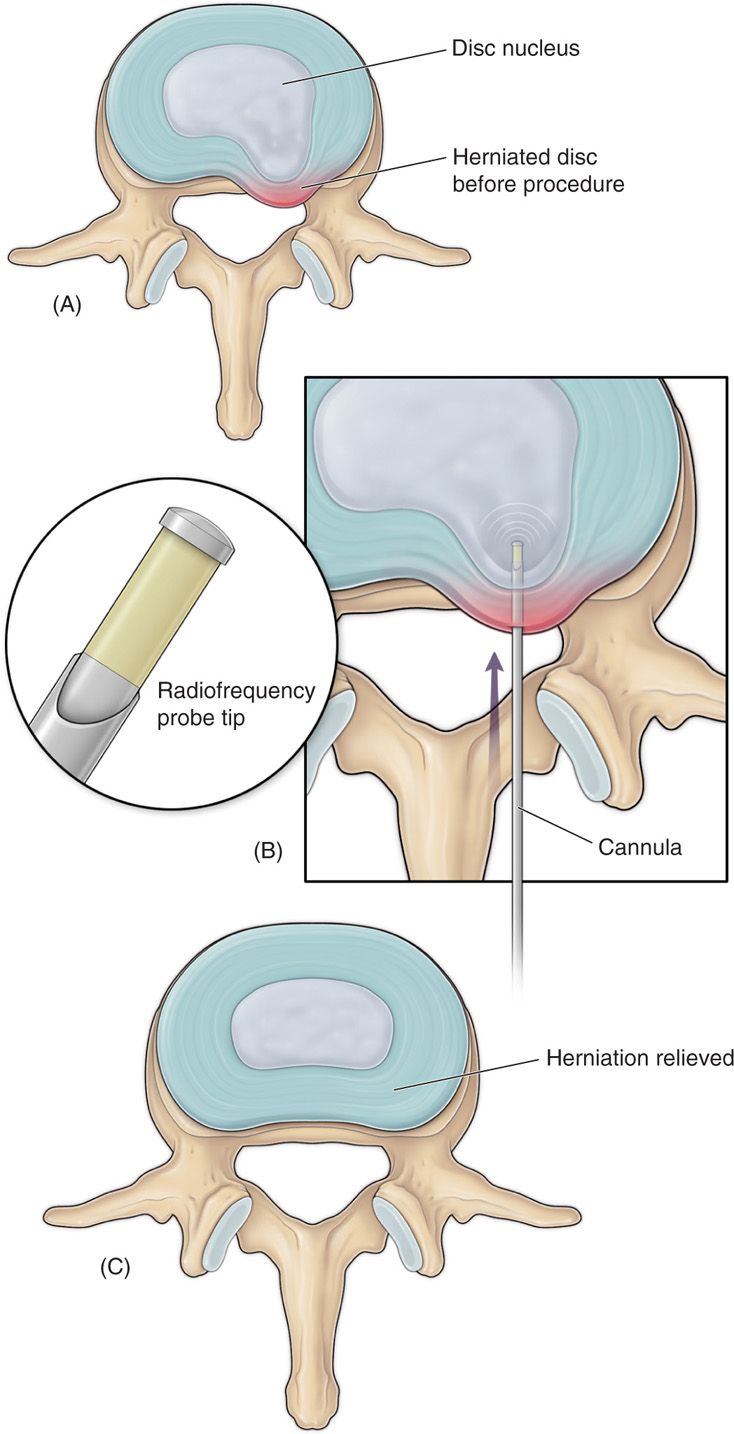
Figure 32-19. Nucleoplasty animation.
• Nucleoplasty is performed with radiofrequency energy that dissolves the disc material using molecular dissociation.
• Coablation technology uses a combination of coagulation and ablation.
• Coagulation denatures the proteoglycans, and the ablation process provides a controlled and localized ablation.
• The by-products are inert gasses, which escape from the disc via the needle.
• The first step specific for nucleoplasty is once again to remove the stylet from the introducer needle that has already been placed in the center of the disc (as described in the initial approach section).
• The Perc-D wand is introduced via the introducer cannula into the disc space.
• The wand is advanced until the distal end of the skin reference mark is positioned at the proximal edge of the needle hub. This is the proximal limit for creating coblation channels.
• The active section of the wand tip is now outside the tip of the needle, and the location of the reference mark identifies the proximal channel limit.
• The tip of the wand is now advanced till the tip reaches the annulus on the anterior border of the disc. This is the distal limit for creating coblation channels. The depth gauge is advanced down the shaft to mark off this distal limit.
• The wand is now withdrawn to the proximal marker.
• Coblation is now carried out.
• The wand is moved back and forth between the proximal and distal markers.
• A series of channels is now created in the nucleus.
• The wand is advanced 5 mm/s to the distal mark, using the ablation mode.
• The wand is withdrawn to the proximal limit, using the coagulation mode.
• The procedure is performed initially orienting the dot on the wand’s handle to the 12 o’clock position. This is repeated creating additional channels at the 2, 4, 6, 8, and 10 o’clock position.
• After the coblation channels have been created, withdraw the spine wand from the needle, and then withdraw the needle.
• A band aid can be applied at the needle insertion site.
• There is no tissue to be sent for pathology in this case, since there is no actual disc material that is aspirated. The compressed disc material is broken down into gasses, which escape from the needle.
POSTPROCEDURE FOLLOW-UP
Following the procedure, patients should be discharged with a mild analgesic and advised to refrain from strenuous activity for 24 to 48 hours postprocedure. Patients should be contacted the following day and scheduled to follow up in office 1 week and 4 weeks following procedure to evaluate progress and or adverse events. Patients should be educated to call the office if any of the following events occur:
• Fever
• Chills
• Weakness in extremities
• Bowel or bladder incontinence or retention
• New onset numbness or paraesthesia in extremities
• Bleeding
• Changes or exacerbation in symptoms
In many cases, patients will experience almost immediate reduction in preoperative symptoms after the disc is decompressed. However, it is not uncommon to see a gradual improvement of symptoms days to weeks following the procedure. Patients should be educated to refrain from heavy lifting, bending, pushing, pulling, and twisting to reduce the risk of reherniation. Back braces are not required; however, they are occasionally used to remind the patient that they had a spinal procedure and to prevent the previously motioned movements and further improve surgical outcome.
POTENTIAL COMPLICATIONS AND PITFALLS
Potential risks of percutaneous disc decompression include but are not limited to:
• Infection including discitis
• Bleeding
• Nerve root irritation or injury
• Exacerbation or worsening of pain
• Cauda equina syndrome
• Hematoma
• Paralysis
• Scar tissue formation
• Failure of technique requiring open surgery
• Recurrence of disc herniation
• Idiosyncratic reaction
• Anaphylaxis
• Death
CLINICAL PEARLS
• The level of evidence for managing predominantly lower extremity pain due to contained disc herniation is level II to III for nucleoplasty,16 and level III for Dekompressor17 based on USPSTF criteria.18 However, both of these procedures are relatively easy to perform, quick, and can be done with minimal sedation, and with minimal risk of complications.
• The success of these procedures largely depends on good selection criteria—these procedure will be ineffective if the disc herniation is not contained, or if the disc has lost greater than 50% of its height.
• If performed for the proper indication percutaneous disc decompression can be very efficacious. Percutaneous disc decompression is a great alternative for patients who have failed procedures such as epidural injections and are not usually surgical candidates.
Related posts:


Stay updated, free articles. Join our Telegram channel

Full access? Get Clinical Tree


