Fig. 8.1
Steps of midline xipho-pubic incision
1.
Place a pad on each side of the planned incision.
2.
Maintain equal traction on each side and use the scalpel to cut vertically, straight on the midline.
3.
Incise to the left of the umbilicus, then straight up and down.
4.
Cut the subcutaneous tissue, and expose the subcutaneous fat with pads on each side.
5.
Apply traction on each side with hooked fingers on the pads to open the fat on the midline and expose the linea alba.
6.
Use bipolar cautery or monopolar coagulation on forceps to selectively secure bleeding points.
7.
Identify (crossing fibers) and cut the linea alba with the scalpel on the entire length of the incision without opening the peritoneum (this prevents contamination of the abdominal wall in case of peritonitis).
8.
Lift both edges of fascia with one or two Kocher clamps on each side.
9.
Make a small hole in the peritoneum.
Keep edges of fascia lifted and enlarge the hole; one finger cephalad and caudad to be sure there is no adhesion under the incision.
Scalpel can be used to cut up to the peritoneum, but most of the surgeons prefer to use cautery (if so, use the section and not the coagulation mode).
10.
In case of peritonitis:
Withdraw liquid for analysis.
Protect the abdominal wall from contamination by placing wet pads in the peritoneal cavity on each side of the incision while enlarging the peritoneal opening.
11.
Keeping the edges of fascia lifted, ligate and divide the ligamentum teres and incise the falciform ligament with cautery.
12.
Place a plastic wound drape and remove the Kocher clamps.
13.
Place self-retaining retractors.
8.2.2 Oblique and Transverse Incisions
Nerves and arteries (consequences):
The intercostal nerves (T5 to T12) run medially and caudad within the abdominal wall. Division may result in weakness of the involved part of the abdominal wall, potentially leading to paralytic hernia (Fig. 8.2).
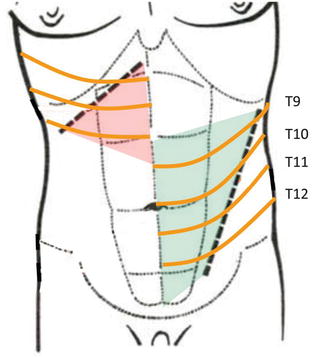
Fig. 8.2
Oblique incisions that interrupt nerves lead to paralytic hernia
Intercostal arteries together with superior and inferior epigastric arteries provide the vascularization of the abdominal wall.
Whenever performing an incision other than midline, try to avoid nerves and arteries, i.e., incisions should be oblique medially and caudad remain laterally to the rectus abdominis.
Strictly transverse incisions are a good compromise, as only one or two nerves are sacrificed (Fig. 8.3
).
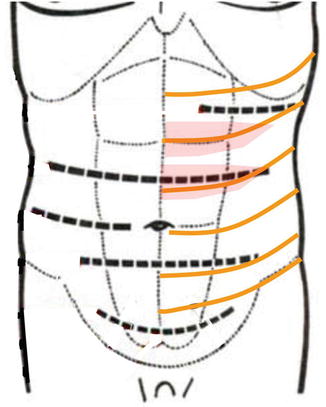
Fig. 8.3
Strictly transverse incisions preserve abdominal wall nerves
Avoid incisions of the abdominal wall that interrupt nerves and/or vessels.
In a patient with a previous transverse or oblique incision:
Use a midline or the same transverse or oblique incision: crossing a transverse or oblique incision by another, or even cutting parallel to a previous transverse or oblique incision, may lead to acute necrosis of the abdominal wall between the incision lines (Fig. 8.4
).
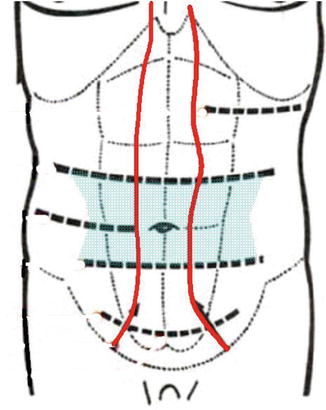
Fig. 8.4
Two parallel transverse incisions lead to abdominal wall inschemia between the incision lines
Even if this severe complication is avoided, incisional hernia is most probable.
Transverse incision should be performed only when the intra-abdominal affection is known, as extension of the incision is difficult if not impossible.
As closure involves several muscular and fascial layers, oblique and transverse incisions are reputed to create less incisional hernia.
Procedure
1.
Place a pad on each side of the planed incision; this should be at least 4 cm below the costal margin.
2.
Maintain equal traction on each side and use the scalpel to cut vertically.
3.
Cut the subcutaneous tissue, and expose the subcutaneous fat with pads on each side. Proceed down to the fascia.
4.
Use bipolar cautery or monopolar coagulation on forceps to selectively secure bleeding points.
5.
Incise the fascia of the external oblique muscle and the anterior rectus sheath. If the incision is short, the fibers of the rectus abdominis can be retracted medially. If needed, cut the fibers with the scalpel and selectively coagulate the smaller vessels and ligate the larger vessels. The fibers of the internal oblique muscle can usually be separated, exposing the fascia of the transversalis muscle in continuity with the posterior rectus sheath.
6.
Lift the transversalis muscle fascia with two Kocher clamps.
7.
Create small hole in the fascia and closely attached parietal peritoneum.
8.
Keeping the fascia edges lifted, enlarge the hole, introduce a curved finger up and down to ensure there is no adhesions under the incision.
9.
In case of peritonitis (a midline incision would have been advisable),
(a)
Withdraw sample for analysis.
(b)
Protect the abdominal wall from contamination by placing wet pads on either side of the incision while enlarging the opening (fascia and peritoneum).
10.
Place a wound plastic drape and remove the Kocher clamps.
11.
Place self-retaining retractors.
8.2.3 McBurney Incision
This incision, used on the right side for appendectomy and on the left side for the Bouilly-Volkmann procedure, is, in fact, a short oblique incision.
If performed laterally to the rectus abdominis muscle, and after dividing the fascia of the external oblique muscle, the fibers of the internal oblique and transverse muscles can be gently separated to give access to the peritoneum.
As no muscle is cut (as long as the incision does not need to be extended), the risk of hernia is minimal.
Procedure
1.
The classic McBurney incision is perpendicular to a line drawn from the anterosuperior iliac spine to the umbilicus, crossing this line at the junction of medial and lateral thirds. The Rocky-Davis incision is a horizontal variant, more cosmetic and easier to extend.
2.
Incise the skin with the scalpel.
3.
Cut subcutaneous fat, fascia superficialis, and deep fat layer with scissors.
4.
Place Farabeuf-type (flat right-angled blades) retractors and expose the fascia of the external oblique muscle. Clean the fat with a pad.
5.
Coagulate bleeding points as necessary.
6.
Incise the fascia of the external oblique muscle parallel to its fibers. Remain strictly lateral to the rectus abdominis and do not open its sheath. If underlying fascia is visible, do not incise it: retract outward to expose muscular fibers of the internal oblique muscle.
7.
Split the muscular fibers of internal oblique muscle by blunt dissection with large scissors. If underlying fascia is visible, do not incise it: retract outward to expose muscular fibers of transversalis muscle. Split the muscular fibers by blunt dissection with large scissors.
8.
Gently place the retractors to maintain the opening down to the peritoneum, clear fat with a gauze.
9.
Grasp the cleaned peritoneum with two curved clamps and pull it out through the hole up to the skin. Be sure that no viscus has been included in the grasp, and make a small hole with scissors.
10.
By pulling on each clamp, enlarge the hole.
11.
Pull the peritoneum up to the skin with clamps to protect the muscular wall from infection.
12.
Leave the clamps attached to the peritoneal edge and place retractors in the peritoneum.
8.3 Exposure of Solid Organs and Hollow Viscus
8.3.1 Gallbladder
When entering the peritoneal cavity through a midline incision, access to the gallbladder and right hepatic lobe is blocked by the ligamentum teres and falciform ligament; these structures must be divided as above.
When entering through a transverse (or oblique) incision, division of the ligamentum teres is not mandatory.
Apply gentle traction with a wet abdominal pad and flat blade retractor on
The transverse colon and the duodenum caudad
The stomach to the left
Divide the cholecystoduodenocolic ligament whenever present to expose the subhepatic space.
A third flat blade retractor placed at the inferior aspect of the liver left to the gallbladder may improve exposure.
8.3.2 Liver
To get access to the liver, make a large right transverse subcostal incision, extended to left or midline. Proceed with ligamentum teres as for gallbladder exposure leaving about 5 cm of ligamentum teres attached to the liver allows for gentle traction if needed. Cut (with cautery) the falciform ligament above the liver as far to the rear as it remains thin (when it widens, middle and left hepatic veins are just behind). Place a fixed retractor. Cut the cholecystoduodenocolic ligament.
Open the lesser omentum to get access to the bursa omentalis. Passing a finger behind the hepatic pedicle through the foramen bursae omentalis is the first step of the Pringle maneuver.
To mobilize the left lobe, cut (cautery) the left triangular ligament, gently pulling the left lobe downward and medially. To protect the abdominal esophagus, place a wet pad behind the left triangular ligament before division. The triangular ligament widens as it continues to the right, becoming the coronary ligament. Cautiously continue the dissection to the right with scissors.
To mobilize the right lobe, lift and rotate the right part of the liver medially, in order to stretch the right triangular and coronary ligaments and divide them (cautery) close to the liver cautiously as you progress to the left (use then scissors) where the inferior vena cava, accessory, and right hepatic veins will appear.
8.3.3 Abdominal Esophagus
A nasogastric tube should be placed.
Through an upper midline incision, proceed as explained before to mobilize the left hepatic lobe. Hold it to the right with a retractor.
The esophageal hiatus of the diaphragm and the esophagocardial junction are exposed.
Incise the peritoneum on the anterior aspect of the esophagus, caution being exercised not to injure the anterior vagal nerve.
Proceed gently with blunt dissection of the abdominal esophagus. At the posterior aspect of the esophagus, the posterior vagal truck is palpable, and blunt dissection should pass behind it.
Encircle the esophagus with an abdominal (vascular) tape.
8.3.4 Spleen
The spleen is attached
To the stomach by the gastrosplenic ligament, which contains 2–10 short gastric arteries and veins in the upper part and left gastroepiploic artery and veins in the lower part, the lower part is continued by the gastrocolic ligament right and the splenocolic ligament left.
To the left colic flexure by the (short) splenocolic ligament.
To the tail of the pancreas by the pancreaticosplenic ligament (contains splenic artery and vein).
To the diaphragm and left kidney by an avascular fascia named phrenicosplenic and splenorenal ligaments.
To mobilize the spleen, there are two options:
Ligation of the splenic artery before mobilization of the spleen
Mobilization of the spleen followed by ligation of the splenic artery
Expose the operative field with a retractor under the left costal arch.
8.3.4.1 Ligation of the Splenic Artery First
1.
Divide the gastrocolic omentum between the stomach and the gastroepiploic arcade near the left colic flexure.
2.
Proceed dividing the avascular part of the gastrosplenic ligament right to the gastroepiploic vessels. The created window opens the bursa omentalis in front of the pancreatic tail.
3.
Incise the parietal peritoneum at the upper border to expose the splenic artery.
4.
Gently dissect and ligate the splenic artery.
5.
Dissect each of the short vessels in the upper part of the gastrosplenic ligament, ligate, and divide them.
6.
Dissect, ligate, and divide the left gastroepiploic vessels.
7.
Ligate and divide the splenocolic ligament.
Ligation and division of the splenic vein before mobilization is an option.
8.
Mobilize the spleen passing your left hand between the diaphragm and the spleen (easy of no adhesions) and rotate the spleen medially.
9.
Incise the peritoneal reflexion in order to expose the posterior aspect of the tail of pancreas.
10.
If not done previously, ligate the splenic vein.
8.3.4.2 Mobilization of the Spleen First
This procedure is preferred to remove a bleeding spleen or when repair of a damaged spleen is attempted.
1.
Wrap the spleen with a pad and grasp it with your left hand.
2.
Clamp the splenocolic ligament on the colic side and divide it.
3.
Wrap the inferior pole of the spleen with the pad.
4.
Rotate the spleen medially.
5.
Incise the peritoneal reflexion (or force the way with your fingers) to divide the avascular splenophrenic ligament.
6.
Expose splenic artery and vein at the posterior aspect of the tail of pancreas and clamp.
7.
Mobilization of the spleen is terminated by putting wet pads in the splenic fossa to lift the spleen and dividing the gastrosplenic ligament (and ligated short vessels).
8.3.5 Right Colon
1.
Expose the operative field with a self-retaining retractor.
2.
Grasp the cecum and retract it medially, displaying the peritoneal reflexion.
3.
Incise the peritoneal reflexion to open Toldt’s fascia caudad to the right colic flexure. Caution is exercised to stay close to the colon, in order to avoid the ureter below and the duodenum above.
4.
Divide the gastrocolic ligament below the vascular gastric arcade and get access to the bursa omentalis at the level of the distal antrum.
5.
If present, divide cholecystoduodenocolic ligament.
6.
Proceed from left to right to mobilize the right part of the transverse colon, ligating all epiploic vessels.
7.
Clamp the right parietocolic ligament and divide it. Exercise caution when tracing the right colic flexure, not to tear the gastrocolic vein at the anterior aspect of the pancreatic head (hemostasis extremely difficult): gently tie and divide it.
8.
Right colon is fully mobilized.
8.3.6 Pancreas
8.3.6.1 Mobilization of the Duodenum and Head of Pancreas (Kocher’s Maneuver)
1.
Expose the operative field with a self-retaining retractor.
2.
Mobilize the right colic flexure caudad and medially (see right colon): this will expose the duodenum and the head of the pancreas.
3.
Incise the peritoneum along the duodenum to open the Treitz fascia and lift the duodenum and head of the pancreas by blunt dissection while rotating them medially in order to expose the inferior vena cava.
8.3.6.2 Exposure of the Body and Tail of the Pancreas
1.
Open the bursa omentalis by tying off and dividing the epiploic vessels from the level of distal antrum to gastrosplenic ligament. (Another option is to dissect greater omentum from the transverse colon to gain access to the bursa omentalis).
2.
Divide the gastrosplenic ligament up to the short vessels.
3.
Retract the stomach upward and divide the avascular folds between posterior aspect of the stomach and anterior aspect of the pancreas.
4.
Incise the parietal peritoneum along the inferior border of the pancreas.
5.
After identification of inferior mesenteric vein, detach the body and tail of the pancreas by blunt dissection.
Related posts:


Stay updated, free articles. Join our Telegram channel

Full access? Get Clinical Tree


