Forensic Photography in the Emergency Department
William S. Smock
Patrick E. Besant-Matthews
A good photograph…is one which conveys to the observer something which he has not seen, known, or thought of before.
—Andreas Feininger, photojournalist, 1906—1999
To the list of individuals who take pictures—professionals who do so for a living and amateurs who do so for fun—must be added occupational, semiprofessional, and functional photographers.
Emergency physicians and nurses fall into this last category. The health professional in an emergency department (ED) may use photography as often as once a week or daily but may have never had the benefit or luxury of any formal photographic instruction. The purpose of this chapter is to inform and educate the emergency physician and nurse on the principles and practices of forensic photography in the ED.
Why Use Photography in the Emergency Department?
We use photography in the ED because a well-composed picture is worth at least a thousand words. In the ED, photography is generally used for one of two reasons: forensic or educational. The term forensic photography implies that the photograph, when properly obtained, may be used in legal proceedings (1). Traditionally, the use of forensic medical photography has been limited to crime scene locations and autopsy suites.
Now, and with ever-greater frequency, forensic medical photography is finding its way into EDs in the United States. Cameras, both digital and film, are being used to document wounds on individuals who survive their injuries. This change is being brought about primarily by the development of new fields of expertise, such as sexual assault nurse examiner (SANE) programs, child abuse and domestic violence units, and clinical forensic medicine programs, and as part of residency and nurse training.
The reasons for employing a camera to aid in addressing the forensic needs of living patients in the ED are numerous and include the following:
To record and document injuries and evidence that cannot be preserved indefinitely or left untouched, given the treatment that is medically indicated.
To act as a future reference or aid to memory.
To document lesser features and details of a situation that would not otherwise be practical or important for the purpose of medical treatment.
To permit the court and jurors to see things as they were and, in effect, check the testimony being presented to see if it makes sense in context.
To document injuries or conditions, and to record what they looked like before and after medical treatment.
To demonstrate malice or criminal intent.
To show the condition of evidence or injuries at the time of discovery or examination.
To demonstrate the absence of injury or alleged findings.
To illustrate and supplement the written medical record.
To teach nurses, medical students, and residents.
From the standpoint of photography’s educational merits, the rationale is self-evident. The ability of the emergency physician or nurse to photographically document a patient’s injury, wound, lesion, or rash or to obtain a radiograph will ensure that the patient’s information can be shared with other health care professionals for educational purposes.
Consent for Forensic Photography
After death, the patient capitulates the right of refusal and the investigating agency makes decisions and follows an accepted course of practice; however, living persons and patients must give consent for photography, unless they are unconscious, under arrest, and/or there is a court order for pictures to be taken, or unless they are photographed from a public place, such as a street or sidewalk. The physician or nurse is obligated by law to obtain consent, either implied or informed, from the living patient before photographs are taken for educational or forensic purposes. Informed consent involves explaining to the patient the purpose of taking the forensic or educational photograph. An awake and alert patient may refuse to be photographed, just as a patient may refuse to undergo a medical procedure or test. The health care provider must explain the reason for the photograph and the associated risks and benefits, if any. When approached in a respectful and polite manner, most patients permit the photographic documentation of their injuries or wounds, especially when it can be of benefit to their criminal case. Likewise, most patients agree to have their lesions, injuries, or rashes photographed for educational purposes when it is explained that future students will benefit from their generosity. The consent form (Fig. 17.1 must become part of the patient’s permanent medical record.
Implied consent is a legal construct used to secure consent from an individual who is unconscious or so seriously injured as to be incapable of comprehending the consent request or responding to it. Consent in this context is construed as a course of action that a reasonably prudent person would adopt. A reasonably prudent person would allow the photographic documentation of injuries when the photographs will aid in the subsequent evaluation and treatment.
The photographic documentation of injuries may be vital to the conviction of those individuals who perpetrated a crime or inflicted a wound. Conversely, such documentation may help ensure that suspects are not wrongfully charged (2). For example, when an unconscious victim of an assault presents with a soot-covered gunshot wound (Fig. 17.2), the physician may obtain photographs on the basis of the assumption that a reasonably prudent person would permit photographic documentation of injuries or evidence that would be destroyed or altered in the course of medical treatment (Fig. 17.3). When implied consent has been used, the physician must obtain consent from either the patient or the next of kin at some later time.
Hospitals may include consent-for-photography language on operative consent or admission forms (Fig. 17.4), such as, “I consent to photographing of the operation/procedure, including portions of the body for medical, scientific, or educational purposes, provided my identity will not be revealed by the pictures or the descriptive text accompanying them” (3). If photography language is not included in the routine surgical consent form, then a separate form with wording similar to the above is required. Wording may vary slightly from state to state (such as in Louisiana, where slightly different laws exist because of the French influence many years ago). The text of the consent form must be reviewed and approved by hospital administration.
The following is an example of a draft for a separate consent to medical photography form:
In connection with the medical services that (name of patient, child, or ward) is to receive at (name of hospital), I hereby consent that photographs, videotapes, motion pictures, or illustrations may be made of him/her by members of the staff or other personnel working with or for the hospital, or any hospital staff member, for the following uses and subject to the following conditions: (a) photographs, or excerpts therefrom, may form part of the medical record or be used for illustrative purposes in lectures and medical publications, being shown, published, and republished in any manner that the hospital and medical staff shall deem proper; (b) best efforts will be made to prevent or limit personal identification and recognition. I expect no compensation or other remuneration. This consent as to any use of the said photographs, videotapes, motion pictures, or illustrations shall act to expressly release from liability the photographer, videographer, or illustrator, the attending physicians, the hospital and affiliated corporations, the authors, editors, and publishers, if any, and their officers and members.
The form should include the name of the physician or nurse and be signed and dated by the patient. If the patient is unable to sign, an authorized representative of the patient or the next of kin should sign the consent form.
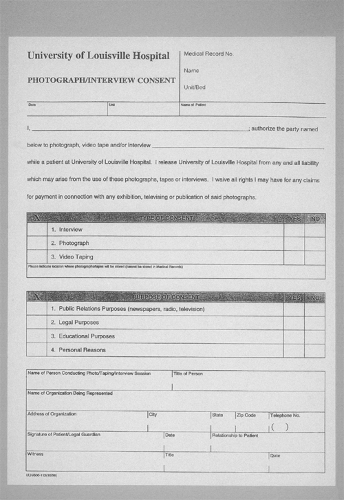 Fig. 17.1. Sample consent-for-photography form from the University of Louisville Hospital. The consent form becomes a permanent part of the patient’s medical record. The photographer should also maintain a copy for his/her records. |
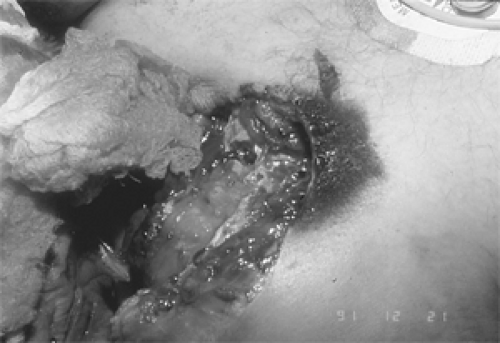 Fig. 17.2. The soot on this close-range shotgun wound is short-lived. It will be removed when the wound is scrubbed in preparation for debridement and closure (see color plate). |
Admissibility and Substantive Evidence
To be accepted as evidence in a court of law, a photograph, either digital or on film, must be an accurate and objective depiction of its subject (4,5,6,7,8,9). The photographer and the photograph must be able to withstand legal challenges as to authenticity, integrity, and credibility, or the judge has an obligation to disregard it as demonstrable evidence (4,5,6,7,8,9).
A photograph is usually not substantive evidence. This means that a photograph cannot be submitted in court as evidence and stand alone without an advocate for it. Someone is going to have to verify it and attest to it and say that they either took it or saw it taken. The court will expect to hear from the advocate presenting the photograph that it is indeed a fair and accurate representation of the situation at the time it was taken.
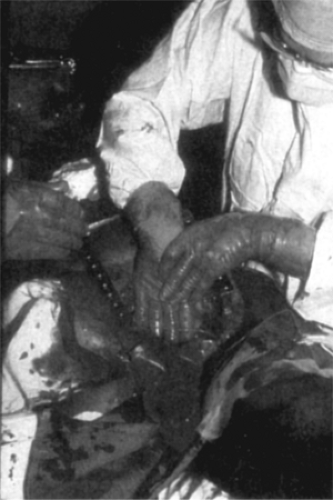 Fig. 17.3. Opening the chest wall alters a wound’s size and characteristics. If possible, wounds and fragile evidence should be documented before surgical intervention. |
A photograph will probably be admitted as evidence by a judge if:
It shows the original appearance or findings and “fairly and accurately depicts” what the health professional saw.
It assists in the identification or characterization of the wound or injuries.
It is not unduly gruesome or inflammatory.
It is of sufficient value to warrant its inclusion.
It will aid the court or jury in obtaining an intelligent or dispassionate evaluation or conclusion.
It is well composed, and most of the picture area is filled with the wound or injury in question.
The feature or wound is clearly visible.
It is nicely exposed and about the right color.
It is in focus.
It has a small ruler in the plane of the wound, to show the wound size (in inches and/or centimeters) (Fig. 17.5).
The image corresponds closely to the verbal description given by the emergency physician or nurse.
It does not contain extraneous matter such as surgical instruments or bloody dressings (Fig. 17.6).
The nurse or physician must also be ready for legal challenges regarding the admissibility of the photographs. The questions and challenges may include the following:
Exactly where and when the photograph was taken.
Exactly what the photo depicted (use lay terms for the benefit of the court, attorneys, and jurors).
The exact anatomic location (supplement with lay terms).
The type of camera and film used.
If filters were used on the lens.
Whether the photograph was obtained by informed or implied consent.
Where the film was developed and if it represented the hospital’s standard protocol.
The use of digital cameras in the ED for forensic purposes has been accepted by US courts (7). Digital images present another set of potential special challenges for their admission into evidence and will be discussed in detail in the section on digital photography in this chapter.
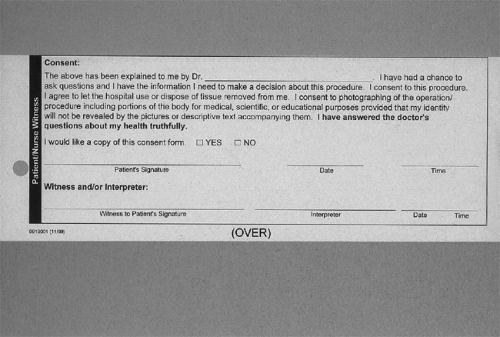 Fig. 17.4. Operative consent form, which includes language about intraoperative photography for educational purposes. |
A photograph with potentially inflammatory content will be challenged. If a photograph is so gruesome and “inflammatory” (4) that it may cause “undue prejudice” (5) toward the accused on the part of the jury, the judge may exclude it from evidence.
Suppose that an elderly woman seen in the ED suffered a severe vaginal laceration from a sexual assault and the accused assailant is on trial. The emergency physician who examined the patient is testifying about the victim’s injuries. The physician describes lacerations (a blunt force, torn, crushing injury) of the vaginal wall, consistent with forced vaginal penetration. The district attorney or commonwealth attorney, who called the treating physician as a witness, produces a photograph (Fig. 17.7) and asks, “Doctor, do you recognize this photograph?” The physician replies, “Yes, it was taken in the ED. The photograph depicts the victim’s vaginal laceration.” After asking several more questions of a legal nature, the lawyer shows the photograph to the defense attorney, offers the photograph in evidence, and hands it to the judge. The defense attorney rises and says that he objects to the
introduction of the photograph. His principle concern is that its introduction will be prejudicial to his client. The judge, whose role it is to see that the trial is conducted according to the accepted rules of law, proceeds to examine the photograph and its suitability for use as evidence. The judge sustains the objection and the photo is not admitted on the grounds that the severity of the laceration and the presence of blood would be inflammatory and prejudicial.
introduction of the photograph. His principle concern is that its introduction will be prejudicial to his client. The judge, whose role it is to see that the trial is conducted according to the accepted rules of law, proceeds to examine the photograph and its suitability for use as evidence. The judge sustains the objection and the photo is not admitted on the grounds that the severity of the laceration and the presence of blood would be inflammatory and prejudicial.
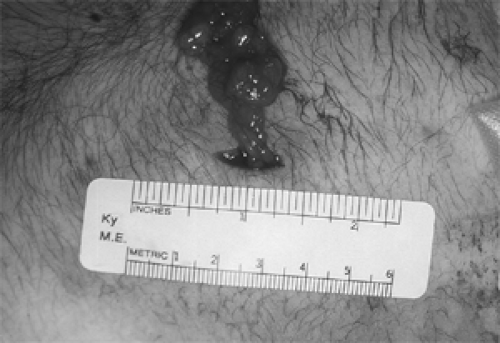 Fig. 17.5. This photo of an abdominal stab wound from a single-edged blade is nicely composed, with the ruler parallel to the wound. The scale is in the plane of the wound and accurately depicts the size of the wound. |
 Fig. 17.6. The presence of extraneous surgical instruments and bloody dressings detracts from the significance of this photograph. |
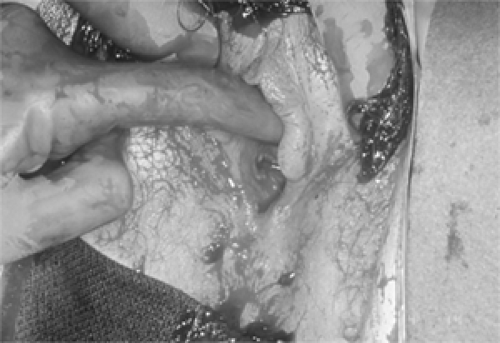 Fig. 17.7. A large vaginal laceration resulting from sexual assault. The presence of blood and the graphic nature of the injury resulted in the judge ruling the photograph inflammatory and not admissible (see color plate). |
In general, a judge probably will not admit a photograph if any of the following conditions apply:
The composition is absurd because the photograph was taken at such a distance from the wound that the wound occupies only a fraction of the image. The remainder of the image area is taken up with parts of the resuscitation or autopsy table, on which are a number of potentially offensive and objectionable items, such as bloody sponges, dressings, pools of partly dried blood, scissors, or clumps of hair (Fig. 17.8).
The wound is out of focus and hard to see.
The picture is overexposed and “washed out.” There is a reflection of the on-camera flash in the middle of the wound. The color is not right. There is a distracting greenish reflection of the overhead fluorescent lights in the metal surface of the resuscitation table.
Poor “scale” technique is used:
Only a section of a plastic ruler is used, cut so that numbers begin at 2 on the inch side and 5 on the centimeter side.
An equipment maker’s name is seen on the scale.
The scale is covering part of the wound.
The scale is not in the plane of the wound but at an angle to it, meaning that because part of the wound is nearer the camera than the scale, any measurement derived from it will be in error by several percentage points.
The physician has just described the wound as being vertical, and clearly it was vertical with respect to the standard anatomic position, but the wound appears horizontal in the photograph.
The photograph was not taken at 90 degrees to the wound, causing perspective distortion (Fig. 17.9).
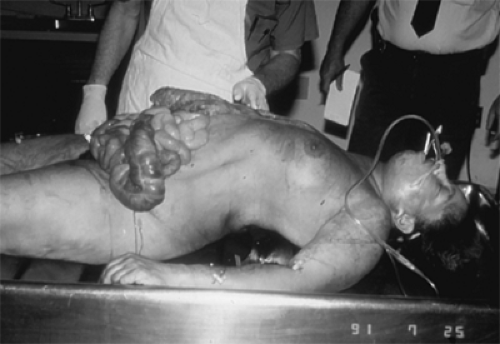 Fig. 17.8. Photographs taken from a distance are important for an overview or general shot but may not be admissible in court on the grounds that they are not specific, detract from the significance of the injury, or include unnecessary information. |
A recent Kentucky ruling determined that “there was no reason to exclude photographic evidence by claiming the photographs were unduly gruesome when the crime itself was brutal and gruesome. The Commonwealth cannot be prevented from proving the commission of a crime that is by its nature heinous and repulsive. Gruesomeness of the photographs alone cannot be the basis for the exclusion of such evidence” (4.
Basic Forensic Photography
The physical care of the patient is always paramount. As important as they are, photographic documentation and evidence collection are secondary concerns. In practice, it is possible to perform forensic photographic evidence collection without compromising patient care (2).
Emergency physicians and nurses who intend to take forensic photographs should have some basic working knowledge of photographic theory. Even if providers are utilizing a “point-and-shoot” camera, they need some background information to understand what goes into making an acceptable forensic photograph. For the purposes of discussion, the author assumes that the reader will be using a 35-mm single-lens reflex (SLR) camera with film or an SLR digital camera. The 35-mm camera is so named because the film it uses is 35mm wide.
 Fig. 17.9. The emergency department photographer should maintain the lens at 90 degrees to the subject. Angles less than 90 degrees introduce perspective distortion, which renders the scale inaccurate. (Reprinted from Smock WS. Forensic photography. In: Stack L, Storrow A, Patton D, eds. Physician’s handbook of clinical photography. Philadelphia, PA: Hanley & Belfus, 2000, with permission.) |
Lens Characteristics
The lens is a clear window of glass, or high-tech plastic, made and positioned so as to gather and focus light onto the light-sensitive film or an electronic sensor inside the camera when the shutter is opened. The lens controls the magnification of the object photographed and other characteristics (sharpness, contrast, color, etc.) of the image. In conjunction with the shutter, it also controls the amount of light that reaches the film or light-sensitive device.
The focal length of a lens is the distance from a point called the optical center to the point behind the lens at which rays of light from a distant subject are brought to a focus. If a lens brings rays of light from a distant object to a focus in a distance of 50mm (just under 2 in.), then this is the focal length of the lens. In effect, it is the magnifying power of the lens.
If one takes the 50-mm lens off the camera and replaces it with another that has a focal length of 100mm (just under 4in.), then the subject will appear twice as large in the viewfinder and on the film. It is as though we put a telescope on the camera and made everything look nearer. We see less of the subject in the viewfinder but what we do see appears twice the size. Ignoring various technicalities of optics, people frequently refer to such a lens as a telephoto.
Now suppose we replace the 50-mm lens with another that has a focal length of 24mm (just under 1 in.) and look through the viewfinder again. We will see a much wider field, with more things in the field of view, but each object appears about half the size. We are now using what is called a wide-angle lens.
So you can either stand at a distance of 4 ft and photograph the whole upper part of a patient on a stretcher with your 50-mm lens, or you can put on your 105-mm lens and, from the same working distance, concentrate on the head of an injured person, which is now about twice as big in the viewfinder as it was before.
The value of a “longer” lens (longer or greater focal length) is that it gives you more distance to work with. In surgery or in the ED, a 200-mm lens (instead of a regular 50-mm) will enable you to:
Stand four times as far away from the patient and get the same size image,
Stand at the same distance but get an image four times larger, or
Stand twice as far away and get twice as large an image, simultaneously.
In general, there is a direct relation between focal length and working distance. If you double the focal length, the camera-to-subject distance doubles for the same image size. If your work entails extensive close-up photography, you should buy a lens that is specially designed for that purpose. These “macro lenses” are designed to give:
Excellent sharpness in the close-up range, including sharpness from edge to edge of the image, not only at the center.
Flat undistorted fields, meaning no curved lines when copying graph paper, diagrams, and printed matter.
Excellent contrast.
The ability to focus down to half life size, or even life size, without any additional attachments.
In fact, the best macro lenses are so good that they will resolve more detail than those that many ordinary films can record (Fig. 17.10). They are also very good for general subject matter. As you might expect, they tend to be more expensive because they are sold in smaller numbers, but for EDs where a significant amount of close-up work will be done, they are well worth the cost.
Macro lenses are available in three focal length ranges:
50 to 60 mm, excellent for copying flat materials.
100 to 105 mm, a very popular range (there are a few at 90 mm) with twice the working distance.
These are great for general patient, injury, and autopsy photography. If in doubt, this is the type you should buy first, unless a very large part of your work involves copying flat objects or similar tasks.
180 to 200 mm. These lenses are a bit more specialized. They are understandably popular with nature and wildlife photographers who want to leave subjects, such as insects, undisturbed or need to keep their distance from dangerous animals. They are also excellent for operating room photography and for patient photography (e.g., when one does not want to get too close to a nervous child or to a recent victim of sexual assault).
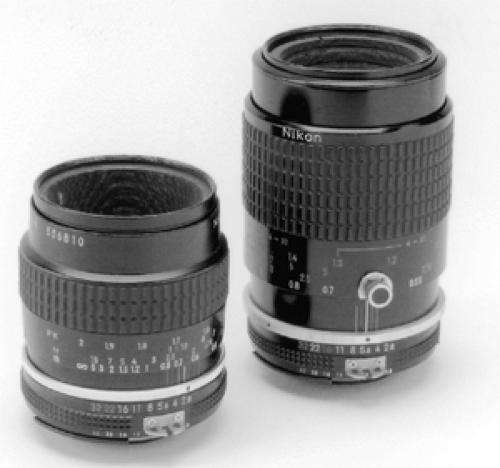 Fig. 17.10. Micro-Nikkor 55-mm, f/2.8, and Micro-Nikkor 105-mm lenses permit the emergency department photographer to take close-up photographs with good depth of field. |
In general, a macro lens with a longer focal length—say 100 mm—will enable you to obtain the same image from twice as far away as a 50-mm lens or twice the image size from the same distance. In biomedical and forensic work, their increased working distance is invaluable under the following circumstances:
In the operating room over the surgeon’s shoulder.
During the sexual assault examination for close-up documentation of vaginal or rectal injuries.
In the ED when an incoherent patient in restraints is trying to hit you.
At a crime scene, enabling you to “reach” the hair and blood on the windshield of the vehicle while resting your arms on the back of the front seat.
In an outdoor setting, facilitating the recording of evidence on the ground with a minimum of kneeling and bending over.
A zoom lens offers continuously variable magnification (focal length). Zoom lenses have a collar or ring that can be turned, or slid lengthways, thereby moving the lens elements to give the image the magnification you desire.
Aperture
Now that the meaning of focal length is understood, lens aperture becomes quite easy because the f/- numbers are derived from the effective aperture and the focal length of a lens. In theory, if a lens has an opening of 2 in. and it brings parallel rays to a focus at a distance of 4 in., then its aperture is 2/4 or, as photographers say, f/2. Likewise, if a lens has a 1-in. opening and brings light to a focus at a distance of 4 in., it has an aperture of 1/4 or f/4. This is the reason the size of the hole admitting light and the amount of light that gets through a given lens go down as the f/- number goes up, and vice versa.
What the ED photographer should know is simply that every time you move from one full f/- number to another, the amount of light entering the camera is halved or doubled, depending on the direction you are going.
Shutter Speeds
The fact that lens apertures move in steps of two is equally important because when you look at your camera you will see that the shutter speeds also go up and down in steps of two. Examine your shutter speed control. It reads something like 2, 4, 8, 15, 30, 60, 125, and so on, which is an abbreviation for 1/2, 1/4, 1/8, 1/15, 1/30, 1/60, 1/125, and so on, of a second.
Exposure
Now we are in a position to control the amount of light reaching the film or the electronic sensor of a digital camera, by adjusting either the size of the aperture or the time the shutter is open. In particular, we have the option of trading lens aperture against shutter speed. For instance, if we double the amount of light coming through the lens and cut the shutter time in half, we will end up with the same amount of light reaching the film.
This is one of the most basic and useful concepts in photography. Suppose there is enough light to get a proper exposure with a shutter speed of 1/125 second and a lens opening of f/8. By simply doubling the aperture (f/8 to f/16) and halving the shutter speed (1/125 to 1/60), we can still obtain the correct exposure.
For all practical purposes, any of the above combinations will admit the same amount of light, so we can now choose whatever pair we desire. This gives us flexibility and control.
If we wish to “catch” or “stop” a moving object such as a high jumper, it would be desirable to use a short shutter opening of 1/1,000 second or less with a big lens opening, whereas if we wanted to create a blurred, artistic image of water coming over a waterfall, we might choose 1/2 second or longer with a small lens opening.
Now you see why understanding that lens aperture and the shutter speeds progress in steps of two is so valuable. Simply stated, we use whatever combination of aperture and shutter time we need to obtain the photograph we want.
Shutter Priority
Shutter priority means that you select the shutter speed for the job at hand, and the camera will calculate the right lens aperture at the moment you make the exposure.
Use this mode when you have to control action, for instance, to freeze moving cars on a freeway with a short shutter time or to blur the water of a waterfall by the use of a longer opening.
Be alert to the possibility that if the shutter is open for only a short period and the lens opens, the depth of field may be too shallow.
Aperture Priority
Aperture priority means that you select the lens opening to give you the depth of field you require, and the camera will determine the proper shutter time when you make the exposure.
Use this when it is important to use a small aperture for greater depth of field or a large aperture to throw a background out of focus, and thereby emphasize a nearer subject.
Be alert to the possibility that a long shutter opening may blur anything that moves during the exposure.
Program
Some cameras allow the user to select a “program” setting. This means that the camera has been preprogrammed by the manufacturer to choose between shutter speeds and apertures, depending on the distance of the subject and the amount of light available when the camera is used. For instance, the manufacturer is likely to have programmed the camera to avoid very long shutter openings, during which the hands of the user might shake and thereby smear the image. All will be well with the “program” setting if, and only if, the subjects being photographed match the built-in instructions reasonably well.
Depth of Field
Depth of field is determined by the size of the aperture set on the lens (the f/- number). The depth of field indicates the nearest and farthest distances between which things will appear acceptably sharp or in focus.
If the close-up lens is wide open at f/4.0 and you focus on a subject 5 ft away, the lens will yield a sharp focus from approximately 4 ft, 11 in. to 5 ft, 1 in. If you change the aperture to f/22 and again focus on a subject at 5 ft, the lens will yield a sharp image from approximately 5 ft, 7/12 in. to 5 ft, 5 in. That is to say, as the aperture becomes smaller, the lens provides a greater depth of sharpness, called depth of field, in front of and behind the point at which the lens is theoretically in perfect focus. This has great practical value. We can use a wide aperture to capture an image separate from its surroundings or a small aperture to get the surroundings sharp on the near and far side of the focal image.
Related posts:


Stay updated, free articles. Join our Telegram channel

Full access? Get Clinical Tree


