INTRODUCTION AND EPIDEMIOLOGY
The breadth of ocular emergencies seen in the ED requires solid examination skills and an understanding of basic differential diagnosis. A recent review1 of 1400 ED ocular emergencies identified the following conditions: ocular trauma in 27%, of which 73% involved corneal abrasions, 6% involved blunt eye trauma, and 5% involved a corneal foreign body; the second most common condition was conjunctivitis (15%), and retinal problems and glaucoma involved 6%.
This chapter reviews eye anatomy, the essential skills needed for the ED eye examination, and common ophthalmic medications. Common causes of the red eye, ocular infections and inflammation, trauma to the eye, acute visual reduction or loss, and acute cranial nerve palsies are discussed. The principles and advantages of ocular US are summarized.
EYE ANATOMY
The orbit is a pyramid of bony walls that converge to an apex posteriorly. The orbit is bordered superiorly by the frontal sinus, medially by the ethmoid sinus, inferiorly by the maxillary sinus, and laterally by the zygomatic bone. The ethmoid bone (lamina papyracea) is paper thin and is the most likely sinus wall to break in blunt eye trauma or to be perforated due to sinusitis with subsequent spread of infection to the orbit. The orbital contents include the ocular muscles, retroseptal fat, and the optic nerve, whereas the globe is considered a separate entity.
The anterior limit of the orbital cavity is the orbital septum, which is a layer of fascia extending from the periosteum along the orbital rim to the levator aponeurosis of the upper eyelid and to the edge of the tarsal plate of the lower eyelid. Abnormalities, such as the accumulation of blood or infection, are referred to as “preseptal” or “postseptal.” Postseptal conditions are extremely serious. The septum is generally impervious to bacteria, which serves to limit spread of infection from the facial skin into the orbit (Figure 241-1). All nerves and vessels of the eye enter through the apex of the orbit, which is also the site of origin for the extraocular muscles. The optic nerve is subject to compression from mass effect due to tumors, abscesses, or hematomas.

The arterial blood supply of the eye and orbit is the ophthalmic artery, the first major branch of the intracranial portion of the internal carotid artery, which enters the orbit beneath the optic nerve. The central retinal artery is the first intraorbital branch of the ophthalmic artery and courses through the optic nerve. The venous drainage of the eye and orbit is through the ophthalmic veins, which drain into the central retinal vein. The ophthalmic veins communicate directly to the cavernous sinus. This venous system has no valves, and this fact is the basis for the spread of facial and periorbital infections to the cavernous sinus.
The eye itself is composed of several different layers (Figure 241-2). The outermost layer is a thin, transparent mucous membrane (the bulbar conjunctiva) that continues onto the posterior surface of the eyelids (the palpebral conjunctiva). Deep to the conjunctiva is the episclera, a layer of thin, elastic tissue containing blood vessels that nourish the next deepest layer, the sclera. The sclera is the collagenous protective coating of the eye, which is the thinnest (and prone to rupture) at the insertion of the rectus muscles.
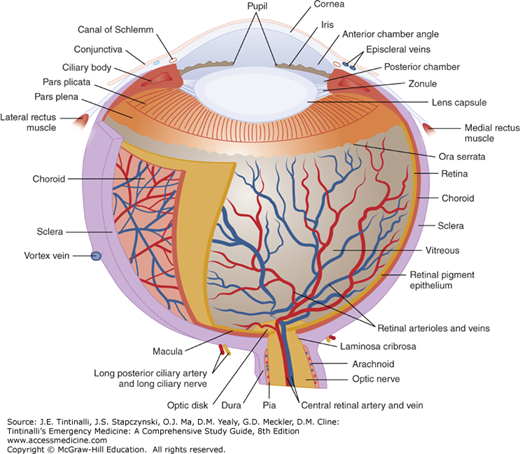
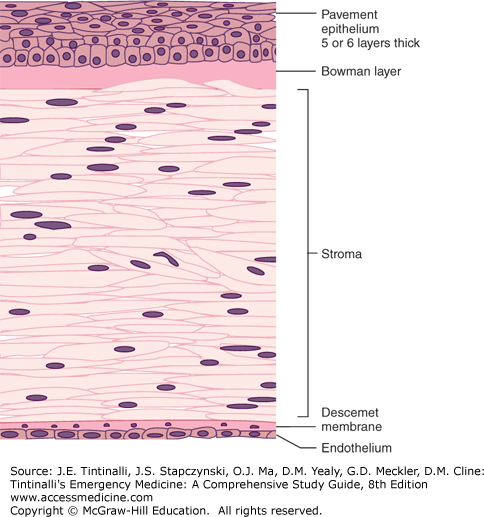
The cornea forms the anterior surface of the eyeball and is attached to the sclera at the limbus. From anterior to posterior, the cornea has five separate layers: epithelium, Bowman layer, stroma, Descemet membrane, and endothelium. The epithelium is five or six cell layers thick and is subject to damage from minor mechanical forces, resulting in corneal abrasion (Figure 241-3).
The iris, ciliary body, and choroid (the vascular pigmented layer of the eye between the sclera and retina) make up the uveal tract. The uveal tract supplies nutrition to the eye and assists in accommodation and pupillary constriction. The lens separates the aqueous humor in the anterior chamber from the vitreous humor in the remainder of the globe. (See the section Acute and Painful Vision Reduction or Loss, Acute Angle-Closure Glaucoma in this chapter for discussion of the production and flow of aqueous humor.) The retina is the sheet of neural tissue containing the rods and cones that lines the posterior two thirds of the inner surface of the globe, extending anteriorly as far as the ciliary body.
EYE EXAMINATION
A detailed history is as important in the patient with an eye complaint as it is for a complaint related to any other organ system. History should first categorize the symptom as vision loss, change in appearance of the eye, eye pain/discomfort, or trauma. The onset (gradual or sudden) of symptoms, duration of the symptoms, and circumstances surrounding the onset are important. For example, a history of sudden, painless monocular vision loss associated with a history of atrial fibrillation or carotid stenosis would suggest a central retinal artery occlusion, but a history of eye pain occurring while hammering metal on metal would suggest a projectile causing corneal abrasion or intraocular foreign body. Eye discomfort should be characterized as pain (aching, burning, throbbing, etc.), pruritus (associated with allergy), or a foreign body sensation as seen with corneal foreign bodies, abrasions, or ulcers. “Flashing lights” and a “curtain or veil” obstructing a portion of the visual field suggest a retinal detachment. In the case of trauma, ask about onset (traumatic iritis occurs 1 to several days after blunt trauma to the eye) and mechanism (globe penetration may occur in association with hammering, grinding, or use of other high-speed machinery). Document tetanus status and give tetanus toxoid as appropriate.
Past medical history is always important and can focus the physical examination and narrow the differential diagnosis. Previous surgery may be the cause of an irregular pupil. Absence of corrective lenses may account for decreased visual acuity and will require modification of the method for testing visual acuity. Use of contact lenses, especially the extended wear type, may be associated with bacterial corneal ulcers. Chronic use of certain ophthalmic medications may cause chemical conjunctivitis and inflammatory changes of the cornea. A history of diabetes or chronic hypertension and acute isolated sixth-nerve palsy suggests an ischemic cranial neuropathy. Monocular diplopia following trauma in a patient with an intraocular lens implant suggests dislocation of the intraocular lens. Always ask about previous instances of similar symptoms and the associated diagnosis.
The eye examination typically proceeds in a sequential fashion unless the circumstances require otherwise (e.g., chemical ocular injuries require irrigation before assessment of visual acuity). The glossary of terms and abbreviations in Table 241-1 is helpful when communicating with the ophthalmologist.
| AC | Anterior chamber, the first portion of the anterior segment. |
| Anisocoria | Unequal pupil size under equal lighting conditions. |
| Anterior segment | Consists of the anterior chamber and posterior chamber. Aqueous humor is produced in the posterior chamber of the anterior segment and circulates through the pupil into the anterior chamber of the anterior segment. |
| APD | Afferent pupillary defect (see Figure 241-8). |
| CF | Counting fingers (visual acuity assessment). |
| CVF | Confrontation visual fields. |
| EOM | Extraocular muscle. Extraocular movements. |
| HM | Hand motion (visual acuity assessment). |
| Hyphema | RBCs in the anterior chamber. |
| Hypopyon | WBCs in the anterior chamber. |
| INO | Internuclear ophthalmoplegia. |
| IOFB | Intraocular foreign body. |
| IOP | Intraocular pressure (mm Hg). |
| Limbus | Circumferential border where clear cornea ends and white sclera begins. |
| NLP | No light perception (blind). |
| OD | Oculus dexter (right eye).* |
| OS | Oculus sinister (left eye). |
| OU | Oculus uterque (each eye).* |
| PH | Pinhole visual acuity. |
| RD | Retinal detachment. |
| Tono-Pen® (Reichert, Inc., Depew, NY) | A hand-held, pen-shaped device for measuring IOP. |
| Ttono | Tension (IOP) with subscript representing method used: (tono = Tono-Pen®; S = Schiötz; A = applanation).† |
| VAc | Visual acuity with correction (glasses or contact lenses).† |
| VAs | Visual acuity without correction. |
Full examination should include the following, generally in the order listed: visual acuity, confrontational visual fields, extraocular movements, pupillary reactions, lids and adnexa, conjunctiva and sclerae, cornea, anterior chamber, iris, lenses, vitreous, intraocular pressure, and funduscopic examination. Measurement of intraocular pressure is done toward the end of the examination because physical touching of the cornea is more irritating and invasive than the rest of the examination. Performance of a thorough funduscopic examination requires dilatation of the pupil, so this part of the examination is performed last. Not all parts of the examination need to be done on every patient. For example, testing visual fields adds little to the evaluation of a corneal foreign body but is essential to the evaluation of acute vision loss.
Most vision-threatening disorders present with decreased visual acuity. Visual acuity testing is the vital sign of the eye and is the first step in any eye examination, even before shining a light in the eye; bright light can temporarily decrease visual acuity. The only exception to this rule is for chemical burns to the eye, where irrigation takes precedence above all else. Test visual acuity with contact lenses or glasses in place if possible. If the patient’s glasses or contacts are unavailable, use pinhole testing of visual acuity. A commercial pinhole occluder may be used, although a perforated metal eye shield or a note card perforated with an 18-gauge needle are accepTable substitutes. The pinhole allows only parallel light rays to fall on the macula, thereby reducing the refractive error and allowing an estimate of the person’s corrected visual acuity. Visual acuity testing is ideally done with a standard wall-mounted visual acuity chart (Snellen chart) with the patient standing 20 ft (6 m) from the chart. Record the visual acuity as 20/x, where the numerator is the distance from which the patient can read the line (always 20) and the denominator is the distance from which a person with normal vision can read the same line. The visual acuity is determined by the smallest line a patient can read with one half of the letters correct. The number of incorrect letters is listed after the visual acuity as follows: 20/x-y (e.g., 20/40-2). Document best acuity in each eye and whether prosthetic devices were used in testing (glasses, pinhole).
Visual acuity can also be tested with a near card (Rosenbaum chart) held 14 in. (36 cm) from the patient. Patients in their mid-40s or older may require reading glasses or bifocals to read a near card because of presbyopia. If the bifocals are not available, use a pinhole occluder.
For patients with visual acuity <20/200, figure counting at a distance (e.g., figure counting at 3 ft or 1 m), perception of hand motion at 1 to 2 ft (0.3 to 0.6 m), and ultimately light perception can be used to document visual acuity. If the patient is unable to detect hand motion, turn off all the lights in the room, fully occlude the contralateral eye, and test for light perception. Illiterate patients can be tested using the direction of the letter E on the chart, and a verbal child may be tested with an Allen chart (pictures). Corneal abrasions or foreign bodies can cause severe photophobia, pain, and tearing, so a topical anesthetic can reduce discomfort sufficiently to allow a more accurate assessment of visual acuity. In recording the results of visual acuity testing, refer to Table 241-1.
When alternating black-and-white lines are passed from one side to another in front of a patient’s eyes, involuntary horizontal nystagmus (optokinetic nystagmus) will occur. The presence of optokinetic nystagmus excludes blindness in a patient with an otherwise normal examination who claims he or she cannot see (hysterical blindness). The test can be performed by placing thick black lines approximately 1 in. apart on a 2-ft strip of cardiac monitor paper, which is passed back and forth at eye level a distance of 1 ft from the patient.
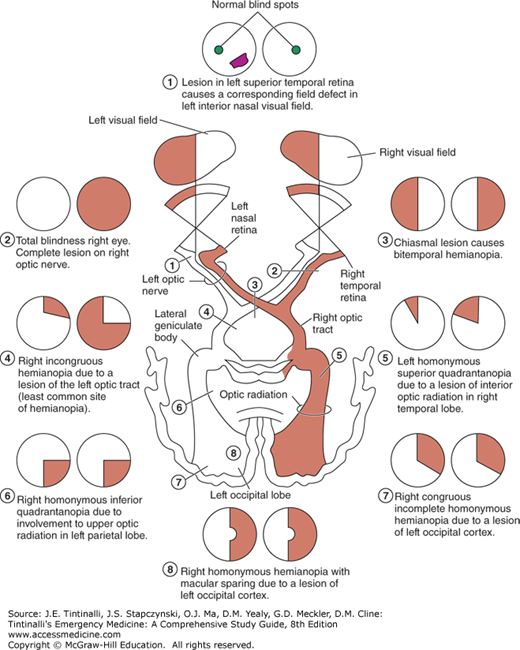
Test all four quadrants of the visual fields by having the patient cover one eye and look at the physician’s nose. The examiner closes the opposite eye and holds a finger halfway between the patient and himself or herself. The finger is wiggled as it is moved medially toward the patient. The normal patient should see movement at approximately the same time as the physician does. A visual field defect may represent pathology anywhere from the occipital cortex to the optic nerve (Figure 241-4). Bitemporal hemianopia can occur in pituitary adenoma; homonymous hemianopia is associated with some cerebrovascular accidents; and monocular field cuts are sometimes seen with large retinal detachments.
FIGURE 241-4.
Visual field defects produced by lesions at various points along the optic pathways: (1) field defect caused by retinal lesion, (2) total blindness right eye, (3) bitemporal hemianopia, (4) right incongruous hemianopia, (5) left homonymous superior quadrantanopia, (6) right homonymous inferior quadrantanopia, (7) right congruous incomplete homonymous hemianopia, and (8) right homonymous hemianopia with macular sparing. [Reproduced with permission from Riordan-Eva P, Whitcher J: Vaughn & Asbury’s General Ophthalmology, 17th ed. New York: Lange Medical Books/McGraw-Hill, 2008.]
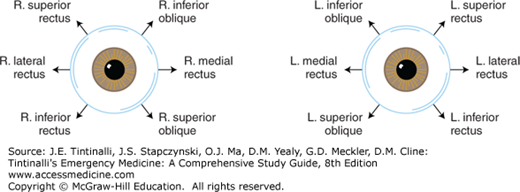
The normal patient can move the eye through the six cardinal positions of gaze, and the eye movements are controlled by the six extraocular muscles attached to each eye (Figure 241-5 and 241-6). Extraocular muscles are innervated by cranial nerves III, IV, and VI. Cranial nerve IV controls the superior oblique muscle, cranial nerve VI controls the lateral rectus muscle, and all other extraocular muscles are controlled by cranial nerve III. Extraocular movement can be impaired by restriction, interrupted or decreased innervation, or trauma. Examples of restriction include thyroid orbitopathy, myositis, and mechanical entrapment of a muscle secondary to an orbital blow-out fracture. Cranial nerve palsies or paresis may be caused by stroke, myasthenia gravis, diabetes, hypertension, tumors, aneurysms, infections, and trauma. Penetrating or blunt traumatic injury to an extraocular muscle also can result in motility disturbance.

Evaluate ocular alignment initially in primary gaze (looking straight ahead), and then test eye movements in all fields of gaze. Always ask the patient about diplopia, which may be a subtle sign of problems with extraocular muscles. Diplopia is usually worse when the patient is attempting to look in the direction of the malfunctioning muscle. Ask patients if diplopia persists when one eye is covered (monocular diplopia). Monocular diplopia can be caused by corneal irregularity, lens problems, or intraocular lens dislocation, or can be a sign of malingering. Resolution of diplopia when one eye is covered represents pathology of an extraocular muscle or its innervation. Patients with lesions of the superior oblique muscle or the fourth cranial nerve may tilt their head to compensate for the diplopia.
Note the pupil size in millimeters and test shape and reaction to light. An irregular pupil may occur from prior surgery or remote trauma. The patient will usually be able to relate a previous history of irregular pupil. The classic irregular teardrop-shaped pupil may also be seen in acute blunt or penetrating trauma with rupture of the iris (Figure 241-7).
Assess pupils under slightly dim light to test for an afferent pupillary defect (Figure 241-8). A positive afferent pupillary defect indicates an optic nerve disorder. Any pathology that prevents light from getting to the CNS, such as opacification of the vitreous with blood, retinal pathology, or optic nerve pathology, will cause an afferent pupillary defect, also known as a Marcus-Gunn pupil. The pupils will be equal in size before testing because of the consensual light response. Therefore, an afferent pupillary defect does not cause a baseline anisocoria and will be discovered only if specifically tested for. Perform the “swinging flashlight test” to detect an afferent pupillary defect. Shine a light in the pupil. The light causes constriction of the ipsilateral pupil and consensual constriction of the opposite pupil. The light is then shined/swung to the opposite pupil. The opposite pupil will dilate if an afferent pupillary defect is present, because the effect of light is not getting through to the CNS.
FIGURE 241-8.
A and B. “Swinging flashlight test” revealing an afferent pupillary defect (Marcus-Gunn pupil) of the left eye. A. Pupils are normal and equal before light testing. B. Both pupils constrict when light is shined into the normal (right) eye. C and D. The test is positive when the affected pupil (left pupil) dilates in response to light. Conditions with an afferent pupillary defect include optic neuritis and central retinal artery occlusion.
Causes of unequal pupils (anisocoria) can range from an acute emergency (posterior communicating artery aneurysm) to chronic baseline conditions such as previous intraocular trauma or surgery, or they can be idiopathic. Physiologic anisocoria (difference in pupil size) is the most common cause of asymmetric pupils. The difference in size is usually <1 mm, and both pupils react normally by constricting to light and dilating in darkness. A single dilated pupil may represent impending uncal herniation (from pressure on the third nerve), but uncal herniation is accompanied by an altered level of consciousness and other focal neurologic signs. A single nonreactive dilated pupil may result from a topical cycloplegic agent (scopolamine, cyclopentolate, or atropine) for uveitis or if an anticholinergic medication (such as ipratropium from a nebulization treatment for bronchospasm) is splashed into the eye. A careful history is important to determine whether anisocoria is preexisting. It is not worthwhile to attempt to “reverse” a suspected chemically altered pupil in the ED as a diagnostic test because the results are not reliable.
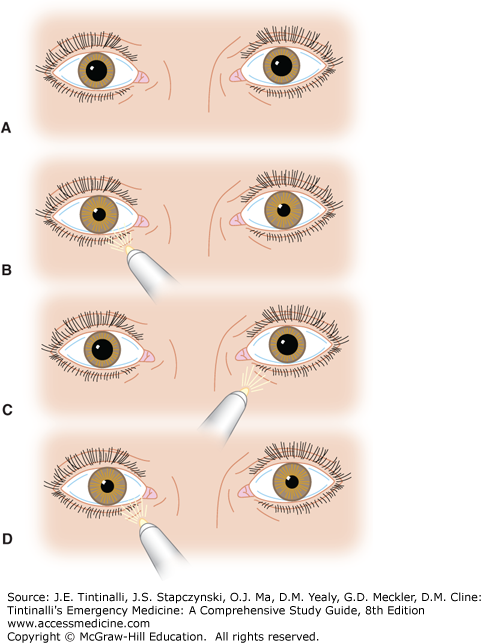
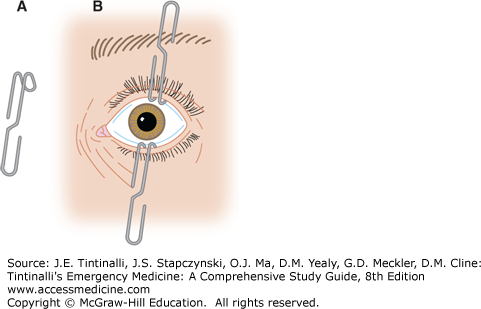
The ocular adnexa include the eyebrows, eyelids, and lacrimal apparatus. Examine the periorbital skin and lids for trauma, infection, dysfunction, deformity, crepitus, or proptosis. Subcutaneous emphysema can be found with blow-out fractures of the medial orbital wall (ethmoid). Palpate the orbital rims for step-off deformities in trauma. Evert the upper eyelid to check for foreign bodies. Use of a cotton applicator is often recommended; however, this technique will only visualize the lower half of the inner upper eyelid (Figure 241-9). The edge of an eyelid retractor may be used to tent the upper lid while a second examiner looks under the lid from a caudal direction, so-called double eversion of the eyelid. This will allow visualization of the upper half of the inner eyelid. A large paperclip may be bent into the shape of an eyelid retractor for this purpose (Figure 241-10 and see Figure 241-38).

FIGURE 241-10.
An alternative to an eyelid retractor. A. Unfold a paper clip and bend it into shape with a hemostat. B. Paper clips used to retract the eyelids. [Reproduced with permission from Reichman EF, Simon RR: Emergency Medicine Procedures. © 2004, Eric F. Reichman, PhD, MD, and Robert R. Simon, MD. McGraw-Hill Professional, Inc.]
The palpebral and bulbar conjunctiva, sclerae, cornea, anterior chamber, and iris and ciliary body make up the anterior chamber, and all except the ciliary body may be examined with the slit lamp (Figure 241-11A).
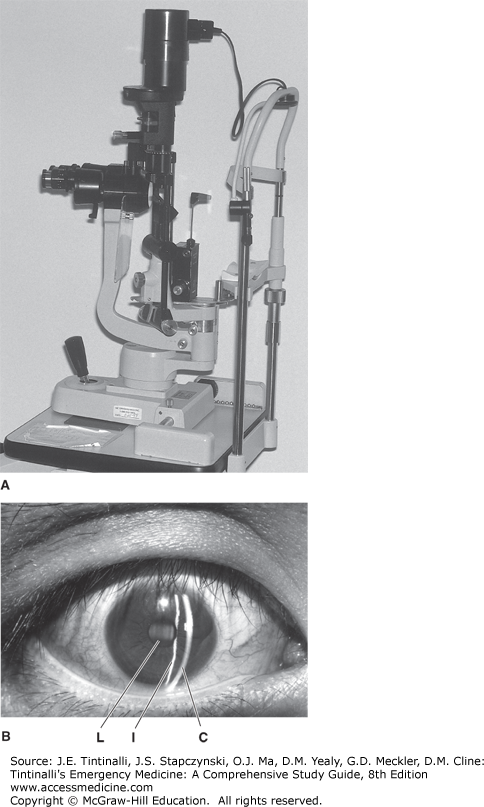
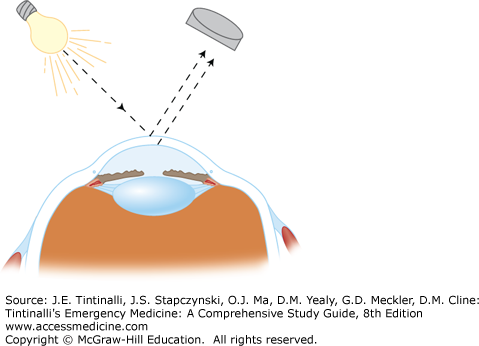
The slit lamp is a binocular microscope that affords a highly magnified three-dimensional view of ocular structures. Use the slit lamp to assess eye complaints whenever possible. The patient and examiner should both be seated on adjusTable stools so that the examiner’s and patient’s eyes are at the same level. Cover the chin rest with tissue paper or a washcloth. Adjust the slit lamp height so the patient can lean forward and comfortably place the forehead against the upper plastic bar and the chin on the chin rest. Adjust the height of the chin rest so the patient’s lateral canthus is even with the black line on the vertical bar. The oculars and light source are generally straight ahead for the general eye evaluation. Focus is adjusted by the anterior-posterior movement of the ocular and light source in relation to the patient. The joystick generally controls focus by moving the slit lamp closer to or farther away from the patient’s eyes. Rotation of the joystick usually controls vertical movement of the light source and oculars. When one looks through the oculars, the focus should be close to correct if a narrow slit of light falls on the structures to be examined. Fine adjustments in focus are then made with the joystick. Adjust the vertical light beam to the full height of the cornea with a width of approximately 1 mm (Figure 241-11B).
Examine the palpebral and bulbar conjunctivae for follicles (seen with allergic and viral conjunctivitis), chemosis (subconjunctival edema fluid), injection/inflammation, discharge, trauma, and foreign bodies.
To examine the cornea, rotate the light source to a 45-degree angle. The slit lamp can be brought close to the proper focus by looking at the slit of light on the cornea with the naked eye and moving the slit lamp in an anterior-posterior direction to obtain the thinnest and sharpest slit possible. The cornea is assessed by narrowing the light source to produce a slit beam that optically sections the cornea (Figure 241-12). Inspect the corneal epithelium for abrasions, ulcers, edema, and foreign bodies. Examine the corneal stroma for edema, scars, and lacerations, and examine the endothelium for precipitates (WBCs on the endothelium characteristic of iritis) and lacerations.
FIGURE 241-12.
Optical sectioning. By creating an angle of 45 to 60 degrees between the slit-beam light source and the observer’s biomicroscope objective, the cornea can be optically “sectioned” obliquely. This allows a cross-sectional view of the cornea and is helpful in ascertaining the depth of penetration of corneal foreign bodies and injuries.
Assess the depth of the anterior chamber by adjusting the angle of the light source on the slit lamp or by shining a penlight onto the iris from a lateral direction. If the iris is bowed forward, as with a shallow anterior chamber, a shadow will be cast on the medial (nasal) iris (Figure 241-13).

Assess the anterior chamber for flare and cells as follows: shorten the slit beam to approximately 1 mm, and shut off the room lights. Select the high-magnification position of the oculars. The incident light source should create an angle of 45 to 60 degrees with the objective (similar to optical sectioning). Focus the light beam on the pupillary margin and pull the joystick back to focus on the cornea. One may see keratitic precipitates that are white spots on the undersurface of the corneal epithelium, representing deposits of inflammatory cells in iritis.
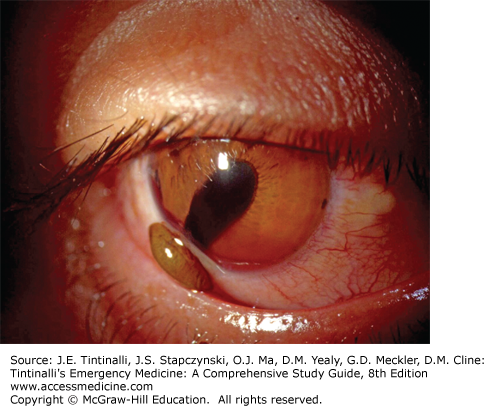
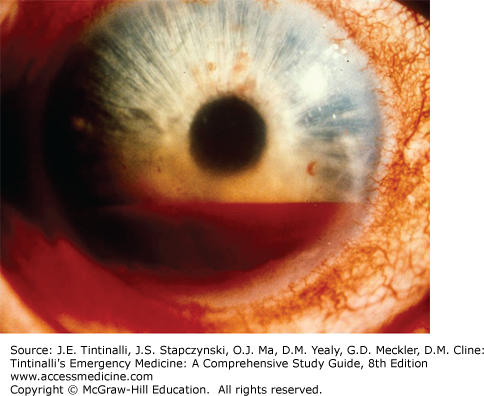
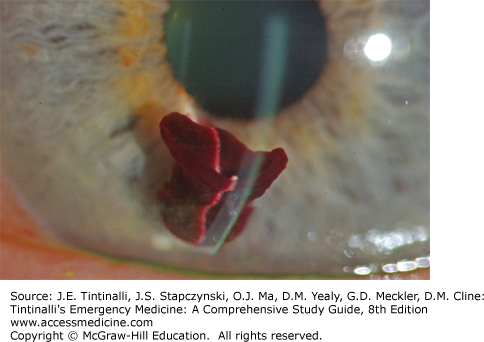
Now move the focus inward halfway between the iris and cornea, with the pupillary aperture as a dark backdrop. This will place your focus in the center of the aqueous humor, and the light beam will illuminate WBCs and red blood cells (if present) slowly drifting up and down in the aqueous convection currents, sometimes likened to snowflakes floating through the beam from a car’s headlight at night. Iritis may result in WBC layers in the anterior chamber (hypopyon) (Figure 241-14). Trauma to the eye may cause red blood cells in the anterior chamber (hyphema or microhyphema). Hyphema is layering of the red cells in the anterior chamber visible to the naked eye (Figure 241-15). A hyphema may occasionally be clotted (Figure 241-16). Flare is described as the appearance of “headlights in a fog” and represents the ability to see the course of the normally transparent light beam through the aqueous humor. Flare is caused by increased aqueous protein in the anterior chamber, which is common with inflammatory conditions such as iritis.

Examine the iris for pupil irregularity and pupillary dysfunction. Irregularity of the pupil will occur whenever one portion of the iris is tethered into place and may occur from posterior synechiae, where the iris is adhesed to the anterior lens capsule as seen in uveitis, or when any portion of the iris plugs a corneoscleral laceration causing a peaked pupil. Trauma may also cause the iris to tear at the root, termed iridodialysis. Assess the lens for opacities, lacerations, and subluxation.
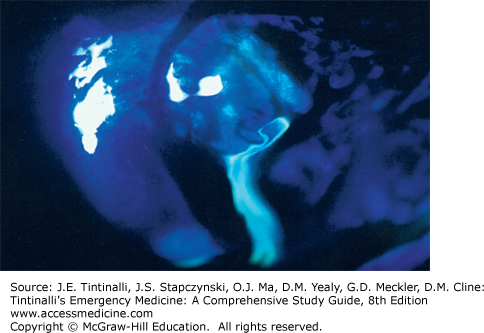
The final part of the slit lamp examination is done after fluorescein is instilled into the eye. Fluorescein binds to damaged corneal epithelium and fluoresces green under a Wood’s lamp or light through a cobalt-blue filter. Always remove contact lenses, as fluorescein will cause permanent staining of the lenses. Touching the fluorescein strip directly to the cornea will cause staining mimicking a linear abrasion. The best way to apply fluorescein dye is to apply several drops of eye-irrigating solution or saline onto a paper fluorescein strip, and then lightly apply the moistened end of the fluorescein strip into the inferior conjunctival fornix. Ask the patient to blink several times to distribute the fluorescein. Then examine the cornea for streaming of fluorescein-tinged aqueous humor (positive Seidel test) seen in full-thickness laceration of the cornea (Figure 241-17). The Seidel test can be negative (no streaming) with a small or spontaneously sealing corneal laceration. Ask the patient to blink to wash out the fluorescein, and then examine the cornea with the cobalt blue filter on the slit lamp. A corneal abrasion will fluoresce bright green. A Wood’s lamp (ultraviolet light) may also be used to look grossly (without the slit lamp) for corneal abrasions, but microscopic/punctate abrasions will be missed without use of a slit lamp.
Note the size, shape, and sharpness of the borders of the optic disk, the cup-to-disk ratio, the size ratio of the arteries to veins (normal 2:3), any nicking where the arteries and veins cross, the texture and color of the retina as well as the presence of lesions (e.g., hemorrhages or exudates) of the retina or vessels (e.g., aneurysms), and the color and size of the macula. To locate lesions of the retina note the direction (e.g., superonasal) and distance from the disk in terms of disk diameters. Opacities of the lens may obscure the view of the retina, and lens opacities appear as black spots of various shapes. Lesions in the vitreous, such as vitreous hemorrhage, will also obscure the view. Vitreous hemorrhage will have an irregular shape and may have a reddish hue.
The direct hand-held ophthalmoscope is used to examine the fundus. Pharmacologic dilatation will greatly enhance the view of the disk, macula, and proximal retinal vessels. Dilation is achieved by using one drop of 1% tropicamide in Caucasian patients and one drop each of 1% tropicamide and 2.5% phenylephrine in all others. An indirect ophthalmoscope provides an excellent three-dimensional view of the optic nerve and retina but requires extensive practice to use and generally is not a tool for the nonophthalmologist.
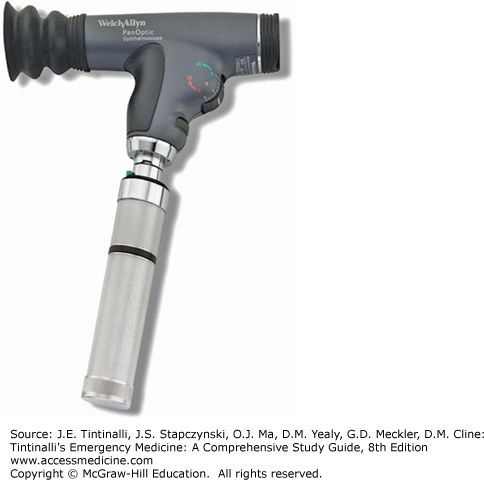
The Welch Allyn PanopticTM direct ophthalmoscope allows a five times larger view of the fundus than the standard direct ophthalmoscope and provides a better view of the fundus with an undilated pupil (Figure 241-18). It also allows for more distance between the patient and examiner, for the comfort of both. The PanopticTM device attaches to a standard Welch Allyn handle.
Use the Panoptic as follows:
Remove your and the patient’s glasses; seat the patient upright or with the patient’s stretcher set as upright as possible. Position yourself in a direct line of vision to the patient’s eyes.
With the scope turned off, focus on an object at least 10 ft away.
Set the aperture dial to small (“home” position—green line).
Turn on the scope and adjust to maximum brightness.
Ask the patient to be still and look straight ahead, and tell him or her that the eyecup will touch the brow.
Place your hand on the patient’s forehead, and position the scope 6 in. away at a 15- to 20-degree angle to the temporal side.
Locate the red reflex, and move the scope toward the patient keeping the red reflex in view.
Maximum view should be obtained when the eyecup is compressed by half.
If you have a dominant eye and prefer to use that for the examination, you may examine the opposite eye without switching your eye on the scope.
Make sure you wipe off the eyepiece with antiseptic/antibacterial solution after use, or change eyepieces between patients.
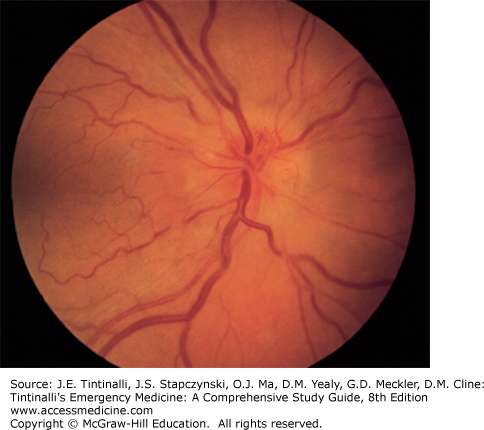
Papilledema Papilledema is bilateral edema of the head of the optic nerve due to increased intracranial pressure. Any disease process that increases the intracranial pressure and inhibits vascular or axoplasmic flow in the optic nerve causes congestion and edema of the nerve head. Bilateral papilledema is a common finding in malignant hypertension, pseudotumor cerebri, intracranial tumors, and hydrocephalus. The disk margins are blurred, the cup is diminished or absent, and the nerve head is elevated with vascular congestion (Figure 241-19). Frequently, flame-shaped hemorrhages are seen on or adjacent to the nerve head. A distinguishing feature of papilledema is prolonged preservation of visual acuity (frequently patients are visually asymptomatic).
FIGURE 241-19.
Optic nerve head edema. Vascular congestion, elevation of the nerve head, and blurred disk margins are characteristically seen in papilledema, papillitis, and compressive lesions of the optic nerve. [Reproduced with permission from Knoop K, Stack L, Storrow A: Atlas of Emergency Medicine, 2nd ed. © 2002, McGraw-Hill, New York.]
The eye remains consistently “inflated” because of a delicate balance between intraocular aqueous fluid production and outflow. Intraocular pressure can decrease due to reduced ciliary body production (some cases of iritis and uveitis) or loss of globe integrity (perforating injury). Intraocular pressure increases when intraocular fluid production exceeds outflow (glaucoma, hyphema). Measure intraocular pressure in all cases of vision loss, eye pain (suspected glaucoma), and acute or remote trauma. Do not attempt to measure intraocular pressure if globe rupture from blunt or penetrating trauma is suspected, as the pressure placed on the globe during pressure measurement may cause extrusion of intraocular contents. The normal intraocular pressure is 10 to 20 mm Hg. Digital palpation of the globe may give a rough estimation, using the examiner’s eye or tip of the nose as control. Provide topical eye anesthetic when devices are used to measure pressure. To measure pressure, the lid must be open, and the patient must look straight ahead. Hold the lids open, with your fingers compressing the patient’s lids against the bony rims of the orbit. Avoid placing any pressure on the globe with your fingers when holding the lids open, because this will cause a falsely high reading. Document the method used for determining intraocular pressure. In recording the pressure, refer to Table 241-1.
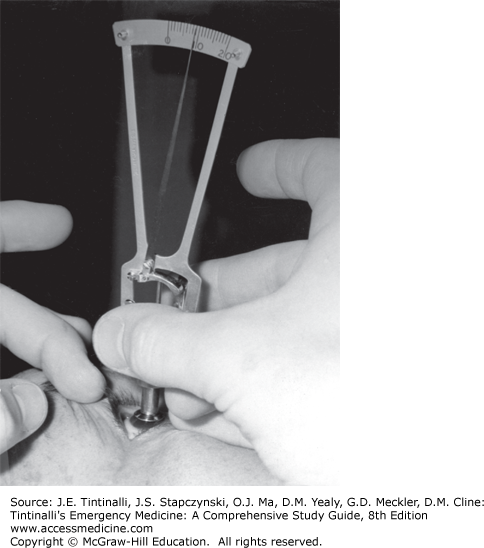
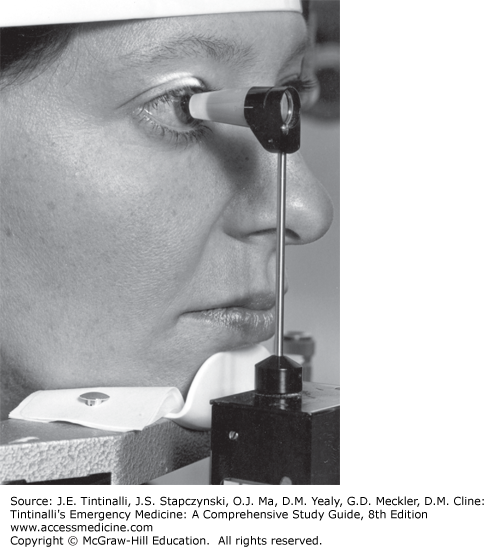
Schiötz Tonometer The Schiötz tonometer is a device using a plunger to indent the cornea. Counterweights are placed on top of the plunger, and the reading off the tonometer scale is correlated to numbers on a chart supplied with the tonometer to give a pressure reading. The direct Schiötz scale reading is not the intraocular pressure. Schiötz tonometry is inaccurate and not well tolerated by patients, and the instrument is difficult to sterilize, leading to potential spread of infection (Figure 241-20). The Tono-Pen® XL (Reichert, Inc., Depew, NY), Goldman® applanation tonometer, and pneumatonometer have supplanted the use of the Schiötz tonometer.
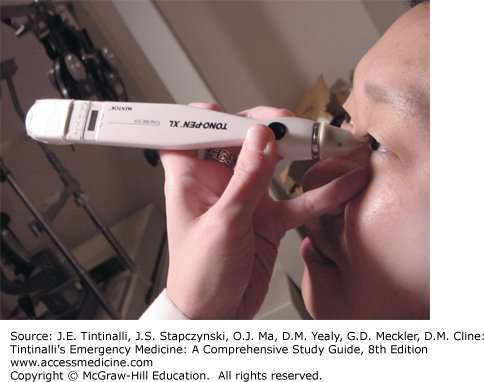
Tono-Pen® The Tono-Pen® XL and similar electronic devices have disposable latex covers and measure pressure by indentation of the cornea. The Tono-Pen® XL is touched to the cornea 4 to 10 times and will read out an average pressure reading (Figure 241-21).
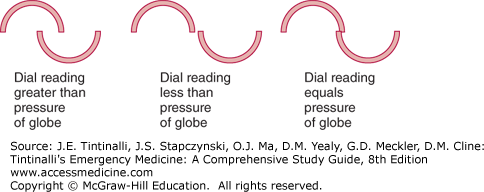
Applanation Tonometer Use of the Goldman® applanation tonometer requires training and practice and is a method used by optometrists and ophthalmologists. The cone must be sterilized between patients. The cone of the tonometer is touched to the cornea after topical anesthesia, and fluorescein is instilled into the eye (without irrigation). When looking through the slit lamp, two half circles are seen and properly aligned by adjusting the dial on the tonometer, from which the pressure is read (Figure 241-22 and 241-23).
COMMON OPHTHALMIC MEDICATIONS USED IN THE ED
Topical anesthetics are needed for eye examination, intraocular pressure measurement, and corneal foreign body removal. Mydriatics and cycloplegics are needed for a more thorough eye examination. Ophthalmic antibiotics are prescribed for conjunctivitis and corneal abrasions. Antiviral medications are used for herpes simplex. Glaucoma may be treated with various combinations of topical nonselective and β1-blockers, selective α2-agonists, carbonic anhydrase inhibitors, cholinergic agents, and prostaglandin analogs. Allergic conjunctivitis is treated with topical nonsteroidal anti-inflammatory drugs, mast cell stabilizers, selective H1 antagonists, or corticosteroids.
Table 241-2 lists common agents used in the ED and those that the consulting ophthalmologists may ask the emergency medicine physician to prescribe.
| Type | Generic Name | Trade Name | Indication | Cautions | Usual Dose |
|---|---|---|---|---|---|
| Mydriatic-cycloplegic | |||||
| Sympathomimetic | 2.5% phenylephrine | Mydfrin® AK Dilate® | Pupil dilation, no cycloplegia, usually adjunctive to an anticholinergic | Hypertension, glaucoma; do not use after chemical injury to the eye | 1 drop, onset 20–30 min, duration several hours |
| Anticholinergic | Cyclopentolate | Cyclogyl® | Short-term mydriasis and cycloplegia for examination | Glaucoma; higher concentrations in children can cause agitation | 0.5% in children, one drop; 1% in adults, one drop; onset 30 min, duration ≤24 h |
| Anticholinergic | Tropicamide | Mydriacyl® Tropicamide Ophthalmic Solution | Short-term mydriasis and cycloplegia for examination | Glaucoma | One to two drops of 0.5% or 1% solution, onset 20 min; duration of action 6 h |
| Anticholinergic | Homatropine | Isopto Homatropine® | Intermediate-term pupil dilation, cycloplegia, treatment of iritis | Glaucoma, avoid in children | One to two drops of 2% solution; onset 30 min; duration of action 2–4 d; for iritis one to two drops twice a day |
| Antihistamine/decongestant | Naphazoline and pheniramine | Naphcon-A® Visine A® | Conjunctival congestion/itching | Do not use >72 h; avoid in narrow angle glaucoma; hypertension; do not use with contact lenses in place | One drop three to four times a day |
| Antihistamine | Olopatadine | Patanol® | Allergic conjunctivitis | Do not administer while contact lenses are present | 0.1% solution, one drop twice daily, onset of action 30–60 min, duration 12 h |
| Topical anesthetics | Tetracaine ophthalmic solution | — | Anesthetic for eye examination, foreign body removal | Sensitivity to ester-type anesthetics; no prolonged use; delays healing | 0.5% solution, one to two drops; onset of action 1 min, duration 30 min |
| Proparacaine ophthalmic solution | Alcaine® Ophthetic® | Anesthetic for eye examination foreign body removal | 0.5% solution, one to two drops; onset of action 20 s, duration 15 min | ||
| Antibiotics | Erythromycin ophthalmic ointment | — | Conjunctivitis Do not use for corneal abrasion if a contact lens wearer | Not agent of choice for contact lens wearers | 1/2 in. applied to lower eyelid two to four times a day |
| Ciprofloxacin | Ciloxan® Ophthalmic Solution and Ointment | Conjunctivitis, corneal abrasion if a contact lens wearer | — | Solution: one to two drops when awake every 2 h for 2 d; ointment, 1/2 in. applied to lower eyelid three times a day for 2 d | |
| Tobramycin | Tobrex® Ophthalmic Solution and Ointment | Conjunctivitis, corneal abrasions if a contact lens wearer | — | 0.3% solution, one to two drops every 4 h; 0.3% ointment, 1/2 in. applied to lower lid two to three times/d | |
| Gentamicin | Garamycin® Genoptic® | Conjunctivitis, corneal abrasion if a contact lens wearer | — | 0.3% solution, instill one to two drops every 4 h; 0.3% ointment, 1/2 in. applied to lower lid two to three times/d | |
| Sulfacetamide sodium | Bleph-10 Ophthalmic Solution 10%® | Conjunctivitis | Do not use for corneal abrasion if a contact lens wearer or if allergic to sulfa | One to two drops four times/d | |
| Besifloxacin | Besivance Ophthalmic Suspension® | Conjunctivitis, corneal abrasion if a contact lens wearer | — | One drop three times a day for 7 d | |
| Levofloxacin | Iquix Ophthalmic Solution® Quixin Ophthalmic Solution® | Conjunctivitis, corneal abrasion if a contact lens wearer | Corneal ulcer | One to two drops every 30 min to 2 h while awake and every 4–6 h at night | |
| Moxifloxacin hydrochloride | Moxeza Ophthalmic Solution® Vigamox Ophthalmic Solution® | Conjunctivitis, corneal abrasion if a contact lens wearer | One drop twice a day for 7 d | ||
| Ofloxacin | Ocuflox Ophthalmic Solution® | Conjunctivitis, corneal abrasion if a contact lens wearer | Conjunctivitis: one to two drops every 2–4 h for 2 d, then one to two drops four times a day for 5 d. Corneal ulcer: one to two drops every 30 min while awake and one to two drops every 4–6 hours after retiring for 2 d, then one to two drops every hour while awake for 5–7 days, then one to two drops four times a day for 2 d or until treatment completion | ||
| Polymyxin b sulfate, trimethoprim sulfate | Polytrim Ophthalmic Solution® | Conjunctivitis | Do not use for corneal abrasion if a contact lens wearer | One drop every 3 h | |
| Gatifloxacin | Zymaxid Ophthalmic Solution® | Conjunctivitis, corneal abrasion if a contact lens wearer | |||
| Antivirals | Idoxuridine | Dendrid Sterile Ophthalmic Solution® | Herpes simplex keratitis | One drop every hour | |
| Trifluridine | Viroptic Ophthalmic Solution® | Herpes simplex keratitis | One drop every 2 h | ||
| Ganciclovir | Zirgan Ophthalmic Gel® | Herpes simplex keratitis | One drop five times per day | ||
| Antibiotic–steroid combination | Prednisolone acetate, sulfacetamide sodium | Blephamide Ophthalmic Suspension® Brimonidine Tartrate Ophthalmic Solution® | Conjunctivitis | Do not use for corneal abrasion if a contact lens wearer or if sulfa allergy | Suspension: instill two drops into conjunctival sac every 4 h during the day and at bedtime Ointment: apply ½-in. ribbon into conjunctival sac three to four times a day and two to four times a night |
| Dexamethasone, neomycin sulfate, polymyxin b sulfate | Maxitrol Ophthalmic Ointment® Maxitrol Ophthalmic Suspension® | Conjunctivitis | Do not use for corneal abrasion if a contact lens wearer | Ointment: ½ inch in conjunctival sac(s) up to three to four times a day Suspension: instill one to two drops four to six times a day up to every hour | |
| Neomycin sulfate, polymyxin b sulfate, prednisolone acetate | Poly-Pred Ophthalmic Suspension® | Conjunctivitis | Do not use for corneal abrasion if a contact lens wearer | One to two drops every 3–4 h | |
| Dexamethasone, tobramycin | TobraDex Ophthalmic Ointment® TobraDex Ophthalmic Suspension® TobraDex ST Ophthalmic Suspension® | Conjunctivitis | Do not use for corneal abrasion if a contact lens wearer | Suspension: one to two drops every 4–6 h ST: one drop every 4–6 h Ointment: ½-in. ribbon three to four times a day | |
| Loteprednol etabonate, tobramycin | Zylet Ophthalmic Suspension® | Conjunctivitis | Do not use for corneal abrasion if a contact lens wearer | One to two drops every 4–6 h | |
| Nonsteroidal anti-inflammatory drugs | Ketorolac | Acular Ophthalmic Solution® Acular LS Ophthalmic Solution® Acular PF Ophthalmic Solution® Acuvail Ophthalmic Solution® | Allergic conjunctivitis, corneal abrasions, UV keratitis | One drop four times a day for 3–4 d | |
| Bromfenac | Bromday Ophthalmic Solution® | Allergic conjunctivitis, corneal abrasions, UV keratitis | One drop every day | ||
| Nepafenac | Nevanac Ophthalmic Suspension® | Allergic conjunctivitis, corneal abrasions, UV keratitis | One drop three times a day | ||
| Diclofenac sodium | Voltaren Ophthalmic Solution® | Allergic conjunctivitis, corneal abrasions, UV keratitis | One drop four times a day | ||
| Mast cell stabilizers | Nedocromil sodium | Alocril Ophthalmic Solution® | Allergic conjunctivitis | One to two drops twice a day | |
| Pemirolast potassium | Alamast Ophthalmic Solution® | Allergic conjunctivitis | One to two drops four times a day | ||
| Lodoxamide tromethamine | Alomide Ophthalmic Solution® | Allergic conjunctivitis | One to two drops four times a day | ||
| Cromolyn sodium | Cromolyn Sodium Ophthalmic Solution® | Allergic conjunctivitis | One to two drops four to six times a day | ||
| Selective H1 antagonist | Bepotastine besilate | Bepreve Ophthalmic Solution® | Allergic conjunctivitis | One drop two times a day | |
| Epinastine hydrochloride | Elestat Ophthalmic Solution® | Allergic conjunctivitis | One drop two times a day | ||
| Emedastine difumarate | Emadine Ophthalmic Solution® | Allergic conjunctivitis | One drop up to four times a day | ||
| Alcaftadine | Lastacaft Ophthalmic Solution® | Allergic conjunctivitis | One drop every day | ||
| Azelastine hydrochloride | Optivar Ophthalmic Solution® | Allergic conjunctivitis | One drop two times a day | ||
| Combination mast cell stabilizers–H1 antagonists | Olopatadine hydrochloride | Pataday Ophthalmic Solution® Patanol Ophthalmic Solution® | Allergic conjunctivitis | One drop two times a day | |
| Nonselective β-blocker | Levobunolol hydrochloride | Betagan Ophthalmic Solution® | Glaucoma | 0.5%: one to two drops once a day; twice a day for more severe or uncontrolled glaucoma 0.25%: one to two drops twice a day | |
| Timolol hemihydrate | Betimol Ophthalmic Solution® | Glaucoma | One drop 0.25% twice a day; may increase to maximum of one drop 0.5% twice a day | ||
| Timolol maleate | Istalol Ophthalmic Solution® Timoptic Sterile Ophthalmic Solution® Timoptic-XE Sterile Ophthalmic Gel Forming Solution® | Glaucoma | One drop once a day | ||
| Carteolol hydrochloride | Carteolol Hydrochloride Ophthalmic Solution® Ocupress Ophthalmic Solution® | Glaucoma | One drop twice a day | ||
| Metipranolol | OptiPranolol Ophthalmic Solution® | Glaucoma | One drop two times a day | ||
| Selective β1-blocker | Betaxolol hydrochloride | Betaxolol Hydrochloride Ophthalmic Solution® Betoptic S Ophthalmic Suspension® | Glaucoma | One to two drops twice a day | |
| Selective α2-agonists | Brimonidine tartrate | Alphagan P Ophthalmic Solution® Brimonidine Tartrate Ophthalmic Solution® | Glaucoma | One drop every 8 h | |
| Apraclonidine hydrochloride | Iopidine 0.5% Ophthalmic Solution® Iopidine Ophthalmic Solution® | Glaucoma | One to two drops three times a day | ||
| Combination α2-agonist–nonselective β-blocker | Brimonidine tartrate, timolol maleate | Combigan Ophthalmic Solution® | Glaucoma | One drop every 12 h | |
| Carbonic anhydrase inhibitors | Brinzolamide | Azopt Ophthalmic Suspension® | Glaucoma | One drop three times a day | |
| Dorzolamide hydrochloride | Trusopt Sterile Ophthalmic Solution® | Glaucoma | One drop three times a day | ||
| Combination carbonic anhydrase inhibitor–selective β-blocker | Dorzolamide hydrochloride, timolol maleate | Cosopt Sterile Ophthalmic Solution® | Glaucoma | One drop every 12 h | |
| Cholinergic agents | Pilocarpine hydrochloride | Isopto Carpine Ophthalmic Solution® | Glaucoma; contraindicated in pupillary block glaucoma | Two drops three to four times a day | |
| Prostaglandin analog | Bimatoprost | Lumigan Ophthalmic Solution® | Glaucoma | One drop once a day | |
| Travoprost | Travatan Z Ophthalmic Solution® | Glaucoma | One drop once a day | ||
| Latanoprost | Xalatan Ophthalmic Solution® | Glaucoma | One drop once a day | ||
| Loteprednol etabonate | Alrex Ophthalmic Suspension® | Allergic conjunctivitis, uveitis | One drop four times a day | ||
| Difluprednate | Durezol Ophthalmic Emulsion® | Allergic conjunctivitis, uveitis | One drop four times a day | ||
| Fluorometholone acetate | Flarex Ophthalmic Suspension® FML Forte Ophthalmic Suspension® FML Ophthalmic Ointment® FML Ophthalmic Suspension® | Allergic conjunctivitis, uveitis | One to two drops four times a day | ||
| Loteprednol etabonate | Lotemax Ophthalmic Ointment® Lotemax Ophthalmic Suspension® | Allergic conjunctivitis, uveitis | Ointment: ½ inch four times a day Suspension: one to two drops four times a day | ||
| Prednisolone acetate | Omnipred Ophthalmic Suspension® Pred Forte Ophthalmic Suspension® Pred Mild Ophthalmic Suspension® | Allergic conjunctivitis, uveitis | Two drops four times a day | ||
| Rimexolone | Vexol 1% Ophthalmic Suspension® | Allergic conjunctivitis, uveitis | One to two drops every hour while awake | ||
THE RED EYE
The differential diagnosis of the red eye is extensive. Key differentiating factors are the presence or absence of pain, itching, photophobia, systemic symptoms, discharge and injections, visual loss, and changes in the cornea, pupils, and intraocular pressure. Table 241-3 lists various causes of the red eye with key differentiating features. Many of these conditions are discussed more extensively in the text.
| Diagnosis | Pain | Itching | Photophobia | Systemic Symptoms | Visual Acuity | Discharge | Injection | Cornea | Pupils | IOP |
|---|---|---|---|---|---|---|---|---|---|---|
| Chalazion | Mild-moderate lid | No | No | No | Normal | No | Minimal localized | Normal | Normal | Normal |
| Hordeolum | Mild-moderate lid | No | No | No | Normal | No | Minimal localized | Normal | Normal | Normal |
| Blepharitis | Mild – foreign body sensation | Yes | Yes | No | Normal | Morning crusting, tearing | Diffuse | Normal | Normal | Normal |
| Dacryocystitis | Mild-moderate medial canthus | No | No | Fever if severe | Normal | No | Localized | Normal | Normal | Normal |
| Ectropion | Irritation | No | No | No | Normal | Watery | Lid margin and diffuse | Normal | Normal | Normal |
| Corneal abrasion | Yes | No | No unless associated iritis (after several hours) | No | Normal unless central or with associated iritis | Watery | Diffuse | Visible abrasion | Normal or constricted with associated iritis | Normal |
| Ultraviolet keratitis | Severe | No | No unless associated iritis (after several hours) | No | Decreased | Watery | Diffuse | Punctate lesions | Normal or constricted with associated iritis | Normal |
| Superficial keratitis | Mild | No | No | No | Normal | Watery | Diffuse | Punctate lesions | Normal | Normal |
| Corneal ulcer | Moderate | No | No | No | No unless central or with associated iritis | Watery | Diffuse | Visible ulcer | Normal | Normal |
| Corneal foreign body | Moderate | No | No | No | Normal unless central | Watery | Diffuse | Visible foreign body | Normal | Normal |
| Chemical burn | Moderate-severe | No | No | No | Normal unless central | Watery | Diffuse—none with severe alkaline burn | Cloudy if severe | Normal | Normal |
| Bacterial conjunctivitis | None or irritation | No | No | No | Normal | Purulent | Diffuse bulbar and palpebral | Normal, punctate lesions if associated keratitis | Normal | Normal |
| Viral conjunctivitis | None or irritation, severe with EKC | No | No | Occasional URI symptoms, fever with EKC | Normal | Watery | Diffuse bulbar and palpebral | Normal, punctate lesions if associated keratitis | Normal | Normal |
| Allergic conjunctivitis | None | Yes | No | Sneezing, rhinorrhea | Normal | Watery | Diffuse bulbar and palpebral | Normal | Normal | Normal |
| Stevens-Johnson syndrome | Foreign body sensation, burning | Yes | Yes | Fever, tachycardia, hypotension, skin and mucous membranes involved | Decreased | Watery | Diffuse | Punctate lesions, corneal ulcer, neovasculari-zation, hazy, perforation | — | — |
| Orbital cellulitis | Pain with eye movement | No | No | Fever | Normal, decreased late | No | Yes | Normal | Normal | Occasionally increased |
| Preseptal cellulitis | Mild—no pain with eye movement | No | No | Fever | Normal | No | Yes | Normal | Normal | Normal |
| Episcleritis | Mild | No | No | Usually none; occasional rheumatologic symptoms | Normal | Watery | Focal | Normal | Normal | Normal |
| Scleritis | Severe, tender to palpation | No | No | Usually none; occasional rheumatologic symptoms | Decreased with advanced disease | Watery | Diffuse, occasionally violaceous color | Normal | Normal | Normal, may be increased |
| Subconjunctival hemorrhage | None | No | No | No | Normal | No | No | Normal | Normal | Normal |
| Iritis/uveitis | Yes | No | Yes | Occasional rheumatologic or GI symptoms | Decreased | Watery | Perilimbal (ciliary) flush | Normal, flare and cells in anterior chamber | Constricted, poorly reactive | Usually normal, may be low |
| Acute angle closure glaucoma | Severe | No | No | Headache, nausea, vomiting | Decreased | Watery | Diffuse | Cloudy or hazy | Midpoint, poorly reactive | Increased |
| Endophthalmitis | Mild-moderate “ache” | No | Yes | Fever | Decreased | Purulent if present | Diffuse | Hazy, flare and cells anterior chamber, hypopyon | — | — |
OCULAR INFECTIONS AND INFLAMMATION


