
Airway Procedures
Eric F. Reichman
Airway management is one of the most basic, crucial, and important aspects of emergency medicine. Without oxygen, the brain begins to die within minutes. The mission for airway management is to ensure airway patency, to protect the airway from contamination (blood, fluids, and/or food), to provide supplemental oxygen, and to institute positive pressure ventilation when spontaneous respirations are inadequate or absent. Airway management can be as simple as lifting a snoring patient’s chin or as involved as awake fiberoptic-guided endotracheal intubation.
A thorough understanding of anatomy is essential for the performance of any medical procedure. Untoward events related to a procedure are often the result of inexperience and/or an inadequate understanding of the regional anatomy, and the airway procedures are no exception. From the evaluation of external anatomic landmarks to the performance of nerve blocks for fiberoptic intubation, understanding the anatomy of the airway will result in fewer attempts at intubation and improved success with fewer iatrogenic misadventures.
CLINICAL PRESENTATION
Airway intervention is required if there is uncertainty about whether the patient’s airway patency, respiratory drive, or oxygenation can be maintained without intervention. Inadequate ventilation may occur for a variety of reasons. Spontaneously breathing patients may develop an airway obstruction caused by food, blood, secretions, or tissue obstruction as a result of the loss of the normal pharyngeal tone. Unconscious patients should have their airway secured and receive mechanical ventilation. Despite spontaneous respiration, the unconscious patient is at risk for aspiration of gastric contents. The conscious patient with airway obstruction is in obvious distress and is more likely to have an obstruction caused by a foreign body, tissue swelling from an infection, laryngeal edema, cancer, or laryngospasm.
Endotracheal intubation can be performed to administer resuscitation medications, ensure a patent airway, deliver oxygen, isolate the airway, reduce the risk of aspiration of gastric or oral contents, suction the trachea, ventilate the patient, or apply positive pressure ventilation. Other indications include altered mental status, head injury requiring hyperventilation, hypoxemia, hypoventilation, apnea, lack of a gag reflex, and unconsciousness.
ED EVALUATION
Evaluation of the airway includes an internal and external examination. The internal examination should evaluate the patient’s dentition, palate, and tongue. Note any protuberant incisors, loose teeth, broken teeth, dental work, and dental devices. Determine if the palate is normal, high and arched, or cleft. Determine if the tongue is elevated, larger, or wider than normal in comparison to the oral cavity. A common classification used by anesthesiologists to grade the difficulty of laryngoscopy and intubation involves the identification of the size the tongue in relation to the faucial pillars, the soft palate, and the uvula (1). External evaluation of the airway is a critical step to a successful intubation. External inspection should include mouth opening, atlantooccipital extension, and thyromental distance. External inspection should also identify obvious problems (e.g., cervical collars, face and/or neck trauma, severe micrognathia, massive obesity, etc.). Please refer to Chapter 1 for a more detailed discussion of this topic.
There are numerous differences between the adult’s and the child’s airway (2). The head-to-body ratio is larger in the child, which results in neck flexion when the child is supine. Placing a rolled towel under the child’s shoulders will correct the flexion. Children have a small mouth with a relatively large tongue when compared to an adult, making orotracheal intubation difficult. The presence of adenoidal tissue in the child makes nasotracheal intubation difficult and orotracheal intubation the preferred method. The most important difference is that the narrowest portion of the infant and child’s airway is below the vocal cords at the cricoid cartilage. In an adult, the narrowest point is at the level of the vocal cords. An endotracheal tube (ETT) may pass through the vocal cords of a young child but might not advance past the cricoid cartilage because of normal anatomy. Forcing an ETT past the vocal cords might result in trauma to the airway and subsequent tracheal stenosis. The child’s laryngeal inlet is narrow and more susceptible to obstruction. The U-shaped epiglottis and a more acute angle between the epiglottis and glottis cause the aryepiglottic folds to be more midline. Children have a relatively shorter trachea, making both right main bronchial intubation and accidental extubation much easier. The narrower diameter of the trachea with smaller spaces between the cartilaginous rings makes a tracheostomy more difficult to perform.
Traditional teaching holds that cuffed ETTs increase the risk of ischemic damage to the tracheal mucosa due to compression between the cuff and the cartilaginous rings. This resulted in the old mandate to use uncuffed ETTs in children younger than 8 years of age. There have been numerous advances in modern ETTs that are changing this orthodoxy (3). Current American Heart Association guidelines now recommend, but do not require, a cuffed ETT for children older than 28 days of age. In the first 28 days of life, the cricoid narrowing functions as a cuff. For children over 28 days of age, the cuffed ETT is just as safe as an uncuffed ETT. The high volume, low pressure cuffs found on currently available ETTs allow the cuff to produce a seal at much lower pressures. The use of cuffed ETTs is becoming more common in pediatric ICUs and emergency departments. Several studies have shown no increase in postintubation stridor or reintubation when cuffed ETTs are used in controlled settings with regular cuff pressure monitoring.
ED MANAGEMENT
Basic Airway Management
Basic airway management is a fundamental skill that must be mastered by all caregivers. With an oxygen source, a means to deliver positive pressure ventilation, attention to detail in positioning, and the use of airway adjuncts, it is usually possible to prevent hypoxia and hypercarbia in the apneic patient.
Patient Positioning
The first goal of airway management is the establishment of a patent airway. The importance of proper positioning cannot be overemphasized. The success of airway management is predicated on this very basic, but often overlooked, issue. Placing the patient in the “sniffing” position may correct many upper airway obstructions because of soft tissue impingement. The “sniffing” position is achieved by flexing the cervical spine approximately 15 degrees and extending the atlantooccipital joint maximally. This position can also be achieved with the chin-lift or jaw-thrust maneuvers. If the patient is obese or has large breasts, the normal sniffing position is often insufficient for relieving an airway obstruction. A ramp or shoulder roll placed under the upper back will result in the “sniffing” position.
Jaw-Thrust Maneuver
The jaw thrust is one of the most basic maneuvers and an initial method of establishing a patent airway. The jaw-thrust maneuver is a two-handed technique. The operator is positioned at the head of the patient and places his or her fingers on the angles of the mandible bilaterally, displacing it anteriorly (Fig. 2.1). A face mask may be simultaneously held in place with the operator’s thumbs and index fingers.

FIGURE 2.1 The jaw-thrust maneuver. (From Reichman EF. Emergency Medicine Procedures. 2nd ed. New York, NY: McGraw-Hill; 2013, with permission.)
Chin-Lift Maneuver
The chin lift is also one of the most basic maneuvers to establish a patent airway. The chin lift is performed by placing the fingers under the tip of the mandible and lifting the chin in an anterior and cephalic direction (Fig. 2.2). Do not place the fingers on the soft tissue of the submandibular space, because this will elevate the tongue and cause further obstruction. The patient’s head may be tilted slightly posterior to aid in opening the airway.
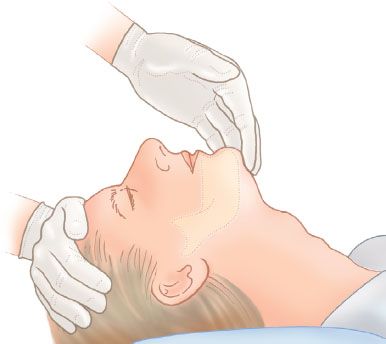
FIGURE 2.2 The chin-lift maneuver. (From Reichman EF. Emergency Medicine Procedures. 2nd ed. New York, NY: McGraw-Hill; 2013, with permission.)
Nasopharyngeal Airways
In addition to proper positioning, one can use various aids to overcome pharyngeal obstruction and facilitate effective ventilation (4). The most commonly used devices are oropharyngeal (oral) and nasopharyngeal (nasal) airways. Regardless of which device is chosen, it is important to place a large-enough airway to bridge the area of soft tissue impingement on the pharynx. Nasopharyngeal airways are soft-rubber or plastic tubes that are inserted through the nostril and into the oropharynx, just above the epiglottis. They are available in numerous sizes; the larger inner diameter is associated with the longer tubes. A size 30- to 32-French tube is appropriate for most adults. Nasopharyngeal airways can be safely placed in the conscious, semiconscious, and unconscious patients. They can also be used when an oropharyngeal airway cannot be placed (e.g., in cases of oral trauma, braces, seizures, trismus, etc.).
Insertion of a nasopharyngeal airway is a quick and rapid procedure. Choose the proper size nasopharyngeal airway. The correct size is estimated by placing the airway next to the patient’s face. Place the flared end of the airway near the tip of the patient’s nose. The airway’s tip should be at the external auditory canal. Liberally apply water-soluble lubricant or anesthetic jelly to the nasopharyngeal airway. If not contraindicated, apply a vasoconstrictor to the patient’s nasal mucosa. Gently insert the nasopharyngeal airway with the beveled tip against the nasal septum to prevent it from getting caught on the turbinates laterally. Insert the airway completely until the flared tip is against the nostril, and rotate it 90 degrees so that it is concave upward. Slight rotation often facilitates the passage of the airway if resistance is encountered during insertion. Supplementary oxygen or positive pressure ventilation with a bag-valve-mask device can be started after the insertion of the airway.
Insertion of a nasopharyngeal airway is associated with complications. If too long, the airway may cause laryngospasm and vomiting. The airway may also be placed with its tip in the esophagus, resulting in gastric distention and subsequent aspiration. Nasal mucosal injury upon insertion can result in epistaxis and aspiration of blood.
Oropharyngeal Airways
The oropharyngeal airway is a semicircular plastic device that holds the tongue up and away from the posterior pharyngeal wall. The oropharyngeal airway is less traumatic and more easily placed than a nasopharyngeal airway. An oropharyngeal airway must only be used in an unconscious patient, or it may cause laryngospasm and vomiting. An 8-, 9-, or 10-cm oral airway is appropriate for most adults.
Insertion of the oropharyngeal airway is a quick and simple procedure. Choose the proper size of oropharyngeal airway. The correct size is estimated by placing the airway next to the patient’s mouth. The distal tip should lie just above the angle of the mandible. Clear the mouth and oropharynx of any blood, secretions, or vomit. Open the patient’s jaw, and separate the teeth. Insert the oropharyngeal airway curved side down. The tip will slide along the palate. After insertion, rotate the airway 180 degrees so that the curve of the oropharyngeal airway follows the curvature of the tongue. An alternative method is to use a tongue blade to depress the tongue and then insert the oropharyngeal airway as above. If the tongue blade is used, the oropharyngeal airway may also be inserted with the curve side upward. Supplementary oxygen or positive pressure ventilation with a bag-valve-mask device can be started after the insertion of the airway.
Insertion of an oropharyngeal airway is not a benign procedure. The airway can push the tongue posteriorly and further obstruct the oropharynx if not inserted properly. Significant lacerations can occur if the lips or tongue are caught between the teeth and the oral airway. The airway can force the epiglottis closed against the vocal cords if it is too long, resulting in complete airway obstruction. Too small an airway will force the tongue against the pharynx, producing an obstruction.
Mask Ventilation
Once mastered, expertise with bag-mask ventilation (BMV) allays the urgency to intubate and permits one to rescue a failed intubation. BMV is a prerequisite to the use of neuromuscular blocking agents to facilitate intubation. Provided one takes steps to minimize the risks of gastric aspiration, BMV for prolonged periods is not unreasonable if intubation is not possible.
Face masks are made of clear plastic, have a soft seal, and have an anatomic shape that conforms to the contours of the patient’s face. Typical adult sizes are 3, 4, or 5. The size must be large enough to completely cover the nose and mouth but not be so large as to allow a leak. The key to effective mask ventilation is ensuring a continually patent airway. A patent airway is initially achieved by placing the patient in the “sniffing” position coupled with a combination of chin lift, jaw thrust, oral airway, or nasal airway. Neglecting this key maneuver results in using excessive positive pressure ventilation in an attempt to compensate for an obstructed upper airway. A bag-mask device can deliver 50 to 100 cm of water pressure to the upper airway with an adequate mask seal, which is more than sufficient pressure to insufflate the stomach if the airway is not optimally opened.
There are two ways to properly hold a face mask (4). The one-handed technique is performed with the nondominant hand (Fig. 2.3). Place the little, ring, and middle fingers under the side of the patient’s mandible. Place the index finger and thumb on the bottom and top portion of the mask. This technique allows the operator to simultaneously lift the mandible and extend the atlantooccipital joint while applying enough downward pressure to create an airtight seal. The dominant hand is used to ventilate the patient with the bag-valve device. The bag-valve device is used to provide positive pressure ventilation. The device consists of a self-inflating bag connected to oxygen on one end and a one-way (nonrebreathing) valve on the other. The valve is connected to the mask or other airway device to allow one-way flow of oxygen.
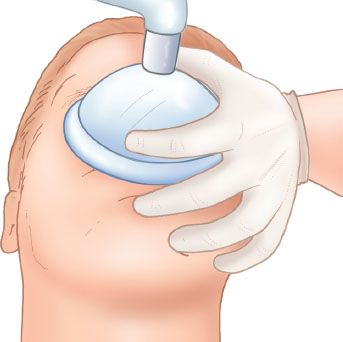
FIGURE 2.3 The one-handed, one-person, mask-ventilation technique. (From Reichman EF. Emergency Medicine Procedures. 2nd ed. New York, NY: McGraw-Hill; 2013, with permission.)
A two-handed, two-person technique may be necessary in patients with facial hair, are obese, are elderly, or are edentulous. Both of the operator’s hands are applied to the face mask to aid in the creation of a tight seal and proper airway alignment (Fig. 2.4). Place the index, middle, ring, and small fingers of the left hand on the body of the left half of the mandible. Position the right hand similarly on the right half of the mandible. Place the face mask on the patient’s face. Apply both thumbs to the mask, and apply pressure to create a seal. Anteriorly elevate the mandible to perform the jaw-thrust maneuver. The second person applies positive pressure through the bag-valve device.
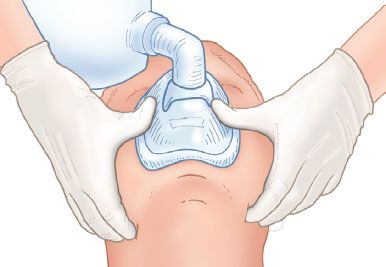
FIGURE 2.4 The two-handed, two-person, mask-ventilation technique. (From Reichman EF. Emergency Medicine Procedures. 2nd ed. New York, NY: McGraw-Hill; 2013, with permission.)
A standard adult resuscitation bag is 1,500 mL. The goal is to deliver 500 to 600 mL of tidal volume at a rate of 24 breaths/min. Smaller devices are available for children, infants, and neonates. Typical ventilation volumes are 5 to 8 mL/kg per breath. Provided the airway is patent, significant insufflation of the stomach is unlikely. The cadence should be similar to the “squeeze …release … release” cadence recommended by advanced cardiac life support (ACLS) but at a slightly faster pace.
The specific type of bag employed in BMV is also important (4). Recent studies demonstrate that bags that minimize dead space, incorporate unidirectional air flow valves (e.g., “duck bill” inspiratory valves), and use one-way expiratory valves to prevent the entrainment of room air during inspiration will deliver 90% to 97% oxygen to spontaneously breathing or ventilated patients. This delivery is in sharp distinction to improperly configured bags that will provide high oxygen concentration during active bagging but deliver only 30% oxygen during spontaneous patient breathing as a result of the entrainment of room air.
Complications of Basic Airway Management
The most serious complication of basic airway management is aspiration of gastric contents, resulting in an acute chemical pneumonitis. It is a significant risk when airway management is needed emergently or routinely in the pregnant, trauma, diabetic, or obese patient. Less-serious complications include soft tissue trauma to the lips, tongue, oral cavity, and eyelids. Tooth fractures or avulsions are uncommon but possible. Facial nerve dysfunction caused by pressure effects of the mask is transient. Corneal abrasions, conjunctival chemosis, and increased intraocular pressure are common with masks that are too large.
Intubation
Orotracheal Intubation
Orotracheal intubation is both common and life-saving. Orotracheal intubation is the primary and preferred method of airway management that every emergency physician must master (3). With proper preparation, definitive control of the airway can be obtained. Airway control assures that the patient can be oxygenated and ventilated when the patient cannot do this on his or her own.
Orotracheal intubation is relatively contraindicated in patients who do not need it, who are likely to be injured by the procedure, whose injuries make success unlikely, or in whom less-invasive techniques may suffice. Intubation may be difficult in patients with likely cervical spine injuries, severe arthritis, severe orofacial injuries, deep airway obstruction, gross deformities of the head and neck, or a quickly changing obstruction (edema or an expanding hematoma). Choose a surgical airway if the manipulation or time required for oral endotracheal intubation puts the patient at risk for spinal injury or hypoxia.
The evaluation, preparation, and technique for orotracheal intubation are complex and essential. Firmly grasp the laryngoscope in the left hand. Insert the tip of the laryngoscope blade into the right side of the patient’s mouth. Smoothly advance the blade inward while keeping pressure against the tongue. Move the blade toward the midline to trap and push the tongue to the left, “clearing a path” for your gaze.
Lift the patient’s airway up and forward exactly along the long axis of the laryngoscope handle (Fig. 2.5). Do not “cock” or “crank back” on the laryngoscope handle with the wrist, or the back of the laryngoscope blade may break the maxillary incisors. If intubating with the curved Macintosh blade, advance the tip into the vallecula, lift the laryngoscope handle to raise the tongue–jaw–epiglottis unit (Fig. 2.5), visualize the vocal cords, and insert the ETT. If intubating with the straight Miller blade, insert the blade completely, lift the laryngoscope handle to raise the tongue–jaw–epiglottis unit (Fig. 2.6), visualize the vocal cords and airway, and insert the ETT. Advance the ETT until the cuff passes through the vocal cords and 2 to 3 cm into the trachea. Inflate the cuff, assess for proper placement, and secure the ETT in place.
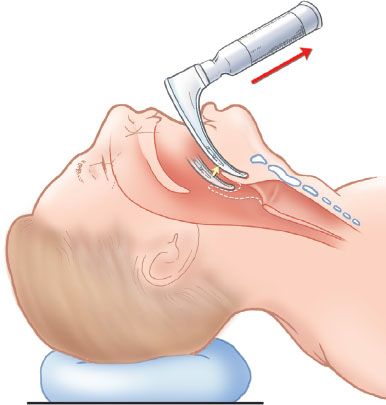
FIGURE 2.5 Intubation with the Macintosh blade. The blade is inserted into the vallecula to elevate the mandible, tongue, and epiglottis as a unit. (From Reichman EF. Emergency Medicine Procedures. 2nd ed. New York, NY: McGraw-Hill; 2013, with permission.)
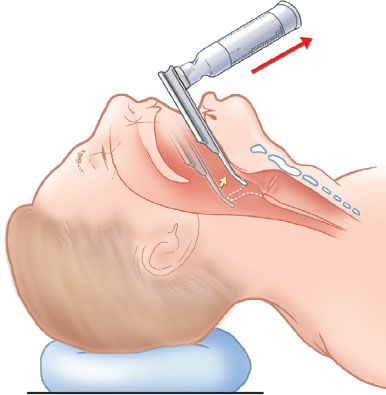
FIGURE 2.6 Intubation with the Miller blade. The blade is inserted into the vallecula to elevate the mandible, tongue, and epiglottis as a unit. (From Reichman EF. Emergency Medicine Procedures. 2nd ed. New York, NY: McGraw-Hill; 2013, with permission.)
Numerous complications are associated with orotracheal intubation (3). Hypoxia often results from prolonged intubation attempts and misplaced ETTs. Bradycardia can be produced by pharyngeal manipulation. Bradycardia may be especially pronounced in children because of their higher vagal tone. Pretreatment with atropine (0.02 mg/kg, with a minimum dose of 0.15 mg) in children younger than 6 years of age can prevent bradycardia. Increased intracranial pressure that is transient can occur as a result of the direct laryngoscopy. Direct mechanical complications from the laryngoscope include lacerations of the lips, trauma to the pharyngeal wall, broken teeth, or dentures that may be aspirated. Vomiting and aspiration can cause subsequent chemical and bacterial pneumonitis. Prolonged stimulation of the pharynx may cause apnea, bronchospasm, or laryngospasm.
Nasotracheal Intubation
Nasotracheal intubation is an alternative to orotracheal intubation to secure an airway in the spontaneously breathing patient (5). Nasotracheal intubation allows awake intubations while the patient maintains protective airway reflexes and avoids the risks of paralytic agents. It is a fairly simple procedure that should be considered in patients with spontaneous respirations in whom an oral airway is considered difficult and in those with an anticipated short intubation period. Nasotracheal intubation is well tolerated by most patients and produces less reflex salivation than orotracheal intubation, thus leading to fewer attempts of self-extubating.
Nasotracheal intubation is contraindicated in patients with apnea, with severe facial or maxillofacial fractures, with basilar skull fractures, with head injury and an elevated intracranial pressure, with nasal or nasopharyngeal obstruction, receiving thrombolytics, with a coagulopathy, or receiving parenteral anticoagulants. Nasotracheal intubation is also contraindicated in patients with neck injuries, as the procedure may increase morbidity and mortality. Nasotracheal intubation should not be performed in neonates, infants, and young children.
Prepare for the procedure. Apply a topical vasoconstrictor to shrink the nasal mucosa. Apply a topical anesthetic to the nasal mucosa. Dilate the nasal passage with your little finger or a series of increasingly larger size nasopharyngeal airways. Choose an ETT. The proper size tube should be at least 0.5 to 1 mm smaller than the size chosen for orotracheal intubation of the same patient.
Insert the ETT into the nostril with the bevel facing the septum (Fig. 2.7A). Advance the ETT with gentle pressure along the nasal floor to pass it through the nasal cavity (Fig. 2.7B). Continue advancing the ETT as resistance is met while it makes a 90-degree change of direction into the oropharynx. Advance the ETT through the oropharynx and into the laryngopharynx (Fig. 2.7C). Listen for breath sounds through the proximal end of the ETT while advancing it. As soon as an exhalation is heard, the patient will take a breath. Advance the ETT during inhalation. The vocal cords are opened their widest during inspiration, which facilitates passage of the ETT. Inflate the cuff (Fig. 2.7D), begin ventilation, confirm proper positioning, and secure the ETT.
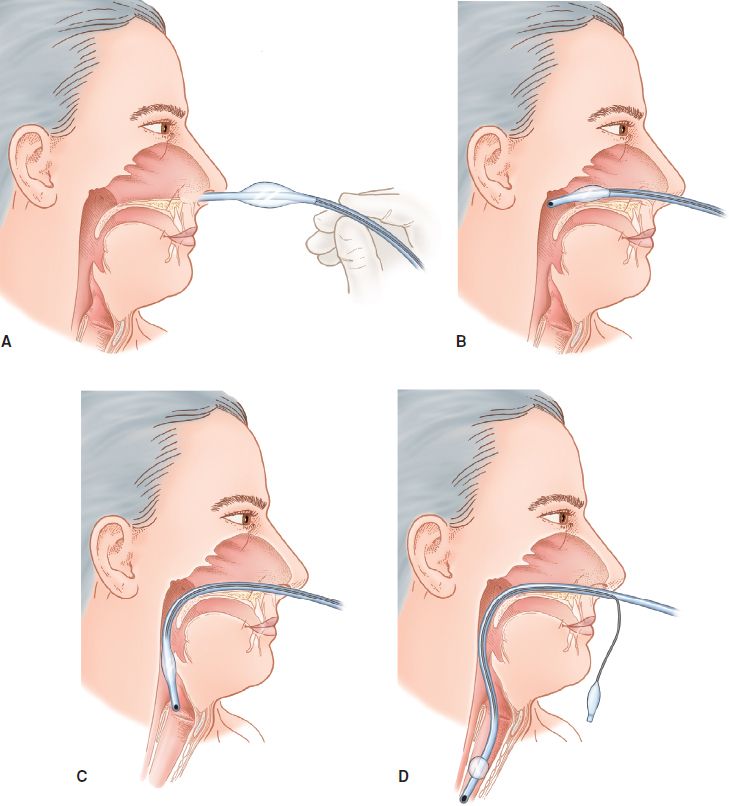
FIGURE 2.7 Nasotracheal intubation. (From Reichman EF. Emergency Medicine Procedures. 2nd ed. New York, NY: McGraw-Hill; 2013, with permission.)


