CHAPTER 38
Minimally Invasive Lumbar Decompression (MILD procedure)
INTRODUCTION
• MILD (minimally invasive lumbar decompression) is an FDA cleared percutaneous, fluoroscopically guided procedure developed as a less destabilizing bone and tissue sparing alternative to more invasive surgical decompression options.
• The removal of hypertrophied ligamentum flavum tissue during the mild procedure creates spinal canal space, thereby reducing intraspinal pressures, relieving nerve compression and alleviating complaints associated with neurogenic claudication.
• The traditional treatment algorithm for spinal stenosis ranges from the least invasive conventional therapies to the most invasive surgeries with fusion (Figure 38-1).
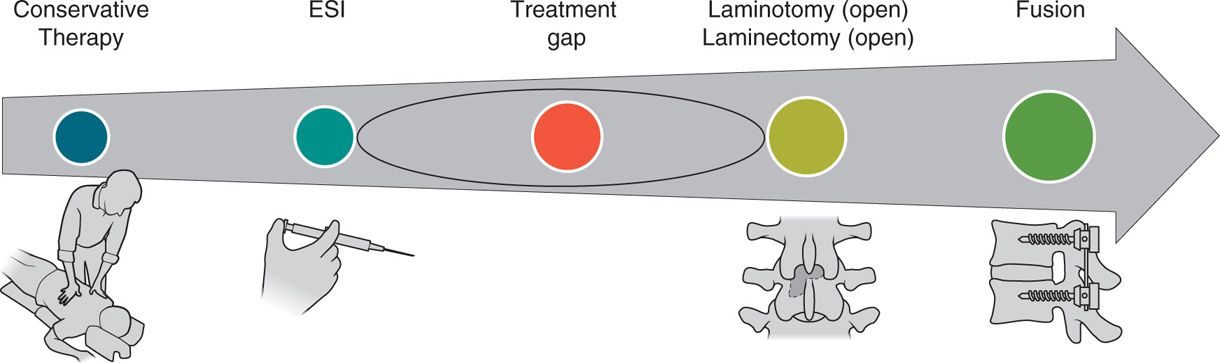
Figure 38-1. Lumbar spinal stenosis treatment algorithm.
INDICATIONS
• Lumbar spinal stenosis secondary to ligamentum flavum hypertrophy on MRI or CT imaging
• Symptomatic neurogenic claudication in patients with lumbar spinal stenosis
• The absence of spinal instability
• The absence of grade II or greater spondylolisthesis
• The absence of severe foraminal or lateral stenosis presumed to be causing the symptoms
CONTRAINDICATIONS
There are no FDA contraindications for the mild procedure. However, relevant clinical contraindications are listed:
• Spinal instability
• Severe neurologic deficit
• The absence of a laminar shelf at the level to be treated
• Inability to appreciate the epidurogram at level and side to be treated
• Infection
• Conventional surgical contraindications such as bleeding disorders and/or active anticoagulation, as well as, systemic or local infections should be considered.
RELEVANT ANATOMY
• Interlaminar space
• Ligamentum flavum
• Facet joint
• Intervertebral disc
• Epidural space
PATHOPHYSIOLOGY OF SPINAL STENOSIS
• Degenerative changes in the lumbar spine include hypertrophy of the ligamentum flavum, facet joint arthritic changes, and bulging intervertebral discs.
• There is structural narrowing of the vertebral canal resulting in nerve root compression and symptomatic neurogenic claudication.
• Neurogenic claudication presents as severe pain in the lower back, buttocks, and/or legs that progressively worsens as the individual stands or walks and is relieved with forward flexion—releasing pressure on the neural elements.
• Neurogenic claudication symptoms do not follow specific dermatomal patterns and, unless associated with severe stenosis, usually are not associated with neurologic deficits.
• Patients often complain of lower extremity numbness or paresthesiae.
• Pain is typically not initiated with nonweight bearing positions such as sitting or lying supine.
• Compared to vascular claudication, patients with neurogenic claudication present with pain during prolonged erect standing and walking, but tolerate cycling due to flexed positioning, and also have palpable pedal pulses.
• In combination with patient symptomatology, radiologic evidence often used to define spinal stenosis is a canal area of less than 100 mm2.
• As confirmed radiologically, the most common level affected by lumbar spinal stenosis is L4-5, followed by L3-4, L5-S1, L2-3, and L1-2 (see anatomical Figure 38-2).
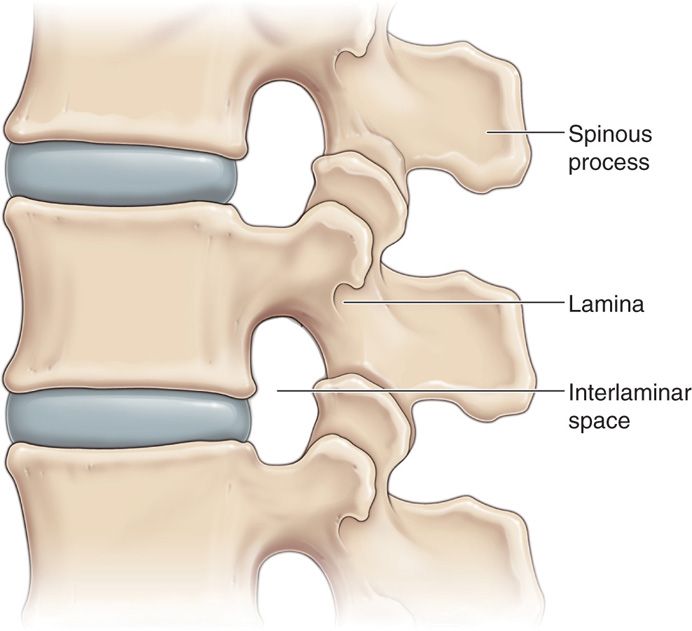
Figure 38-2. Lumbar spine anatomy.
As the vertebral canal narrows, there is a transient pressure elevation at the level of stenosis that is provoked by weight bearing. Symptomatic lumbar spinal stenosis can be related to this pressure elevation. It is postulated that as the pressure rises, venous congestion and neural ischemia occur. Flexion of the lumbar spine expands the canal diameter to its maximum diameter, thus providing a decrease in canal pressure and symptomatic relief. Positions that decrease the force of gravity on the spinal canal also provide symptomatic relief in lumbar canal stenosis. When seated, the counter force provided by the chair counteracts that of gravity, providing an overall decrease in canal pressure. When supine, the effect of gravity on the spinal canal is eliminated totally, as the force of gravity is now perpendicular to the spine.
MECHANISM OF ACTION
• The mechanism of action for the mild procedure is based upon these pressure-volume relationships.
• It is well known that a small change in volume can create a much larger change in pressure.
• By decompressing the spinal canal with even a small volume of tissue, the associated pressure change may decompress neural structures and restore venous flow, thus providing symptomatic relief.
LIGAMENTUM FLAVUM HYPERTROPHY
• Ligamentum flavum hypertrophy contributes significantly to spinal stenosis.
• The ligament can become quite thick, and according to current literature, may contribute up to 85% of the induced narrowing of the spinal canal.
• Although relative in regard to patient size, ligamentum flavum tissue greater than 2.5 mm in diameter, as measured perpendicular to the midpoint of the lamina, may be considered enlarged by radiologic criteria.
• Ligamentum flavum hypertrophy occurs when collagenous tissue collects posterior to the fibrous ligamentum flavum anterior border (Figures 38-3 and 38-4).
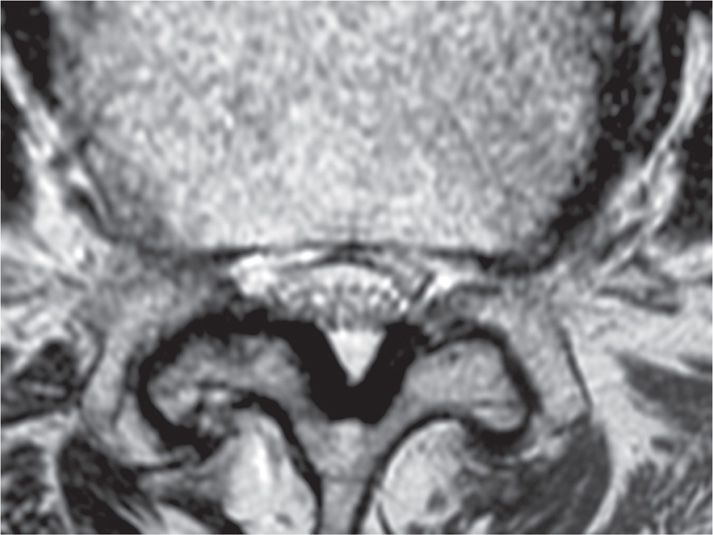
Figure 38-3. This is a photo of an axial cut MRI image of the lumbar spine demonstrating spinal stenosis with ligamentum flavum hypertrophy (black V-shaped tissue in posterior canal). (Used with permission Courtesy of Wade H.M. Wong, DO.)
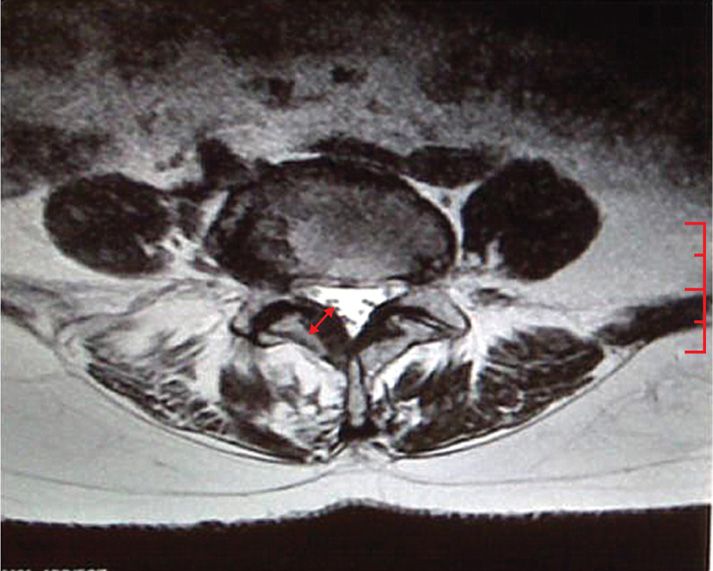
Figure 38-4. The ligamentum flavum measurement is taken at the midpoint of the pedicle and is measured in a perpendicular direction from the pedicle as demonstrated in this photo. A measurement of 2.5 mm or greater is considered hypertrophic. (Used with permission from Charles Stevens, MD.)
• The change in thickness of ligamentum flavum tissue appears to occur in the presence of chronic micro-instability that slowly develops over time.
• This process is especially evident in adjacent segmental disease associated with patients who have had previous laminectomy procedures.
• These patients almost always develop ligamentum flavum hypertrophy as a result of the shear stress associated with adjacent level postsurgical changes.
It has been observed that mild is extremely effective in treating spinal stenosis associated with adjacent segmental disease, provided there is no preexisting spinal instability. The posterior anatomical position of this tissue makes it amenable to percutaneous decompression. The mild procedure utilizes a 12-gauge working port through which decompression instruments are placed. The optimum approach for effective decompression is in line with the inferior lamina. The working port is positioned in such a manner that it parallels the superior surface of the inferior lamina. Although minor adjustments may be indicated based upon individual patient anatomy, this approach provides the most consistent position for maximum tissue resection.
The ligamentum flavum tissue is accessed through the interlaminar window. The size and shape of this space varies by patient and spinal level. In addition, degenerative changes, including shingling of the lamina, as well as intraoperative positioning of the patient, may influence access through the interlaminar space. Preoperative imaging studies are extremely important to ensure optimum access and decompression.
EPIDUROGRAM
An important and key aspect of the mild procedure is the epidurogram. An epidurogram is utilized as a safety feature allowing the mild decompression to proceed while avoiding device contact with the dura, cauda equina/nerve roots and major blood vessels, thus preventing potential patient injury.
• It is beneficial to place the epidurogram at the same level and on the ipsilateral side of the level being treated.
• This permits minimal use of contrast, which is recommended to ensure appreciation of the contralateral oblique fluoroscopic view of the epidurogram at the treatment site during decompression of the ligamentum flavum.
• An alternative, but less desired approach would be placement of the epidurogram one level below the treatment level. This approach demands greater contrast volumes, which may affect visualization.
• The epidurogram provides an anterior working border that should be respected at all times. Maintaining all decompression efforts posterior to the epidurogram ensures avoidance of the spinal canal and neural structures.
PREOPERATIVE CONSIDERATIONS
• Informed consent with proper explanation of potential complications.
• Anticoagulation—patients must have normal coagulation status.
• The patient must be able to lie prone.
• Anesthesia—the patient must be able to endure light sedation or monitored anesthesia care.
• Intravenous access is necessary.
• Evaluation for contrast allergy—minimal amounts of epidural contrast is used. Gadolinium may be substituted but visualization of epidurogram must be verified.
Mild is considered a minimally invasive outpatient procedure. It is performed in a sterile operating or procedure room with utilization of fluoroscopy. The patient’s imaging studies should be present and available for reference during the procedure.
The preoperative workup for the mild procedure is similar to that of other minimally invasive spine surgical interventions, ie, implantation of spinal cord stimulators or intrathecal pumps. Patients should have appropriate medical or cardiac clearance per treating facility’s anesthesia guidelines. Normal coagulation studies should be confirmed and anticoagulation medication use suspended.
Preoperative intravenous antibiotic administration is desirable. Most mild patients require light conscious sedation. In the rare case that conscious sedation is contraindicated, a general anesthetic may be used. Occasionally physicians have found their patients to be comfortable during the procedure using only local anesthetic.
INDICATIONS
Mild is cleared by FDA to perform lumbar decompressive procedures for the treatment of various spinal conditions. The mild devices are specifically designed to access the interlaminar space from a posterior approach, enabling removal of small portions of the lamina, then preferentially resecting and debulking the thickened ligamentum flavum, thus accomplishing a lumbar decompression.
FLUOROSCOPIC VIEWS
• Mild is a fluoroscopically guided procedure. Utilization of a proper epidurogram is paramount to the success of mild.
• Begin in the posterior-anterior (PA) view. Align the inferior end plate of the level being treated in parallax. This view will open the apex of the interlaminar space allowing the epidural needle to be placed optimally in the apex.
• Utilize PA and lateral views for placement of your epidural needle. The epidural needle is best placed in the ipsilateral apex of the interlaminar space of the level being treated.
• PA and contralateral oblique views are used for cannula placement.
• All resection is done utilizing the contralateral oblique view. Use frequent PA visualization during resection to confirm medial-lateral instrument positioning.
Although AP and lateral fluoroscopic views are appreciated, the bulk of this procedure is performed utilizing a contralateral oblique fluoroscopic view.
• This view is obtained by “obliquing” the C-arm between 40 and 45 degrees to the contralateral side of the planned treatment side.
• In this view, the superior articular process of the level being treated should be positioned at the junction of the posterior and middle thirds of the vertebral body. In this view, the trajectory of the fluoroscopic beam is parallel to the inferior lamina of the ipsilateral treatment side.
• In the contralateral view, the epidurogram presents as a sharp, crisp line representing the posterior border epidural quadrant being treated.
• The epidurogram may have a “scalloped” appearance, representing ligamentum flavum enlargement.
• The reduction in the “scalloped” shape, or a thickening and straightening of the epidurogram, is expected as decompression of the ligamentum flavum tissue occurs.
• Only a small amount of contrast is required to obtain the necessary epidurogram (typically <1 cc). Intraoperative replenishing or “blushing” of the epidurogram (using <0.5 cc of contrast) may be needed for optimum visualization (Figures 38-5 and 38-6).
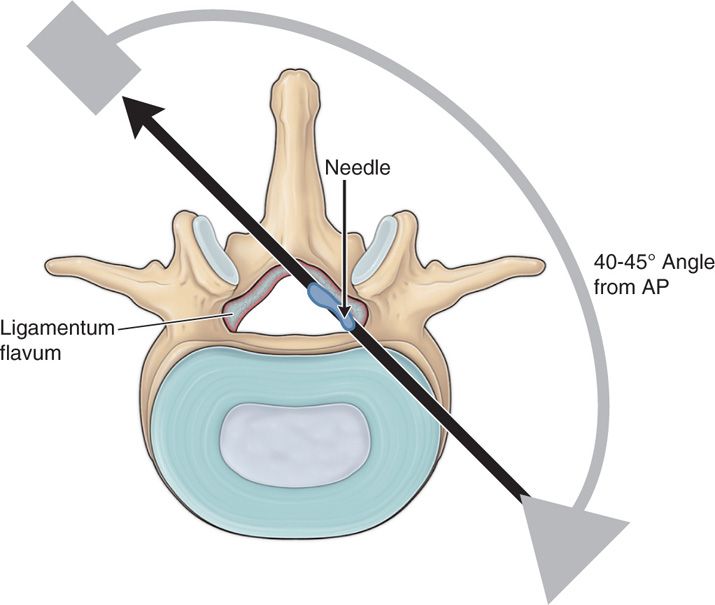
Figure 38-5. The “contralateral oblique” fluoroscopic approach is used during tissue resection. This view provides maximum visualization of the lamina and the epidurogram at the level of resection.
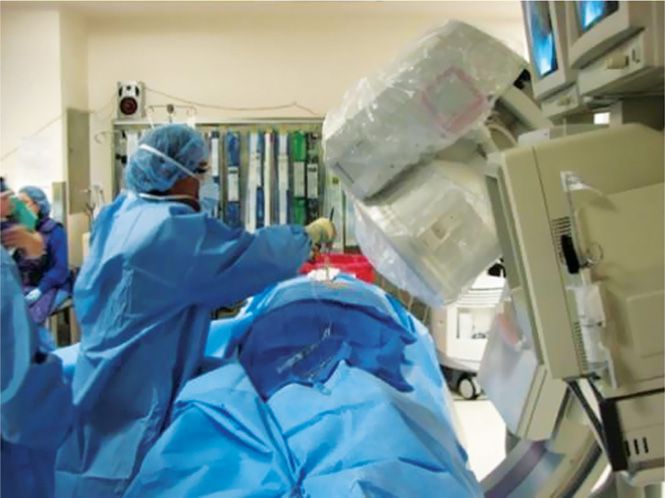
Figure 38-6. A typical scene of a physician performing the mild procedure. (Used with permission from Wade H.M. Wong DO.)
Depth of instrument placement during the mild procedure is observed in the contralateral oblique fluoroscopic view. All advancement of instruments, and the entire decompression procedure should be performed utilizing this view.
While all aspects of the procedure should be conducted in the contralateral oblique fluoroscopic view with constant visualization of the epidurogram, it is prudent to frequently stop and check the AP view. The AP view allows verification of the mild instruments’ medial to lateral position within the posterior spinal space.
POSITIONING THE PATIENT
• Prone position
• Lumbar flexion with abdominal bolster or radiolucent frame
• Arms elevated to allow lateral and contralateral fluoroscopic visualization
Patients undergoing the mild decompression procedure are placed in a prone position with the abdomen bolstered to reduce lordosis. Reduction of lumbar lordosis opens the interlaminar window facilitating access to the posterior spinal space. It is important to appreciate the degree of laminar shelving that may exist. In some elderly patients with significant degenerative changes to the spine, the lamina can overlap or “kiss,” making interlaminar entry difficult. Increased lumbar flexion can aid in these cases (Figure 38-7).
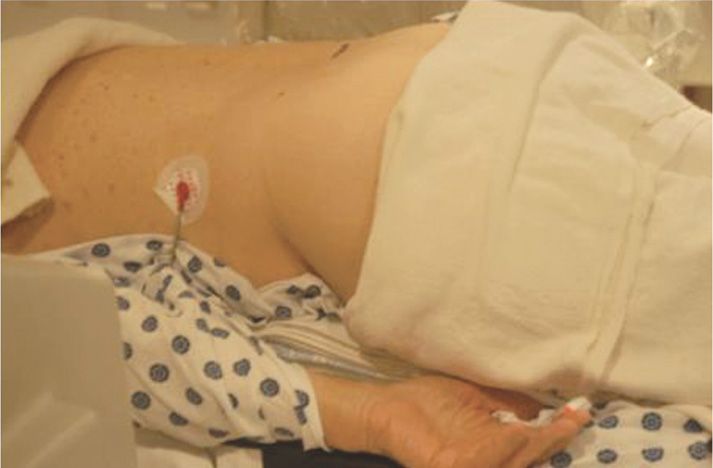
Figure 38-7. A properly positioned patient for the mild procedure is demonstrated. The patient is prone with reduction of the lumbar lordosis. (Used with permission from Wade H.M. Wong DO.)
Conversely, it is also important not to over-flex the lumbar spine. Hyperflexion of the lumbar spine extends the epidural space as well as the posterior spinal tissue. Too much extension of these tissues can increase the difficulty of decompression. In addition, once the epidural space is extended, the epidurogram will lose its scalloped shape associated with ligamentum flavum hypertrophy making it more difficult to identify the procedure endpoint (a straighter, thicker epidurogram).
Abdominal bolstering can be accomplished utilizing multiple techniques. Pillows can be used under the abdomen. Sometimes with this technique, the pillows become too compressed and the patient can sink, thus reducing the intended lumbar flexion. Another technique utilizes rolling of sheets or blankets into logs 8 to 12 in in height, depending on patient’s body. These logs are then placed under the patient’s iliac crests and under the clavicles. Finally, radiolucent devices such as Wilson and Camden frames may be utilized.
EQUIPMENT
• The mild procedure is performed using a mild kit provided by Vertos Medical Inc. (Aliso Viejo, CA). The kit contains much of what is needed to perform the procedure. Contained within the kit is the 5.1 mm portal, trocar and handle, a bone resecting device (mild Bone Sculpter Rongeur), a soft tissue resecting device (mild Tissue Sculpter), a portal stabilizer, a depth guide, and a surgical clamp (Figure 38-8).
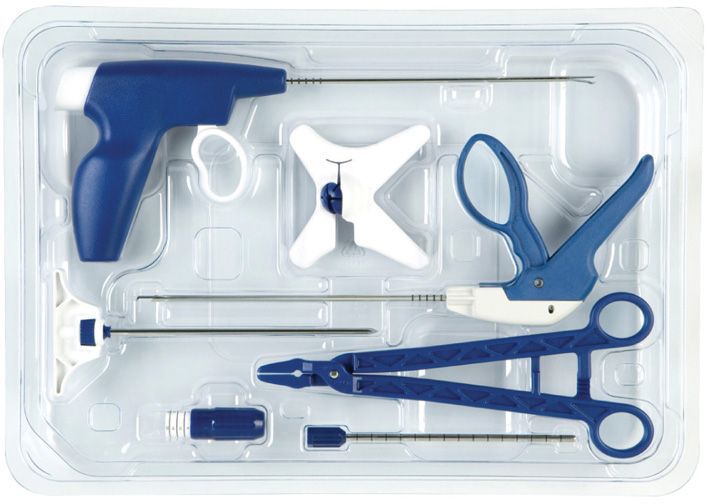
Figure 38-8. The mild kit contains the Tissue Sculptor, the Bone Sculptor Rongeur, the mild portal, the mild trocar and handle, the mild portal stabilizer, the mild depth guide, and the mild surgical clamp.
• The mild Bone Sculpter Rongeur is utilized to remove small portions of bone along the superior and inferior laminar border. This enables the removal of small osteophytes and disengages the ligamentum flavum attachments along the posterior lamina. This disengagement of ligamentum fibers from the lamina facilitates the ultimate removal of ligamentum tissue.
• The mild Tissue Sculpter is uniquely designed to excise hypertrophied ligamentum flavum tissue in a nontraumatic manner. It has a blunt, curved distal tip and a superior positioned cutting edge to capture, cut, and then retains tissue in the shaft of the instrument. This device can accommodate multiple tissue cuts per pass, but should be cleaned frequently to avoid over filling. The posterior end of this instrument has a tissue eject trigger allowing contained tissue to be ejected from the device and discarded.
• Not included in the kit, but needed for the procedure is an epidural needle (recommend 20 gauge), loss of resistance syringe, IV extension tubing and syringe and needles for infiltration of local anesthesia.
• The contrast utilized should be a nonionic substance. Isoview M200 is the author’s choice. For patients with contrast allergies, gadolinium may be considered provided it creates a visible epidurogram.
• Other equipment needed for this procedure includes a radiolucent procedure table and a C-arm.
• Prior to beginning, the procedure one should carefully map out the exact location of the hypertrophied ligamentum flavum on the MRI. This will allow one to define trajectory and approaches to the stenosis.
INTRAOPERATIVE TECHNICAL STEPS
• Step 1: Patient position.
![]() Position patient prone with reduction of lumbar lordosis (see patient positioning above). Check pressure points prior to implementation of anesthesia.
Position patient prone with reduction of lumbar lordosis (see patient positioning above). Check pressure points prior to implementation of anesthesia.
• Step 2: Fluoroscopy.
![]() Using fluoroscopy, identify and superficially mark the midline as well as the medial pedicular borders bilaterally at the intended treatment level(s).
Using fluoroscopy, identify and superficially mark the midline as well as the medial pedicular borders bilaterally at the intended treatment level(s).
![]() These markings will prove useful later in the case as they can serve as a reminder of instrument distal tip orientation.
These markings will prove useful later in the case as they can serve as a reminder of instrument distal tip orientation.
![]() For example, if the proximal end of the portal is positioned extremely lateral, outside of the skin markings, it is likely the distal tip has crossed midline, thus requiring repositioning (Figure 38-9).
For example, if the proximal end of the portal is positioned extremely lateral, outside of the skin markings, it is likely the distal tip has crossed midline, thus requiring repositioning (Figure 38-9).
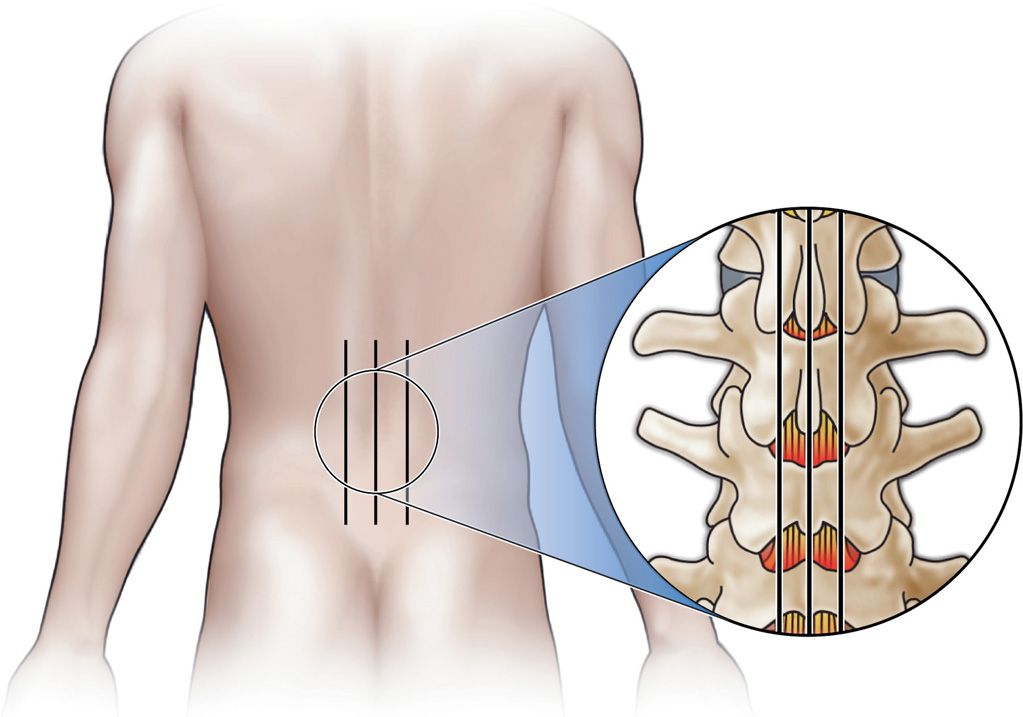
Figure 38-9. Superficial skin markings are made to identify the midline and the medial pedicular borders.
• Step 3: Epidural needle placement.
![]() Align the inferior end plate of the level to be treated with the fluoroscope. This will open the superior aspect of the intervertebral space.
Align the inferior end plate of the level to be treated with the fluoroscope. This will open the superior aspect of the intervertebral space.
![]() The goal is to place the epidural needle as high in the apex of the intervertebral space and as close to midline as possible while remaining ipsilateral to the treatment side.
The goal is to place the epidural needle as high in the apex of the intervertebral space and as close to midline as possible while remaining ipsilateral to the treatment side.
![]() This will provide the best epidurogram with the needle as far out of the working zone as possible.
This will provide the best epidurogram with the needle as far out of the working zone as possible.
![]() Utilize a “loss of resistance” technique with a continuous pressure placed on the hub of the syringe. A bounce loss of resistance technique will more often than not result in a wet tap in these patients.
Utilize a “loss of resistance” technique with a continuous pressure placed on the hub of the syringe. A bounce loss of resistance technique will more often than not result in a wet tap in these patients.
![]() Once loss of resistance is confirmed, inject a small quantity on contrast (1 cc or less) to confirm epidural spread in the contralateral oblique fluoroscopic view. Injection of contrast is facilitated with the use of a high-pressure IV extension tube.
Once loss of resistance is confirmed, inject a small quantity on contrast (1 cc or less) to confirm epidural spread in the contralateral oblique fluoroscopic view. Injection of contrast is facilitated with the use of a high-pressure IV extension tube.
![]() With severe stenosis, it may be necessary to place the epidural needle at the level above or below the level of the stenosis.
With severe stenosis, it may be necessary to place the epidural needle at the level above or below the level of the stenosis.
• Step 4: Skin entry site and trajectory planning.
![]() The skin entry site is usually one and one half levels below the treatment site on the ipsilateral side. This typically falls at the level of the pedicle, one level down.
The skin entry site is usually one and one half levels below the treatment site on the ipsilateral side. This typically falls at the level of the pedicle, one level down.
![]() The best approach is usually about 15 degrees off of midline, but may need to be adjusted based on the patient’s spinal anatomy.
The best approach is usually about 15 degrees off of midline, but may need to be adjusted based on the patient’s spinal anatomy.
![]() Create a skin wheel with local anesthetic. Use a 5-in 22-gauge spinal needle to advance toward the inferior lamina.
Create a skin wheel with local anesthetic. Use a 5-in 22-gauge spinal needle to advance toward the inferior lamina.
![]() Utilize an AP fluoroscopic view to direct the needle approximately half way to determine the medial to lateral trajectory needed at this level on this side. (Imaging studies should be reviewed preoperatively for trajectory planning and available throughout the case for reference.)
Utilize an AP fluoroscopic view to direct the needle approximately half way to determine the medial to lateral trajectory needed at this level on this side. (Imaging studies should be reviewed preoperatively for trajectory planning and available throughout the case for reference.)
• Once the medial to lateral trajectory of the needle has been determined, change the fluoroscopic view to a contralateral oblique view for advancement to the lamina.
• Advancement of the needle in the AP view does not allow visualization of instrument depth.
• Do not advance the instrument unless utilizing direct visualization in the contralateral oblique view.
• The needle track may need to be adjusted until it lies parallel to the superior surface of the inferior lamina at the treatment level.
• Copious injection of local anesthetic along the periostium, as well as along the needle track (upon exit of this needle) ensures adequate local analgesia.
• Step 5: Insertion of tissue access device.
• Once the track has been determined, a 15 blade is used to make a skin puncture wound.
• The portal, when cannulated with the handled trocar, is referred to as the mild Tissue Access Device.
![]() This access device is advanced along the same track until the distal end is positioned on the superior surface of the inferior lamina, within the posterior half of the lamina (Figures 38-10 and 38-11).
This access device is advanced along the same track until the distal end is positioned on the superior surface of the inferior lamina, within the posterior half of the lamina (Figures 38-10 and 38-11).
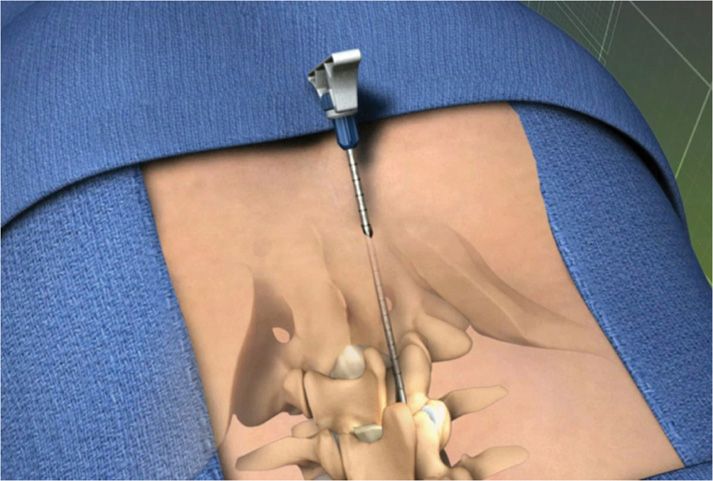
Figure 38-10. The mild portal is loaded with a trocar and is positioned parallel to the superior surface of the inferior lamina.
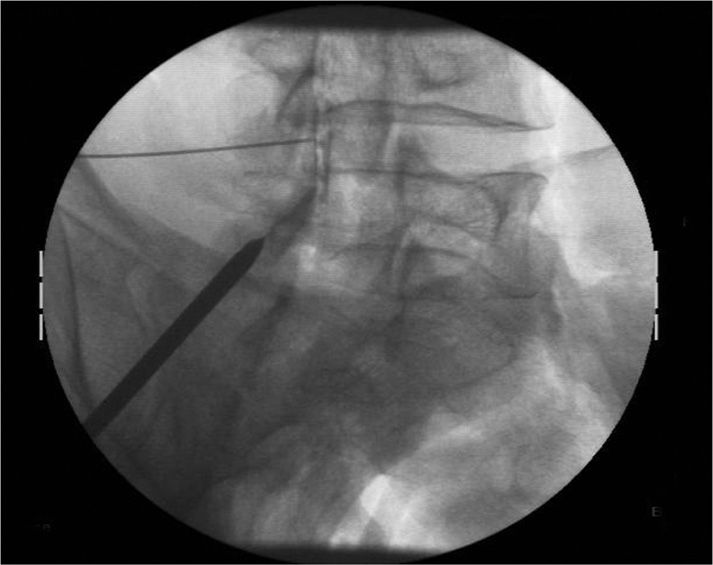
Figure 38-11. A photograph of a contralateral oblique fluoroscopic image demonstrating the epidural needle positioned high in the L4-5 intralaminar space with visible epidurogram. The trocar is positioned parallel to the superior surface of the inferior lamina. The tip of the trocar is seen here at the posterior edge of the inferior lamina.
• Step 6: Removal of trocar.
![]() Release and remove the trocar by gently turning the locking screw on the handle.
Release and remove the trocar by gently turning the locking screw on the handle.
• Step 7: Placement of portal stabilizer.
![]() Next slide the portal stabilizer over to the portal and snap into place.
Next slide the portal stabilizer over to the portal and snap into place.
![]() The stabilizer has a roller ball mechanism that allows pivoting of the cannula, which may facilitate tissue removal.
The stabilizer has a roller ball mechanism that allows pivoting of the cannula, which may facilitate tissue removal.
![]() The portal stabilizer simultaneously provides some stability as it serves to control the angle of the mild portal against the skin surface.
The portal stabilizer simultaneously provides some stability as it serves to control the angle of the mild portal against the skin surface.
• Step 8: Depth guide placement.
![]() Next, attach the depth guide to the distal end of the portal.
Next, attach the depth guide to the distal end of the portal.
![]() This device provides a stop that limits the depth (forward motion) of any instrument inserted into the portal.
This device provides a stop that limits the depth (forward motion) of any instrument inserted into the portal.
![]() It has a dial mechanism that allows instruments to extend in 5 mm increments from 0 to 25 mm beyond the tip of the port and into the interlaminar space (Figure 38-12).
It has a dial mechanism that allows instruments to extend in 5 mm increments from 0 to 25 mm beyond the tip of the port and into the interlaminar space (Figure 38-12).
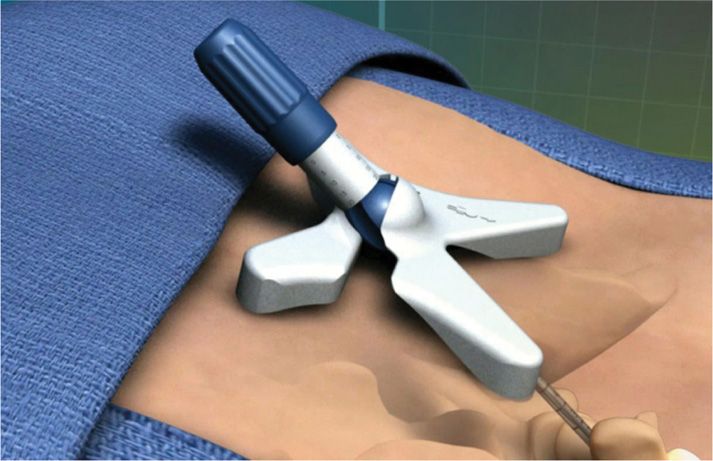
Figure 38-12. The mild Portal Stabilizer serves to control the angle of the mild portal against the surface of the skin. The mild depth guide serves to adjust the depth of the Bone Sculpter Rongeur and the Tissue Sculpter within the intralaminar space in 5 mm increments.
• Step 9: Bony tissue decompression.
![]() Decompression is initiated with the use of the mild Bone Sculpter Rongeur.
Decompression is initiated with the use of the mild Bone Sculpter Rongeur.
![]() This instrument is inserted through the port and used to resect and excise superior and inferior laminar tissue.
This instrument is inserted through the port and used to resect and excise superior and inferior laminar tissue.
![]() It is a single bite instrument that must be withdrawn from the port and emptied after each pass.
It is a single bite instrument that must be withdrawn from the port and emptied after each pass.
![]() It is recommended that a systematic technique be utilized starting at the medial surface of the inferior lamina and working toward the lateral end.
It is recommended that a systematic technique be utilized starting at the medial surface of the inferior lamina and working toward the lateral end.
![]() Then, beginning at the medial surface of the superior lamina, work toward the lateral end to include the lateral intervertebral border (Figure 38-13).
Then, beginning at the medial surface of the superior lamina, work toward the lateral end to include the lateral intervertebral border (Figure 38-13).
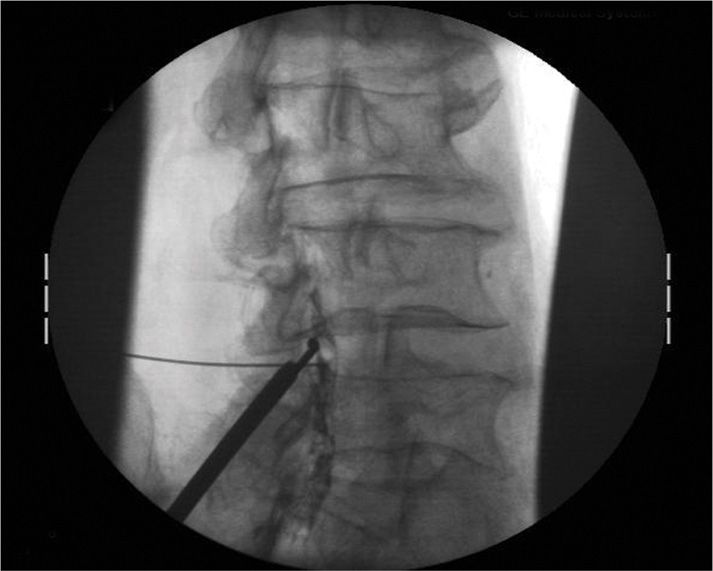
Figure 38-13. The mild Bone Sculpter Rongeur is being used along the inferior edge of the superior lamina.
• Step 10: Ligamentum flavum debulking.
![]() Once an adequate amount of bone has been resected, the mild Tissue Sculpter is placed within the port and utilized to resect remaining soft ligamentum flavum tissue.
Once an adequate amount of bone has been resected, the mild Tissue Sculpter is placed within the port and utilized to resect remaining soft ligamentum flavum tissue.
![]() This device may be used for multiple bites, but must be withdrawn from the port regularly and tissue sufficiently discharged to avoid overfilling, which could affect normal action of the trigger mechanism.
This device may be used for multiple bites, but must be withdrawn from the port regularly and tissue sufficiently discharged to avoid overfilling, which could affect normal action of the trigger mechanism.
![]() The instrument design requires a scooping upward motion from inferior to superior direction combined with activation of the trigger, which implements the cutting action.
The instrument design requires a scooping upward motion from inferior to superior direction combined with activation of the trigger, which implements the cutting action.
![]() Repositioning of the tissue sculpter with each cut ensures additional tissue resection. It is suggested that a thoughtful plan of resection be utilized beginning at the medial aspect of the interlaminar space and working laterally.
Repositioning of the tissue sculpter with each cut ensures additional tissue resection. It is suggested that a thoughtful plan of resection be utilized beginning at the medial aspect of the interlaminar space and working laterally.
![]() Continual visualization of the epidurogram is required throughout the procedure. Care is taken to avoid passage of instruments beyond the epidurogram.
Continual visualization of the epidurogram is required throughout the procedure. Care is taken to avoid passage of instruments beyond the epidurogram.
![]() Maintaining a position posterior to the epidurogram with all instrumentation throughout the procedure ensures that neural structures are protected (Figure 38-14).
Maintaining a position posterior to the epidurogram with all instrumentation throughout the procedure ensures that neural structures are protected (Figure 38-14).
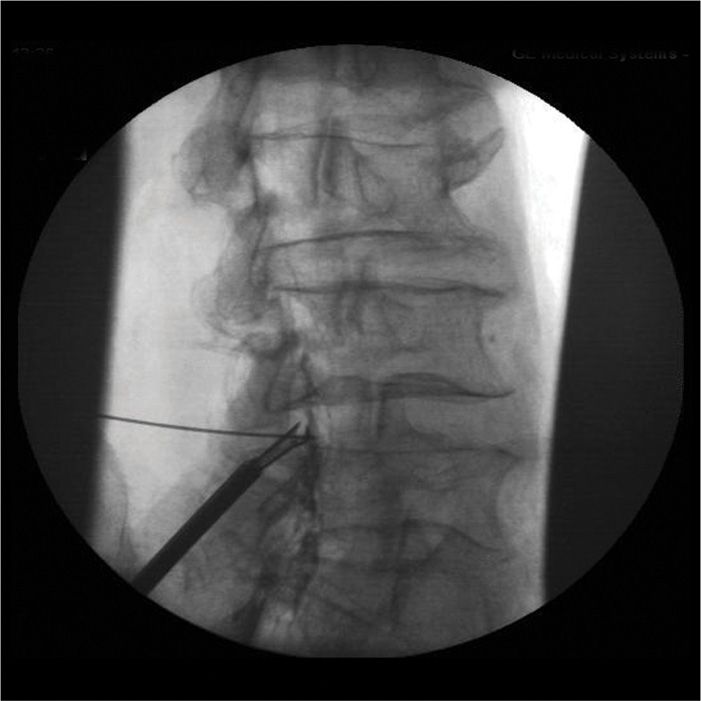
Figure 38-14. The mild Tissue Sculpter is being used to remove ligamentum flavum tissue from the posterior intralaminar space.
• Step 11: Repeat epidurogram.
![]() With adequate ligamentum flavum tissue resection, a change in the epidurogram is observed.
With adequate ligamentum flavum tissue resection, a change in the epidurogram is observed.
![]() Typically, the epidurogram is visualized as straighter and/or thicker.
Typically, the epidurogram is visualized as straighter and/or thicker.
![]() This finding is considered the end-point of the procedure and all instruments are withdrawn (Figures 38-15 and 38-16).
This finding is considered the end-point of the procedure and all instruments are withdrawn (Figures 38-15 and 38-16).
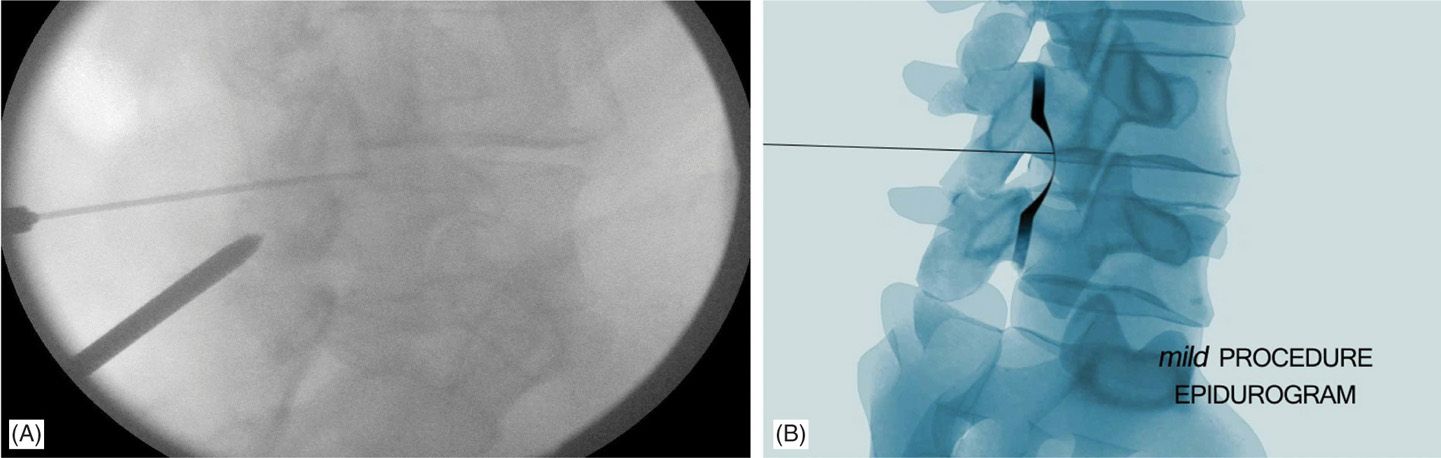
Figure 38-15. (A, B) Per-mild. Note the shape of the epidurogram before the mild procedure as a thin scalloped shape.

Figure 38-16. (A, B) Post-mild. Note the shape of the epidurogram after the mild procedure as thicker and straighter indicating improved flow of contrast after debulking the hypertrophied ligamentum flavum.
• Step 12: Wound dressing.
![]() The wounds are then cleaned and closed using a sterile adhesive-strip and a sterile dressing. The patient is taken to PACU (Figure 38-17).
The wounds are then cleaned and closed using a sterile adhesive-strip and a sterile dressing. The patient is taken to PACU (Figure 38-17).

Figure 38-17. Small 5.1 mm incisions are covered with a small dressing post procedure.
POSTPROCEDURE CONSIDERATIONS
• Post mild patients are recovered in the same fashion as other outpatient spinal procedures.
• Typical PACU monitoring protocols should be implemented in addition to neurological checks no less than 3 times every 15 minutes.
• Postoperative oozing from the wound site is frequently observed. Re-enforcement of the dressing may be indicated prior to discharge.
• Nearly all patients treated with mild are discharged on the day of the procedure. Postoperative ice and mild analgesics are appropriate.
• Postprocedure discomfort maybe reported for up to 7 to 10 days in some cases. Once neurological exams have been confirmed as normal, these complaints should be treated conservatively.
• Most patients undergoing the procedure have become deconditioned over a period of years. Postoperatively a course of physical therapy may be required to functionally rehabilitate the patient.
CLINICAL PEARLS AND PITFALLS
Pearls
• Selection of patients: As with most procedures, optimal mild patient selection is critical to success. These patients should demonstrate clinically significant symptomatic neurogenic claudication and have verifiable ligamentum flavum hypertrophy. Patients with severe foraminal or lateral recess stenosis outweighing the potential benefit of a percutaneous decompression procedure should be avoided.
• Positioning is extremely important to the success of this procedure. While reduction of lumbar lordosis is important to facilitate access to the interlaminar space, it is important not to over flex the lumbar spine. Over flexion of the lumbar spine creates taut posterior tissues making excision of ligamentum flavum tissue difficult.
• Trajectory planning for port placement is an important aspect of the procedure. Begin with the port placed parallel to the superior surface of the inferior lamina.
• Placement of the epidural needle is one of the most important aspects of this procedure. To ensure the best placement, attempt to position the epidural needle as close to the apex of the intervertebral space as possible. This is best achieved by first aligning the fluoroscopic view at the level to be treated such that the inferior end plate of the superior vertebral body is in alignment. For example, if decompressing the L4-5 level, the inferior end plate of L4 should be aligned to ensure apical access of the L4-5 interlaminar space.
• “Less is more” when it comes to contrast. Take care not to inject too much contrast. As the volume of contrast is increased, it begins to flow around the epidural space, thus diminishing the resolution of the epidurogram in the contralateral oblique view. It is important to note that what is needed from the epidurogram in the contralateral oblique view is a fine crisp line that layers along the quadrant of the epidural level being treated at that time.
Pitfalls
• Forgetting to create superficial skin markings delineating the midline and the bilateral medial pedicular borders can lead to intraoperative confusion. These markings are used intraoperatively for orientation of the distal end of working instruments during the case.
• Advancing the local anesthetic needle or the trocar or any instrument in the AP fluoroscopic view is dangerous. Advancement in this view does not allow one to adequately visualize depth. All advancements should proceed in the contralateral oblique view.
• Advancement of an instrument beyond the epidurogram poses the risk of a serious complication including nerve injury and dural puncture. The procedure as described maintains all instrumentation posterior to the epidurogram. When performed as recommended, this is the safest decompression procedure currently available.
Related posts:


Stay updated, free articles. Join our Telegram channel

Full access? Get Clinical Tree


