FIGURE 33.1 Anatomy of the internal jugular vein.
- More superficial position than the SV
- Lower stenosis or occlusion rate as opposed to the SV.
The advantages of using the right as compared to the left IJV include:
- Apical pleura does not rise as high on the right as the left and the right side avoids the thoracic duct
- Straighter course to the superior vena cava as compared to the left IJ or either subclavian route.
Role of Ultrasound
Due to variability in the anatomic relationship of the IJV to the carotid artery, RTUS guidance should be utilized if available. This variability may relate to the level and degree of neck rotation as identified when examined with ultrasound. As the neck is turned away from 30 to 90 degrees, the IJV assumes a more anterior position in relation to the carotid artery (21). Sonography lessens the complications of inadvertent puncture and/or cannulation of the carotid artery (37). The IJV is usually superficial with no intervening structures to interfere with the ultrasound waves, making ultrasound guidance a suitable adjunct for vein accessibility. Use of RTUS leads to increased cannulation success rates, a decrease in the attempts to puncture the vein, a shorter time to actual cannulation, and a reduced risk of carotid artery puncture (22). Due to these benefits, use of RTUS guidance for IJV cannulation is recommended as the standard practice.

FIGURE 33.2 Identify the apex of the triangle formed by the two heads of the sternocleidomastoid (SCM) and clavicle.
Internal Jugular Technique
Using Landmarks Without Ultrasound
- Verify that the patient does not have allergies to medications (Figs. 33.2 and 33.3).
- Complete all five steps described in the Sterile Preparation of Operator and Skin section with the following modifications.
- Place the patient in a Trendelenburg position, at least 15 degrees head down to distend the neck veins and to reduce the risk of air embolism.
- Slightly turn the head (no more than 20 degrees) away from the puncture site. Turning it too far leads to flattening of the vein and increases the risk of arterial puncture.
- Obtain a “maximum sterile barrier,” which includes the placement of a cap, shielded mask, sterile gown, and gloves.
- Stand at the head of the bed.
- Cleanse the skin and place a large drape over the area. In nonsedated patients, always inform them of the steps of the procedure as you move forward and create a tent with the drape over their face to relieve any anxiety and to make breathing easier.
- Identify the apex of the triangle formed by the two heads of the SCM muscle and clavicle.
- Palpate the carotid pulse, which will be medial to the vein.
- Use local anesthetic (1% lidocaine provided in the kit) and the smallest needle available to anesthetize the puncture site at the apex of the triangle.
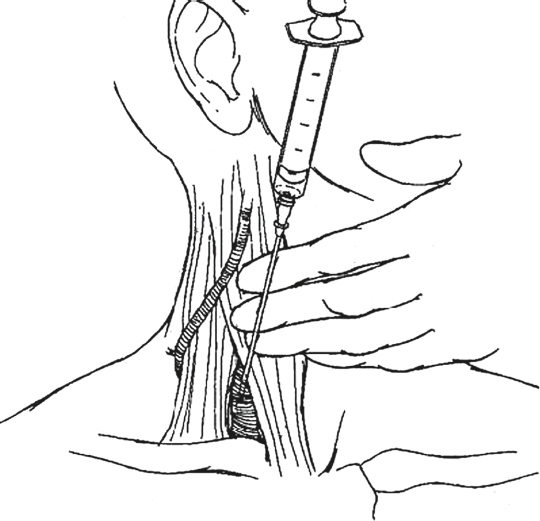
FIGURE 33.3 Attach a fresh 10-cc syringe to the large 18-gauge 2-inch introducer needle and, using the previously placed 22-gauge needle as a guide, find the IJV.
Some operators may choose to bypass steps 11–17, which involves using a smaller finder needle, but the complete steps of locating the IJV are listed.
- Small needle locator: Use a 10-cc syringe attached to a small finder needle (usually 22-gauge 1 inch) to find the IJV. This helps to decrease inadvertent carotid artery injury.
- Insert the 22-gauge needle with the bevel up, at an angle of 45 degrees to the skin and advance it downward toward the ipsilateral nipple.
- The syringe and needle can be stabilized by resting the hand on the mandible of the patient at its midpoint, if needed.
- The vein is usually within 2 to 3 cm of the skin. If the vein is not found, redirect the needle more laterally.
- Unlike the SV, during line insertion, the jugular vein is easily compressed manually. As a result, a blood flashback is quite frequently not encountered until the needle is being withdrawn; therefore, withdraw slowly.
- If the blood from the needle is pulsatile, remove the needle and hold pressure for a full 10 minutes prior to proceeding. Consider ultrasound-guided placement if not being utilized.
- Once the IJV is identified, leave the 22-gauge needle in place.
- Big needle: The large 18-gauge 2 inch needle attached to a 10-cc syringe with the bevel up, is now used to find the IJV, utilizing the previously placed 22-gauge (finder) needle as a guide.
- Once venous blood is obtained, use the Seldinger technique to complete the procedure.
- Verify that all ports allow aspiration of venous blood and can be flushed with saline without resistance.
- Suture the catheter in place, cover with a biopatch and sterile dressing, and document the procedure appropriately in the chart.
- Obtain a stat chest radiograph to verify the position and exclude pneumothorax or other injuries.
| TABLE 33.1 Distance from Skin Puncture Site to Atriacaval Junction | |
 | |
Andrews et al. (23) have recently measured the distance from skin puncture site to atriacaval junction in 100 patients undergoing central venous cannulation by various routes. Their findings are presented in Table 33.1.
Ultrasound-Guided Technique
- After completing steps 1 to 7 as listed above, place gel on the probe and apply the probe cover in a sterile manner. After this is done, apply gel to the neck and utilize the probe to locate the IJV and carotid artery in the anatomic triangle. Orientation of the probe is key, as well as knowing the anatomic location of the vessels. The short-axis view with RTUS will demonstrate the vein in a lateral position with the artery medially. Regardless of the location, the vein will be compressible by applying downward pressure with the ultrasound probe, whereas the artery is not. The artery will also pulsate, whereas the vein will not (Fig. 33.4).
- Once the IJV is located, provide local anesthetic to the area where the needle will be inserted.
- Insert the needle attached to a 10-cc syringe with the bevel up, at an angle 45 degrees to the skin, while observing the entrance into the subcutaneous tissue on the ultrasound monitor.
- Apply suction to the plunger and advance the needle tip towards the IJV, until entered.
- When venous blood is obtained, follow the Seldinger technique to complete the procedure.
- Verify that all ports allow aspiration of venous blood and can be flushed with saline without resistance.
- Suture the catheter in place, cover with a biopatch and sterile dressing, and document the procedure appropriately in the chart.
- Obtain a stat chest radiograph to verify the position and exclude pneumothorax or other injuries.

FIGURE 33.4 Ultrasound image of the internal jugular vein (IJV) and carotid artery (CA) in short-axis view. The arrow indicates the catheter within the IJV. M, medial; L, lateral.
Steps to Prevent Complications
- Do not force the wire through the introducer needle, resistance of any type is an indication to stop, remove the needle and guidewire, and hold pressure on the vein.
- One hand should be on the guidewire at all times during the procedure to avoid losing the wire into the IJV.
- Avoid overzealous dilation of the IJV with the dilator. Excessive dilation extending beyond the subcutaneous tissue and fat into the vein increases the risk of postprocedure complications (oozing, hematoma formation, arteriovenous fistula formation, and pseudoaneurysm formation).
- Verify that the guidewire moves easily back and forth through the dilator as the dilator is advanced toward the vein to avoid puncturing through the back wall of the vein due to bending of the wire at the dilator tip.
- Inadvertent arterial puncture and subsequent hematoma or pseudoaneurysm formation can be prevented by providing direct pressure on the artery for approximately 10 minutes. If carotid artery puncture is NOT recognized and the artery is cannulated, leave the catheter in place and obtain a stat vascular surgery consult, as removal can be lethal to the patient.
- If the patient is intubated and on high positive end-expiratory pressure (PEEP) settings, holding the inspiratory effort for a few seconds while cannulating the IJV may decrease the overinflation of the lung apex and decrease the chances of obtaining a pneumothorax. (This should only be performed if no deleterious effects result in the patient’s oxygenation, ventilation, alveolar recruitment, or overall status.)

FIGURE 33.5 Anatomy of subclavian vein.
SUBCLAVIAN VEIN CANNULATION
Anatomy and Patient Positioning
The SV is a continuation of the axillary vein and runs from the outer border of the first rib to the medial border of the anterior scalene muscle where it joins with the IJV at the thoracic inlet, to form the innominate vein (brachiocephalic vein). It runs most of its course along the underside of the clavicle as defined by its name, sub meaning below, and clavian pertaining to the clavicle (Fig. 33.5). Situated between the clavicle and the first rib, the vein can be within 5 mm of the apical pleura of the lung (20,24). Anteriorly, the medial third of the clavicle overlies much of the SV, providing a reliable landmark for its location. The clavicle can be divided into thirds (medial, middle, and lateral). The juncture between the medial third and middle third of the clavicle will be the optimal landmark to access the SV. In some patients, palpation of the clavicular notch will also help in identifying this landmark. An understanding of the relationship between these two structures is crucial for successful cannulation of the SV. The vein is separated posteriorly from the subclavian artery by the insertion of the scalenus anterior muscle. Its diameter is approximately 7 to 12 mm. Of note, the left SV is the site at which chyle, enters the bloodstream via the thoracic duct. The position of the SV and its relationship to the clavicle changes with different shoulder positions. It has been found that the position that provides the greatest exposure of the SV is with the shoulders in the neutral position and slightly retracted (25). However, in the Trendelenburg position, the shoulders assume a protracted (shrugging) position secondary to the effects of gravity. This must be actively reversed by pulling the arm in a caudal direction while performing the venipuncture to return the shoulder to a neutral position and maximize vein exposure from under the clavicle.
A retracted position of the shoulder, as obtained by placing a rolled towel beneath the vertebral column between the scapulae to allow the shoulders to fall back (Fig. 33.6), has been shown to serve two very important purposes: (a) it prevents the interference between the path of the needle insertion and the humeral head of the shoulder, ensuring that the needle and syringe are always parallel to the coronal plane; and (b) it brings the SV into close contact with the undersurface of the clavicle, which is desirable for accurate identification of the vein (26). More, however, is not better. Jesseph et al. (27) showed, using magnetic resonance imaging, that excessive shoulder retraction resulted in compression of the vein in the groove between the first rib and the clavicle. Understanding these relationships will improve the chances for successful cannulation of the vein.

FIGURE 33.6 Patient positioning for subclavian vein cannulation.

FIGURE 33.7 Identify the middle one-third of the clavicle as it follows a gentle curve up toward the shoulder.
Keeping the shoulder neutral and retracted was further emphasized by the radiologic studies by Land et al. (28,29). They demonstrated using single-view venograms in 70 adult patients that the SV, which was in the path of the needle when the shoulder was in neutral position, moved out of its path when the shoulder was abducted or elevated. The left SV also ran more medial in relation to the clavicle as compared to the right.
Infraclavicular Technique
- Verify that the patient does not have allergies to chlorhexidine or lidocaine (Figs. 33.7–33.10).
- Complete all five steps described in the “Sterile Preparation of Operator and Skin” section with the following modifications.
- Place a rolled towel in the middle of the back between the shoulder blades and then position the patient in a Trendelenburg, at least 15 degrees head down to distend the SV and to reduce the risk of air embolism.
- Obtain a “maximum sterile barrier,” which includes the placement of a cap, shielded mask, sterile gown, and gloves.
- Cleanse the skin and drape the area with the large drape provided in the kit.
- Identify the middle one-third of the clavicle as it follows a gentle curve up toward the shoulder.
- Use local anesthetic (1% lidocaine provided in the kit) and use the smallest needle available to anesthetize the puncture site 2 cm inferior and lateral to the curving middle one-third portion of the clavicle, as well as the periosteum of the clavicle in that area.
- A common mistake, especially in overweight patients or patients with large stature, is to use a puncture site that is too close to the clavicle. This makes it extremely difficult to pass the needle under the clavicle while maintaining the needle and syringe parallel to the coronal plane and the floor, as well as the guidewire and catheter. As the angle of entry between the patient’s chest and the syringe increase in an effort to get under the clavicle, the chances of producing a pneumothorax also increase proportionally. A distance more than 2 cm from the edge of the clavicle may be necessary in larger patients.
- Therefore, at all times maintain the needle and syringe parallel to the coronal plane and floor. An assistant can pull the arm caudad at the initiation of venipuncture, if needed.
- Enter the skin at the anesthetized area and point the needle tip with bevel up toward the suprasternal notch, while utilizing the nondominant hand as a guide with the index finger at the sternal notch and the thumb keeping the subcutaneous tissue taut at the needle entrance site.
- While maintaining constant suction on the syringe and a parallel line to the coronal plane and the floor, gently advance the needle tip cephalad until it hits the clavicle.
- Once the clavicle is encountered, pull the needle back 2 cm before using your thumb from the nondominant hand to guide/steady the needle as you pass under the clavicle. When under the clavicle, continue to maintain suction on the syringe and advance the tip of the needle toward the sternal notch, while using the thumb of the nondominant hand to push the needle posteriorly while maintaining the position parallel to the coronal plane.
- Once venous blood is obtained, use the Seldinger technique to complete the procedure.
- Verify that all ports allow aspiration of venous blood and can be flushed with saline without resistance.
- Secure the catheter with suture, and cover with a biopatch and sterile dressing. Document the procedure appropriately in the chart.
- Obtain a stat chest radiograph to verify the position and exclude pneumothorax or other injuries.
- Check the distance of the catheter inserted from skin entry site (see Table 33.1).

FIGURE 33.8 Enter the skin at the anesthetized point and point the needle tip toward the suprasternal notch. While maintaining constant suction on the syringe and a parallel line to the coronal plane and the floor, gently advance the needle tip cephalad until it passes under the clavicle and into the vein.

FIGURE 33.9 Once venous blood is obtained, use the Seldinger technique to complete the procedure.

FIGURE 33.10 Secure the central line and flush all ports with sterile saline after aspirating back venous blood to eliminate trapped residual air bubbles.
Supraclavicular Technique
- Verify that the patient does not have allergies to medication and prep agents (Fig. 33.11).
- Complete all five steps described in the “Sterile Preparation of Operator and Skin” section with the following modifications.
- Place the patient in a Trendelenburg position, at least 15 degrees head down to distend the SVs and to reduce the risk of air embolism.
- Obtain a “maximum sterile barrier,” which includes the placement of a cap, shielded mask, sterile gown, and gloves.
- Cleanse the skin and drape the area with the large drape provided in the kit.
- Use local anesthetic (1% lidocaine provided in the kit) and the smallest needle available to anesthetize the puncture site at the junction of the SCM muscle and the clavicular head.
- Attach a fresh 10-cc syringe to the large needle.
- Enter the skin at the anesthetized point with the bevel of the needle up, along the upper border of the juncture between the medial and middle third of the clavicle at the insertion of the clavicular head of SCM muscle.
- The syringe is depressed 15 degrees below the coronal plane and the needle is directed at an angle 45 degrees to the sagittal plane.
- The vein is met at an average depth of 1 to 2 cm from the skin.
- Once venous blood is obtained, use the Seldinger technique to complete the procedure.
- Verify that all ports allow aspiration of venous blood and can be flushed with saline without resistance.
- Suture the catheter, cover with a biopatch and sterile dressing, and document the procedure appropriately in the chart.
- Obtain a stat chest radiograph to verify the position and exclude pneumothorax or other injuries.

FIGURE 33.11 Enter the skin at the anesthetized point along the upper border of the medial one-third of the clavicle at the junction of the sternocleidomastoid muscle and the clavicular head. The syringe is depressed 15 degrees below the coronal plane and the needle is directed at an angle 45 degrees to the sagittal plane. The vein is met at an average depth of 1 to 1.5 cm from the skin.
Ultrasound-Guided Technique
Many studies have evaluated the use of ultrasound for placement of a CVC via the SV. In the Cochrane Systematic Database Review, Brass et al. (30) stated that on the basis of available data, where the quality of data reviewed was low, two-dimensional ultrasound offers small gains in safety and quality when compared with an anatomical landmark technique for subclavian central vein catheterization. It is the recommendation of this author that, although RTUS can and should be implemented in IJV and femoral vein CVC placement, given the equivocal data and difficulty of ultrasound use seen with experienced physicians, the landmark technique be should be mastered for placement of a SV central line.
Steps to Prevent Complications
- Do not force the wire through the introducer needle, resistance of any type is an indication to stop, remove the needle and guidewire, and restart the procedure.
- One hand should be on the guidewire at all times during the procedure to avoid losing the wire into the SV.
- Avoid overzealous dilation of the SV with the dilator. Excessive dilation extending beyond the subcutaneous tissue and fat into the vein increases the risk of postprocedure complications (oozing, hematoma formation, arteriovenous fistula formation, and pseudoaneurysm formation).
- Verify that the guidewire moves easily back and forth through the dilator as the dilator is advanced toward the vein to avoid puncturing through the back wall of the vein due to bending of the wire at the dilator tip.
- If the patient is intubated and on high PEEP settings, holding the inspiratory effort for a few seconds while cannulating the SV may decrease the overinflation of the lung apex and decrease the chances of obtaining a pneumothorax. (This should only be performed if no deleterious effects result in the patient’s oxygenation, ventilation, alveolar recruitment, or overall status.)
FEMORAL VEIN CANNULATION
Anatomy and Patient Positioning
The femoral vein is a continuation of the long saphenous vein in the groin. It is located within the femoral triangle, along with the femoral artery and nerve. The triangle is bounded by the inguinal ligament superiorly which extends from the anterior superior iliac spine (ASIS) to the pubic symphysis, the sartorius muscle laterally, and the adductor longus muscle medially. The vein lies just medial to the artery (Figs. 33.12–33.14).

FIGURE 33.12 Anatomy of the femoral artery and vein. Use the pneumonic NAVEL (nerve, artery, vein, empty space, lymphatics) to recall structures as you move in a lateral to medial direction toward the navel.

FIGURE 33.13 Choose a puncture site 1 to 2 cm inferior to the inguinal ligament to avoid intra-abdominal injury and retroperitoneal hematomas.
The femoral route is popular as it avoids many of the following complications associated with SV and IJV routes (31):
- Pneumothorax
- Hemothorax
- Arrhythmias
- Thoracic duct laceration
- Damage to phrenic, vagus, and recurrent laryngeal nerves
An added benefit of the femoral route is that a radiograph is not necessary to verify proper position. The femoral route is also thought to be the easiest site for rapid access and the best site for inexperienced operators to learn the basic techniques of central venous access using the Seldinger technique (32).

FIGURE 33.14 Locate the femoral artery, keep a finger on the artery, and insert the introducer needle attached to a 10 cc syringe at an angle of 45 degrees to the skin, about 1 cm medial to the femoral artery pulsation, 2 cm below the inguinal ligament.
Bleeding from inadvertent arterial puncture, which is a common mechanical complication, is more easily controlled by direct pressure in the groin as compared to the other sites (33). Other complications that can occur with femoral line placement include the risk of retroperitoneal puncture with hematoma formation and catheter related thrombosis with increased risk of thromboembolism. Joynt et al. (34) showed that the risk of catheter-related DVT (deep vein thrombosis) may occur as soon as 1 day after cannulation and is usually asymptomatic, in critically ill patients. Approximately 9.6% of the 124 patients in this study developed a lower extremity DVT in the cannulated leg and 3 of those patients died. The increased risk should be carefully considered when the femoral route of cannulation is chosen.
The femoral vein is accessed within the triangle, where it lies medial to the artery. The acronym NAVEL (nerve, artery, vein, empty space, lymphatics) is an excellent way to remember the important structures from lateral to medial. To cannulate the femoral vein, first palpate the femoral pulse, which will give you the location of the artery. To help with locating the vein and aid in cannulation, the patient’s leg can be placed in abduction to open the femoral triangle and make access to the vein easier. Approximately 2 cm medial to the pulse and 3 to 4 cm deep will be the vein. In patients where the femoral pulse is not palpable, an imaginary line can be drawn from the ASIS to the pubic symphysis. This line can then be divided into thirds. The femoral artery should be located at the junction of the medial and middle thirds and the vein approximately 2 cm medial to this point.
Technique Without Ultrasound
- Verify that the patient does not have allergies to chlorhexidine or lidocaine.
- Extend the patient’s leg and abduct slightly at the hip.
- Complete all five steps described in the “Sterile Preparation of Operator and Skin” section.
- Locate the femoral artery, keep a finger on the artery, and advance the introducer needle attached to a 10 cc syringe with the bevel up, at an angle 45 degrees to the skin, about 2 cm medial to the femoral artery pulsation, 2 cm below the inguinal ligament.
- Slowly advance the needle cephalad and posteriorly while continuously maintaining suction on the plunger. Too much suction applied to the plunger in a hypovolemic patient may lead to vein collapse with minimum blood return. This may mislead the operator into assuming the needle is not in the vessel lumen.
- Once venous blood is obtained, use the Seldinger technique to complete the procedure.
- Verify that all ports allow aspiration of venous blood and can be flushed with saline without resistance.
- Secure the catheter with suture, cover it with a biopatch and sterile dressing, and document the procedure appropriately in the chart.
Ultrasound-Guided Technique
- After completing steps 1 to 3 as listed above, place gel on the probe and apply the probe cover in a sterile manner. After this is done, apply gel to the groin, and utilize the probe to locate the femoral artery and vein. Orientation of the probe, as well as knowing the anatomic location of the vessels is essential. The short-axis view with RTUS will demonstrate the vein in a medial position with the artery laterally. Aside from location, the vein will be compressible by applying downward pressure with the ultrasound probe, whereas the artery is not. The artery will also pulsate, whereas the vein will not (Fig. 33.15).
- Once the femoral vein is located, give local anesthetic to the area where the needle will be inserted.
- Insert the introducer needle attached to a 10-cc syringe with the bevel up, at an angle 45 degrees to the skin, while observing the entrance into the subcutaneous tissue on the ultrasound monitor.
- Apply suction to the plunger and advance the needle tip towards the femoral vein, until the lumen is entered.
- When venous blood is obtained, follow the Seldinger technique to complete the procedure.
- Verify that all ports allow aspiration of venous blood and can be flushed with saline without resistance.
- Secure the catheter with suture, cover it with a biopatch and sterile dressing, and document the procedure appropriately in the chart.

FIGURE 33.15 Ultrasound image of the femoral vein (FV) and the femoral artery (FA) in short-axis view, demonstrating the anatomic relationship. M, medial; L, lateral.
Related posts:


Stay updated, free articles. Join our Telegram channel

Full access? Get Clinical Tree


