TRANSPORT OF THE INJURED VICTIM
1. Never move a victim unless you know where you are going. If you are lost and caring for an injured victim (or yourself), prepare a shelter. Try to position yourself so that visual distress signals can be fashioned in an open field, in the snow, or near a visible riverbank. Keep the victim covered and warm. Assume that the victim is frightened and needs frequent reassurance. If he cannot walk, you must attend to his bodily functions. A urinal can be constructed from a wide-mouthed water bottle. Defecation is more complicated, but may be assisted by cutting a hole in a blanket or sleeping pad placed over a small pit dug in the ground.
2. Unless you are in danger, never leave a victim who is unconscious or confused.
3. If possible, send someone for help and wait with the victim, rather than perform an exhausting and time-consuming solo or duo extrication. If someone is to be sent for help, choose a strong traveler and provide him with a written request that details your situation (number of victims, injuries, need for supplies, specific evacuation method required). While you certainly don’t want to underestimate the seriousness of the situation, don’t request a helicopter evacuation for someone with a sprained ankle who can easily be carried out in a litter. Anyone sent to obtain assistance should contact the closest law enforcement agency, which will seek the appropriate rescue agency.
4. Conserve your strength. Don’t create additional victims with heroic attempts at communication or feats of strength and exertion.
5. Attempt to transport a victim only if waiting for a rescue party will be of greater risk than immediate movement, if there are sufficient helpers to carry the victim (as a general rule, it takes six to eight adults to carry one injured victim), and if the distance is reasonable (under 5 miles, or 8 km). A victim who is carried on an improvised stretcher over difficult terrain usually gets a rough ride. Always test your carrying system on a noninjured person before you use it on the victim.
LIFTING AND MOVING TECHNIQUES
Straight Lift
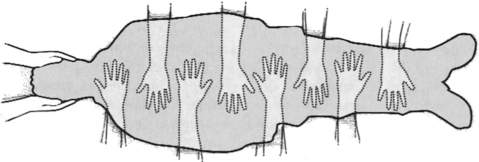
If a person is seriously injured, profoundly weak, or unconscious, he should be lifted so that he remains motionless and with his spine in as straight an alignment as possible. This can be accomplished by five rescuers. The first kneels at the head, controls the victim’s head and neck, and calls out commands. The other four rescuers kneel at the victim’s sides, one at chest level and one at hip level on one side, and the others at lower back level and leg level on the opposite side (Figure 232). In this way, they can slide their hands under the victim in a staggered fashion to provide a continuous chain of support. If necessary, the rescuer closest to the legs can free a hand to position a pad, backboard, or litter underneath the victim. The rescuers should lift the victim straight up into the air, taking care not to injure their backs.
Logrolling the Victim (See Figure 25)
1. The first rescuer approaches the victim from the head, and keeps the head and shoulders in a fixed position (no neck movement).
2. The second rescuer extends the victim’s arm (on the side over which the victim is to be rolled) above the victim’s head. The first rescuer takes this arm and uses it to help support the head in proper position. If the arm is injured, it is maintained at the victim’s side.
3. All rescuers work together to roll the victim, without moving his neck.
CARRIES AND LITTERS
Carries
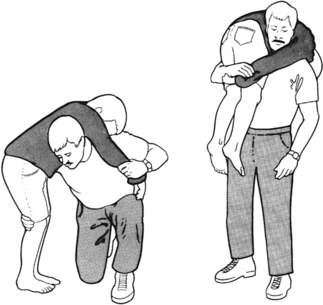
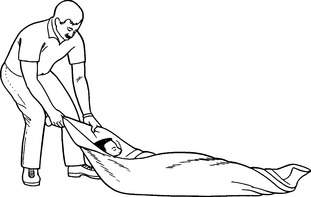
If the victim has suffered an injury that does not allow him to walk out, mechanical transport must be improvised. A single person who cannot walk but who does not need to be on a litter (one with, for example, a broken ankle, mild exhaustion, or acute mountain sickness) may be carried on the back of a strong rescuer using a rope seat. This is fashioned by passing a long 1 in (2.5 cm) rope or strap across the victim’s back and under his arms, then crossing the rope in front of his chest. The victim is loaded piggyback onto the rescuer’s back, and the rope ends are passed forward over the shoulders of the rescuer, under his arms, and around to the rescuer’s back, then between and through the victim’s legs from the front, and around the outside of the victim’s legs just under the buttocks, to be tied snugly in front of the rescuer’s waist (Figure 233). Such a rope seat is far preferable to a standard fireman’s carry, which is very fatiguing (Figure 234). A blanket drag (Figure 235) is only good for very short distances, such as to pull a person quickly away from an immediate hazard.

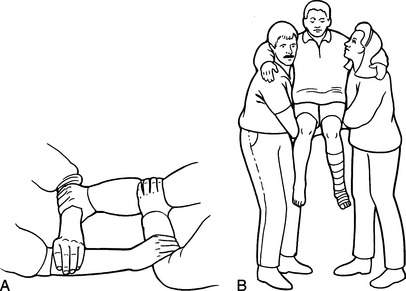
Other simple ways to carry a victim include the four-hand seat, backpack carry, ski pole or tree limb backpack carry, and coiled rope seat. In the first method, two rescuers interlock hands. Each rescuer first grasps his right wrist with his left hand. Holding the palms down, each rescuer then firmly grasps the left wrist or forearm of the other rescuer with his right hand, interlocking all four hands (Figure 236). The victim sits on the four-hand seat. In the second method, leg holes can be cut into a large backpack, so that a victim can sit in it like a small child would in a baby carrier. In the third method, two rescuers with sturdy backpacks stand side by side. Pack straps are looped down from each pack, and ski poles or tree limbs are slung across through the loops, or the poles are placed to rest on the padded hip belts. The poles should be padded so that the victim can sit on the rigid seat, steadying himself by draping his arms around the shoulders of his rescuers (Figure 237). The split-coil rope seat is created by coiling a rope, then fixing the coil at one segment. The coil’s loops are split and used to position the victim on the rescuer’s back (Figure 238). A two-rescuer split-coil technique is also useful (Figure 239).


Stay updated, free articles. Join our Telegram channel

Full access? Get Clinical Tree


