Fig. 4.1
Normal right upper quadrant view. On the left side of the figure, there is the “white curtain” of the lung, descending to cover the texture of the liver
Another normal finding is the “mirror effect,” an US artifact. Due to the curved surface of the diaphragm, you will happen to see the same texture of the liver above (i.e., on the left side) the diaphragm bright line (Fig. 4.2).
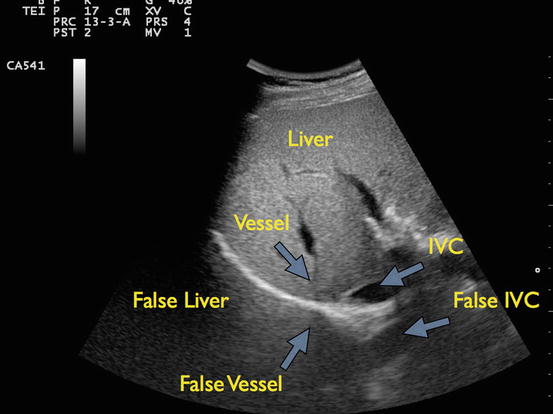
Fig. 4.2
Mirror effect. On both sides of the diaphragm, you can see the same texture. That indirectly rules out pleural effusion
On left side of the patient, the technique will be the same: upper left abdominal quadrant view, pan headward 1 or 2 in. You will see the spleen, a bright white line (the diaphragm), and the white curtain moving in and out of the screen with the patient’s breathing.
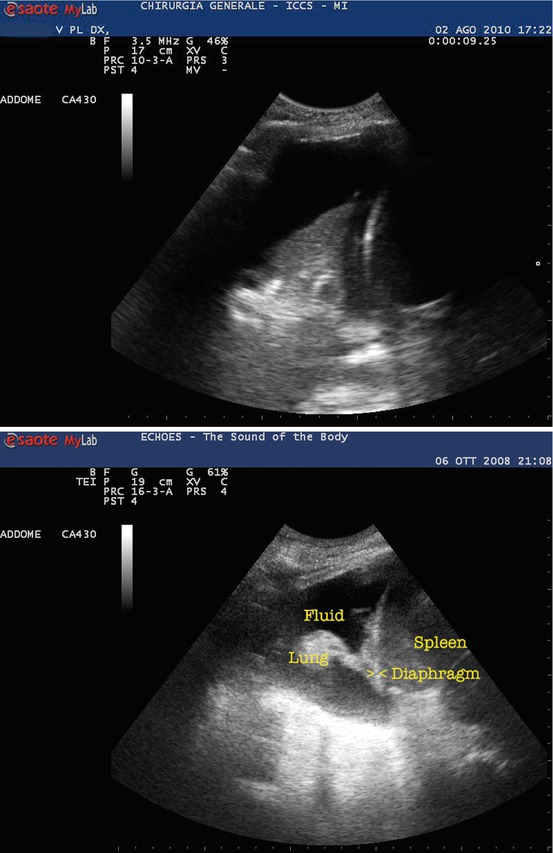
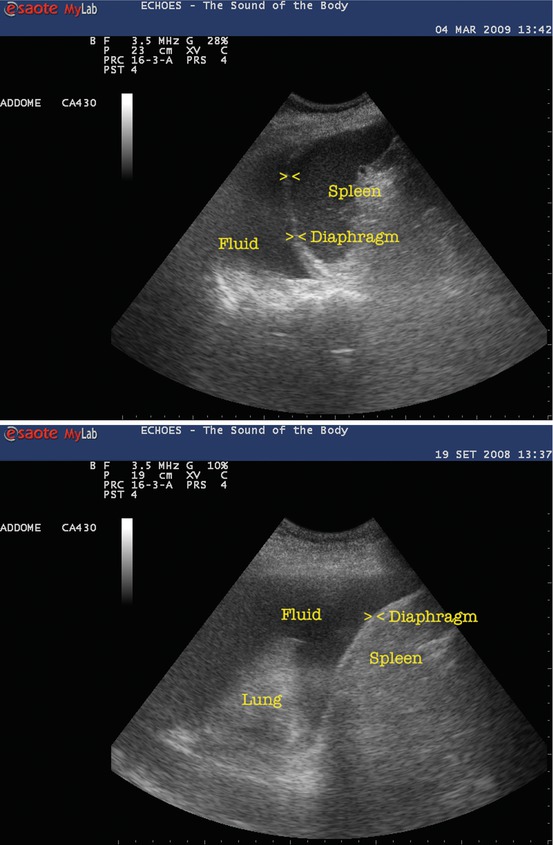
In patients affected by hemothorax, you will see the liver or the spleen, according to the side you’re probing, the bright line of the diaphragm and on the left side of the screen, there will be a sort of black triangle or black strip, which is fluid (Figs. 4.3, 4.4, 4.5, and 4.6).
Figs. 4.3, 4.4, 4.5, and 4.6
Hemothorax. On the right of the figure, there is the texture of the solid organ (spleen or liver). You may notice the bright, curved line of the diaphragm, and on the left side (above the diaphragm) there is the fluid. Note the collapsed lung appears “solid” with some white spots (trapped air bubbles)
As you may recall from the abdominal views, fluid is (almost) always black on the screen.
That simple.
Since these views can be considered an extension of the abdominal examination, you will use the curved array.
Now we can explore the chest to detect PTX.
In order to obtain a correct chest exam, we need to set our US machine to let us see artifacts (i.e., you have to switch off any artifact reduction algorithm that US machine manufacturers are proud of).
You may explore the chest using almost any kind of probe, but it’s advisable to use the linear array, because higher resolution helps to tell the very artifacts we’re looking for. When you will become skilled, you will use phased array or curved probes too.
The probe will be applied longitudinally, on the midclavicular line, on the uppermost area of the chest (your patient is in supine position) (Fig. 4.7).
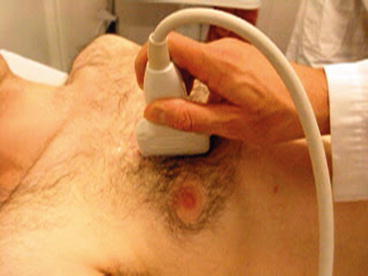
Fig. 4.7
Position of the probe on the chest when scanning for PTX
You have to recall the anatomy of the chest wall. Think of it in layers: skin and subcutaneous tissue, muscles, ribs, and pleura (Fig. 4.8).
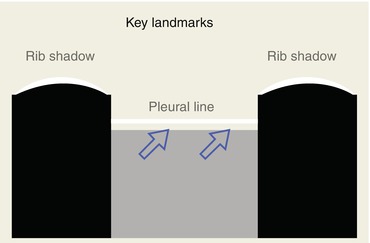
Fig. 4.8
Scheme of a classic US chest view for PTX: two ribs with their shadows and amidst them the pleural line
When you apply the probe on the chest of the patient, the first image you have to look for is the “bat sign” (Fig. 4.9), an original way to describe normal US anatomy.
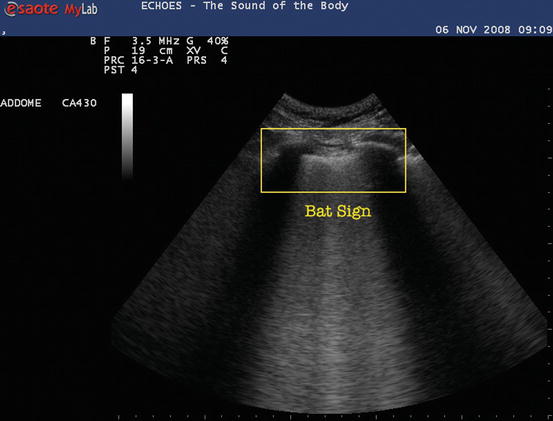
Fig. 4.9
Two ribs with their shadows and amidst them the pleural line: the so-called bat sign
The bat sign is characterized by two ribs and their shadows and the pleural line.
As you can see in Fig. 4.9, with a bit of imagination, you can see the wings of the bat (the ribs with their acoustic shadow) and the back of the bat (the bright pleural line), flying toward you.
This particular static sign allows us to know if our ultrasound exam will be conducted properly: in fact if you’re not able to see the bold white line between the rib shadows (pleural line), you cannot tell if there is a PTX.
(NB: properly, pleural line defines the visceral pleural interface sliding up and down, so it is obviously not detectable if there is PTX, but to help you in familiarizing with chest US, let’s call pleural line the white line 1 cm below and between the two rib shadows.)
No bat, no exam!
In trauma patient, we have to pay particular attention to subcutaneous emphysema, since high acoustic impedance of the air in subcutaneous tissue will deflect the ultrasonic beam, preventing us to detect the bat sign and thus to perform the exam.
Once we clearly see the pleural line, we can start the exam looking for a dynamic sign called “sliding lung” or “gliding sign.”
The “sliding lung” can be described as a rhythmic sparkle of the pleural line, moving synchronously with the breathing cycle of the patient.
It’s generated by the comet tail artifacts of the air in the outer alveoli, just beneath the visceral pleura sliding on the parietal pleura (Fig. 4.10).
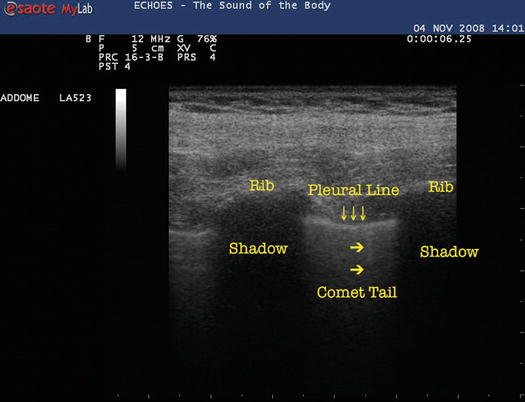
Fig. 4.10
Close-up of the pleural line. Notice the small vertical comet tail artifacts departing from the bright line
If you can detect the sliding lung, you can be sure there is no PTX.
In order to identify the sliding lung properly in difficult environment (i.e., bright lights in ER reflecting on the US machine screen), you can switch on the M-mode (motion mode), and you’ll have a second useful dynamic sign: the seashore sign.
M-mode measures the intensity of each single point along the scanning line. If a structure remains still, it will produce horizontal lines (since in M-mode our Y-axis on the screen is depth and X-axis is time). If a structure moves, it will produce a “granular” pattern (Fig. 4.11).
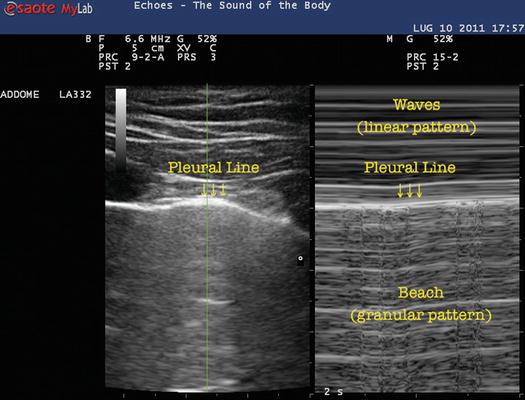
Fig. 4.11
 Introduction and Focused Questions
Prehospital Ultrasound in Trauma: Role and Tips
Introduction and Focused Questions
Prehospital Ultrasound in Trauma: Role and Tips
 Including EFAST in Trauma Algorithms: When? What Now?
 CEUS: What Is It?
 Basic Ultrasound Physics, Instrumentation, and Knobology
 The Role of EFAST in a Comprehensive US Trauma Management (ABCDE-US): Facing with Clinical Scenarios


Seashore sign. You may notice the different patterns in M-mode: above the pleural line, the linear pattern, and the granular pattern below it
Related posts:
Introduction and Focused Questions
Prehospital Ultrasound in Trauma: Role and Tips
Including EFAST in Trauma Algorithms: When? What Now?
CEUS: What Is It?
Basic Ultrasound Physics, Instrumentation, and Knobology
The Role of EFAST in a Comprehensive US Trauma Management (ABCDE-US): Facing with Clinical Scenarios
Stay updated, free articles. Join our Telegram channel
Full access? Get Clinical Tree
