Figure 4.1 Potential spaces in the peritoneal cavity. (a) Transverse and (b) midline longitudinal views. Artwork created by Emily Evans © Cambridge University Press.
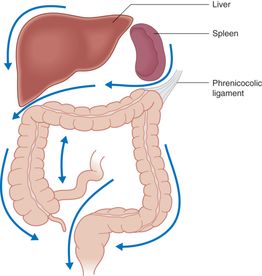
Figure 4.2 Gutters in the abdominal cavity. Artwork created by Emily Evans © Cambridge University Press.
Theoretically, free intraperitoneal fluid would collect first in the lowest point of the supine abdominal cavity (i.e. the pelvic cavity) (Figure 4.1b). In reality, however, this potential space is quite small, and any clinically significant intraperitoneal fluid will overflow into the right upper quadrant via the right paracolic gutter. With fluid originating from the left upper quadrant (LUQ), free fluid often accumulates first in the subphrenic space before overflowing into the splenorenal recess, and subsequently the Morison’s pouch (Figure 4.2).
Technique
Point-of-care questions
Transducer selection and orientation
For the most part, the abdominal portion of the E-FAST examination is performed with a low-frequency (2–5 MHz), curvilinear ultrasound transducer. This ensures good penetration and adequate visualization of the anatomical structures in question. For smaller children, the phased-array transducer (2–8 MHz) may also be used since it has a smaller footprint and a higher frequency. Finally, since the lungs are more superficial compared to the abdominal solid organs, a higher frequency linear transducer (5–10 MHz) is preferable for this part of the E-FAST examination. Alternatively, the low-frequency abdominal transducer may be utilized to acquire lung images. In performing ultrasonography at the right and left upper quadrants, the indicator should be angled posteriorly, approximately 10°, in order to scan along the longitudinal axis of the kidneys (Figure 4.3).
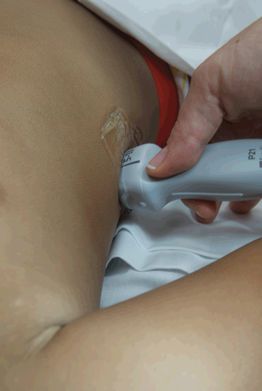
Figure 4.3 Transducer orientation. In order to obtain proper right upper quadrant and left upper quadrant views of the FAST examination, the indicator should be obliquely oriented, and angled posteriorly approximately 10° in order to scan along the long-axis of the kidneys.
Patient position and preparation
The patient should be in the supine position for the E-FAST. For the majority of patients, the most sensitive location for detecting intra-abdominal fluid is at the most dependent portion of the peritoneal cavity – Morison’s pouch, or the right upper quadrant. It is important to note that, in smaller children, their most dependent portion may actually be the pelvis rather than Morison’s pouch.
In order to improve the sensitivity for detecting fluid in the abdominal cavity, the patient may be in 5–10° Trendelenburg position. Likewise, positioning the patient in a reverse Trendelenburg position may increase the sensitivity of the subxiphoid and suprapubic views. The right upper quadrant scan should be completed prior to log-rolling a trauma patient, in order to maximize its sensitivity for detecting intra-abdominal fluid.
Ultrasound imaging: views
Ideally the E-FAST should be completed in less than five minutes at the patient’s bedside. The E-FAST is performed in the four standard views, in addition to the bilateral lung examinations (Figure 4.4).
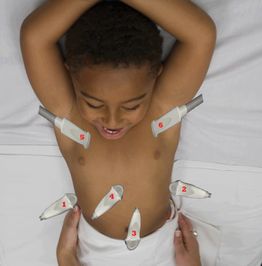
Figure 4.4 Probe positioning for the E-FAST examination. The recommended order is to first obtain Morison’s view at the right upper quadrant, since it is the most sensitive. Then, the left upper quadrant view. The kidney on the left is located more superior and posterior than the right. Next, obtain the suprapubic windows. Then, the subxiphoid view, since depth will need to be increased. Finally, the lung examinations are performed with the linear high-frequency transducers.
Right upper quadrant (Morison’s) view
The purpose of the right upper quadrant view is to visualize the region where the right kidney is adjacent to the liver (Morison’s pouch). This is likely the most important view of the E-FAST examination, since free fluid from abdominal organ injuries usually collects here first. Approximately 85% of positive FAST examinations have fluid in the right upper quadrant. As little as 250 mL of intra-abdominal fluid can be visualized. Start by placing the transducer in the longitudinal/coronal orientation, with the indicator towards the patient’s head (Figure 4.5a). Begin imaging at the costal margin, at approximately the midaxillary line. Once the hepatorenal junction is visualized, sweep through the entire kidney – anterior to posterior, superior to inferior – to complete the scan. By moving the transducer slightly cephalad, the diaphragm can be visualized as well on this view.
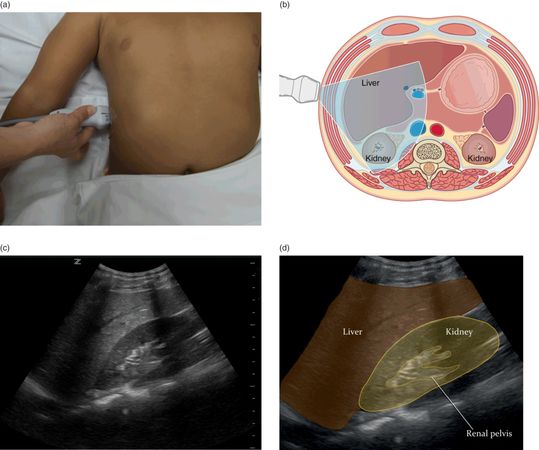
Figure 4.5 Right upper quadrant (Morison’s) view. (a) Transducer placement at the right upper quadrant (RUQ). (b) Illustration of transducer placement and relevant anatomy Artwork created by Emily Evans © Cambridge University Press. (c) Normal ultrasound image of Morison’s pouch. (d) Illustration of important structures visualized in the ultrasound image including the kidney, diaphragm, and liver. Illustration by Laura Berg, MD.
Normally Morison’s pouch appears as a bright white line between the liver and the right kidney (Figure 4.5b–d). Free fluid, most commonly from intra-abdominal blood in the case of trauma, would appear anechoic. The diaphragm, if visualized, appears as another hyperechoic, or bright white, structure cephalad to the liver. When encountering difficulties visualizing Morison’s pouch, it is often helpful to move the transducer longitudinally along the rib cage or anteriorly/posteriorly to try to bring the right kidney then the liver into view.
Left upper quadrant (splenorenal) view
The purpose of the left upper quadrant (LUQ) view is to visualize the region where the left kidney is adjacent to the spleen (splenorenal junction) and to detect fluid collection there. Start by placing the transducer in a longitudinal/coronal orientation, with the indicator oriented towards the patient’s head (Figure 4.6a) on the patient’s left side. Begin imaging at the costal margin, posterior to the midaxillary line. It is important to note that the left kidney is located more superior and posterior than the right kidney. Once the splenorenal junction is visualized (Figure 4.6b–d), sweep through entire kidney – anterior to posterior, superior to inferior – in order to complete the scan. Move the transducer slightly cephalad to visualize the diaphragm. Note that free fluid can accumulate medial or cephalad to the spleen in addition to the splenorenal interface. Therefore the left upper quadrant should not be considered complete until the diaphragm is visualized on this view. The left upper quadrant view tends to be technically more difficult since the spleen is smaller, more cephalad, and more mobile compared to the liver. Given the location of the left kidney, one often encounters more rib shadows that obscure the view of the splenorenal interface. In order to improve visualization of this region, the transducer can be placed more posterior (to the point that it almost touches the bed) while maintaining the wrist in a neutral (as opposed to a flexed) position.
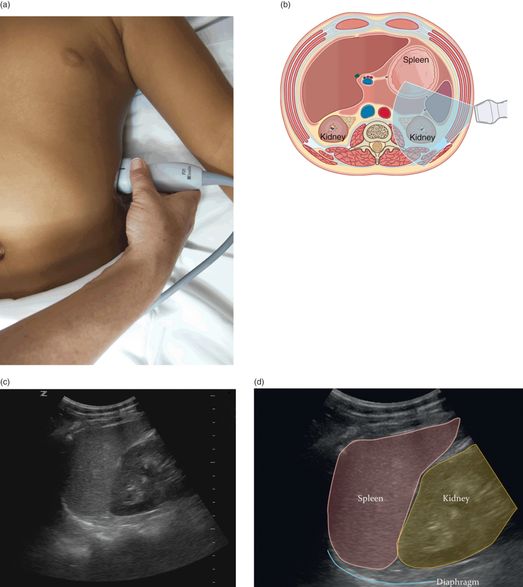
Figure 4.6 Left upper quadrant (splenorenal) view. (a) Transducer placement at the left upper quadrant (LUQ). (b) Illustration of transducer placement and relevant anatomy. Artwork created by Emily Evans © Cambridge University Press. (c) Normal ultrasound image of the splenorenal space or left upper quadrant. (d) Illustration of important structures visualized in the ultrasound image including the kidney, diaphragm, and spleen. Illustration by Laura Berg, MD.
Similar to the right upper quadrant view, the splenorenal junction normally appears as a hyperechoic line, and free fluid would appear anechoic on ultrasound. However, the phrenicocolic ligament prevents free fluid from actually accumulating between the spleen and kidney. Therefore, fluid often collects inferior or superior to the kidney, or beneath the diaphragm.
Suprapubic view
The purpose of the suprapubic view is to visualize the rectovesicular pouch in males and rectouterine pouch (pouch of Douglas) in females. It is interesting to note that, due to the anatomic differences between children and adults, this is often the most dependent portion of the abdominal cavity in children. Start by placing the transducer in a transverse orientation immediately superior to the pubic symphysis, with the indicator towards the patient’s right. Angle the transducer slightly towards the feet in order to adequately visualize the entire bladder (Figure 4.7a). Once the bladder is visualized (Figure 4.7c,d), rotate the transducer 90° clockwise towards the patient’s head in order to obtain the sagittal view (Figure 4.8).
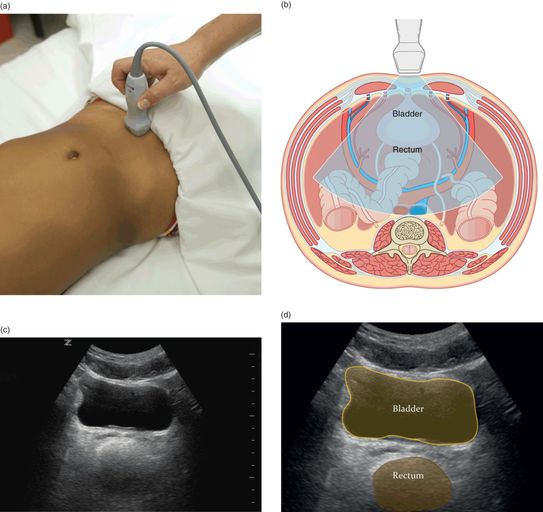
Figure 4.7 Suprapubic view, transverse orientation. (a) Transducer placement at the suprapubic region with the indicator oriented towards the patient’s right side. (b) Illustration of transducer placement and relevant anatomy. Artwork created by Emily Evans © Cambridge University Press. (c) Normal ultrasound image of the transverse suprapubic view. (d) Illustration of important structures visualized in the ultrasound image, including the bladder and rectum. Illustration by Laura Berg, MD.
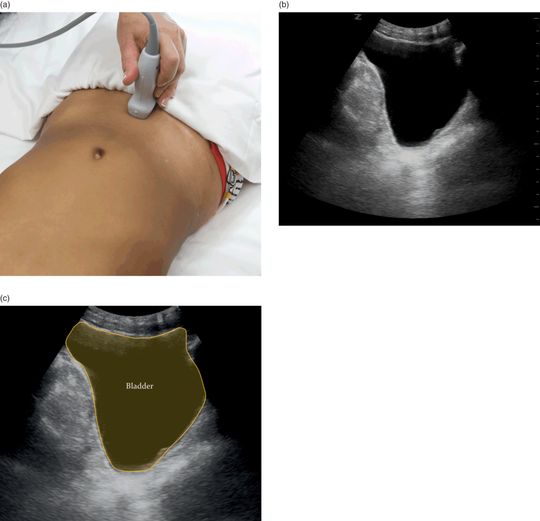
Figure 4.8 Suprapubic view sagittal orientation. (a) Transducer placement at the suprapubic region with the indicator oriented towards the patient’s head. (b) Normal ultrasound image of the sagittal suprapubic view. (c) Illustration of important structures visualized in the ultrasound image, including the bladder. Illustration by Laura Berg, MD.
Anechoic free fluid may be visualized posterior to, or adjacent to, the bladder. In order to improve the visualization of free fluid, it is often necessary to decrease the far field gain (time gain compensation), which minimizes posterior acoustic enhancement artifact (see Chapter 1). False positives in this view can be due to physiologic fluid in menstruating women, the prostate in men, or fluid within the bowel loops. Ideally, the suprapubic view should be performed prior to the insertion of a Foley catheter, whenever feasible. Otherwise, it may be difficult to identify the bladder itself and distinguish it from surrounding free intraperitoneal fluid. Alternatively, the Foley catheter may be clamped after its insertion, or saline can be instilled in order to help visualize the bladder and the structures posterior to it (Figure 4.9).
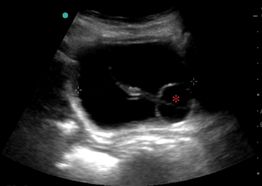
Figure 4.9 Transverse view of the bladder with a Foley catheter. In order to visualize the bladder once a Foley (*) is in place, the catheter may be clamped and/or saline instilled into the bladder.
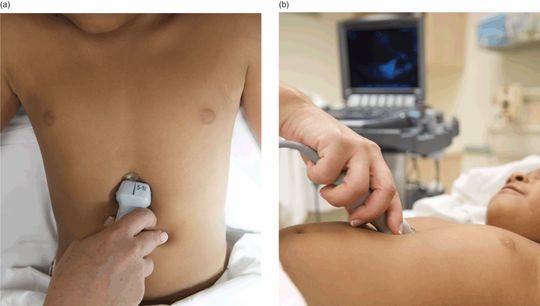
Cardiac (subxiphoid) view
The purpose of the subxiphoid view is to evaluate cardiac activity and to detect pericardial effusions. Begin by placing the transducer at the subxiphoid region, with the indicator oriented towards the patient’s right side (Figure 4.10a). The transducer should be placed relatively flat on the abdomen, and slightly angled up towards the patient’s left shoulder. It is suggested to hold the transducer from above, in order to attain the appropriate plane of imaging (Figure 4.10b). Steady pressure might be required to displace interfering bowel gas. With this positioning, the left lobe of the liver acts as an acoustic window to enhance imaging of the heart. Further, image depth often needs to be adjusted (increased) in order to completely visualize the posterior pericardium. If the subxiphoid view is difficult to obtain, a parasternal long view should be attempted as an alternative cardiac view (see Chapter 5).