Fig. 34.1
(a, b) Neuroanatomy of the branches of the occipital nerve
The diagnostic workup for peripheral cranial neuralgia includes a history of pain originating or ending in the nerve area and a physical examination that includes tenderness over the respective nerve and nerve root distribution. Some implanters have recommended confirmation of the neuropathic pain generator by a good temporary response to injection of local anesthetic that provides relief for the duration of the medication used, but there has been no prospective confirmation that this is predictable of a good outcome.
Once the patient is felt to be an appropriate candidate for stimulation, the anatomy is reexamined and the skin is evaluated for lesions, texture, and bony prominences. The peripheral nerves branch into multiple fibers and the coverage of the appropriate pain pattern should be considered when planning the types and number of leads and electrodes needed. The respective cranial region is shaved to remove hair, which can be a nidus for infection. The trial leads are often placed via a single needle stick on the affected side(s), and the permanent leads are most commonly placed via a midline incision for occipital neural stimulation, parietal/temporal incision for a auriculotemporal nerve stimulation, and incision just behind the hairline for supraorbital/supratrochlear stimulation. Infraorbital stimulation requires needle entry over the maxillary region (Fig. 34.2).
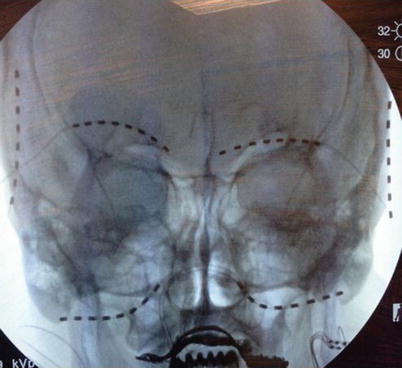
Fig. 34.2
Supraorbital, infraorbital, and auriculotemporal nerve stimulation
By using a widely spaced octipolar lead array, the area of stimulation increases, covering the multiple branches of the nerve. With temporary leads, once the implant is placed by fluoroscopy, the leads are secured to the skin by a suture or tape. In permanent occipital nerve implants, the surgical process begins by making an incision at the midline just below or above the occipital prominence. Tissue separation can be achieved with the blunt use of a surgical scissor to minimize trauma. Once the fascia is visualized, a cautery tool is used to achieve hemostasis. In some younger and healthier patients blunt dissection will not be possible and sharp dissection is needed. This can lead to increased bleeding, and the implanter must focus on hemostasis. Once hemostasis is acceptable, a needle is placed in the desired path of the planned lead placement. Local anesthetic should be placed only at the needle entry location. If local anesthetic is placed in the path of the needle, it will be difficult to confirm stimulation on the operating room table. Use of epinephrine in local anesthetic may reduce bleeding. Fluoroscopy is important to guide and confirm the needle path, but ultrasound is an acceptable alternative for guidance. In many cases, the needle must be slightly bent to achieve the desired depth and course of the lead implant. Needles with a plastic stylet are often easier to use because the metal stylet may be difficult to remove once the needle is bent. The depth of the needle should be just below the dermis in the subcutaneous tissue. The needle bevel should be directed downward to avoid placing the tip of the lead too superficially. Once the stylet is removed, the lead is placed to the tip of the needle using fluoroscopy to confirm placement. The needle is then pulled distally while the lead is held in position using radiograph confirmation, while the tissue is stabilized by holding pressure above the lead.
Once the lead is in the desired location, a handheld programmer is used to activate the leads and achieve stimulation. In many cases an array with multiple cathodes is successful, which will help spread the current. When two leads are placed it is not uncommon to use one lead with primarily anodes and the other with primarily cathodes to create a cross-talk to cover a wider neuropathic pain profile.
For permanent implants, when the patient’s stimulation is acceptable, the leads are anchored to the fascia with nonabsorbable suture. At each incisional site, a coil is then made as a form of strain relief and the leads are tunneled to the pocket. Pocketing options include the anterior chest wall in the subclavicular region, posterior axillary region, buttock, and flank. If pockets are made in more distal locations, it may be necessary to add lead extensions to reach the pocket (Figs. 34.3 and 34.4).

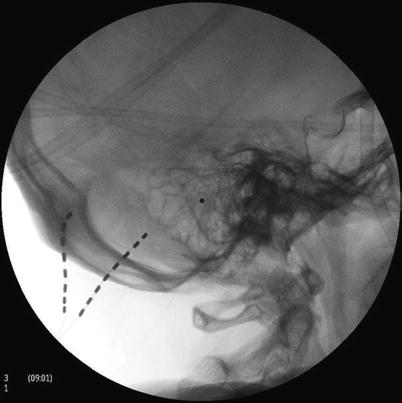
Fig. 34.3
Occipital nerve stimulation, AP view
Fig. 34.4
Occipital nerve stimulation, lateral view
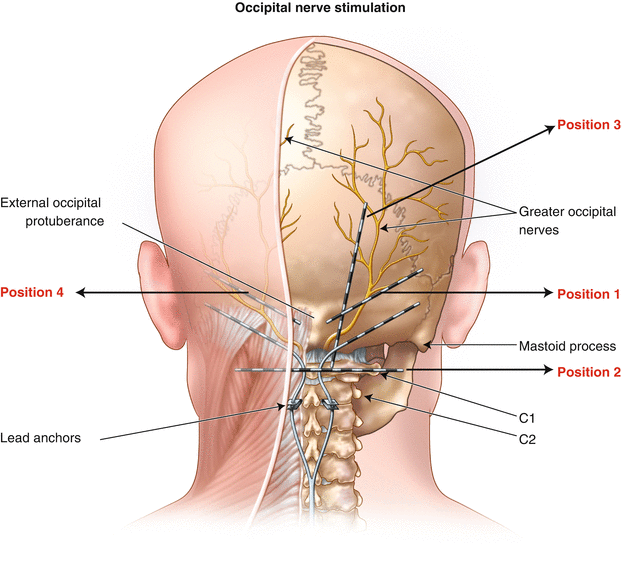
34.2.1 Method for Occipital Stimulation
The targets for the leads vary based on physician preference and can range from a lateral C1 approach to a perpendicular greater occipital nerve approach. The most common area for placement for the leads is at an angle from the midline to the lateral edge of the occipital bone, in order to capture fibers of both the greater and the lesser occipital nerves (Fig. 34.5). This placement allows for proper stimulation even in the event of mild-to-moderate migration.