20.1 | Checks before any procedure |
- The content here is to refresh memories and reinforce points to users who have been conventionally trained and are competent in these procedures. Do not perform a procedure in which you have not been trained. Get supervision if you are not competent. Generally get written consent unless dire emergency. Most invasive procedures should not take place out of hours except in an emergency.
- In terms of procedures, be aware that the only way to avoid complications is not to do any. Before you undertake a therapeutic procedure which should improve circumstances (e.g. a chest drain) or a diagnostic procedure (e.g. central line placement to measure CVP/pulmonary artery pressures), consider whether the procedure will change management significantly; can you get the information elsewhere? The information you may get might be erroneous due to failure to calibrate or other errors. Complications will happen and you can make a patient even worse, so ensure that the emergency procedure was valid and vital and could someone support or supervise you, or be doing it? Procedures are time consuming and this time might be better spent doing other things.
Questions before any procedure | |
(1) Is it the right patient? (2) Is it the right procedure? (3) Is it the right (or left) side? (4) Have I the right to do it, i.e. has informed consent been obtained? | (5) Is the patient anticoagulated or have a coagulopathy? (6) Is this the right time: can it wait until working hours? (7) Am I the right person to do this (should I get someone more skilled to do it or supervise me)? |
20.2 | Venepuncture |
- Equipment: sharps bin, cannula, sterile bung and micropore tape (check for known allergies). Non-sterile gloves (check for latex allergy), alcoholic wipe 2% chlorhexidine (Clinell), tourniquet, dressing (sterile), cotton wool (sterile), trolley, syringe (10 ml), flushing agent (NS for injection).
Technique
- Introduce self, explain procedure and get verbal consent. Make sure that the cannula used is appropriate for indication. Choose vein and apply tourniquet above vein. Prepare skin at the selected insertion site with a med swab, wait 30 sec to allow the area to dry. Do not re-palpate the vein or touch the skin. Remove the needle guard and inspect the cannula for any faults. Hold the patient’s hand/wrist/forearm using the thumb, to keep the skin taut. Do not to contaminate the site. Place the needle tip several millimetres distal to the proposed site for cannulation, with the bevel facing up and elevate the angle of the cannula to 15–25° and insert the cannula into the skin (fragile veins require a lower angle of insertion). Once the vein has been located with the needle, lower the angle for insertion. Look for back flow of blood into the cannula chamber, unless the vein is small in which case this may be delayed. Hold the cannula steady relative to the vein whilst withdrawing the needle slightly and then slowly advance the cannula. If there is any sign of swelling, haematoma, pain or resistance the vein wall may be ruptured. If so, release tourniquet or you will cause a haematoma. Remove cannula. Apply pressure with cotton wool. Otherwise, when flashback is seen along the length of the cannula the investigator or delegated person will advance the cannula until it is fully inserted into the vein. Release the skin tension and the tourniquet. Apply gloved digital pressure to the distal end of the cannula to prevent blood spillage. Remove the introducer needle and discard into an appropriate yellow sharps container. Now secure a sterile bung to the end of the cannula. Secure the cannula to the patient using a sterile dressing. Flush the cannula with a minimum of 2 ml of IV NS for injection and cap off. Check the patient feels no discomfort, and observe the cannula site for signs of swelling or redness. Ensure that you complete cannula chart and any accompanying documentation. If you fail then try again, but if you have tried several times with no success either get some help or come back to the task later. If it is an emergency then get help urgently. You cannot resuscitate a patient successfully without IV access. If you have found the cannula is intra-arterial (pulsatile, high pressure, bright red blood) then remove cannula and apply pressure over the site for 10+ minutes until haemostasis. Check distal pulses. Take senior advice if pulseless or distal ischaemia.
20.3 | Chest drain insertion |
- Introduction: ask the ‘right’ questions (Section 20.1 above): note the use of ultrasound-guided insertion is associated with lower complication rates. Incorrect placement of a chest drain can lead to significant morbidity and even mortality. Follow local guidance. Do not attempt unless trained.
- Indications. (1) Pneumothorax: not all require a chest drain (Section 4.12 on pneumothorax). The differential diagnosis between a PTX and a bulla requires careful radiological assessment including CT. (2) Pleural fluid: malignant pleural effusion, simple pleural effusions in ventilated patients, empyema and complicated parapneumonic pleural effusion, traumatic PTX or haemopneumothorax. (3) Postoperative: e.g. thoracotomy, oesophageal surgery, cardiothoracic surgery. The urgency of insertion will depend on the indication and degree of physiological derangement that is being caused by the substance to be drained.
- Procedure to insert a chest drain: only to be done by trained or supervised persons. Done well there are 3% early complications and 8% late complications. Training reduces complications.
- Potential complications: incorrect placement with drain outside the pleura, in the fissure, tube kinked. Injury to intercostal vessels. Trocar must not be used as risk of spearing heart, liver and other organs. Excessive bleeding risk: ensure no coagulopathy – clotting screen and platelets if unsure.
- Equipment: aseptic pack with sterile drapes, iodine or equivalent solution. Gauze, scalpel, 2/0 silk and curved needle, 5 and 10 ml syringes. Orange and green needles, sterile gloves, chest drain (Seldinger or ‘trocar’ type). Chest drain bottle or bag with flutter valve.
Methods
- Pre-procedure: informed consent obtained and documented unless dire emergency. Check identity of the patient and the site of insertion of the chest drain. Confirm the clinical signs (percuss the chest and listen) and review the latest CXR and clinical indications. As ever, all equipment needed to insert a chest drain should be available before commencing the procedure. Patient positioning: as comfortably as possible because the procedure may be prolonged. Much will depend on the clinical state of the patient. If possible patient lying back at 45° with the arm on the side used flopped behind head to open up rib spaces (see figure above). Alternatively, fatigued patient may lean forward resting on some pillows on a table, as long as access to the axilla is preserved. Occasionally the procedure is done with a patient lying on their side with the affected side uppermost. In a trauma situation, or ITU, an emergency drain insertion is more likely to be performed whilst the patient is supine. Premedication: analgesia should be considered – MORPHINE 5 mg IM with cyclizine or MIDAZOLAM 1–5 mg IV if not hypoventilating with appropriate monitoring (pulse oximetry) and resuscitation equipment immediately available. 100% O2 should be given to all PTX patients if appropriate as it helps resolution. Aseptic technique: full aseptic precautions (washed hands, gloves, gown, antiseptic preparation for the insertion site and adequate sterile field) in order to avoid wound site infection or secondary empyema.
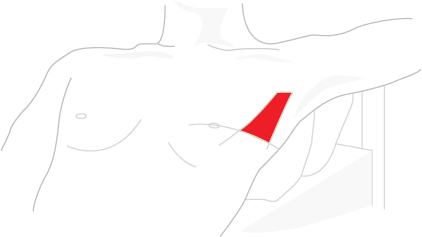
Choice of chest drain
- Sizes 10–36Ch. Drains may be inserted via direct surgical incision (thoracostomy) or using the Seldinger technique with guide wire and dilator system. Spontaneous PTX and non-viscous effusions can be drained with relatively small calibre drains via Seldinger method. Better tolerated with less discomfort, but traumatic pneumothoracies, haemothoracies and empyemas may need larger drains, typically 26F and above. Inserting the drain: most commonly placed in 4th–5th intercostal space (ICS) in the mid-axillary line – the lowest axillary hair is useful marker where present. Area known as the safe triangle with anterior border of latissimus dorsi, the lateral border of the pectoralis major, a line superior to the horizontal level of the nipple and an apex below the axilla as shown above. Any other placement should be discussed with a chest physician. In an apical PTX, placement in the 2nd ICS can be considered but is difficult to maintain. A specific position (identified with CT or ultrasound) may also be required for a loculated effusion. Seldinger chest tube technique: infiltrate with up to 10 ml of 1% lignocaine along the intended track. Remove catheter, dilator, introducer wire and introducer needle from pack and insert introducer needle into the thoracic cavity into the chosen site. Withdraw air with a syringe to confirm placement. Now thread introducer wire through needle lumen into the chest. Whilst holding wire tip and then base, remove needle leaving introducer wire running into chest. Thread dilator over introducer wire, and advance into chest, dilating a track for catheter. Remove dilator. Thread tube over the wire fully into chest ensuring side holes lie within chest cavity. Remove wire. Suture catheter in place. Attach catheter to drainage unit. Obtain post-procedure chest X-ray. Rigid chest tube insertion: infiltrate with 10–15 ml of 1% lignocaine along the intended track, make a 3–4 cm incision through skin and subcutaneous tissues between the 4th and 5th ribs, parallel to the rib margins. Continue incision through the intercostal muscles, and right down to the pleura and use dissecting forceps to bluntly dissect down to the pleura and then insert through the pleura and open the jaws widely, again parallel to the direction of the ribs. This will create a PTX if not locally present and allows the lung to fall away from the chest wall somewhat. Insert gloved sterile finger through your incision and into the thoracic cavity. Make sure you are feeling lung (or empty space) and not liver or spleen. Grasp end of chest tube with the forceps (convex angle facing down towards ribs), and insert chest tube through the hole you have made in the pleura. After tube has entered thoracic cavity, remove forceps and manually advance the tube. Clamp distal tube end with forceps and suture and tape tube in place and attach tube to drainage. NEVER EVER USE A TROCAR TO INSERT DRAIN. Obtain post-procedure chest X-ray for placement; tube may need to be advanced or withdrawn slightly. Need to be a bit firm but gentle. The chest tube should be placed in the pleural cavity; significant force should never be used as this risks sudden chest penetration and damage to essential intrathoracic structures. The operator should ensure controlled spreading of the intercostal muscles on the superior surface of the ribs to avoid injury to the intercostal vessels and nerves that run below the inferior border of the ribs. The drainage system: connect to an underwater seal drainage system. This employs positive expiratory pressure and gravity to drain the pleural space. Tube is submerged at least 2 cm below water of the reservoir/collection chamber. Underwater seal acts as a one-way valve to expel air from the pleural space. Keep collection chamber below the patient at all times or air will re-accumulate in the pleural space. Large pleural effusions: drained in stages. Rapid shifts in pleural pressures and re-expansion can cause re-expansion pulmonary oedema, a serious complication. A limit of 1–1.5 L of fluid should be drained before the tube is clamped. If the patient starts to cough or complains of chest pain before this point is reached, drainage should be stopped and may be resumed a few hours later. Portable valve systems can be used for patients with on-going air leaks or fluid drainage and these use a one-way flutter valve which is generally lower resistance to drainage than with conventional underwater seal units. Ambulatory systems exist. Securing the chest drain: secure with 1/0 silk suture anchored to the skin and the drain with a suitable non-slip knot technique. This should prevent excessive travel of the drain in and out of the chest wall. The skin incision can be closed each side of the chest tube usually with one 2/0 silk suture each side. Nylon/Ethilon can be used but is more difficult to tie. Tie sutures securely. Purse string sutures should be avoided because they convert a linear wound into a circular wound which can be painful and leave an unsightly scar. Dressings: purpose-designed dressings should be used, i.e. Drainfix for small bore drains and Mefix for large bore drains. Excessive dressings restrict chest wall movement or cause moisture collection. Dressings should allow site inspection. Drain connections should not be covered. A tag of adhesive dressing tape can support the tube and protect it against being pulled out. Patient should be aware to look after the drain and keep the underwater bottle below the chest, avoid compressing the tube by sitting or lying on it and avoid tension on the tube. Analgesia: ensure regular analgesia is prescribed whilst the chest drain is in place. Dressings should be changed daily for the following reasons: to enable the insertion site to be monitored for signs of infection (swab if any signs of infection), as well as to monitor for surgical emphysema, to ensure the chest drain remains well placed, and the anchor suture is intact. Monitoring/recording: fluid in tube should swing with respiration due to changes in intra-pleural pressure. Fluid should rise on inspiration and fall on expiration. Bubbling and swinging are both dependent on an intact underwater seal and so can only be picked up if the drain tube extends below the water level in the bottle. Ask patient to take deep breaths and cough and assess. Absence of swinging suggests drain is occluded or is no longer in the pleural space. Try flushing the drain and if no success obtain a chest X-ray to determine the underlying cause. Bubbling in the underwater seal fluid chamber generally indicates an on-going air leak which may be continuous, present on one phase of spontaneous ventilation, or only on coughing. Persistent bubbling throughout the respiratory cycle may indicate a continuing broncho-pleural air leak. Faulty connections and entrained air through the skin incision should also be assessed. If drain inserted for a fluid collection, e.g. effusion or empyema, then record volume and nature of the drain fluid recording. Drains inserted just for fluid should not bubble so the presence of this feature is abnormal and should be recorded. Any abnormal signs or complications should be referred for medical review. Bleeding from a drain inserted for drainage of a haemothorax (+/− PTX) needs urgent medical review. With fractured ribs most bleeding is from the intercostal vessels, which slows down as the lung reinflates. However, continued bleeding into the drain bottle is indicative of pathology that may need thoracic surgical intervention. After thoracic trauma, more than 1500 ml of blood into the bottle initially or continued bleeding of greater than 200 ml/h requires discussion with the thoracic surgeons. Small bore drains should be flushed regularly with NS; the flush should be prescribed on the Treatment Sheet and carried out by appropriately trained personnel. Full respiratory and cardiovascular observations should be carried out and documented. Clamping chest drains: chest tubes for PTX should not be clamped. Exceptions to this may be when the drainage bottle requires replacement or when testing the system for air leaks. Clamping a pleural drain in the presence of a continuing air leak may result in a tension PTX or possibly worsening surgical emphysema. If a chest tube is clamped it should be under the direct supervision of a respiratory physician or surgeon on a ward with experienced nursing staff. A patient with a clamped tube should not leave the specialist ward environment. Instructions should be left that if the patient becomes breathless or develops surgical emphysema, the chest tube must be unclamped immediately and the medical team alerted. In cases of PTX there is no evidence that clamping a chest drain at the time of removal is beneficial. Drains for fluid drainage can be clamped or closed to control drainage rate as necessary.
Changing the drain bottle
- When changing the drain bottle because it is full, temporary clamping of the drainage tube may be necessary to prevent entry of air into the pleural cavity. It is acceptable to clamp the tube between thumb and forefinger. This has the advantage of removing the risk of inadvertently leaving the tube clamped. Local policy should be followed with regard to asepsis and infection control. Suction: a patient who is free from pain and who can cough will generate a much higher pleural pressure differential than can safely be produced with suction. If a patient cannot re-inflate his own lung or a persistent air leak is preventing re-inflation, high volume, low-pressure thoracic suction in the range of 3–5 kPa (approximately 30–50 cmH2
Related posts:

Stay updated, free articles. Join our Telegram channel


Full access? Get Clinical Tree


