CHAPTER 15 PRACTICAL PROCEDURES
GENERAL INFORMATION
 Always seek senior help if you are not familiar with a procedure.
Universal infection control precautions


 Place all sharps directly into a sharps bin; do not manually resheath or break needles. Do not overfill sharps bins, and ensure that the bin is securely fastened before disposal.

 If you do accidentally cut, scrape or puncture your skin, follow the ‘accidental inoculation procedure’, encourage bleeding, wash with warm soapy water, dry and cover with a waterproof dressing. Report the incident to the senior person in charge and ensure a report is completed. Seek advice from the occupational health department or A&E. In some cases, post-exposure prophylaxis may be required. This is time-critical, so seek immediate advice. It may be appropriate for someone else to complete the practical procedure.


ARTERIAL CANNULATION
Indications
 Haemodynamic monitoring: particularly in situations where non-invasive measurements are inadequate, e.g. where changes in arterial blood pressure are likely to be sudden or profound, at extremes of blood pressure and in the presence of arrhythmias.
Procedure
Arterial cannulation. You will need:
Universal precautions; sterile gloves
Syringe of local anaesthetic / needle
Syringe of heparinized saline flush
Arterial cannulae (usually 20 gauge or 22 gauge)
Extension line and three-way tap
Decide which artery to cannulate. The radial artery of the non-dominant hand is usually preferred in the first instance. Alternatives include the ulnar, dorsalis pedis and posterior tibial arteries. It is pointless, however, to persist with attempts at peripheral arterial cannulation in patients who are hypotensive and ‘shut down’. The femoral and brachial arteries are useful during resuscitation of profoundly shocked patients. Ultrasound guidance is potentially useful at all sites to aid arterial cannulation, particularly in hypotensive patients and those whose landmarks are obscured by oedema or obesity.


Seldinger technique
 Advance needle through the puncture site towards the artery at a shallow angle. As the vessel is punctured, a flashback of arterial blood is seen in the hub. Pass the guide wire through the needle into the artery. Withdraw the needle and pass the cannula over the guide wire. The guide wire is then discarded.
Direct cannulation
 Either: advance the cannula and needle through the puncture site towards the artery at a shallow angle. As the vessel is punctured a flashback of arterial blood is seen in the hub. Holding the needle still, advance the cannula over the needle into the artery. This should be a single smooth movement without resistance.


USE OF PRESSURE TRANSDUCERS
 The patient’s arterial catheter is connected to the transducer by a continuous column of (heparinized) saline. A pressurized flushing device maintains a small forward flow (approximately 2–3 mL / h) to keep the cannula patent.
 Pressure changes in the vessel are transmitted via the saline to a diaphragm. As this diaphragm moves in response to the pressure changes, its electrical conductivity changes. This results in fluctuations in electrical signal from the diaphragm, which is interpreted by a monitor and displayed as an arterial waveform and blood pressure values. Systolic, diastolic and mean pressures are usually displayed.
 There must be no air bubble in the connection tubing or transducer chamber. This will damp the trace and produce lower blood pressure values. Flush well before connecting the transducer to the patient.


CENTRAL VENOUS CANNULATION
 Do not attempt central venous cannulation without supervision until you have been adequately taught to do so. You must be aware of possible complications and how to manage them.
Indications
Central venous access is almost universal in intensive care patients. Indications include:


Ultrasound guidance for vascular access
The use of ultrasound to guide central venous access procedures is recommended in all cases (NICE Guidance. Central venous catheters, ultrasound locating devices, Sept. 2002. www.nice.org.uk/guidance/TA49).


 Effective use of ultrasound requires practice. In particular the needle must be visualized as it passes into the vessel. Seek instruction before attempting to use it on a patient.
Traditional approaches to the central veins are described below.
Internal jugular vein
Right sided internal jugular vein cannulation is associated with a lower incidence of complications and higher incidence of correct line placement than other approaches. It is especially appropriate for patients with coagulopathy or those patients with lung disease in whom pneumothorax may be disastrous. It may be best avoided in those patients with carotid artery disease or those with raised intracranial pressure because of the risks of carotid puncture and of impaired cerebral venous drainage. Internal jugular cannulation is associated with a higher incidence of catheter infection than subclavian cannulation but both have a much lower infection rate than the femoral approach.
The internal jugular vein runs from the jugular foramen at the base of the skull (immediately behind the ear) to its termination behind the posterior border of the sternoclavicular joint, where it combines with the subclavian vein to become the brachiocephalic vein. Throughout its length it lies lateral, first to the internal and then common carotid arteries, within the carotid sheath, behind the sternomastoid muscle (Fig. 15.1A). Ultrasound demonstrates the close proximity of the vein to the carotid artery (Fig. 15.1B). Many approaches to the internal jugular vein have been described. A typical landmark approach is from the apex of the triangle formed by the two heads of the sternomastoid (Fig. 15.1).


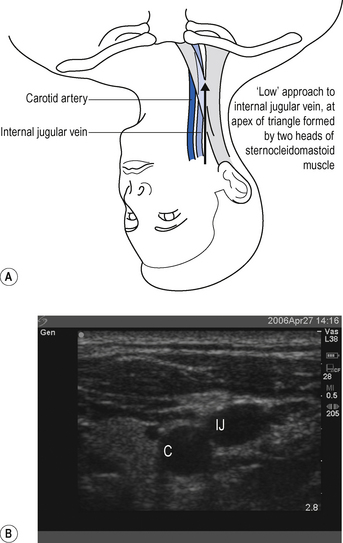
 It is a common mistake to assume the internal jugular vein is deep. Typically it is <2 cm from the skin. Do not introduce the needle to its full length. There is a danger of puncturing the apex of the lung.
External jugular vein
The external jugular vein lies superficially in the neck, running down from the region of the angle of the jaw, across the sternomastoid before passing deep to drain into the subclavian vein. It can be used to provide central venous access, particularly in emergency situations when a simple large-bore cannula can be used for the administration of drugs and resuscitation fluids. Longer central venous catheters can be sited via the external jugular but the angle of entry to the subclavian vein often leads to inability to pass guide wires centrally and results in a high failure rate.
Subclavian vein
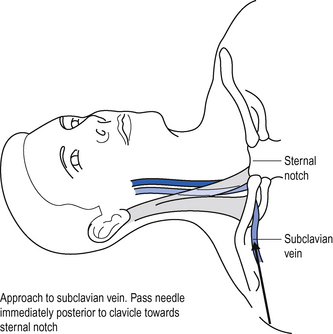
The subclavian vein is a continuation of the axillary vein. It runs from the apex of the axilla behind the posterior border of the clavicle and across the first rib to join the internal jugular vein, forming the brachiocephalic vein behind the sternoclavicular joint. See Fig. 15.2.
 Position the patient supine (some people advocate placing a sandbag between the patient’s shoulder blades, which allows the shoulders to drop back out of the way).


Femoral vein


 Ultrasound can be used to identify the vessels and ensure that the vein is punctured near the inguinal ligament where the artery and vein lie side by side. See Fig. 15.3.
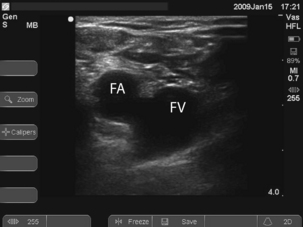
Procedure
Central venous cannulation. You will need:
Universal precautions; sterile gown and gloves
5-mL syringe of local anaesthetic
Heparinized saline to flush line
Ultrasound probe cover and sterile gel
 Central venous catheterization is almost universally achieved using a catheter over a guide wire (Seldinger) technique. This is associated with a lower incidence of incorrect line placement and complications than cannula over needle techniques.


 Using a 10-mL syringe and needle enter the central vein by the chosen approach, maintaining suction on the syringe at all times.


 If provided, pass the dilator over the wire into the vein. Then remove it, leaving the wire in situ.


 If you appear to have missed the vein on the first pass, pull back slowly while maintaining suction on the syringe. You often find you have gone through the vein and can identify it on withdrawal.
Position on chest X-ray
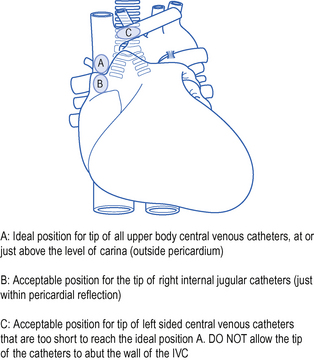
The catheter should lie along the long axis of the vessel and the distal segment and tip should be in the superior vena cava (SVC) or at the junction of the SVC and right atrium but ideally outside the pericardial reflection. Catheters below this level may perforate the heart and cause cardiac tamponade. The pericardial reflection lies below the level of the carina and this can therefore be used as a radiological marker. Catheters placed via subclavian veins of left internal jugular vein must not be allowed to lie with the tip abutting the wall of the superior vena cava. This may cause pain, perforation and accelerated thrombus formation. Either advance the catheter to lie in the long axis of the SVC or pull it back to lie in the brachiocephalic vein. See Fig. 15.4.
COMMON PROBLEMS DURING CENTRAL VENOUS ACCESS
Cannot find the vein
Check position (ultrasound and / or landmarks) and try again. If unsuccessful do not persist with repeated passages of the needle in the hope of striking oil! You may have misinterpreted the landmarks, or the vein may be absent or occluded (e.g. with thrombus). Seek help.
 Do not proceed immediately to attempt cannulation on the contralateral side: this increases the risk of complications, such as bilateral pneumothorax!


Complications
Complications of central venous cannulation depend in part on the route used but include those in Box 15.2.
Box 15.2 Complications of central venous cannulation
| Early | Late |
|---|---|
| Arrhythmias | Infection |
| Vascular injury | Thrombosis |
| Pneumothorax | Embolization |
| Haemothorax | Erosion/perforation of vessels |
| Thoracic duct injury (chylothorax) | Cardiac tamponade |
| Cardiac tamponade | AV fistula |
| Neural injury | |
| Embolization (including guide wire) | |
| AV fistula |
CHANGING AND REMOVING CENTRAL VENOUS CATHETERS
Line colonization with bacteria and fungi is common and there is no evidence that changing lines on a regular basis (e.g. every 5–7 days) is of benefit. (See Catheter-related sepsis, p. 340.)


 The difficulty with this technique is retaining sterility, Wear two pairs of gloves and discard the top pair when you have removed the old line.
LARGE-BORE INTRODUCER SHEATHS / DIALYSIS CATHETERS
Indications
Introducer sheaths are available in a number of sizes for different applications, including insertion of pulmonary artery catheters and temporary pacing wires. In adults, 7.5 or 8.5 Fr are generally used. They may be used as large-bore access for volume resuscitation. Smaller sheaths may be used for introducing specialized monitoring such as jugular bulb oximetery. Large-bore double lumen dialysis catheters are used for haemodialysis, haemofiltration, plasma exchange and rapid transfusion.


