Fig. 12.1
Incisions should be designed so that they lie in parallel to the depicted relaxed skin tension lines to minimize tension upon closure
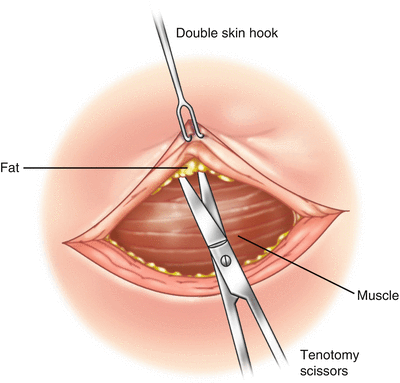
After performance of any necessary debridement, care should be taken to minimize any crush injury to the skin edges. Double skin hooks are used to elevate the skin edges, not toothed forceps. The defect should be undermined sufficiently to allow for a low or no tension closure. Undermining is performed in the avascular plane just superficial to the underlying fascia using tenotomy scissors in a spreading motion (Fig. 12.2). A low current monopolar electrocautery can also be used. Attention is given to preservation of perforating vessels of significant size and avoidance of injury to superficial sensory nerves. This is particularly important in the extremities as injury to a major superficial vein, such as the saphenous or cephalic vein, or a sensory nerve can easily occur. A surgeon must anticipate and avoid these structures in their predictable anatomic locations. Once the skin edges lie in close approximation with application of gentle pressure, attention is turned to closure of the wound.


Fig. 12.2
Proper dissection technique involves the use of double skin hooks to minimize damage to the skin edges (forceps cause a crush injury), and blunt dissection in the avascular plane using tenotomy scissors
A layered closure is always employed on the trunk and extremities. If the underlying superficial fascia (Scarpas’s fascia) can be identified, then it should be reapproximated using interrupted 2-0 or 3-0 absorbable suture. Dead space, although unusual in straightforward primary closures, must be eliminated to prevent formation of a seroma and eventual dehiscence of the wound. The placement of “quilting sutures,” between the deep undersurface of the undermined skin and the deep fascia can be very helpful in obliterating the dead space. Placement of a closed suction drain, such as a Jackson-Pratt drain is also acceptable.
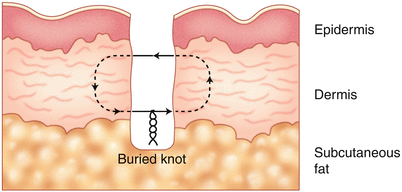
The skin edges should then be approximated using 3-0 absorbable interrupted buried deep dermal sutures (Fig. 12.3). Remember that buried dermal sutures provide strength to allow the external sutures to be removed early, but they do not prevent eventual widening of the scar as they are absorbable sutures. The skin edges should be everted to obtain the best result, as a wound that is precisely brought together tends to widen whereas a wound with everted skin edges will flatten over time into a narrower scar. The final layer of closure everts the skin.


Fig. 12.3
Deep dermal sutures are interrupted sutures with a buried knot designed to take tension off the final layer of closure. It is important to enter and exit the skin at the same level on each side in order to bring the skin edges together properly
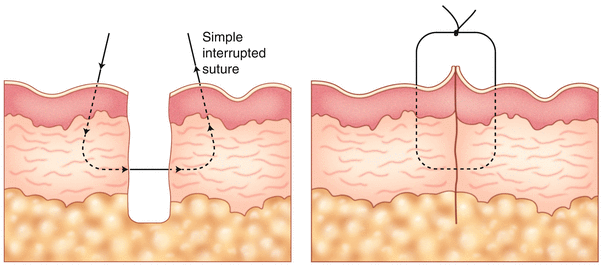
There are several techniques for skin closure. The most commonly utilized is the simple interrupted suture. In order to evert the skin edges, the suture needle pierces the skin at an angle away from the incision so that the deeper aspect of the suture is further apart than the superficial aspect thus creating a parallelogram (Fig. 12.4). As with all techniques, the depth of the suture on opposite sides of the wound should be equal to prevent the edges from overlapping. Horizontal or vertical mattress sutures may be employed in areas of thicker skin (the back and glabrous tissue on the hands and feet) to maximize eversion of the skin edges and to distribute tension in areas of mobile skin. Both of these techniques are best performed using a 3-0 or 4-0 nonabsorbable monofilament suture.


Fig. 12.4
Simple interrupted sutures are very useful for small wounds and can provide excellent skin eversion
Subcuticular (intradermal) sutures prevent suture marks in the skin and therefore are often preferred in areas of cosmetic importance. In this running dermal closure, horizontal bites through the superficial dermis approximate the skin edges. A 4-0 nonabsorbable or absorbable monofilament may be employed. Nonabsorbable suture should be removed in approximately 10–14 days regardless of closure type.
Staples may save time for long incisions. The skin edges should be gently everted using toothed forceps prior to placement of each staple, as there is a tendency for the skin to invert otherwise. Staples must be removed early (by postoperative day 7) to prevent “train track” scars.
Skin adhesives can be used as a primary skin closure only if the deeper layer of sutures has already everted the skin edges and the wound is under no tension. Skin adhesive can also be used to “seal” the skin overlying a subcuticular suture if application of dressings in this area would be difficult or if the wound is at risk for contamination (e.g., the perineum).
Dressings should remain in place for 24–48 h after surgery. If skin adhesive has been employed, they may not be necessary. Dry gauze dressings with an overlying ABD pad are held in place with paper tape on the trunk. On the extremities, the dry gauze dressings are held in place with a gauze wrap followed by a non-constricting cotton elastic dressing.
Postoperative Care
Two days after closure, the patient may remove the dressings and cleanse the wound gently with soap and water. Showering is encouraged but the patient may not soak the wound (tub bathing, swimming pool, hot tub, lake, ocean). Dressings should be reapplied and changed daily if there is any residual fluid egress from the wound or if the patient will be in an environment that risks infection to the wound.
Sutures should be removed at 10–14 days and staples by 7 days. Steristrips should be applied especially on areas with high tension and constant movement. Scar care may be initiated at this time. Gentle pressure massage of the scar in a circular motion for a few minutes 2–3 times daily can significantly soften and flatten scars. Silicone gel or sheets have been shown to improve the appearance of scars over time. If a patient appears to develop a keloid scar, intralesional steroid injection may be considered.
Skin Grafting
Skin grafts can be performed as full-thickness grafts (containing the entire thickness of the dermis) or split-thickness grafts (containing only a small portion of the dermis), with advantages/disadvantages and specific indications for each.
Important Facts About Skin Grafts
As skin grafts do not carry their own intrinsic blood supply, and, therefore, rely on recipient bed tissues for survival, they cannot be used to cover areas with exposed (denuded) cartilage, bone, or tendon. If perichondrium, periosteum, and/or paratenon are intact, skin grafting can be performed; however, these situations are often better addressed with tissue transfer techniques, discussed later.
Contracture
All skin grafts undergo two processes of contracture: primary (immediate) and secondary (delayed). Primary contracture refers to the diminution of graft size immediately after its removal from the donor site, and is directly proportional to the dermal content of the graft, which contains elastic connective tissue. Since the dermis is completely removed with a full-thickness skin graft, the donor site must be designed in such a way that it can be closed primarily. This limits the size of full-thickness skin available for grafting, but will vary from patient to patient based on skin laxity.
Secondary contracture is due to scarring of the recipient site as the graft heals over time, and is inversely proportional to the dermal content of the graft. Therefore, in areas where minimal long-term scar contracture is favored (eyelids, across joints, etc.) a full-thickness graft would be preferred. Similarly, a split-thickness graft would be preferable to cover large areas where secondary contracture is less problematic (chest, back, abdomen, perineum, thighs, upper arms, etc.).
Skin Graft Physiology
Understanding the physiology of skin graft survival is critical to preventing postoperative complications, discussed below. In the first 24–48 h, skin grafts adhere to the recipient bed through fibrin deposition and survive through simple diffusion, often referred to as serum imbibition. Following this initial stage, the capillaries remaining in the dermal element of the graft begin to align with those in the recipient site through a process called inosculation. The third stage of skin graft healing is revascularization through true angiogenesis.
Because they initially survive primarily through simple diffusion, which is distance-limited, skin grafts can be compromised by any fluid accumulation between the graft and recipient site, including blood (hematoma) or serous fluid (seroma). Similarly, any mechanical process that could interrupt the delicate alignment of vessels that occurs during inosculation, such as shear force, can impair graft survival.
Preoperative Preparation
Unless a very large surface area is planned for split-thickness grafting (i.e., large total-body surface area burns), in which case blood loss could be significant, routine preoperative lab work should not be necessary for these procedures. As with all wound healing interventions, every effort should be made preoperatively to optimize the patient’s nutritional status, cessation of tobacco use, etc.
Operative Technique
Recipient Site Preparation
The best wound to graft is an acute excisional wound that needs no preparation. If a defect is not repaired immediately, in case of positive margins and re-excision, then the wound has to be appropriately prepared, cleaned of any necrotic material or fibrinous exudate, and washed thoroughly to remove bacteria that may be harbored in the crevasses of the wound. Several techniques exist for achieving a clean bed, and include mechanical debridement with the back of a forceps or curette, gentle scraping with a blade, or pressurized water systems, including pulse lavage or VersaJet™. Regardless of how the bed is prepared, the most important step in the entire procedure is obtaining meticulous hemostasis prior to application of the graft. Hematoma formation beneath a graft is the most common reason for graft failure.
Full-Thickness Skin Grafts
Once a wound has been appropriately selected and prepared for closure with a full-thickness skin grafts (FTSG), the first step is to select a donor site. The inguinal crease provides a large amount of full-thickness skin while still allowing primary closure, and harvest can be performed bilaterally if additional graft is needed. The medial surface of the arm and upper thigh are alternative donor sites if a thinner skin graft is desired.
Once the dimensions of the wound bed are known, an FTSG can be designed—it should be oversized approximately 15–20 % to account for primary contracture. Regardless of the location, donor sites should be excised in an elliptical fashion, with a 3-4:1 length: width ratio oriented to place a linear scar in the relaxed skin tension lines (Fig. 12.1). The ability to close the donor site primarily can be verified with the “pinch test” before committing to the final graft dimensions.
After marking the donor site, the tissues are infiltrated with local anesthetic containing epinephrine to optimize hemostasis. Once this has taken effect, the area is sharply incised through the level of the dermis, and elevated from the underlying subcutaneous tissues using either a knife or electrocautery. Once the graft has been harvested, it is kept in saline-moistened gauze for later use while the donor site is closed. With larger grafts, the donor site wound margins may require slight undermining to allow closure without tension.
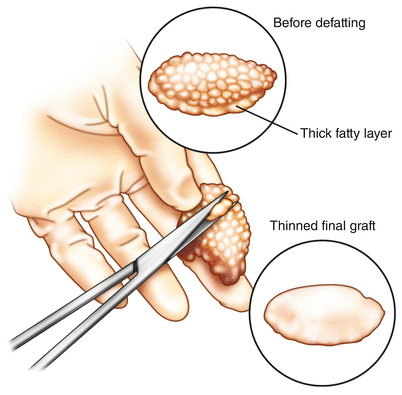
To maximize graft take, all remaining subcutaneous tissues should be removed from the dermal surface of the graft so that only dermis and epidermis remain. This is done sharply with curved scissors, e.g., curved Iris, mayo or facelift scissors (Fig. 12.5). In order to allow egress of any fluid which may build up beneath the graft, it may be “pie-crusted,” by cutting small slits in the graft with a scalpel blade.


