CHAPTER 34
Percutaneous Radiofrequency Discectomy With Disk IT
INTRODUCTION
The low back pain remains a major burden for patients and health care providers. In about 45% of patients with low back pain, the cause is degenerative intervertebral disc. The degenerative process may result in disc herniation or internal disc disruption. Disc herniation may be either extruded or contained.
Internal disc disruption (IDD) results in annular tears, which may be classified according to the modified Dallas criteria (Figure 34-1). Extension of the tear into the annulus results in discogenic pain.
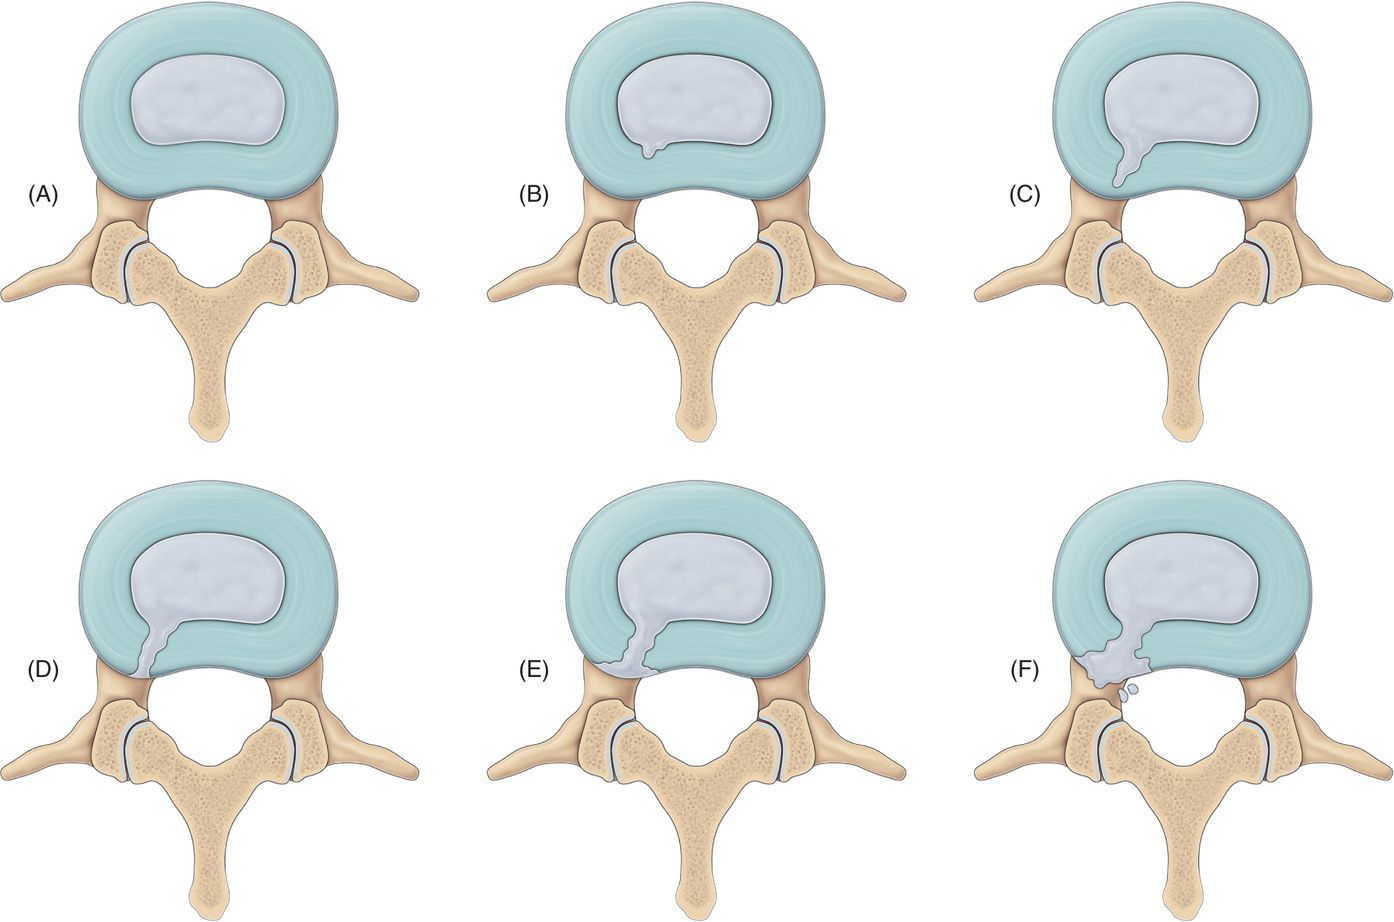
Figure 34-1. Modified Dallas criteria. (A) equals grade 0 – normal disc and (F) equals grade 5 tear.
Disc degeneration results in 2 separate phenomena that explain the painful process.
• Initially, there is extension of the sensory nerve fibers beyond the outer third of the annulus, an area that previously was mechanically insensitive. These nerves may also extend into the nucleus pulposus. This leads to pain with normal mechanical loads. Secondly, there may be fracture of the end plates. This results in inflammation and the introduction of cytokines into the nucleus pulposus. Complete tear of the annulus results in leakage of the contents of nucleus into the epidural space. Contents may irritate the neural plexus in the dura, both the anterior and posterior longitudinal ligaments and dorsal root ganglion (DRG), which may result in back pain.
• Contained disc herniations most often resolve with time and conservative measures. Internal disc disruption is likely to continue to cause pain. Interventional pain management approaches may be of help in these cases.
The International Association for the Study of Pain (IASP), in its taxonomy, has adapted the following set of criteria for diagnosing IDD:
• No visible disc herniations seen on magnetic resonance imaging (MRI) or computed tomography (CT).
• During provocation discography injection of the suspected disc, recreation of the patient’s exact back, and/or leg pain must occur.
• Injection of the disc above or below the suspect disc must be nonpainful, and this acts as a control disc or normal disc.
• A grade 3 or 4 radial annular fissure must be demonstrated on post discography CT (Figure 34-2).
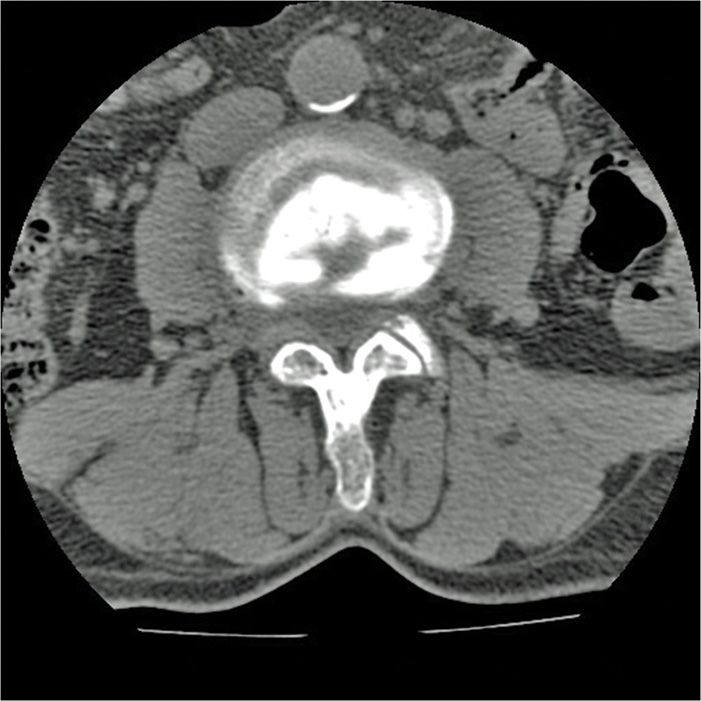
Figure 34-2. Postdiscogram CT scan with Dallas grade IV tear.
PERCUTANEOUS RADIOFREQUENCY DISCECTOMY—DISK-IT-11
• Composed of 2 straight sharp insulated needles of 15 or 20 cm length with active tips of 20 mm.
• The proximal end of active tip has a radiopaque marker.
• In addition, 2 thermocouple electrodes of suitable length (15 or 20 cm) are needed for electro stimulation and making radiofrequency lesion bilaterally in the annulus.
This technique can be used to help treat pain caused aby internal disc disruptions of the thoracic and lumbar discs. The diagnosis should be made by history and physical examination. Symptoms include low back pain with or without unilateral or bilateral radicular pain, provocation by cumulative loading, sitting intolerance, pain on flexion, no severe neurologic deficit, tenderness over the spinous processes at the painful level(s). The diagnosis must be confirmed by MRI and provocative discography with concordant pain.
INDICATIONS
• Low back and thoracic back pain due to discogenic causes.
• Discogenic pain caused by internal disc disruptions and confirmed by a manometric provocation discogram (causing concordant pain) and a postdiscogram CT scan.
CONTRAINDICATIONS
There are multiple well-defined pain generators in the spine, and not all sources can be treated with percutaneous radiofrequency discectomy.
Following pain, generators are not treatable by radiofrequency discectomy:
• Zygapophyseal (facet) joint
• Sacroiliac joint and ligaments
• Dorsal root ganglion
• Spinal ligaments
• Paraspinal muscles
In addition, there are other relative or absolute contraindications that are common to intradiscal procedures. These include:
• Patient refusal
• Systemic or local infection
• Irreversible coagulopathy or bleeding disorder
• Suspected history of cancer with metastasis
• Suspected unstable fracture
• Cauda equina syndrome
• Central pain syndrome
PERIOPERATIVE CONSIDERATIONS
• Important perioperative considerations include documentation of conservative measures tried
• Other sources of pain investigated and excluded
• A provocation manometric discography performed and concordant painful disc identified
• Patient education including risks, benefits, and outcomes
DOCUMENTATION FOR OFF-LABEL INDICATIONS
This procedure has been approved for thoracic and lumbar disc disruption and should not be used in the cervical area. There is no literature suggesting that it can be safely used in the cervical area.
RELEVANT ANATOMY
• The intervertebral disc lies between the vertebral bodies, linking them together. The components of the disc are nucleus pulposus, annulus fibrosus, and cartilaginous end-plates.
• The blood supply to the disc is only to the cartilaginous end plates.
• The nerve supply is basically through the Sino vertebral nerves.
• Biochemically, the important constituents of the disc are collagen fibers, elastin fibers, and aggrecan.
• As the disc ages, degeneration occurs, osmotic pressure is lost in the nucleus, dehydration occurs, and the disc loses its height. The disc has its nerve supply for the annulus only. In addition, there is the nerve supply to the end plates of the vertebral bodies. These are all sources of pain (Figures 34-3 and 34-4).
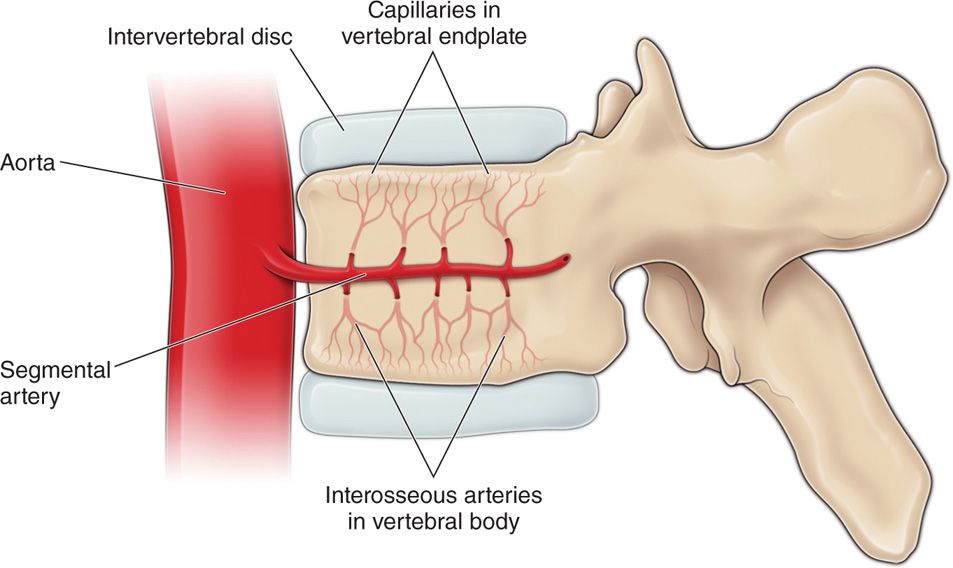
Figure 34-3. Anatomy and blood supply.
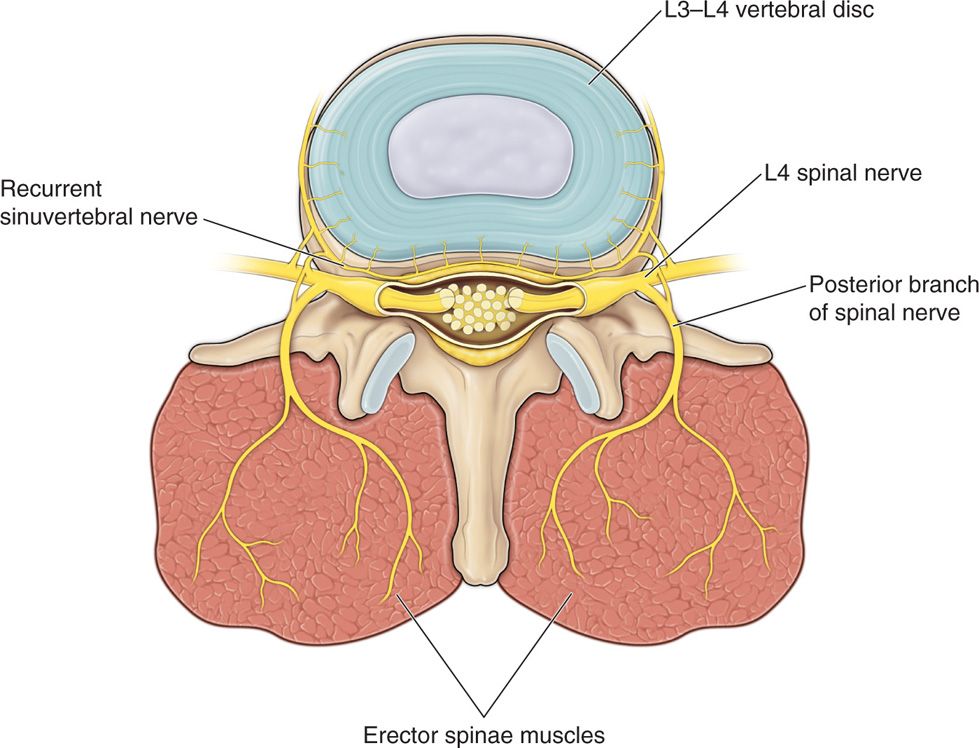
Figure 34-4. Nerve supply to disc.
POSITIONING OF PATIENT
• The procedure is performed in prone position.
• To overcome the lumbar lordosis use of a radiolucent pillow or any such device is recommended. This allows for better visualization of the disc and easier placement of needles.
• Position the patient flat on the table before starting. Adjustments during the procedure are more difficult. Use of tilting fluoroscopic table is highly recommended.
• Ensure the patient is comfortable before starting. Sometimes sedation may make the procedure difficult to perform as patient may get restless. Needle positioning may then become difficult. Success of the procedure is dependent on correct needle positioning.
FLUOROSCOPIC VIEWS
Comprehension on the use of fluoroscopy is essential for success. Minimal fluoroscopic exposure is recommended.
• As this procedure involves bilateral needle placement, use of a C-arm that can rotate 45 degrees on both sides is very helpful.
• Patient must understand the importance of being still.
• Identify the level and mark the area. Before starting, always perform a time out.
INTRAOPERATIVE TECHNICAL STEPS
This is an intradiscal procedure and every effort must be made to take all aseptic precautions. All present must wear cap and mask and the operator needs to be gowned and gloved. Administer preoperative antibiotics. Intradiscal antibiotics may be considered as per protocol.
• Sterile preparation and full body drape is necessary.
• Identify the target disc. Square the end plates of the disc. Then rotate the C-arm till the superior and inferior articular processes are at about the middle of the disc. Kambin’s triangle should be identified (Figure 34-5).
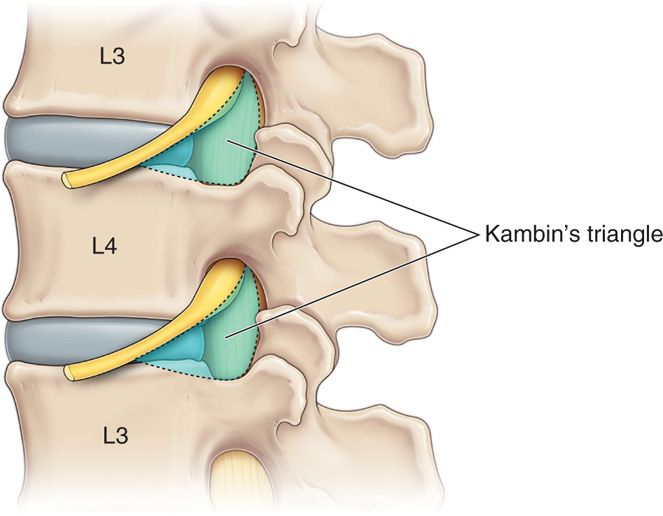
Figure 34-5. Kambin’s triangle.
• Anesthetize the skin and needle tract, and then advance the needles into the disc. Needle entry point is more medial. Do not bend the needle. Needle trajectory should be flatter compared to discogram as the needle needs to be in the annulus and not nucleus pulposus. Confirm position of the needles in both AP and lateral fluoroscopic view. Correct needle position is confirmed when the fluoroscopic image in lateral view shows needles have traversed almost the entire length of the disc, but have not exited the ventral margin. In the AP view, the needle is at inner margin of the pedicle on both sides (Figures 34-6 through 34-8).
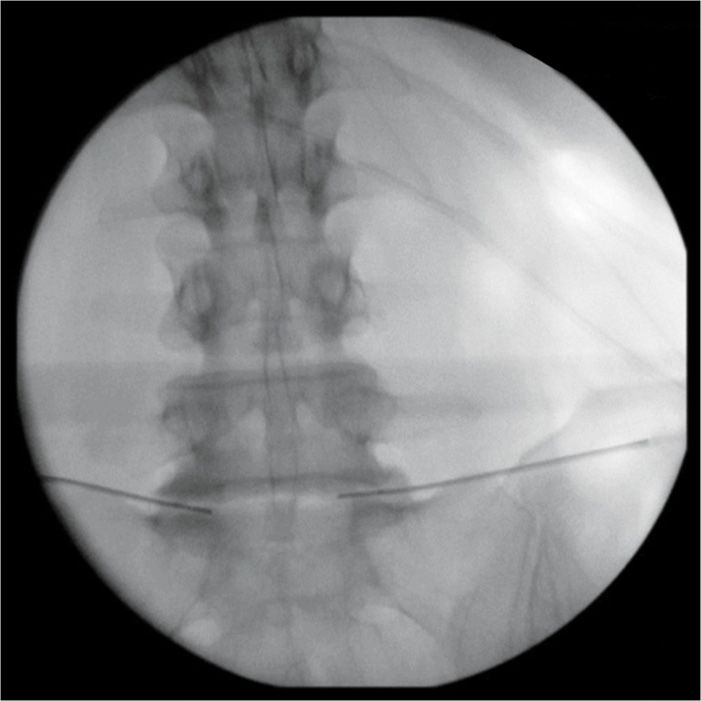
Figure 34-6. Bilateral needle placement AP view. (Reproduced with permission from Neurotherm.)
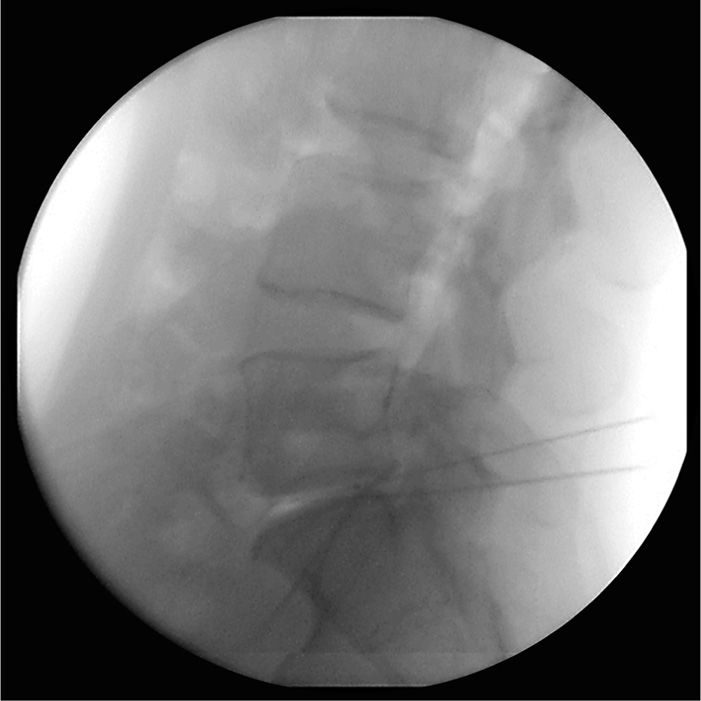
Figure 34-7. Bilateral needle placement lateral view. (Reproduced with permission from Neurotherm.)
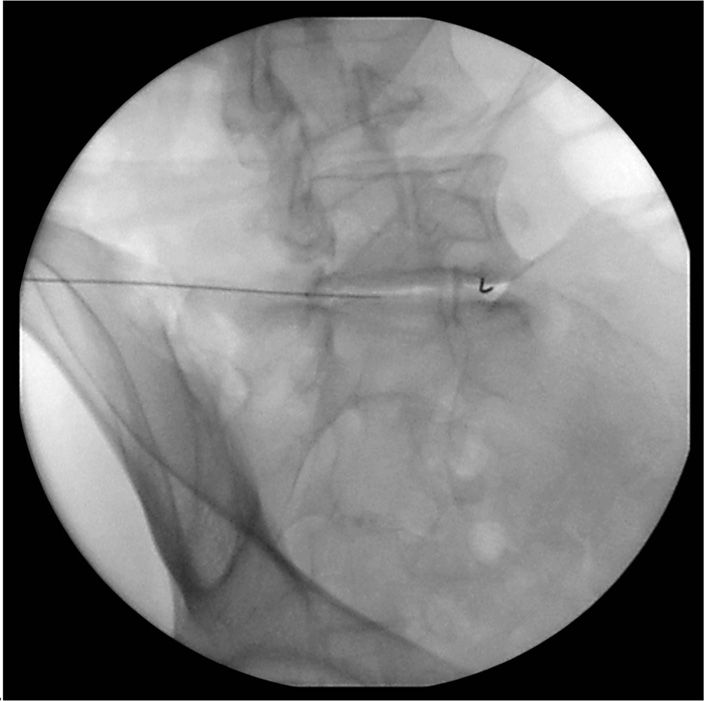
Figure 34-8. One needle in place with radio opaque marker noted and other in Kambin’s triangle. (Reproduced with permission from Neurotherm.)
SELECTION OF NEEDLES, MEDICATIONS, AND EQUIPMENT
For each level of discectomy, two 20-gauge 15/20-cm introducer needles are needed. In addition, appropriate length electrodes are required. Radiopaque contrast may be needed. The Neurotherm NT1100 machine is used for this procedure (Figures 34-9 and 34-10).

Figure 34-9. Disk IT II electrode. (Reproduced with permission from Neurotherm.)
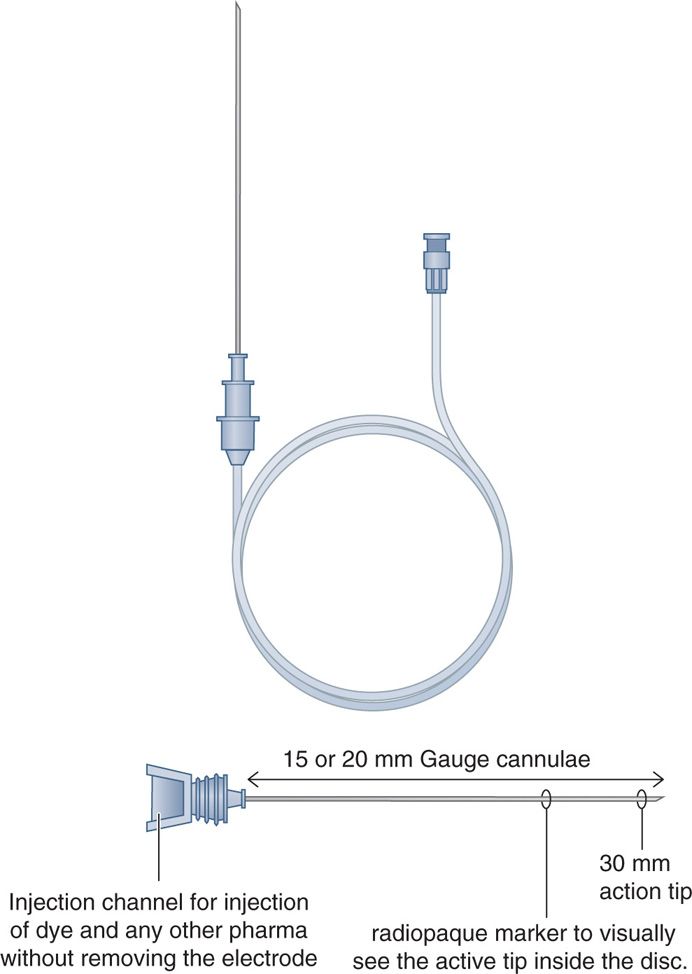
Figure 34-10. Disk IT II introducer.
After confirmation of needle position, perform radiofrequency discectomy as per protocol set up by Neurotherm as under:
• The NT1100 has 2 pre-programmed protocols (thermal and pulsed).
• Thermal protocol: Start with 2 minutes at 60 degrees C, followed by 2 minutes at 70 degrees C, and finally 2 minutes at 80 degrees C.
• Pulsed protocol: 8 minutes on 60 V, 10 millisecond width and maximum temperature set at 50 degrees C.
Resuscitation equipment must be readily available.
POSTPROCEDURE INSTRUCTIONS
• Procedure performed—percutaneous radiofrequency discectomy.
• No strenuous activity for 10 to 14 days.
• Use abdominal support if needed.
• Use pain medications prescribed as needed.
• Follow up office visit in 2 weeks.
• Start physical therapy 2 to 3 times per week for 6 to 8 weeks, 2 weeks after procedure.
Patients should expect pain relief based on symptoms. Radicular symptoms tend to get better. Axial symptoms are less likely to respond to treatment. Axial symptoms also take longer to respond.
MONITORING OF POTENTIAL COMPLICATIONS
Immediate complications include:
• Increased pain
• Site pain and erythema
• Radicular symptoms due to possible irritation of nerve roots during needle placement
Serious complications are:
• Infection resulting in discitis
• Cauda equina syndrome
• End plate necrosis
• Disc herniation
CLINICAL PEARLS AND PITFALLS
• Proper selection of patient is essential for success.
• Diagnosis should be confirmed using a manometric provocation discogram and preferably with postdiscogram CT scan.
• Good explanation of procedure, its complications and outcomes to the patient including need for postoperative physical therapy is essential.
• Good positioning of patient is key to success. Use of an adjustable table will be helpful.
• Achieve optimal position before starting procedure.
• Working with an experienced radiology technician is recommended. Sedation may help but be aware that a lightly sedated patient may get very restless.
• Deep sedation can be dangerous as possible complications from incorrect positioning of needles may not be identified and potential neural damage may occur.
• Confirm position of needles in both AP and lateral views before starting radiofrequency. Success of the procedure depends on good positioning of needles.
• Occasionally, patient may complain of pain during the procedure. Stop and review position of needles, and if no apparent cause for pain can be identified, abandon procedure.
In summary, Disk-IT 11 is:
• The most economical way for disc treatment.
• Has the easiest placement of needles/electrode.
• Can be used in thermal RF or pulsed RF mode.
• Results are comparable to biacuplasty, annuloplasty, and IDET.
• Can be used in “black discs” due to a 20-gauge introducer.
• Less traumatic to disc.
Related posts:
 Corticosteroids: Inditoc-authortions, Pharmacology, and Risks in Interventional Pain Management
 Surgical Treatment of Trigeminal Neuralgia
 Viscosupplements and Steroid Injections
 Supraclavicular and Infraclavicular Nerve Blocks
 Commercially Available Reservoir Options for Intrathecal Drug Delivery
Stay updated, free articles. Join our Telegram channel

Full access? Get Clinical Tree


