CHAPTER 54
Myofascial Injections (Trigger Point, Piriformis, Iliopsoas, and Scalene Injections)
OVERVIEW OF MYOFASCIAL INJECTIONS
Myofascial pain is a common source of pain in the neck, low back, and other areas of the body. The term “myofascial pain” encompasses muscle strain, myofascial trigger points, and specific muscle pain syndromes. These syndromes include piriformis syndrome, iliopsoas related pain, and pain associated with the scalene muscles (trigger points, neurogenic thoracic outlet syndrome).
RELEVANT ANATOMY
Skeletal muscle consists of muscle fibers under somatic nervous control. Each nerve root innervates a muscle or group of muscles known as a myotome. The muscle belly of skeletal muscles is connected by tendons to bone. Trigger points occur in the muscle body, most often located in the center of the muscle.
TRIGGER POINT INJECTIONS
• Trigger points are hyperirritable localized taut bands of skeletal muscle that produce characteristic referral patterns.
• A trigger point (TP) may occur in isolation or concomitantly with myofascial pain syndrome or other pain generating syndromes.
• Trigger points are diagnosed by history and physical examination.
• A patient will complain of a localized pain or regional pain located in or around any skeletal muscle.
• The neck, shoulder girdle, and low back are the most common areas involved. Commonly involved muscles are the trapezius, splenii, cervical and lumbar paraspinal muscles, and the quadratus lumborum.
• On examination, localized taut bands of muscle are noted and palpation produces characteristic non-dermatomal referral patterns.1
• Trigger points may be active or latent. Active trigger points produce spontaneous pain, while latent trigger points produce pain only when palpated.
• Active trigger points may result from trauma, overload or overuse injury, or due to a muscle being in a prolonged contracted or shortened position.
• Treatments for active trigger points include physical therapy (stretching and strengthening, conditioning, therapeutic modalities); trigger point injections; acupuncture; biofeedback; transcutaneous nerve stimulation (TENS); and some medications.2–4
• Trigger point injections are intramuscular injections of local anesthetic with or without corticosteroids thought to work by local anesthetic effect, interruption of pain transmission, mechanical effects on the muscle itself, and disruption of ephaptic transmission.
Basic Concerns for Injection
• Immunocompromised patients, patients at high risk for infection.
• Patients with metastatic cancer pain may have local masses in the region.
• Patients may have thrombocytopenia secondary to chemotherapy.
• Patients with allodynia in the area of injection.
Contraindications
• Infection, systemic or localized
• Coagulopathy
• Distorted or complicated anatomy
• Patient refusal
Preoperative Considerations
• Refer to ASRA guidelines, consider the risks and benefits.
• Anticoagulation—this is less of a concern than for an epidural.
• Physical examination of the area for infection, skin ulceration or necrosis, and extent of disease.
• The ability of a patient to tolerate a supine, prone, lateral decubitus, or seated position for the injection.
Equipments
• Isopropyl alcohol or chlorhexidine
• 25-gauge 1.5-in needle
• 3, 5, or 10 mL syringe for medications
Medications
• 0.25% bupivacaine or other local anesthetic
• Corticosteroid (dexamethasone, triamcinolone, or methylprednisolone)
Technique
• The muscle is palpated and the trigger points are identified and marked. Ultrasound may be used to identify hypoechogenic TPs.
• Sterile prep of the area to be injected.
• The needle is inserted into the trigger point. When the patient verbally identifies the painful area, and after negative aspiration, local anesthetic is injected with or without steroid. Botolinum toxin A, 6-12.5 units per muscle, total dose not to exceed 300 units.
• The authors use a nonparticulate steroid, dexamethasone (4 mg in 30 mL bottle of local anesthetic), or a low dose of particulate steroid (eg, 20-40 mg of methylprednisolone diluted in the local anesthetic solution) may also be used.
• Pain relief can be obtained with 1 to 3 mL of injectate per trigger point this may be done in a fanwise technique.
• There should be no paresthesia, blood, or cerebrospinal fluid (CSF) with needle insertion.
Postprocedure Follow-Up
Patient should be monitored closely for the following:
• Neurologic symptoms (weakness, urinary or bowel incontinence)
• Signs of local infection (warmth, erythema, purulent drainage, fever)
• Bleeding
• Exacerbation of symptoms
• Depending on the location of the injection, the patient should be instructed on the signs and symptoms of pneumothorax (neck, shoulder, thoracic, and anterior chest wall injections), or local nerve blockade (eg, inadvertent median nerve block in injection of flexor carpi ulnaris).
Potential Complications and Pitfalls
• Infection
• Bleeding
• Nerve block
• Hematoma
Clinical Pearls
• The success of the procedure of the procedure is dependent on the diagnosis and localization of the trigger point.
• Patients with chronic widespread pain or psychological disorders may be less likely to respond to TrPs.
• Patient’s can expect days to weeks or months of 50% to 100% relief. In some instances of acute TrPs in the absence of other pain generators, a TrP injection is curative when combined with physical therapy or a home exercise program.
PIRIFORMIS INJECTIONS
• Piriformis syndrome (PS) is a painful condition consisting of pain in the buttock with or without radiation in the distribution of the sciatic nerve.
• It is a relatively uncommon disorder though some suggest it may contribute to up 8% of buttock pain. Piriformis syndrome is a diagnosis of exclusion.
• There are no standardized diagnostic criteria for PS.
• Piriformis syndrome can be a consequence of an abnormal relationship between the sciatic nerve and the piriformis muscle (PM), resulting in irritation of the sciatic nerve.
• A hypertrophic muscle, infection or the invasion of the muscle by tumor can cause pressure/irritation on the nerve.
• In 78% to 84% of the population, the sciatic nerve passes in front and medial to the muscle, but in 12% to 21% of individuals the divided nerve passes through or posterior to the muscle being exposed to its contractions triggering sciatic symptoms.5,6
• Piriformis syndrome should be considered in patients who present with buttock pain, tenderness to palpation over the PM, and have a positive response to several provocative maneuvers including5:
![]() Pace sign: pain and weakness with seated abduction of the hip against resistance
Pace sign: pain and weakness with seated abduction of the hip against resistance
![]() Lasegue sign: pain with unresisted flexion, abduction, and internal rotation of the flexed hip
Lasegue sign: pain with unresisted flexion, abduction, and internal rotation of the flexed hip
![]() Freiberg sign: pain with forced (ie, against resistance) internal rotation of the extended hip
Freiberg sign: pain with forced (ie, against resistance) internal rotation of the extended hip
Due to its small size, its proximity to neurovascular structures, and its deep location, the piriformis muscle is usually injected under radiographic or ultrasound guidance. Piriformis injections under CT or electromyographic guidance have also been described.7,8 In this chapter, we will discuss flouoroscopic and US-guided piriformis injections.
Basic Concerns for Injection
Piriformis injections are relatively safe procedures. However, the same conditions noted in the section on trigger point injections are causes for concern.
Contraindications and Preoperative Considerations
These are the same as the ones noted in the section on trigger point injections.
Equipments
• Isopropyl alcohol or chlorhexidine
• 25-gauge 1.5-in needle
• Insulated nerve-stimulating 15-cm block needle
• Nerve stimulator
• 3, 5, or 10 mL syringe for medications
Medications
• 0.25% bupivacaine or 1% lidocaine
• Corticosteroid (dexamethasone, triamcinolone, or methylprednisolone)
Fluoroscopic Technique
• The patient is placed prone on a fluoroscopy table, and the inferior margin of the sacroiliac joint is imaged and marked.
• The patient is prepped and draped in sterile fashion.
• The needle insertion site is 1 to 2 cm caudal and 1 to 2 cm lateral to the inferior margin of the SI joint.
• The insertion site is anesthetized with 2 to 3 mL of 1% lidocaine.
• The insulated needle is inserted and advanced with the nerve stimulator on (1 mA, 2 Hz, 0.1 ms) until a sciatic nerve evoked motor response is achieved (dorsiflexion, plantar flexion, eversion, inversion) at 0.4 to 0.6 mA.
• The needle is slightly withdrawn until the sciatic stimulation disappears. This is to avoid intraneural injection.
• Steroid (40 mg of either methylprednisolone or triamcinolone) plus 5 mL of saline is injection around the sciatic nerve.
• The needle is pulled back 1 cm into the belly of the piriformis muscle and 1 to 2 mL contrast is injected.
• The contrast should outline the piriformis muscle belly with no sign of spillage, ie, the margins are clean (Figure 54-1).
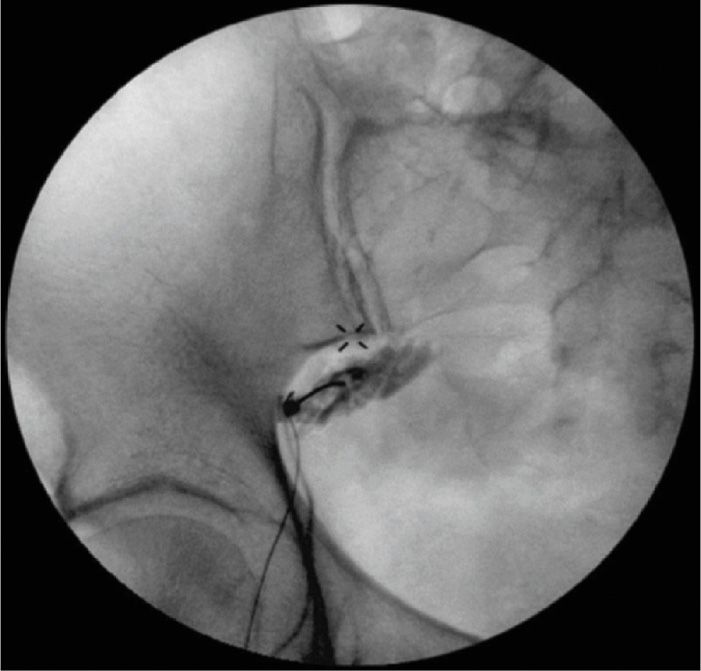
Figure 54-1. The piriformis muscle was outlined after a dye injection. (Reproduced with permission from Mackenzie-Brown, Chekka K, Benzon HT. Reprinted from: Musculoskeletal injections: Iliopsoas, quadratus lumburom, piriformis, trigger point injections. In Huntoon M, Benzon HT, Narouze, S. Spinal Injections and peripheral nerve blocks. In Deer T. Interventional and Neuromodulatory Techniques in Pain Management. New York: Elsevier – Churchill Livingstone, 2011.)
• After the characteristic dye spread is achieved, the local anesthetic solution and steroid are administered. Typically, good pain relief can be attained with an injection of 5 mL of 0.25% or 0.5% bupivacaine plus 40 mg of methylprednisolone (or triamcinolone).
Ultrasound-Guided Piriformis Injections
Ultrasound-guided technique permits not only a direct view of the PM, but also examines its relationship to the sciatic nerve and rule out some an anatomic variation.9
Patient Position
The patient is in prone position with the US machine on the opposite side.
Equipment
• A curved, low frequency US probe (2-6 MHz) is used to scan a wider and deep area.
• US machine should have Doppler to help identifying the inferior gluteal artery medial to the sciatic nerve and anterior to the PM.
• A 20- to 22-gauge 10- to 12-cm-long needle is recommended.
Preparation as described above.
Scanning Procedure
There are 2 recommended scanning techniques:
1. The classic technique
• Position the transducer in short-axis (transverse) over the SIJ where medially the sacrum will be visible and laterally the ilium/gluteus maximus muscle (GMM) complex will be observed.10
• Keep the SIJ in the center of the screen and move the transducer caudal until the lateral view of the ilium is lost, indicating that the transducer is over the greater sciatic notch.
• In that position the operator will see the hyperechoeic lateral portion of the sacrum medially.
• In the center of the image, the following are visualized: the skin and fat in the near field, then the GMM and deeper to it and originating from the anterior/lateral sacral edge is the piriformis muscle with the typical longitudinal fibers.
• Clockwise rotation on the right gluteal area and counter clockwise on the LEFT gluteal area. Move the transducer slightly lower and with mild clockwise rotation, the sciatic nerve will be visible deeper in the medial aspect of the piriformis and the ischium appears initially as a curved hyperechoeic line (posterior acetabulum) and more caudally it becomes a flat line deeper to the piriformis (Figure 54-2).
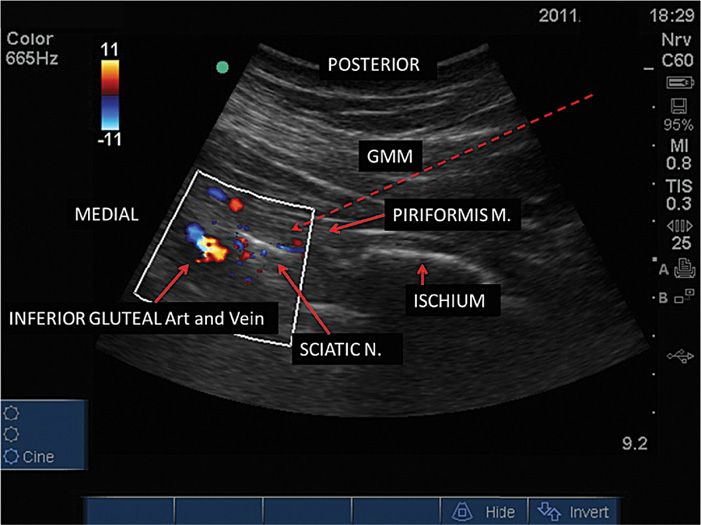
Figure 54-2. The piriformis muscle over the ischium and the sciatic nerve and under the gluteus maximus muscle (GMM). The red dashed arrow shows the in-plane needle trajectory.
2. Alternative technique
• Place the transducer over the line between the greater trochanter and the ischial tuberosity.
• Once the sciatic nerve is identified, it is followed cephalad until the PM and the GMM are seen over the sciatic nerve.
Two Pearls with Either Approach
• To confirm the view of the PM, flex the knee in 90 degrees and rotate the hip of the patient internally/externally to see the PM sliding over the ischium as opposed to the stable position of the GMM (Figure 54-3).
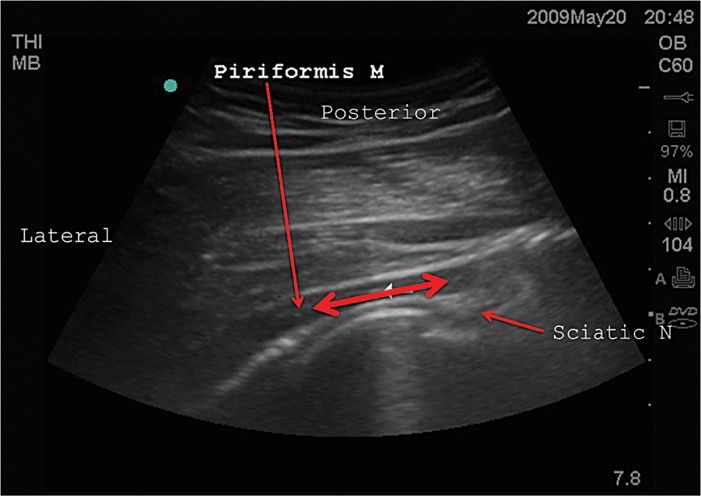
Figure 54-3. Typical movement to identify the piriformis muscle over the ischium when flexing the knee in 90 degrees and rotating the hip internally externally.
• When observing the sciatic notch it is useful to identify the ischial spine since other muscles in similar position to the PM insert in the area (ie, the gemelli and obturator muscles) and should be differentiated from the PM.
Needle Insertion
• The more perpendicular the needle is to the US beam, the better is the view.
• With the patient in prone position, the PM runs almost horizontal between the sacrum and the femur.
• We suggest a lateral to medial, in-plane approach with the needle entering the skin at 3 to 4 cm lateral to the lateral edge of the transducer to achieve a rather flat trajectory that makes it much easier to see.
• After local anesthetic infiltration, the needle should cross the skin and fat in a lateral-to-medial, posterior-to-anterior direction, enter the GMM and then the PM in its medial half, where it is thicker.
• Hydrodissection with normal saline (NS) 1 mL may help in confirming the position of the tip before injecting into the PM.
• A steroid (methylprednisolone or triamcinolone) with local anesthetic bupivacaine or lidocaine is then injected.
Postprocedure Follow-Up
Patient should be advised to call pain medicine service for any procedure related complications and/or any unexpected neurological deficit. Though complications are uncommon, patient should be monitored closely for following:
• Neurologic symptoms (weakness, urinary or bowel incontinence)
![]() It is common for the patient to have weakness or numbness in the distribution of the sciatic nerve for the expected duration of the local anesthetic.
It is common for the patient to have weakness or numbness in the distribution of the sciatic nerve for the expected duration of the local anesthetic.
• Signs of local infection (warmth, erythema, purulent drainage, fever)
• Bleeding
• Exacerbation of symptoms
Potential Complications and Pitfalls
Same as in the section on trigger point injections plus sciatic nerve blockade.
Clinical Pearls
• The success of the procedure is dependent on the diagnosis of piriformis syndrome.
• Patients with other spine or SI joint comorbidities, chronic widespread pain or psychological disorders may be less likely to respond.
ILIOPSOAS INJECTIONS
Overview
Pain emanating from the iliopsoas muscle is relatively uncommon, but a very real cause of low back, hip, or inguinal pain. Patients typically present with unilateral low back or anterior hip pain, though pain can frequently refer into the thigh or inguinal area.
On examination:
• An antalgic gait may be noted as the patient enters the examination room, due to a shortened stride on the affected side.
• The patient may also have pain and/or weakness when squatting to sit or when transitioning from a seated position to a standing one.
• The psoas muscle can be palpated deep in the abdomen, medial to the anterior superior iliac spine, when the ipsilateral hip is flexed.
• Pain on palpation while flexing the hip against resistance is an excellent diagnostic tool for psoas myopathy, but may be extremely uncomfortable for the patient due to pain and privacy reasons.
Provocative tests:
• Are not specific for the iliopsoas muscle, but can be used to aid in the diagnosis via active and passive extension of a painful muscle.11
• Thomas test—inability of the patient to completely extend the affected hip when lying supine, with contralateral hip fully flexed, due to tightened hip flexors
• Yeoman test—pain with passive extension of affected hip when lying prone, typically a sacroiliac joint test, but can cause anterior hip pain with passive iliopsoas extension
• Gaenslen test—pain with maximal extension of affected hip (leg hangs off examination table) and maximal flexion of contralateral hip (knee held to chest), typically a sacroiliac joint test, but can cause anterior hip pain with passive iliopsoas extension
• FABER test—pain with Flexion Abduction and External Rotation of affected hip
• Snapping hip test—“snapping” or “clicking” when hip is rotated from flexion and abduction to extension and adduction—this rules out coxa saltans or “snapping hip syndrome”
Relevant Anatomy
• The psoas major muscle is located in the retroperitoneal space and is composed of two layers.
• A deep layer that originates from the transverse processes of L1-5.
• A superficial layer that originates from the lateral portions of T12-L4.
• The lumbar plexus is located between these two layers of muscle.
• The psoas major also has fibrous attachments to all of the lumbar discs except the L5-S1.
• According to their position, the attachments are categorized as either “anterior” or “posterior.”
• The attachments located on the vertebral bodies and intervertebral discs are referred to as anterior fascicles, while those located on the transverse processes are known as the posterior fascicles.12
• The psoas joins the iliacus muscle, which arises from the ilium, to form the iliopsoas muscle within the iliac fascia.
• This muscle then runs anterolaterally through the iliopubic (iliopectineal) eminence, through the muscular lacuna beneath the inguinal ligament, then forms a tendon that sits anterior to the hip joint and finally inserts onto the lesser trochanter of the femur.13
• Innervation of the psoas muscle is achieved via the lumbar plexus from the ventral rami of L1-3, while the iliacus muscle is innervated by the femoral nerve from the ventral rami of L1-4.
Imaging
Once the diagnosis is suspected, it can be confirmed through history and physical examination alone, without the aid of special imaging. However, diagnostic imaging is often required due to the uncommon nature of the syndrome, and a diagnosis is frequently made based on incidental findings. Multiple imaging modalities, including ultrasound, CT scan, and MRI can be useful in providing rapid and accurate information. CT scanning can be used to outline the extent of affected tissue and may provide a diagnosis, such as infection or tumor.
Basic Considerations
The same concerns that apply to any myofascial injection will apply to iliopsoas injections as well. Care must also be taken to ensure that the muscle is free of tumor, abscess or hematoma before proceeding with an injection. Additionally, the practitioner must always be cognizant of the muscle’s intimate relation to the spinal column and major vascular structures.
Basic Concerns for Injection
See section on trigger point injections.
Contraindications
Include the following, in addition to the ones noted in the section on trigger point injections:
• Known allergy to contrast
• Pregnancy (for fluoroscopy only)
Preoperative Considerations
See section on trigger point and piriformis injections.
Equipment (for fluoroscopy-guided injections)
• Sterile prep and drape
• 3.5-in 22- or 25-gauge spinal needle
• 1.5-in 25-gauge needle for infiltration
• 2 × 3 mL syringes (for contrast and local anesthetic)
• 5 mL syringe (for injectate)
• Extension tubing (flush air out)
• Local anesthetic with/without steroid
• Iodinated contrast
• Fluoroscopy or ultrasonography
Medications
• Long or short acting local anesthetic (0.25% or 0.5% bupivacaine)
• Steroid (methylprednisolone or triamcinolone)
• Sedation if needed for procedure (midazolam)
Fluoroscopic Technique
• Perform “timeout”
![]() Verify patient, procedure, side, allergies, and contraindications.
Verify patient, procedure, side, allergies, and contraindications.
![]() Verify all necessary equipment is prepared.
Verify all necessary equipment is prepared.
• Place patient prone on examination table.
![]() Ensure patient is comfortable and can remain still.
Ensure patient is comfortable and can remain still.
![]() Place pillows beneath abdomen as needed to correct lumbar lordosis.
Place pillows beneath abdomen as needed to correct lumbar lordosis.
![]() Apply monitors as needed.
Apply monitors as needed.
• Perform sterile prep and drape.
• Visualize L4 transverse process on AP fluoroscopy.
![]() Place radiopaque marker or coaxial laser guide on inferior edge of transverse process.
Place radiopaque marker or coaxial laser guide on inferior edge of transverse process.
• Infiltrate with local anesthetic.
![]() Initial skin wheal
Initial skin wheal
![]() Infiltrate deep subcutaneous tissues in plane of anticipated injection.
Infiltrate deep subcutaneous tissues in plane of anticipated injection.
• Place needle in subcutaneous tissue in plane with fluoroscopy beam.
• Adjust the needle as it is advanced to achieve “gun barrel” view.
• The needle is advanced approximately 1.5 cm to touch the transverse process.
• For the psoas muscle injection, the tip of the needle touches the superior aspect of the middle or the lateral one-third of the transvers process. The needle is then advanced 1 cm beyond the transverse process.
• Remove stylet, attach extension tubing and contrast syringe.
![]() Ensure tubing is air free before injecting.
Ensure tubing is air free before injecting.
![]() Aspirate to assess extravascular location before injecting.
Aspirate to assess extravascular location before injecting.
• Inject approximately 1 mL of iodinated contrast under fluoroscopy.
![]() Observe distinct muscle striation pattern, “sail like” (Figure 54-4).
Observe distinct muscle striation pattern, “sail like” (Figure 54-4).

Figure 54-4. Right psoas muscle injection. (The muscle outlined on the left is the quadratus lumborum. Note that it is lateral to the tip of the transverse process.) (Reproduced with permission from Mackenzie-Brown, Chekka K, Benzon HT. Reprinted from: Musculoskeletal injections: Iliopsoas, quadratus lumburom, piriformis, trigger point injections. In Huntoon M, Benzon HT, Narouze, S. Spinal Injections and peripheral nerve blocks. In Deer T. Interventional and Neuromodulatory Techniques in Pain Management. New York: Elsevier – Churchill Livingstone, 2011.)
![]() Observe contrast spreading in discrete muscle sheath.
Observe contrast spreading in discrete muscle sheath.
![]() Confirm no arborization or disappearance of contrast.
Confirm no arborization or disappearance of contrast.
• Obtain lateral confirmatory imaging.
• Attach local anesthetic/steroid syringe to extension tubing.
![]() Aspirate, then slowly inject medication.
Aspirate, then slowly inject medication.
![]() STOP injecting if needle moves out of place, patient complains of severe pain, or aspiration is positive.
STOP injecting if needle moves out of place, patient complains of severe pain, or aspiration is positive.
![]() Document patient’s pain before, during, and after injection.
Document patient’s pain before, during, and after injection.
• Usually 6 to 8 mL local anesthetic (0.5% bupivacaine) and steroid (40 mg methylprednisolone or triamcinolone) is injected.
• Remove needles, clean patient’s skin, apply hemostatic dressing.
• Assess patient for any immediate complications or side effects.
![]() Weakness, bleeding, increased pain
Weakness, bleeding, increased pain
ULTRASOUND-GUIDED TECHNIQUE
Single shot procedures as well as catheter placements can be accomplished safely with US guidance. Sedation as mentioned above is recommended. Two US-guided techniques are presented in this chapter.
Lateral Approach (modified from the one proposed by Kirchmair et al)14
This technique is recommended in patients with BMI lower than 35 since the US view is impaired by the thick abdominal wall.
• The patient is placed in lateral decubitus with a mild anterior tilt.
• Extensive skin prep is done from the posterior midline to the anterior axillary line and from the iliac crest to the lower costal margin.
• A low-frequency (2-6 MHz) curved probe is recommended covered with a sterile plastic sheet.
• The transducer is initially placed lateral to the spine, in cross-sectional view, just above the iliac crest (Figure 54-5).
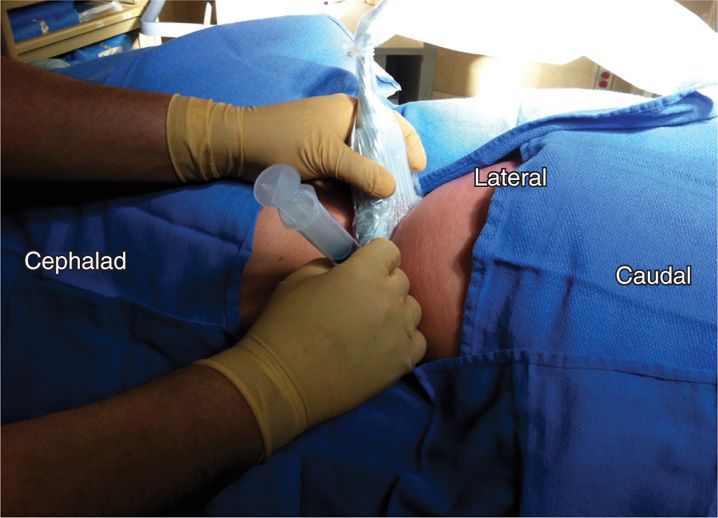
Figure 54-5. Needle in position lateral to the vertebral body in the psoas muscle.
• The image is optimized in terms of gain, depth, texture, etc.
• The scan is moved laterally identifying the following structures as the probe is kept still and perpendicular to the skin over the posterior axillary line (PAL): skin, fat, lateral part of the erector spinae muscle, quadratus lumborum, part of the external and internal oblique muscles and transverse process of L4.
• At this level, it is unlikely that the kidney is seen, unless the patient takes a very deep breath.
• The transducer is then moved slowly toward a more lateral position between the PAL and the mid axillary line and the hyperechoeic lateral portion of the vertebral body is seen; lateral to it is the cross-sectional cut of the psoas muscle.
• Gentle and slow scanning on the psoas muscle and looking at the medial-posterior area will show the nerve root coming into the muscle along with an artery.
• We recommend an in-plane access with an entry point in the skin about 4 cm medial to the medial end of the transducer.
• Anesthetize the skin with lidocaine deep in the planned trajectory of the needle.
• Use a 12- to 15-cm-long 20-gauge needle for single shot injections or a long epidural needle for insertion of a catheter in the muscle.
• The needle is advanced from lateral to medial, from posterior to anterior in the plane of the US directly toward a point which represents the junction between the posterior and the middle third of the muscle (in the anteroposterior plane) and the medial and the median third in the lateral plane, almost at the center of the body of the muscle.
• The needle is easily visible because of the almost perpendicular angle with the US beam (Figure 54-6).

Figure 54-6. Position of the patient, transducer, and needle for the in-plane posterolateral psoas compartment block technique.
• If catheter used, the catheter should be advanced 2 to 3 cm beyond the needle tip under direct vision with the bevel of the needle facing cephalad along the fibers of the muscle.
• The same volumes and drugs as in the radioscopy-guided approach are recommended.
US-Guided Posterior Approach
• Position the patient prone with a pillow under the abdomen to obtain a flat, more superficial spine position.
• The area that is prepped and draped includes the iliac crest to the last rib area. In this approach, the transducer probe case is initially positioned longitudinally over the spinous process at the level of L3-L4.
• The spinous processes are identified and the transducer is moved laterally showing the laminae, then the masses of the facet joints and finally the transverse processes of L2-L3-L4 like a trident.15
• Carefully observe while the patient pushes his/her ipsilateral knee against the table, will show the fibers of the psoas muscle deeper, in between the transverse processes.
• Local anesthesia is applied to the skin 2 to 3 cm distal to the inferior edge of the transducer and then deep in the trajectory of the needle.
• The needle is advanced in between the transverse processes of L3 and L4 about 1.5 cm deeper from the distance measured from the probe to the posterior surface of the transverse process.
• When injecting in that position not much will be seen and no liquid should be seen superficial to the transverse processes.
• If catheter used, the catheter can be advanced as in the lateral approach above.
Postprocedure Follow-Up
• Expect some degree of immediate relief with local anesthetic effect
• Expect from 2 to 5 days to start steroid effect
• Assess patient for lower extremity weakness
• Assess patient for any signs of intravascular anesthetic injection
• Avoid submersion in water (eg, swimming, bathtub) for 24 to 48 hours
• Keep pain log
Potential Complications and Pitfalls
• Intravascular injection into aorta or vena cava (needle is too anterior)
• Intrathecal or epidural injection (needle is too medial or larger volumes are injected)
• Lumbar plexus block (psoas compartment injection)
• Hematoma formation
• Abscess formation
• Allergy to any component of procedure
Clinical Pearls
• Thorough history and physical examination to ensure accurate diagnosis.
• Utilize preprocedural imaging to aid in diagnosis and plan injection.
• Ensure the muscle is free of abscess, hematoma, or tumor.
• Meticulous needle direction under fluoroscopy to avoid too medial or anterior placement.
SCALENE MUSCLE INJECTIONS
Overview
Scalene muscle injections are indicated for neurogenic thoracic outlet syndrome (TOS), as diagnostic and therapeutic tools for either presurgical planning or pain management. The diagnosis of TOS itself can be controversial, but since 1956, when it was first described, it was thought to result in upper extremity symptoms due to neurovascular compression in the cervicoaxillary canal.16
• The incidence of TOS varies anywhere from 3 to 80 cases per 1000 people and there exist 3 different forms of the syndrome: neurogenic, venous, and arterial.
• The most common type, neurogenic, accounts for 95% of all cases and results from brachial plexus compression between the anterior and middle scalene muscles and the first rib.
• Patients often present with unilateral paresthesia and/or weakness of the upper extremity, and variable other symptoms such as headache and cold intolerance.
• The diagnosis is often difficult to achieve due to a lack of specific diagnostic criteria, relative insensitivity of imaging modalities and other diagnostic testing, and a lengthy list of confounding diagnoses on the differential.17
A procedure that has proved useful in the diagnosis and management of neurogenic TOS has been local anesthetic injection into the anterior scalene muscle alone or both the anterior and middle scalene muscles. The result of this block relaxes the muscle(s) elevating the first rib and mimics the effects of a first rib resection or scalenectomy. The quality of relief achieved by this technique has been shown to correlate well with successful physical therapy and surgical treatments.18 In order to be predictive of surgical success however, care must be taken to avoid blockade of the brachial plexus and cervical sympathetic ganglia. In fact, successful treatment of TOS with scalene muscle injection has been shown to be independent of any brachial plexus injection effect.19
Imaging
Even the most sensitive imaging modality (eg, MRI) fails to reveal abnormalities causing TOS in patients. However, there are several reasons to obtain some form of high resolution imaging before performing any procedure in the posterior triangle of the neck. First, aberrant anatomy is frequently found in this region, from muscle anomalies (scalene minimus muscle presence, sickle-shaped middle scalene) to bone abnormalities (cervical rib, prolonged transverse process) which may confuse needle placement. Second, isolated or repeated trauma is a factor in up to two-third of neurogenic TOS cases, from whiplash injuries to repetitive motion stress due to work or sports activities. In these cases, evaluating the surrounding soft tissue for evidence of other injury (eg, rotator cuff tear) will aid in the diagnosis and management of the patient. Finally, a very small percentage of TOS cases are acquired through tumor metastases, osteomyelitis or other uncommon sources, that will greatly impact the treatment strategy for the patient.20
Basic Concerns for Injection
Same as in the sections on trigger point and piriformis injections
Contraindications
Same as in the previous sections
Preoperative Considerations
Same as in the previous sections
Equipment
• Sterile prep and drape
• 1.5-in 22- or 25-gauge needle (hyperechoic)
• 1.5-in 25-gauge needle for infiltration
• 2 × 3 mL syringes (for infiltration and local anesthetic injection)
• Extension tubing (flush air out)
• Local anesthetic
• Botulinum toxin (optional)
• Ultrasonography with 10 to 12 MHz probe
• Ultrasound gel
• 4 × 4 in gauze
Medications
• Choice of long or short acting local anesthetic 2 to 3 mL (0.25% bupivacaine)
• Botulinum toxin 20 (12-15 units per muscle)
• Sedation if needed for procedure (midazolam)
Techniques
The injections can be done blindly, which is not recommended, until fluoroscopy (to see spread of contrast within the muscle), under CT guidance, or with ultrasound which is the preferred technique.
Ultrasound-Guided Technique
• Perform “timeout.”
![]() Verify patient, procedure, side, allergies, and contraindications.
Verify patient, procedure, side, allergies, and contraindications.
![]() Verify all necessary equipment is prepared.
Verify all necessary equipment is prepared.
• Place patient supine or lateral decubitus on examination table.
![]() Ensure patient is comfortable and can remain still.
Ensure patient is comfortable and can remain still.
![]() Place pillows as needed to optimize exposure.
Place pillows as needed to optimize exposure.
![]() Apply monitors as needed.
Apply monitors as needed.
• Perform sterile prep and drape.
![]() Sterile ultrasound sheath or Tegaderm dressing.
Sterile ultrasound sheath or Tegaderm dressing.
![]() Apply sterile gel to ultrasound probe and skin.
Apply sterile gel to ultrasound probe and skin.
![]() Identify medial and lateral on US probe.
Identify medial and lateral on US probe.
• Identify external landmarks (clavicle, sternocleidomastoid, trapezius).
![]() Place probe in axial oblique plane at level of cricoid cartilage/C6 vertebra.
Place probe in axial oblique plane at level of cricoid cartilage/C6 vertebra.
![]() Move laterally from trachea.
Move laterally from trachea.
![]() Identify carotid artery then internal jugular vein (compressible).
Identify carotid artery then internal jugular vein (compressible).
![]() Move laterally to identify brachial plexus in interscalene groove.
Move laterally to identify brachial plexus in interscalene groove.
• Another approach via identification brachial plexus at supraclavicular area.
![]() Place probe in supraclavicular area similar to a supraclavicular plexus block.
Place probe in supraclavicular area similar to a supraclavicular plexus block.
![]() Identify brachial plexus lateral to artery.
Identify brachial plexus lateral to artery.
![]() Follow the brachial plexus cephalad.
Follow the brachial plexus cephalad.
![]() Identify the anterior and middle scalene muscles on either side of the brachial plexus.
Identify the anterior and middle scalene muscles on either side of the brachial plexus.
• Identify scalene muscles.
![]() Anterior scalene muscle is medial to brachial plexus.
Anterior scalene muscle is medial to brachial plexus.
![]() Middle scalene muscle is lateral brachial plexus.
Middle scalene muscle is lateral brachial plexus.
![]() Brachial plexus roots/trunks appear as round and hyperechoic between muscles.
Brachial plexus roots/trunks appear as round and hyperechoic between muscles.
![]() Sliding probe inferiorly visualizes subclavian artery and vein.
Sliding probe inferiorly visualizes subclavian artery and vein.
• Infiltrate with local anesthetic.
![]() Initial skin wheal
Initial skin wheal
![]() Shallow subcutaneous infiltration
Shallow subcutaneous infiltration
• Place needle in subcutaneous tissue in plane with ultrasonography beam.
![]() Utilize out-of-plane technique to avoid traversing the fascia on the interscalene grove, allowing leakage of the local anesthetic and causing brachial plexus blockade19 (Figure 54-7).
Utilize out-of-plane technique to avoid traversing the fascia on the interscalene grove, allowing leakage of the local anesthetic and causing brachial plexus blockade19 (Figure 54-7).
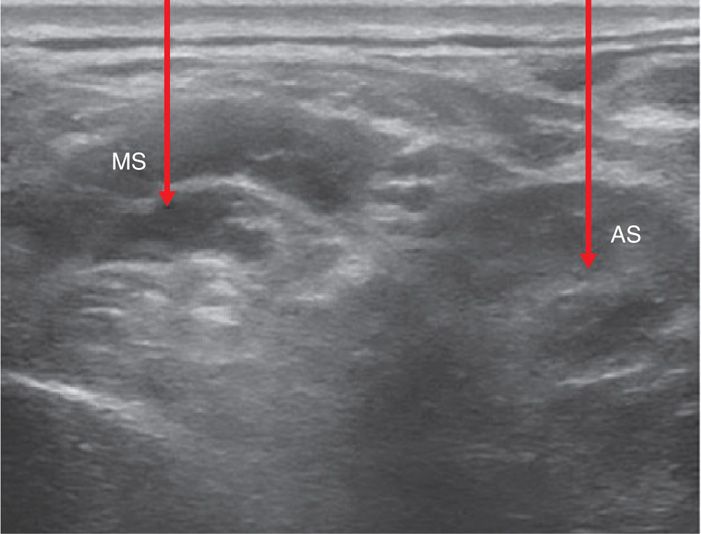
Figure 54-7. An out-of-plane needle approach to scalene muscle injection. AS, anterior scalene muscle; MS, middle scalene muscle; arrows display location of injection. (Reproduced with permission from Benzon HT, Rodes ME, Chekka K, et al. Scalene muscle injections for neurogenic thoracic outlet syndrome: Case series. Pain Pract 2011 Jun 2.)
![]() Connect extension tubing to needle.
Connect extension tubing to needle.
![]() Flush tubing with local anesthetic to eliminate air.
Flush tubing with local anesthetic to eliminate air.
• Adjust the needle as it is advanced to penetrate anterior or middle scalene muscle.
![]() Advance the needle using “hydrodissection,” ie, injecting very small amounts of saline to visualize the tip of the needle.
Advance the needle using “hydrodissection,” ie, injecting very small amounts of saline to visualize the tip of the needle.
![]() Avoid deviation into surrounding tissues.
Avoid deviation into surrounding tissues.
![]() Place the tip of the needle in the belly of the scalene muscle, preferably away from the brachial plexus.
Place the tip of the needle in the belly of the scalene muscle, preferably away from the brachial plexus.
• Attach local anesthetic/botox syringe to extension tubing.
![]() Aspirate, then slowly inject medication.
Aspirate, then slowly inject medication.
![]() Inject 1 to 2 mL of 0.25% bupivacaine per muscle.
Inject 1 to 2 mL of 0.25% bupivacaine per muscle.
![]() STOP injecting if needle moves out of place, patient complains of severe pain, or aspiration is positive.
STOP injecting if needle moves out of place, patient complains of severe pain, or aspiration is positive.
![]() Document patient’s pain before, during, and after injection.
Document patient’s pain before, during, and after injection.
• Remove needles, clean patient’s skin, apply hemostatic dressing.
• Assess patient for any immediate complications or side effects.
![]() Weakness, bleeding, increased pain
Weakness, bleeding, increased pain
Postprocedure Follow-Up
• Expect relief of symptoms shortly after injection with local anesthetic
• Expect relief of symptoms in 2 to 3 days with botox
• Keep log of symptoms post procedure
• Keep area clean and dry
Potential Complications and Pitfalls
• Horner sign
• Brachial plexus block
• Dysphonia
• Dysphagia
• Sensory blockade and weakness of the upper extremity
• Intravascular placement
• Spinal accessory nerve (CN XI) injury
Clinical Pearls
• Thorough history and physical examination to ensure accurate diagnosis.
• Utilize preprocedural imaging to aid in diagnosis and plan injection.
• Ensure the muscle is free of abscess, hematoma, or tumor.
• Meticulous needle direction under ultrasonography to avoid brachial plexus or intravascular placement.
Related posts:


Stay updated, free articles. Join our Telegram channel

Full access? Get Clinical Tree


