MINOR BRUISES AND WOUNDS
BRUISES
Never attempt to puncture or cut into a bruise to drain it. This is fraught with the risk of uncontrolled bleeding and the introduction of bacteria that cause infection. The exception to this rule is a tense and painful collection of blood under the fingernail (see page 258).
A severe bruise, usually caused by a direct blunt force, can on rare occasion develop into a compartment syndrome (see page 73).
BLACK EYE
A black eye is a darkened blue or purple discoloration in the region around the eye. It can be caused by a direct blow (bruise) or by blood that has settled into the area from a broken nose, skull fracture, or laceration of the eyebrow or forehead. “Raccoon eyes” are black eyes caused by a skull fracture. If a black eye is due to a direct injury (with swelling and pain), first examine the eyeball for injury (see page 182). The skin discoloration may be treated with intermittent cold compresses for 24 hours.
BLOOD UNDER THE FINGERNAIL
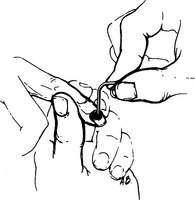
When a fingertip is smashed between two objects, there is frequently a rapid blue discoloration of the fingernail, which is caused by a collection of blood underneath the nail. Pain from the pressure may be quite severe. To relieve the pain, it is necessary to create a small hole in the nail directly over the collection of blood, to allow the blood to drain and thus relieve the pressure. This can be done during the first 24 to 48 hours following the injury by heating a paper clip or similar-diameter metal wire to red-hot temperature in a flame (taking care not to burn your fingers while holding the other end of the wire; use a needle-nose pliers, if available) and quickly pressing it through the nail (Figure 134). Another technique is to drill a small hole in the nail by twirling a scalpel blade, sharp knife, or needle. As soon as the nail is penetrated, blood will spurt out, and the pain will be considerably lessened. Before and after the procedure, the finger should be washed carefully. If the procedure was not performed under sterile conditions, administer dicloxacillin, erythromycin, or cephalexin for 3 days.
PUNCTURE WOUNDS
Puncture wounds are most frequently caused by nails, tree branches, fishhooks, and the like. Because they do not drain freely, these wounds carry a high risk for retained bacteria and subsequent infections. A puncture wound should be irrigated copiously with the cleanest solution that is available and left open to heal. Bleeding washes bacteria from the wound, so a small amount of bleeding should be encouraged. Never suture or tape a puncture wound closed, unless necessary to halt profuse bleeding; doing so promotes the development of infection. Similarly, do not occlude the opening of a puncture wound with a “grease seal” or plug of medicinal ointment; apply any antiseptic sparingly. If the wound is more than ¼ in (0.6 cm) at its opening, you can leave a piece of sterile gauze in the wound as a wick for a day or two, to allow drainage and prevent the formation of an abscess cavity (see page 241). If the wound becomes infected (see page 240), apply warm soaks four or more times a day. Treat the victim with dicloxacillin, erythromycin, or cephalexin for 4 days.
SCRAPES
The pain of cleansing can be relieved by applying pads soaked with lidocaine 2.5% ointment to the abrasion for 10 to 15 minutes before scrubbing. To avoid lidocaine toxicity, don’t do this if the surface area of the abrasion exceeds 5% of the total body surface area (an area approximately five times the size of the victim’s fingers and palm). In some cases, particularly when there is deeply embedded grime that will be extremely painful to remove, it is useful to inject the wound with a local anesthetic (see page 262).
CUTS (LACERATIONS)
1. Control bleeding. This can be done in almost every instance by direct pressure (see page 54). Apply firm pressure to the wound using a wadded sterile compress, cloth, or direct hand contact (wearing latex gloves, if possible; if you are allergic to latex, use other nonpermeable gloves, such as nonlatex synthetic). Hold the pressure for a full 10 to 15 minutes without release. If this does not stop the bleeding, apply a sterile compress and wrap with an elastic bandage, taking care to not wrap so tightly as to occlude the circulation (check for warm and pink fingers and toes). If bleeding is not controlled with pressure alone, you may need to apply a hemostatic (stops bleeding) dressing or compress. These are described on page 55. During all of these maneuvers, keep the victim calm and elevate the injured part as much as possible.
2. Clean the wound. In many cases, “the solution to pollution is dilution.” After you have controlled the bleeding, the minor wound(s) should be properly cleansed. If you have needed to use hemostatic gauze or other ancillary agent (such as Celox) other than brief pressure to control the bleeding, you should wait for at least 60 minutes before attempting to clean the wound. Otherwise, brisk bleeding may reoccur. Wear sterile, nonpermeable, nonlatex gloves if these are available; if you are not allergic to latex, latex gloves are acceptable. If sterile gloves are not available, wear nonsterile gloves. Examine the wound and remove all obvious foreign debris.
3. Anesthetize (numb) the wound. Most laypeople will never be called on to sew (suture) or staple a wound closed. However, for the benefit of rescuers who might need to practice advanced skills, here are the basics:
Stay updated, free articles. Join our Telegram channel

Full access? Get Clinical Tree


