CHAPTER 8 Upper limb blocks
Interscalene block
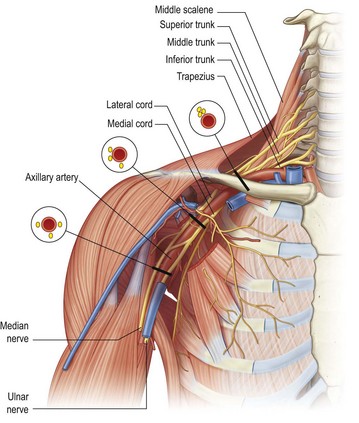
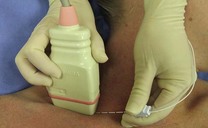
Use this block for anaesthesia/analgesia of the shoulder joint (dislocation reduction), arm, elbow, and proximal forearm injuries or amputations (Fig. 8.1).
Landmark technique
Preparation
• Position the patient supine or in semi-Fowler’s position with the head facing away from the side to be blocked. Position the patient’s arm comfortably by their side and ask them to hold their shoulder down, as though they are reaching for their knee.
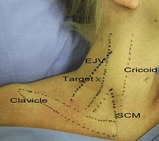
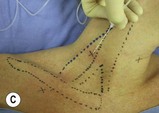
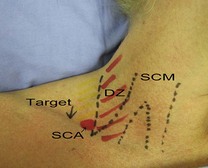
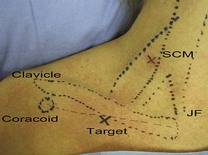
• Mark the important landmarks with a skin marker (Fig. 8.2):
• The posterior border of the clavicular head of the sternocleidomastoid muscle. Ask the patient to turn their head away from the side to be blocked because this tenses the sternocleidomastoid muscles and makes it more prominent. Then ask the patient to lift their head off the table while facing away. This also helps to identify the posterior border of the clavicular head of the sternocleidomastoid muscle.
• The external jugular vein. Ask the patient to try to sit up (or sit forward). This manoeuvre flattens the skin of the neck and helps to identify the interscalene groove, and the Valsalva manoeuvre distends the external jugular vein.
Technique
• Prepare the field by cleaning the skin with an antiseptic solution and positioning sterile drapes.
• Identify the target area for the initial needle insertion – the interscalene groove, at about the level of the cricoid cartilage, or slightly inferiorly. The most common error is inserting the needle too far anteriorly. Examine the anatomical landmarks carefully.
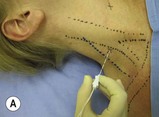
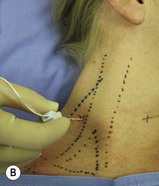
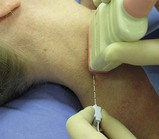
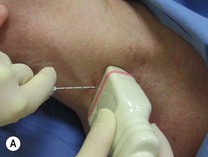
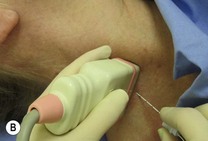
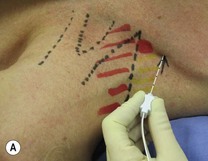
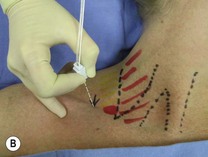
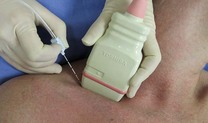
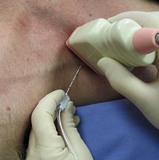
• Puncture the skin at the target point with a 25 mm to 50 mm nerve-block needle (Fig. 8.3A–C). Direct the needle perpendicular to the skin surface – slightly medially, inferiorly 30° to 45° and posteriorly aiming at the transverse process of C6. If you are using a more inferior puncture site (25 mm above the clavicle), insert the needle perpendicular to the skin surface taking care not to aim superiorly. The inferior angle of the needle is important to decrease the risk of inadvertent entry into one of the neural foramina.
• An alternative method is to use a parasagittal approach with the needle held parallel to the scalene muscles and aimed inferiorly towards the midpoint of the clavicle.
• If you are using a nerve stimulator, insert the needle using the same technique. Appropriate twitches include pectoralis, deltoid, triceps, biceps or any muscle of hand or forearm, but not the trapezius.
• Aspirate. If no flashback of blood is obtained, inject 30 to 40 mL of local anaesthetic slowly with intermittent aspiration to rule out intravascular injection. Slow injection increases block success and decreases complications. If resistance to injection, severe paraesthesias or cramping pain sensations occur with initial injection, then the needle should be withdrawn by 1 to 2 mm to avoid intraneural injection. Use the higher end of the volume range if C8/T1 anaesthesia is desired (remembering that larger volumes are associated with more undesirable effects for this particular block).
• The onset of anaesthesia with lidocaine is from 5 to 15 minutes and with bupivacaine is from 10 to 20 minutes; duration of anaesthesia is 3 to 6 hours and 8 to 10 hours, respectively; duration of analgesia is 5 to 8 hours and 16 to 18 hours, respectively.
Complications
• Inadvertent total spinal anaesthesia is a potentially serious complication resulting from incorrect needle placement or from local anaesthetic tracking proximally within the nerve root sheath.
• Phrenic nerve block occurs frequently, so do not use this block bilaterally or in patients with respiratory compromise.
Ultrasound technique
Preparation
• Position the patient supine or in semi-Fowler’s position with the head facing away from the side to be blocked.
• Use a linear high-frequency probe (10 to 15 MHz is ideal) and select an appropriate pre-set application.
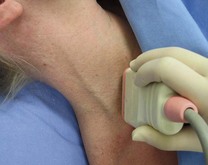
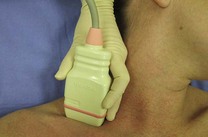
• Identify the area to begin the scan – either the midline of the neck or the supraclavicular fossa, depending upon which scan strategy is employed (Fig. 8.4).
• Perform a preliminary non-sterile survey scan to identify the relevant anatomy and optimise the image by adjusting depth of field (about 20 to 30 mm), focus point, and gain. Mark the best probe position on the skin with a pen, if required.
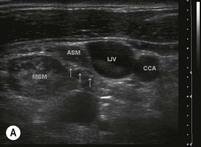
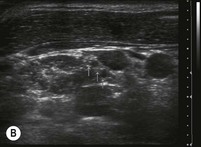
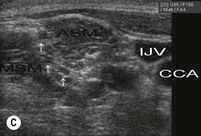
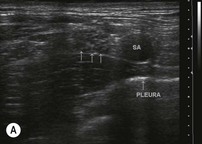
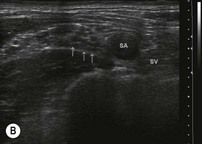
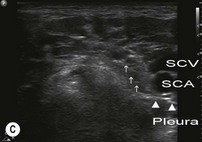
• Place the probe transversely in the midline at the level of the cricoid cartilage. Move the probe laterally to identify the carotid artery, internal jugular vein and the anterior scalene muscle immediately lateral to the vessels. The brachial plexus can be identified in transverse section in the space between the anterior and middle scalene muscles. In the interscalene region the brachial plexus nerve roots appear as a cluster of round or oval hypoechoic structures (Fig. 8.5A–C).
• Prepare the field by cleaning the skin with an antiseptic solution and positioning sterile drapes. Cover the probe with a sterile probe-sheath and apply sterile ultrasound gel to the area of the interscalene groove.
Technique
In-plane approach (Fig. 8.6)
• Advance the needle towards the edge of the nerves while visualising the entire length of the needle in real time.
• Aim to contact nerve roots in the centre of the interscalene groove from the lateral side; avoid injection close to the neural foramina.
Out-of-plane approach (Fig. 8.7A&B)
• Line up the nerve target at the midpoint of the screen. The needle insertion point will correspond to the exact centre of the transducer.
• Insert a 25 mm to 50 mm 22G nerve-block needle on the superior or inferior side of the ultrasound probe.
• Observe tissue and needle movement as the needle is advanced towards the target. Aiming for the side of the nerve bundle rather than the centre makes needle placement more accurate.
The injection process
• Slowly inject local anaesthetic around the nerve roots by positioning the needle in the centre of the interscalene groove, adjacent to the nerve sheath. Aspirate frequently to avoid inadvertent intravascular injection. If resistance to injection, severe paraesthesias or severe cramping pain are provoked in the limb during injection, immediately withdraw the needle by 1 to 2 mm to avoid intraneural injection.
• Observe the local anaesthetic spread during injection. A hypoechoic collection will appear adjacent to and then spread around the nerves.
• An expansion of the tissue in the interscalene groove indicates a correct positioning of the local anaesthetic injection; expansion within the scalene muscle indicates intramuscular injection and the needle should be repositioned.
• Reposition the needle at least once to ensure complete circumferential local anaesthetic spread around the nerve roots.
• The volume of local anaesthesia introduced appears to be directly related to side effects and complications of the interscalene block. Phrenic nerve blockade is more frequent when volumes greater than 10 mL are injected. The use of ultrasound allows for smaller volumes to be placed accurately and effectively. Inject 10 mL of local anaesthetic or just enough that the nerve roots are visualised to be completely surrounded by hypoechoic fluid. Injection of as little as 5 mL of local anaesthetic within (rather than around) the nerve sheath itself can produce an effective block.
Supraclavicular block
Landmark technique
Preparation
• Position the patient supine or in semi-Fowler’s position with the head facing away from the side to be blocked. Rest the patient’s arm comfortably across their abdomen.
• Mark the important landmarks with a skin marker (Fig. 8.8):
• The posterior border of the clavicular head of the sternocleidomastoid muscle at the point of insertion onto the clavicle (ask the patient to lift their head off the table while facing away, as this helps to define this landmark).
• Draw a line on the neck parallel to the midline through this point to demarcate the lateral extension of the cupola of the lung. The area medial to this line is a danger area because of the risk of pneumothorax.
Technique
• Prepare the field by cleaning the skin with an antiseptic solution and positioning sterile drapes.
• Identify the target area for needle insertion – about 25 mm lateral to the posterior border of sternocleidomastoid and 15 mm (one fingerbreadth) superior to the clavicle. This should be immediately posterolateral to the pulsation of the subclavian artery superior to the clavicle.
• Puncture the skin at the target point with a 25 mm to 50 mm nerve-block needle. Insert the needle perpendicularly to the skin and advance it 2 to 5 mm (Fig. 8.9A&B). Redirect the needle inferiorly, keeping it parallel to the scalene muscles (in a slightly lateral direction) until paraesthesias are elicited. The insertion depth is unlikely to be more than 25 mm. Once the rib is contacted the needle can be ‘walked’ anteriorly and posteriorly while keeping the syringe parallel to the interscalene groove until the brachial plexus is located. If the rib is not found, the needle should be carefully redirected first laterally and then medially until it is contacted or paraesthesias or nerve twitches are elicited.
• If you are using a nerve stimulator, insert the needle using the same technique. The needle is advanced slowly until flexion or extension twitches of the fingers are obtained.
• Aspirate. If no flashback of blood is obtained, inject 30 to 40 mL of local anaesthetic slowly with intermittent aspiration to rule out intravascular injection. Slow injection increases block success and decreases complications. If resistance to injection, severe paraesthesias or cramping pain sensations occur with initial injection, the needle should be withdrawn by 1 to 2 mm to avoid intraneural injection.
• The onset of anaesthesia with lidocaine is from 5 to 15 minutes and with bupivacaine is from 10 to 20 minutes; duration of anaesthesia is 3 to 6 hours and 8 to 10 hours, respectively; duration of analgesia is 5 to 8 hours and 16 to 18 hours, respectively.
Ultrasound technique
Preparation
• Position the patient supine or in semi-Fowler’s position with the head facing away from the side to be blocked.
• Use a linear high-frequency probe (10 to 15 MHz is ideal) and select an appropriate pre-set application.
• Identify the area to begin the scan – either the midline of the neck or the supraclavicular fossa.
• Perform a preliminary non-sterile survey scan to identify the relevant anatomy and optimise the image by adjusting depth of field (20 to 30 mm), focus point, and gain. Mark the best probe position on the skin with a pen, if required. Position the probe over the supraclavicular fossa in the transverse plane to obtain the best possible cross-sectional view of the subclavian artery and brachial plexus (Figs 8.10, 8.11A–C). Scan proximally and distally to observe the nerve roots and nerve trunks. The nerves in this region are round or oval, are hypoechoic, and can be found lateral and superficial to the subclavian artery (which can be identified with the assistance of colour Doppler if necessary) and superior to the first rib. The subclavian vein is medial to the artery. Visualise the pleura (check for the pleural sliding sign and comet tails) and note the relation to the brachial plexus and the planned needle track. Also take note of the distance from the skin to the rib and the skin-to-pleura distance.
• Prepare the field by cleaning the skin with an antiseptic solution and positioning sterile drapes. Cover the probe with a sterile probe-sheath and apply sterile ultrasound gel to the area of the supraclavicular fossa.
Technique
In-plane approach (lateral to medial)
• Advance the needle towards the edge of the nerve bundle while visualising the entire length of the needle in real time and avoiding pleural or vascular puncture (Fig. 8.12).
An alternative in-plane approach (medial to lateral)
The advantage of ultrasound guidance is that any approach can be used and the needle tip can be positioned next to the nerves under direct vision (Fig. 8.13). While this approach has the advantage of advancing the needle away from the artery and the pleura, it also makes it more difficult to position the needle close to the nerves if they lie deep or directly lateral to the artery.
Out-of-plane approach
This is similar to the traditional blind landmark approach. The needle is introduced and advanced into the proximity of the nerve (Fig. 8.14).
• Identify the subclavian artery and the round hypoechoic nerve trunks of the brachial plexus located lateral to the artery, with the probe in the transverse plane in the supraclavicular fossa.
• Raise a weal of local anaesthetic with a 27G needle at the needle insertion point on the superior side of the transducer.
• Introduce a 25 mm to 50 mm 22G nerve-block needle perpendicular to the superior aspect of the probe.
• Advance the needle carefully towards the edge of the nerve trunks. While the needle itself might not be visible, its progress can be assessed by local tissue movement and the tip can be followed by angling the probe back and forth in order to avoid pleural or vascular puncture.
The injection process
• Slowly inject local anaesthetic around the nerve roots by positioning the needle adjacent to the nerve sheath. Aspirate frequently to avoid inadvertent intravascular injection. If resistance to injection, severe paraesthesias or severe cramping pain are provoked in the limb during injection, immediately withdraw the needle by 1 to 2 mm to avoid intraneural injection.
• Observe the local anaesthetic spread during injection. A hypoechoic collection will appear adjacent to and then spread around the nerves. If no fluid collection develops, then ensure that intravascular injection has not occurred.
• Observe the pattern of local anaesthetic spread around the target nerves during injection. Inject most of the local anaesthetic immediately superior to the first rib and next to the subclavian artery if anaesthesia to the distal forearm and hand is desired, because the ulnar nerve often lies in this position, posterior to the subclavian artery.
Infraclavicular block
Landmark technique
Preparation
• The arm can be kept at the patient’s side or across their abdomen, but ideally the arm should be abducted at the shoulder and flexed at the elbow to keep the relationship of the landmarks to the brachial plexus constant. Make sure that you can visualise the twitches of the hand.
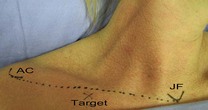
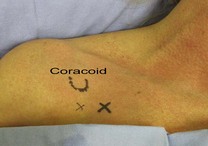
• With a pen, mark the important landmarks for the infraclavicular block (Fig. 8.15):
• The coracoid process – as the arm is elevated and lowered the coracoid process can be felt medial to the shoulder.
Technique
• Prepare the field by cleaning the skin with an antiseptic solution and positioning sterile drapes.
• Identify the target area for needle insertion – about 30 mm inferior to the midpoint of a line joining the medial end of the clavicle and the coracoid process.
• Puncture the skin at the target point with a 100 mm nerve-block needle. Advance the needle laterally at a 45° angle to the skin, parallel to the line connecting the medial clavicular head with the coracoid process (Fig. 8.18).
< div class='tao-gold-member'>
Only gold members can continue reading. Log In or Register to continue
Stay updated, free articles. Join our Telegram channel

Full access? Get Clinical Tree


